
Test Soda Firing #1 (8/11/20)
Lauren and I moved to Logan, Utah in July for me to start an MFA in Ceramics at Utah State University. My main goal here is to experiment with local materials; especially using local rocks to make glazes. I have been out to collect some samples, but before I dive into that research, I wanted to test the myriad of purchasable clays that the studio has for our use.
In pottery, clay is number 1. It is my main ingredient. The tomatoes in the tomato sauce. In North Carolina, I was making my own clay, a blend of four or five different local clays. But there isn’t a ton of local sources of clay in Utah. Plenty of rocks, but not much clay, really. Whilst I am here, I feel okay trying out these commercial clays and not going mad trying to harvest and process local clay, too. There are several rooms full of different kaolins and all sorts that I have access to. It’s a potters playground!
The system is very well set up at USU. As well as this marvelous array of materials, I also have access to a small bluebird mixer and a larger dough mixer for preparing clay. The larger mixer can do 200-300lbs in one go and the smaller one is more suited to 50-100lbs. Okay, so that’s the clay part… I want to test and see how they respond to soda firing.
WHY SODA?
As an apprentice and afterwards in North Carolina, I primarily fired my pots in wood kilns with the late addition of salt. The salt (NaCl) vaporises and sodium molecules bond with silica in the clay to produce a clear glaze on the pots. I love the surfaces that result from this atmosphere, but feel like I have a pretty good handle on it as a process.
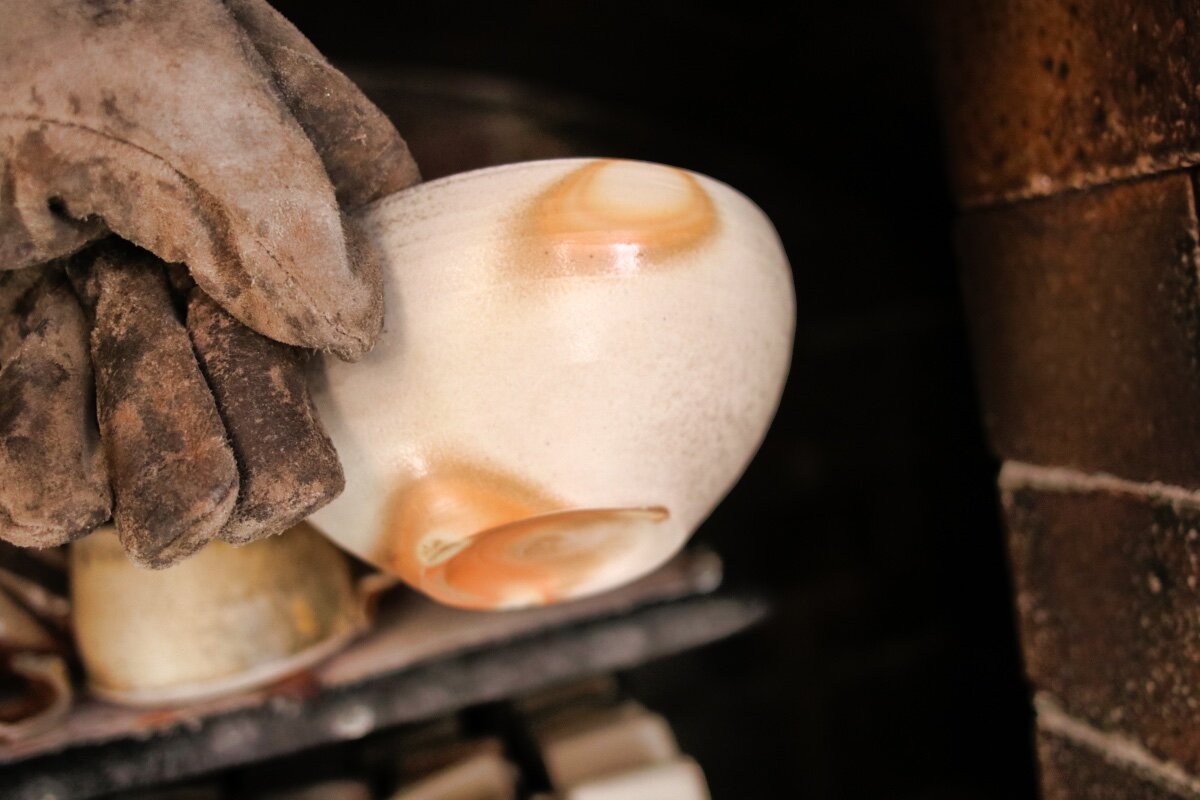
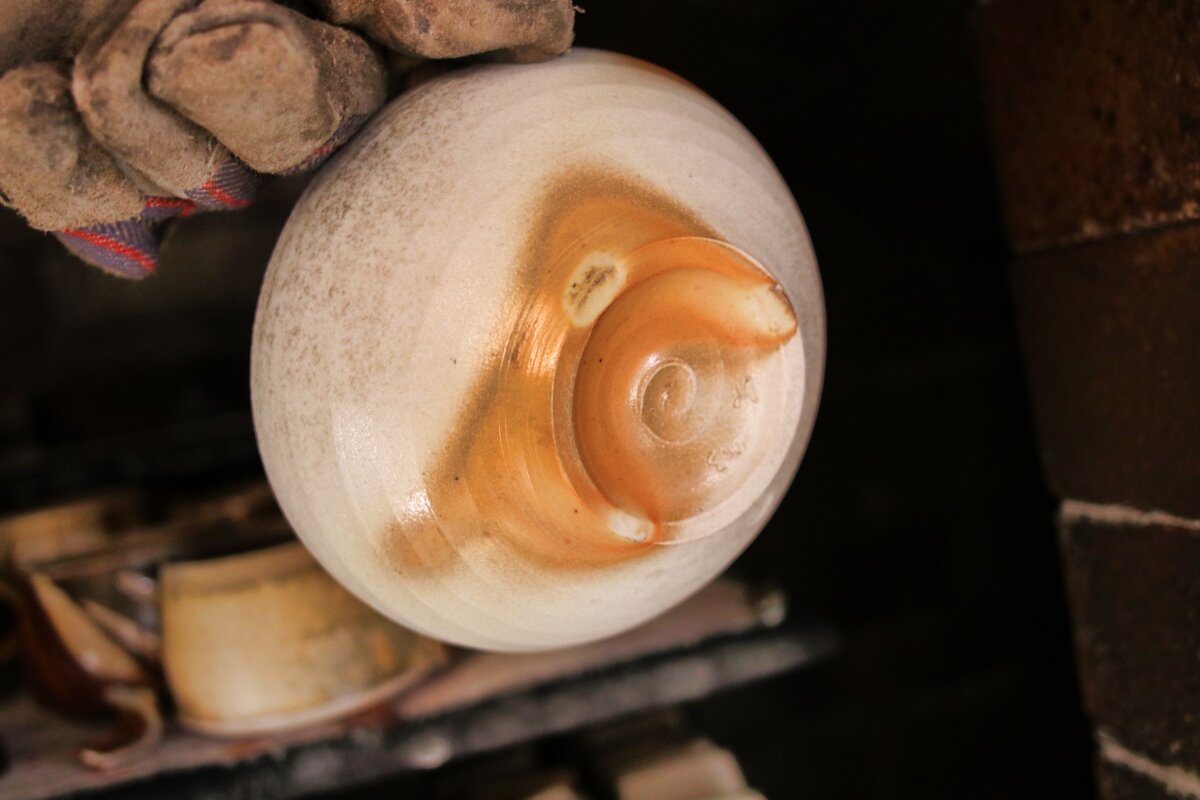
Soda firing, however, is a whole other thing. The process is similar to firing with salt, but instead of sodium chloride, you introduce soda ash (Na₂CO₃) or baking soda (NaHCO₃). The sodium still reacts with the clay to form a clear glaze on the pots, but it is much less volatile. With salt firing you rarely get a dry surface; it flies so readily around the kiln reacting with the pots. With soda you get much more localized effects; each pot will have more soda on one side than the other. This makes for more dramatic surfaces.
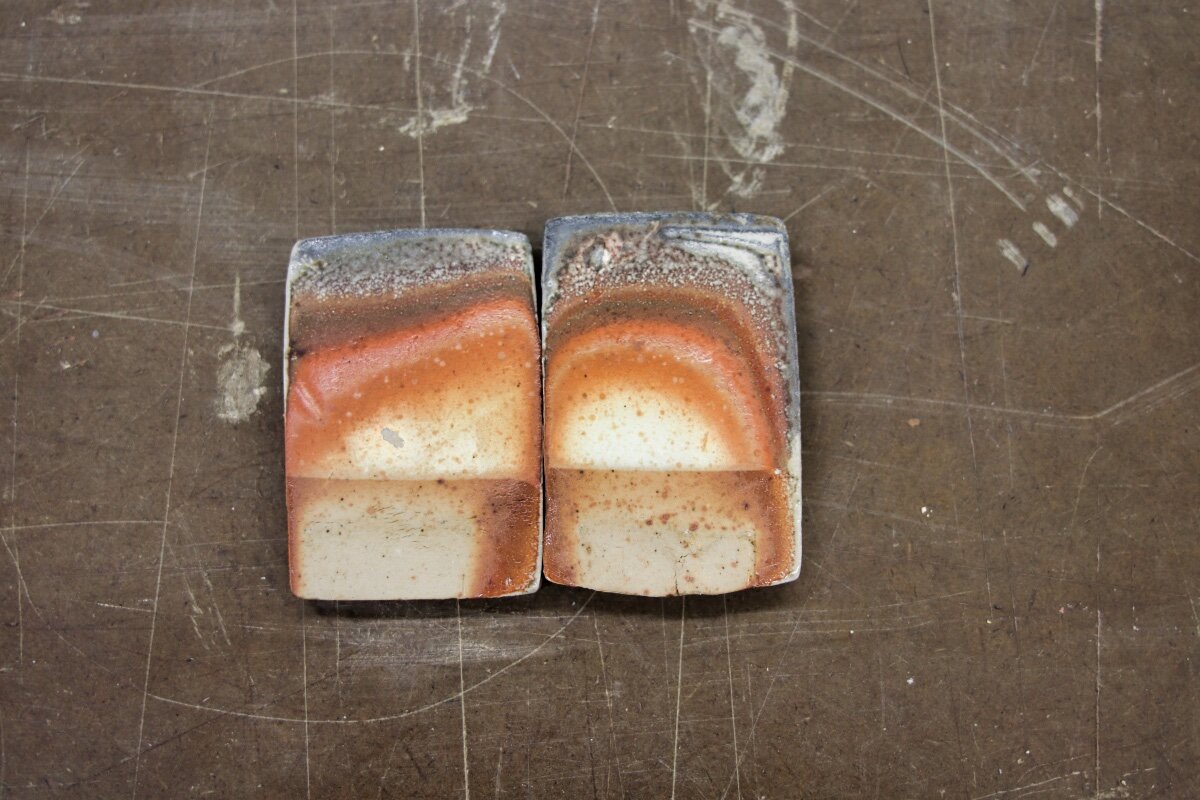
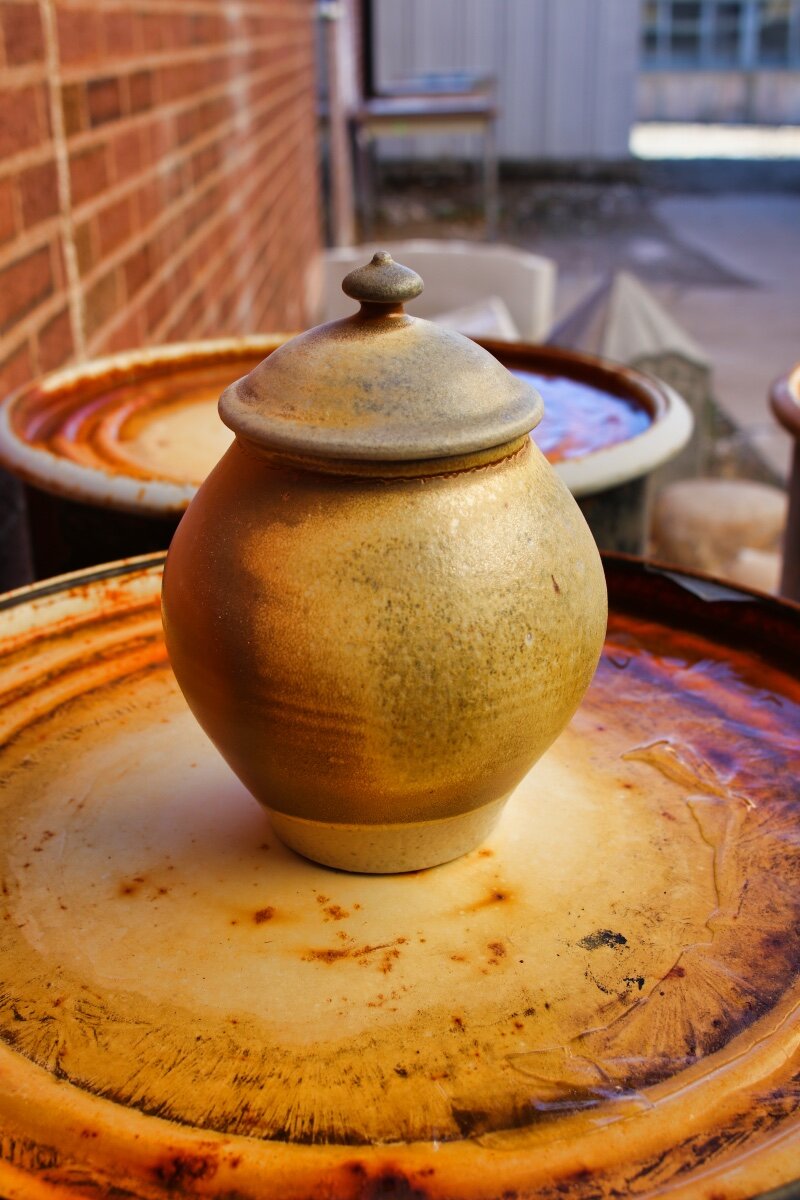
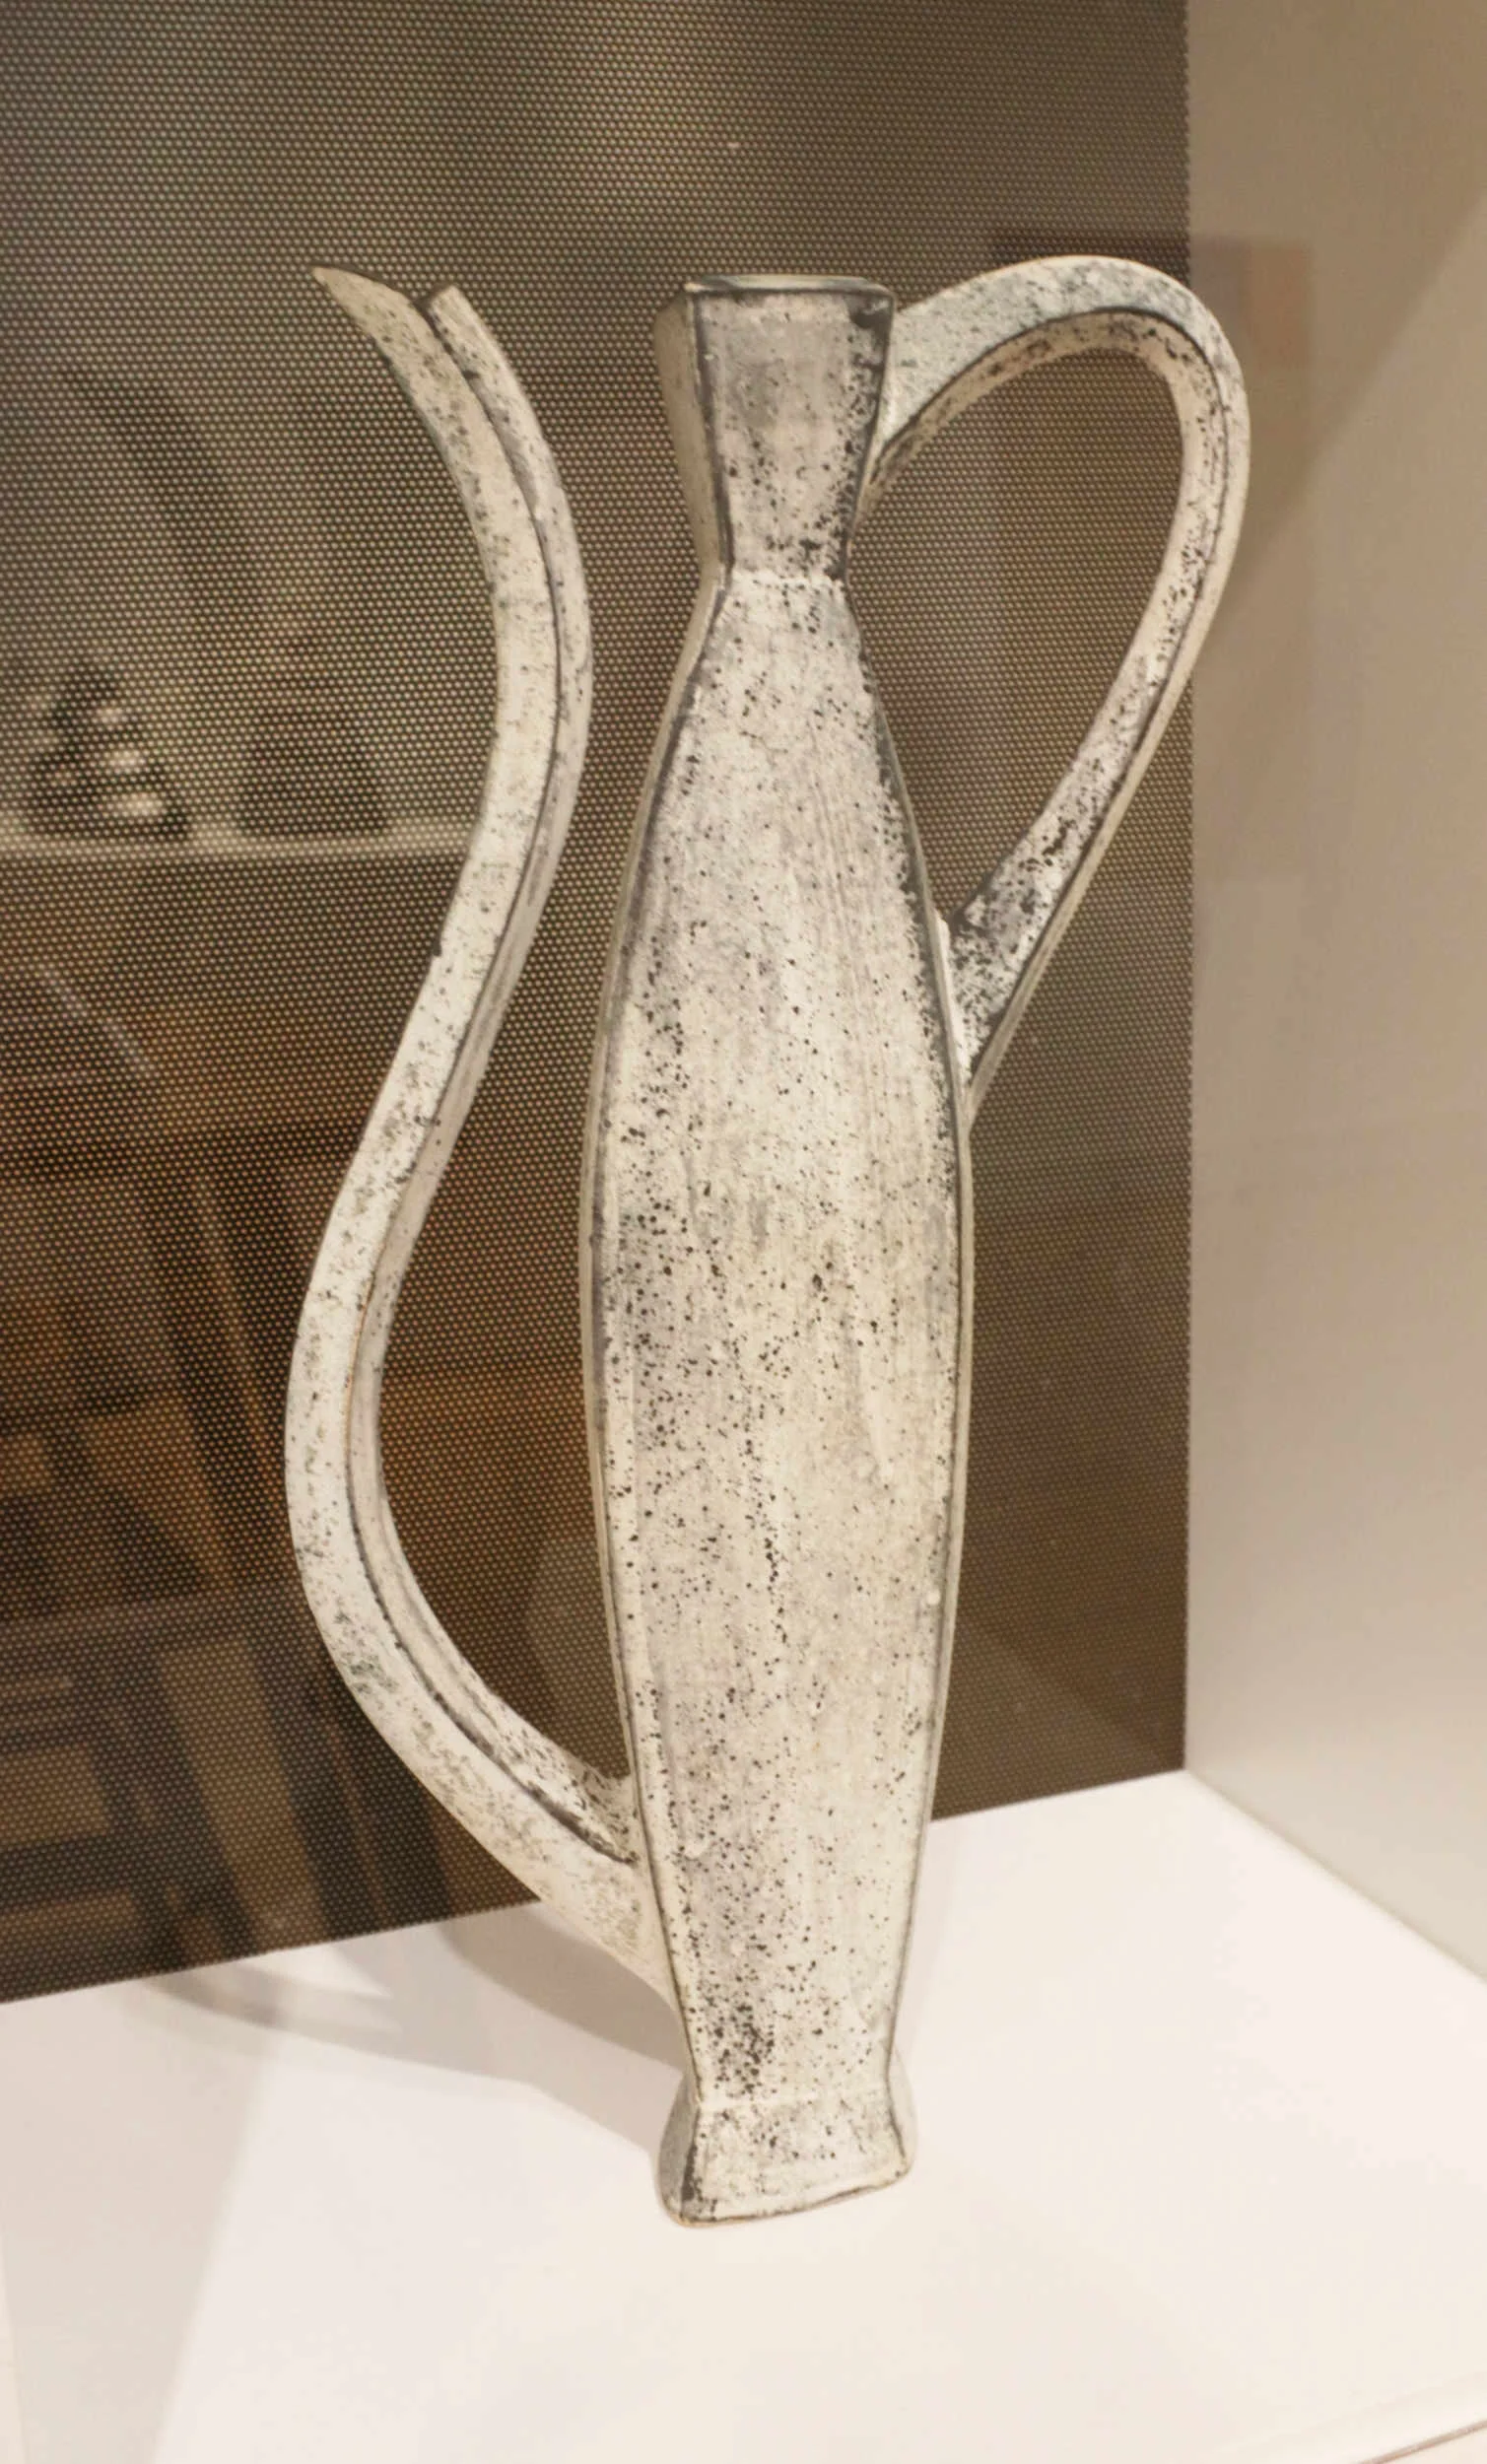
Here’s what I mean. Below on the left is a salt glazed jar… the orange peel effect of the salt wraps around the whole pot in a pretty even way. The variation on the belly/shoulder of the pot is due to a light dusting of wood ash, not the salt. On the right is a soda glazed cannister jar out of my first soda firing. The area that got a lot of soda went grey and the area with less went red. There was a clay slip on each of these pots. You can see the darker clay color underneath the salt glazed jar and the lighter clay under the slip on the soda jar. This shows how much the clay is crucial in soda firing. The slip here is registering the level of soda far more than the white stoneware underneath would.
Salt glazed cannister jar, Hamish Jackson, fired in Lara O’Keefe’s salt kiln, 2019, NC.
Soda glazed cannister jar, Hamish Jackson, fired in the soda kiln at USU, 2020, UT.
I have wanted to delve into soda for a while now, but never had a real chance. This goal aligned with my other one of testing clays. I figured why not experiment with the available clays in the studio in the soda kiln. By doing so I would see how reactive they are and to try to understand their character.
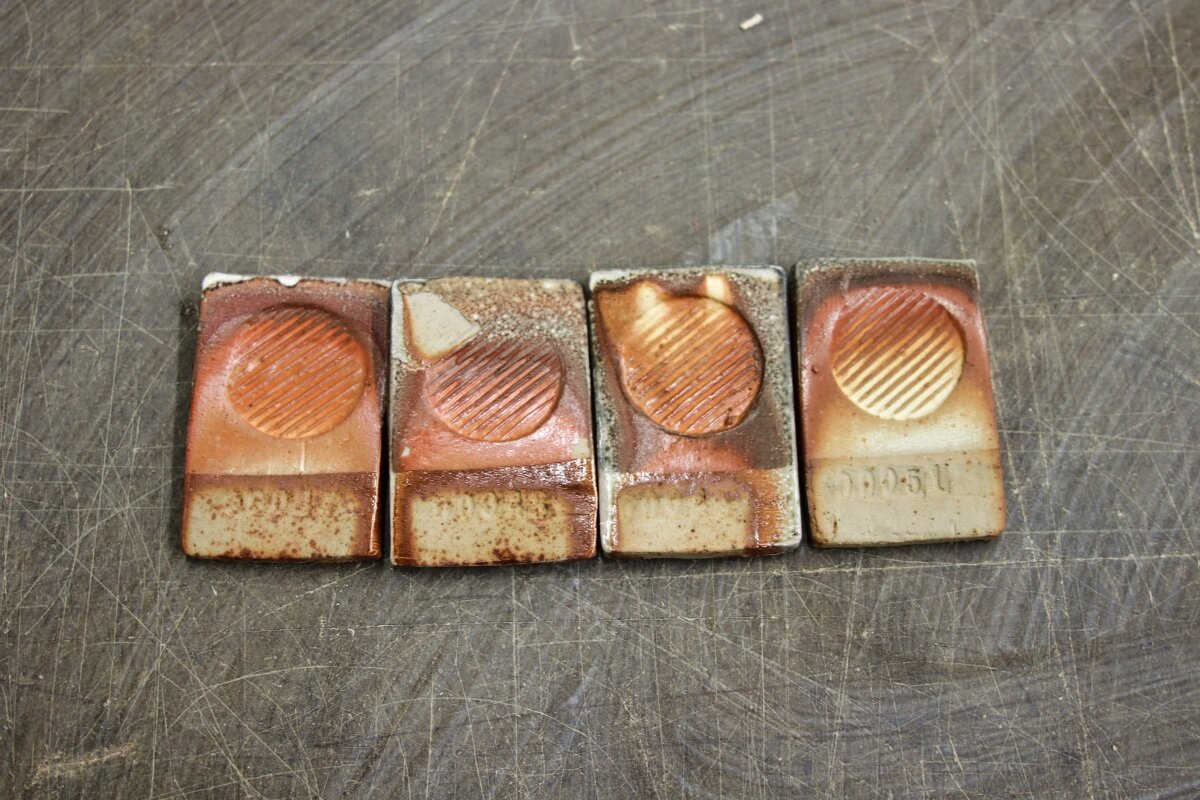
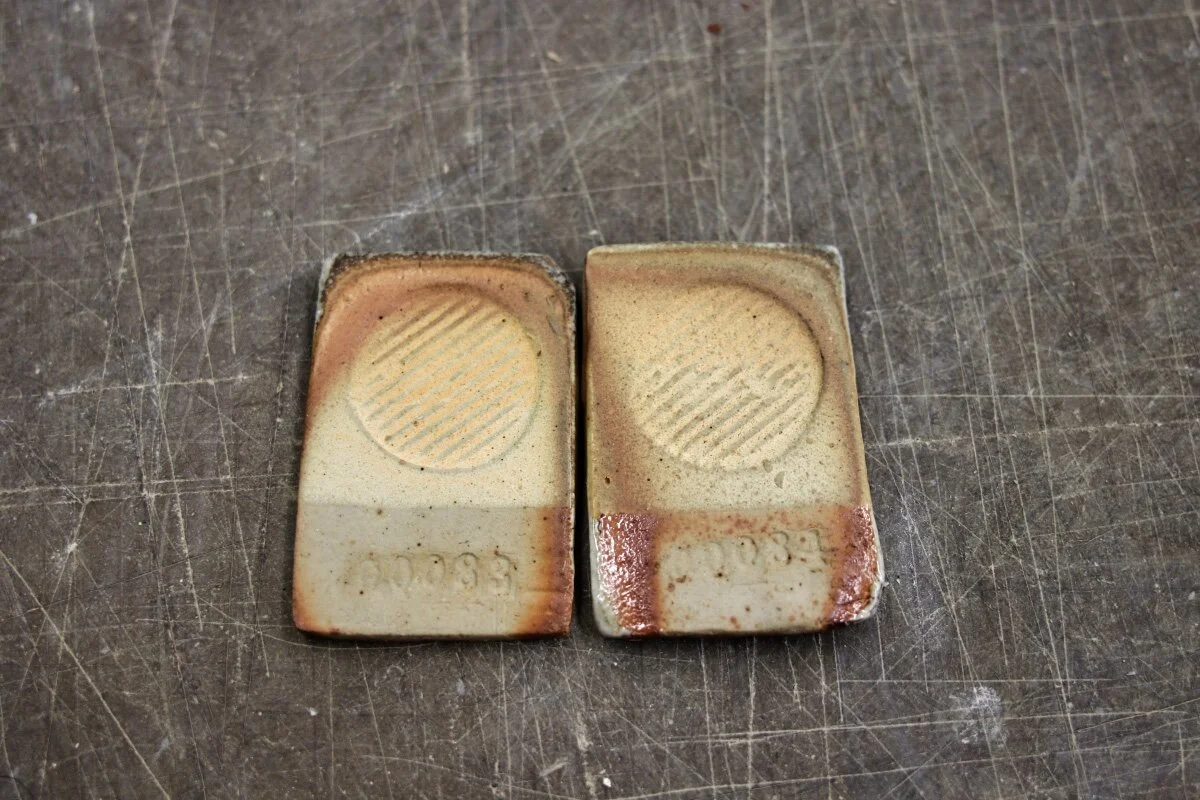
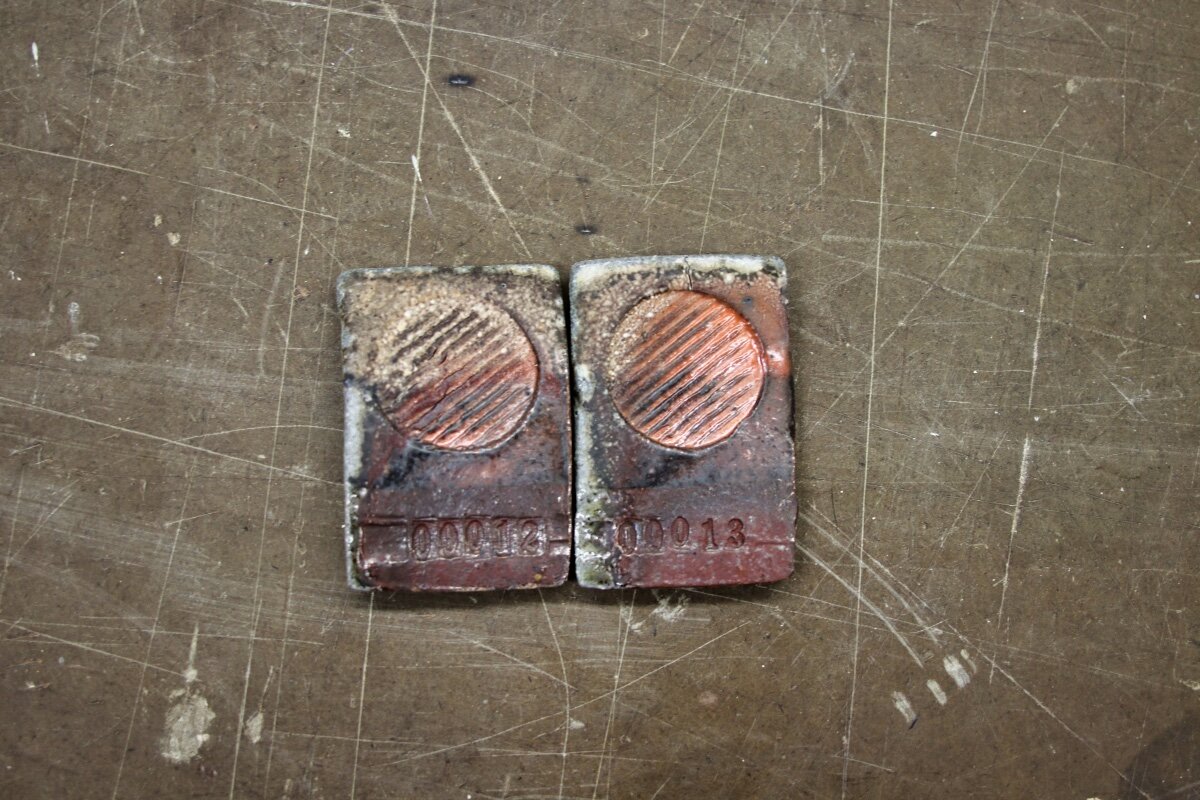
So for my first soda firing, I made a bunch of test tiles and some pots using a couple of clays recommended by Dan Murphy (one of the professors). I chose to run each slip test on 3 different clay bodies to see what difference that made. I used a high alumina porcelain, a white stoneware and an iron rich clay. Each test got 3 trials in the kiln. In retrospect, I wish I had made twice the amount of tiles so I could have saved a whole set for my next firing. But I got plenty of information anyway. It was an excellent exercise.
Before loading and firing, I spoke with several people about how they have approached soda: Casey Beck, Harry Levenstein, Louis Reilly, Denise O’Connell Joyal and Isaac Howard. It was super helpful to pick their brains before I got rolling. Check them out, they all make really lovely pots.
THE FIRING
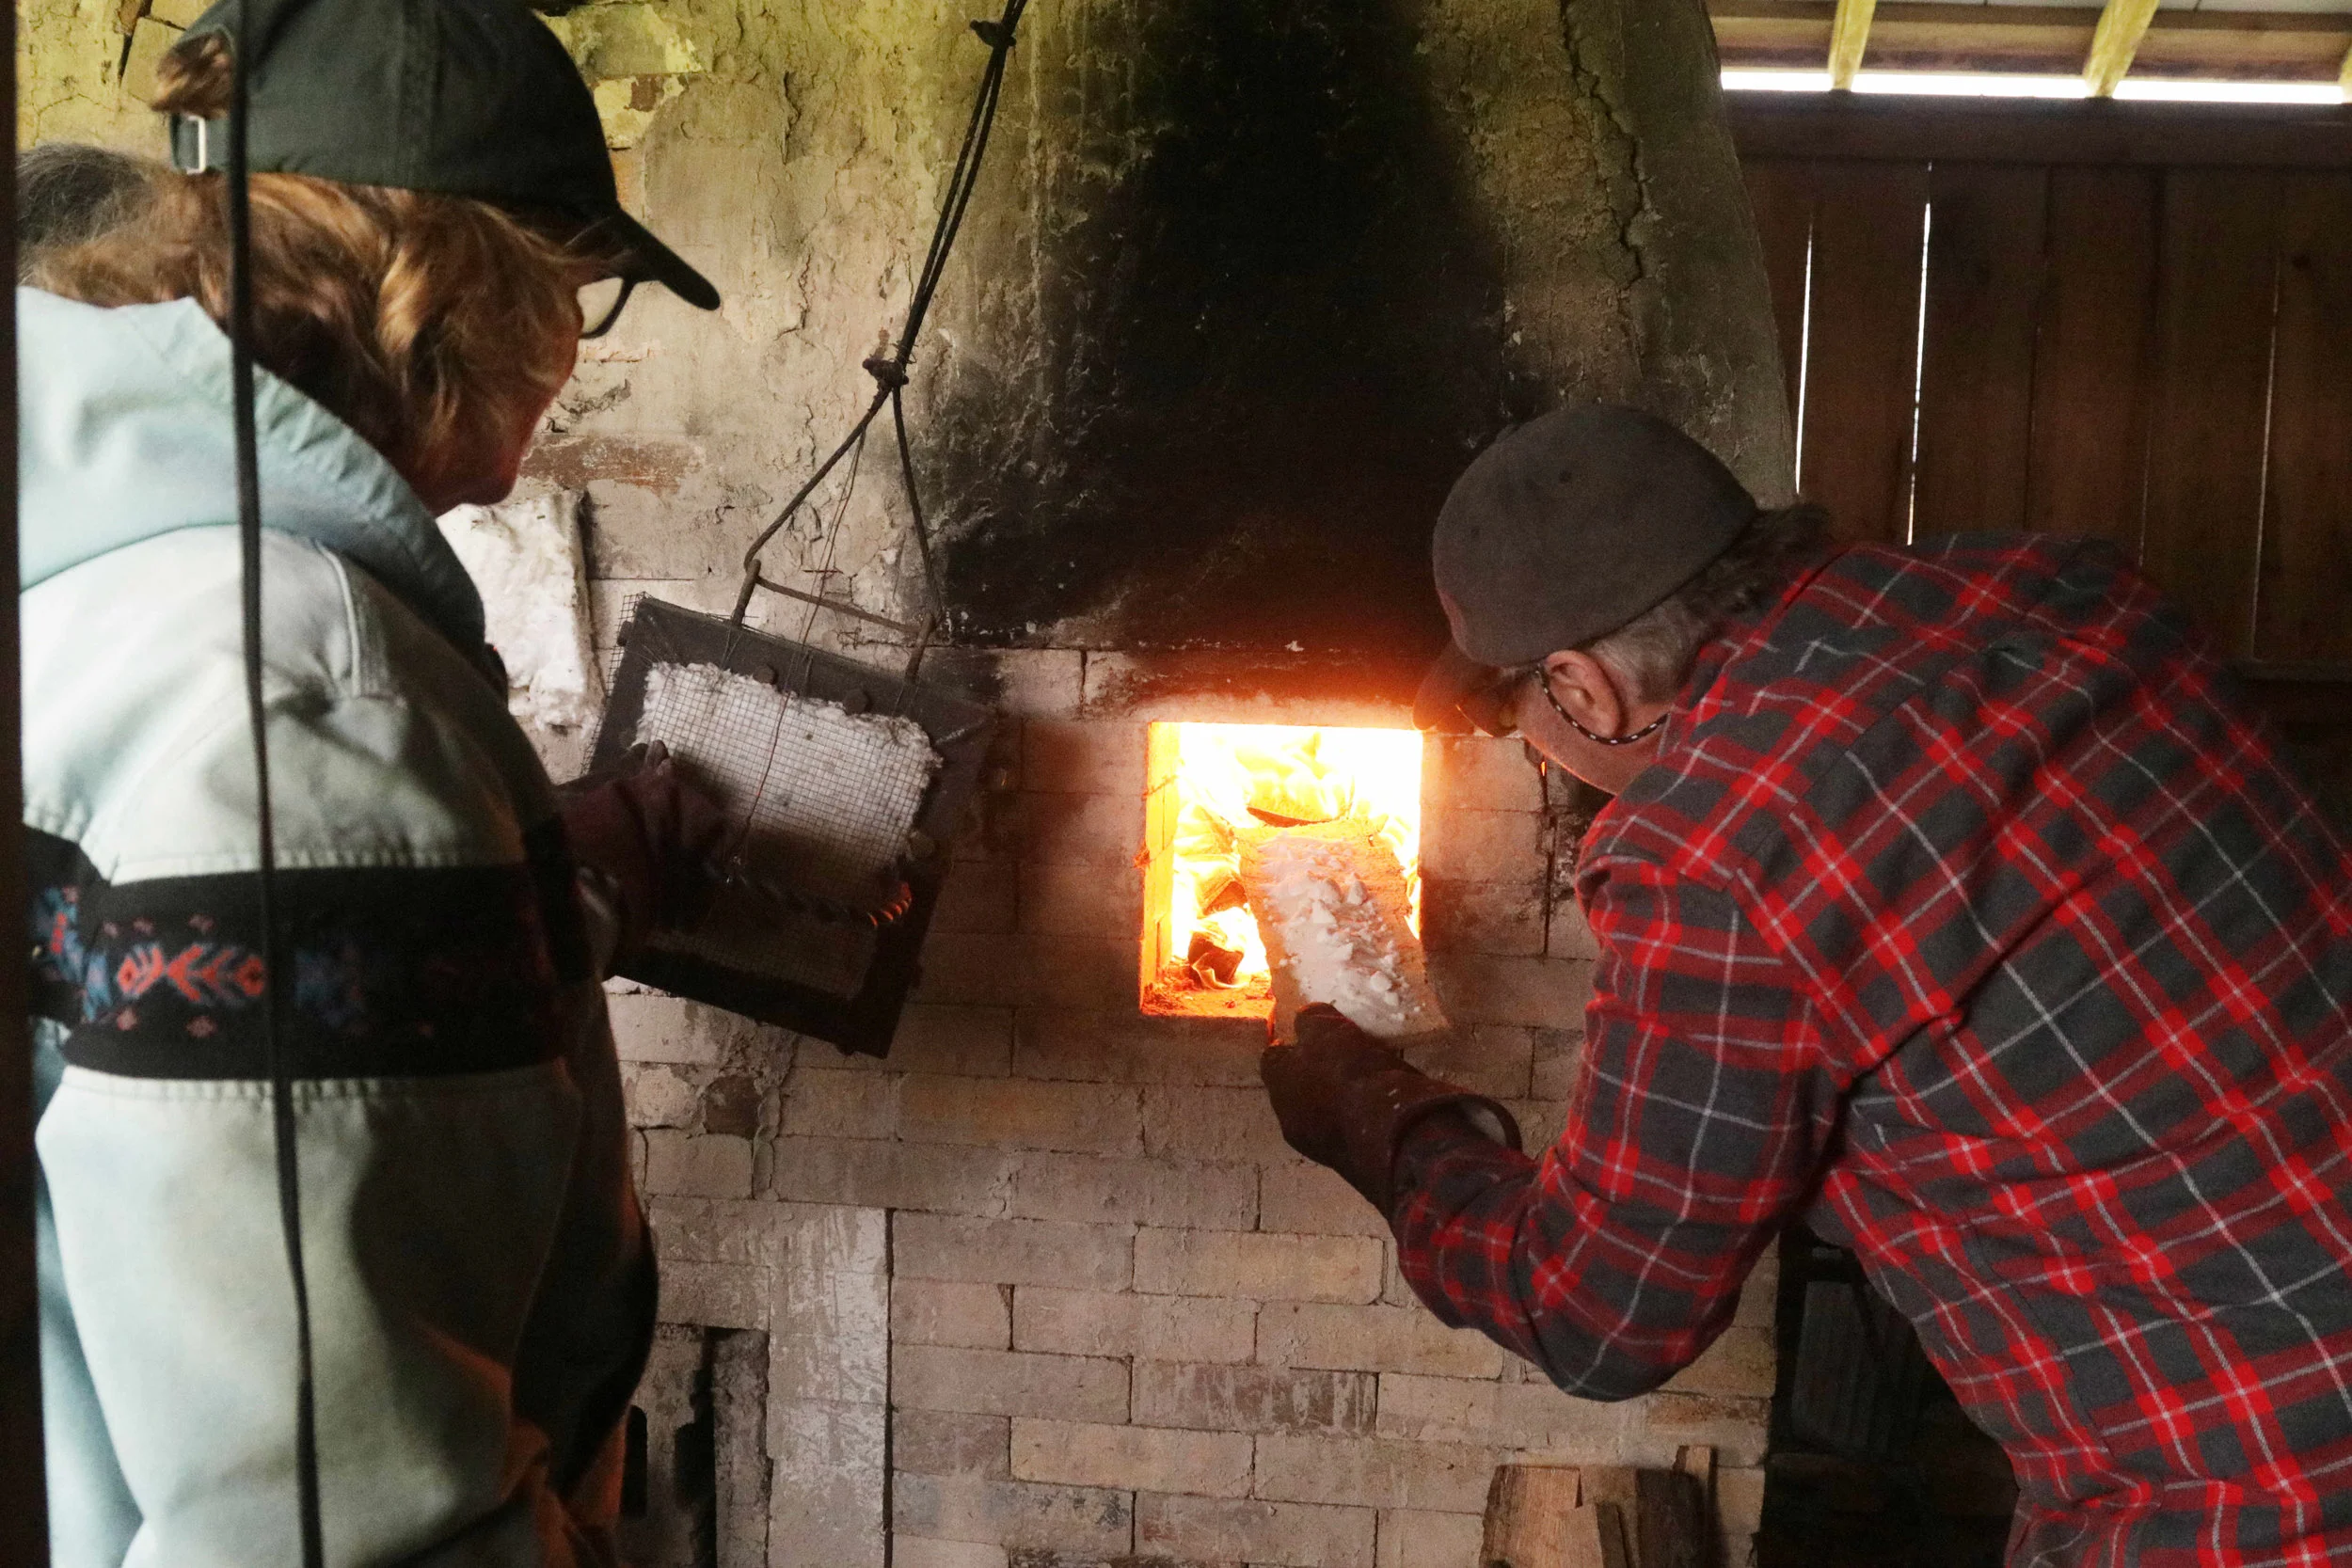
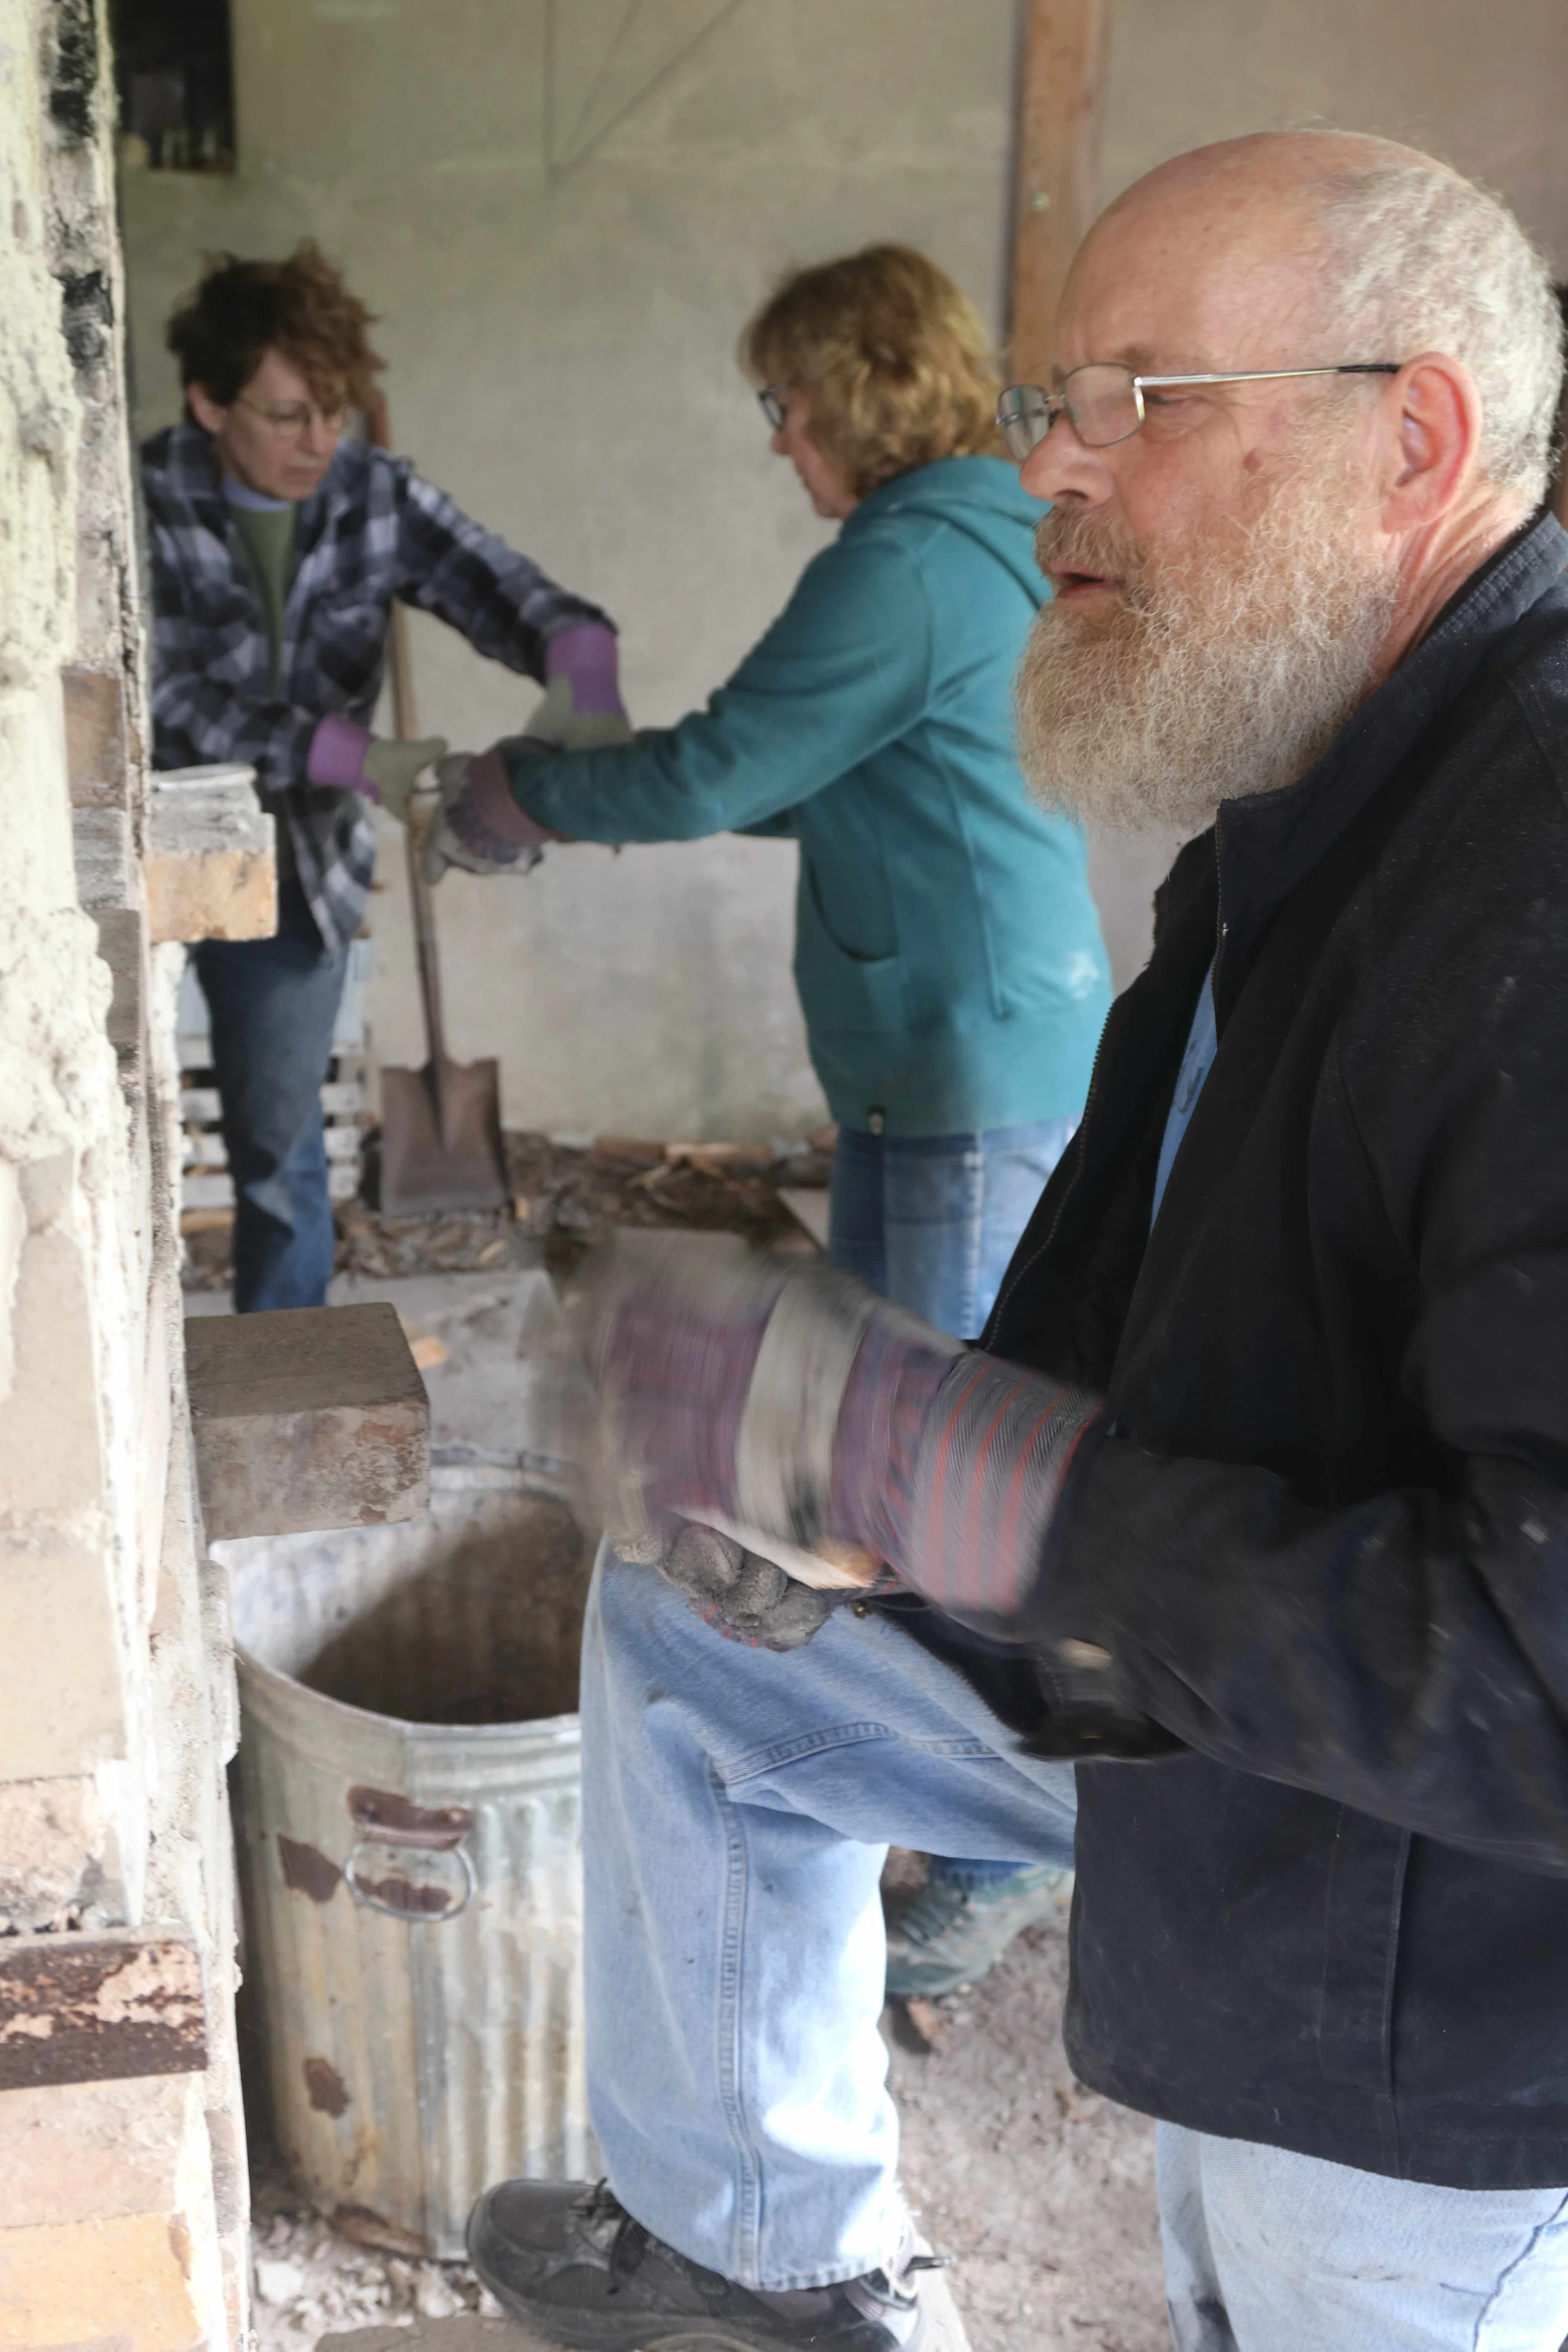
I decided to fire in the way I thought would produce the best results (after much thought). I did an hour of body reduction when cone 010 went down, keeping the kiln in medium reduction on the way up and then sprayed in soda slowly over the course of 6 hours, starting when cone 7 went down, ending when cone 10 was down. I went in cycles, pushing the damper in when I introduced soda, with a couple of pieces of wood each time too, and then opened the damper back up to get the temp to rise back to where it had been. At the end of the firing, I let the kiln drop to 1850°F and then down-fired it in reduction to 1600°F. This was fairly time consuming and I was happy to have Tansy O’Bryant on the crew. She had pots in the kiln and was very helpful with the down-firing and clean up afterwards.
Alright, enough chatter. Here’s some of the results…
NOTE ON THE RESULTS
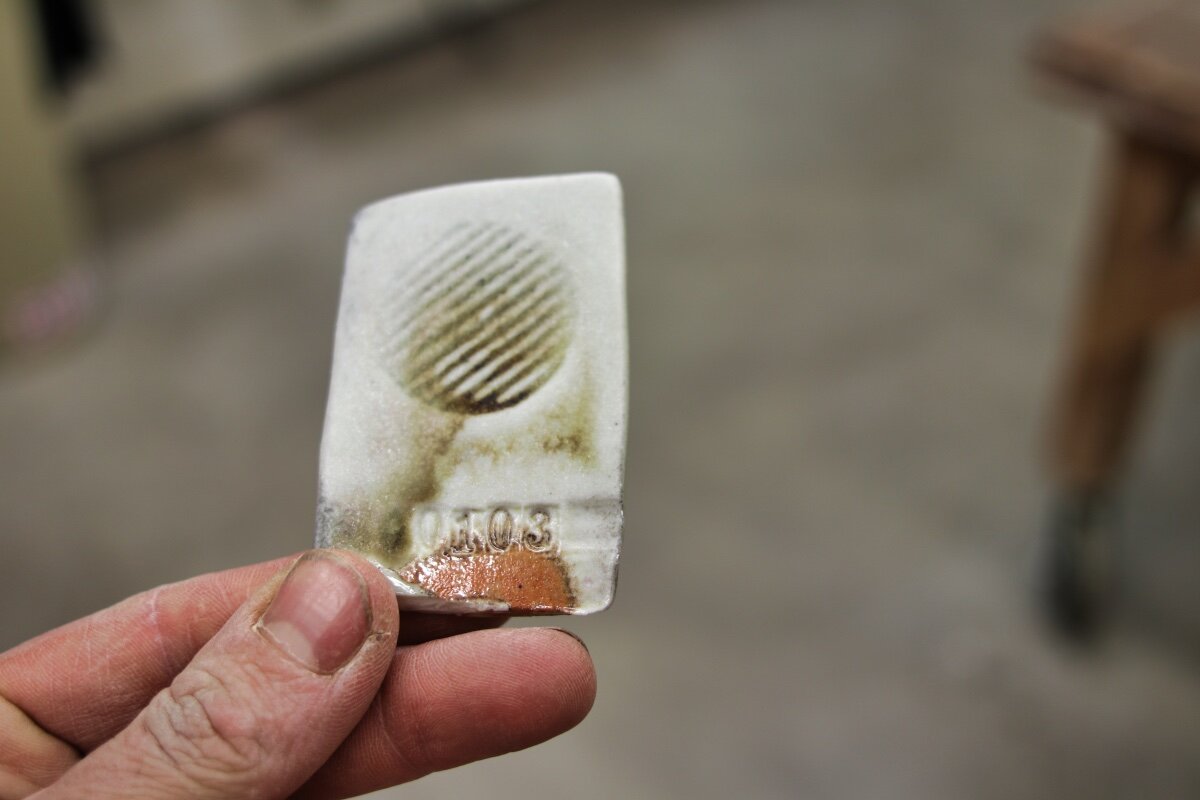
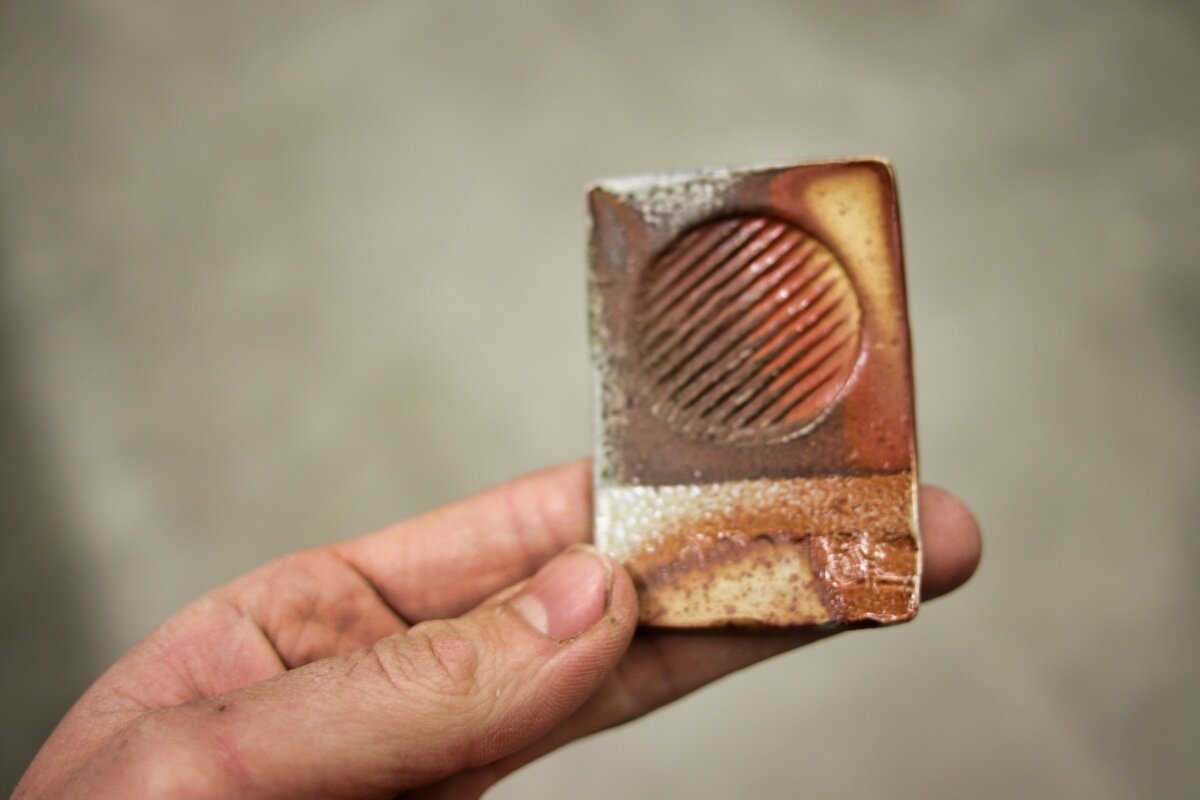
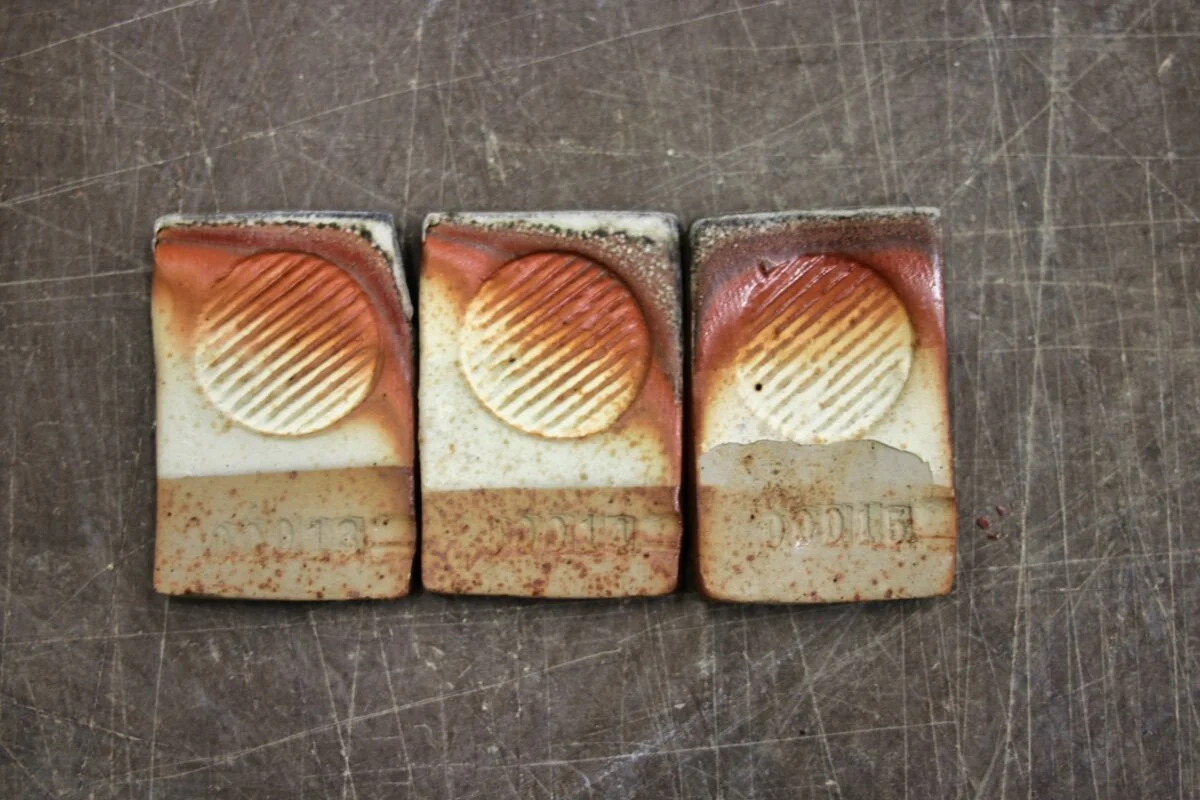
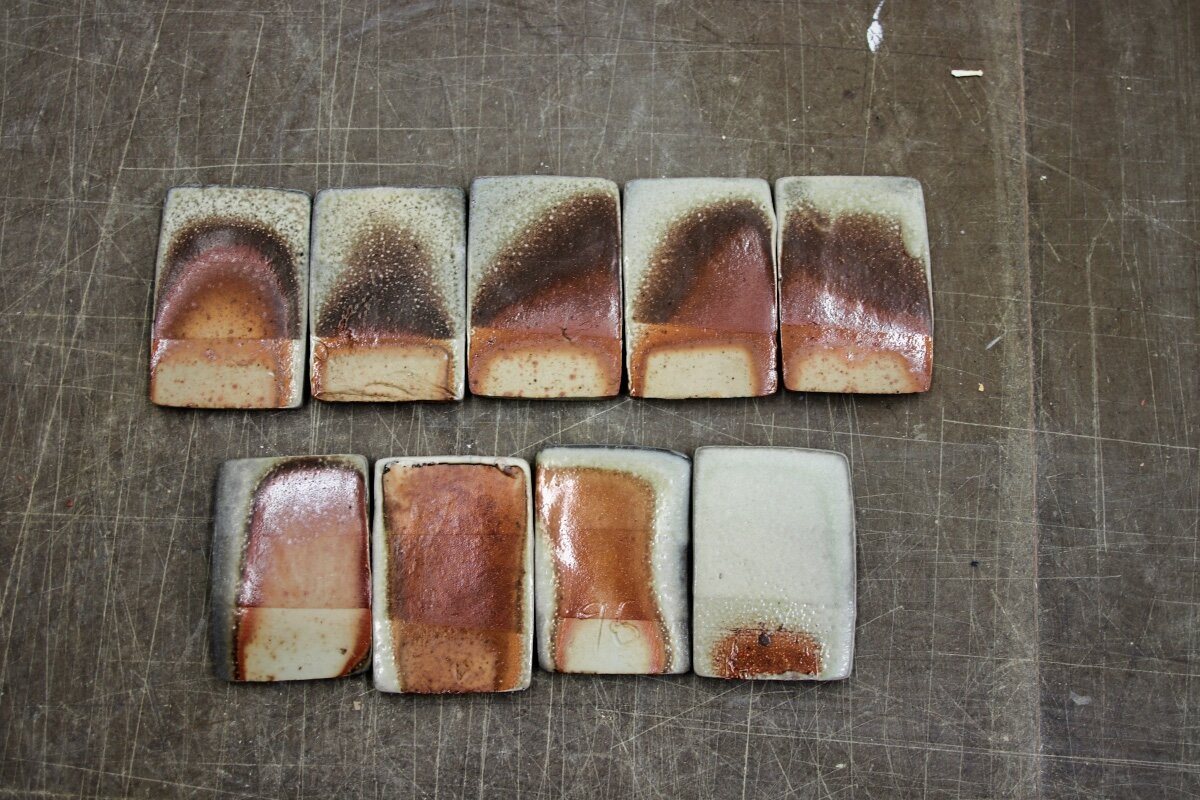
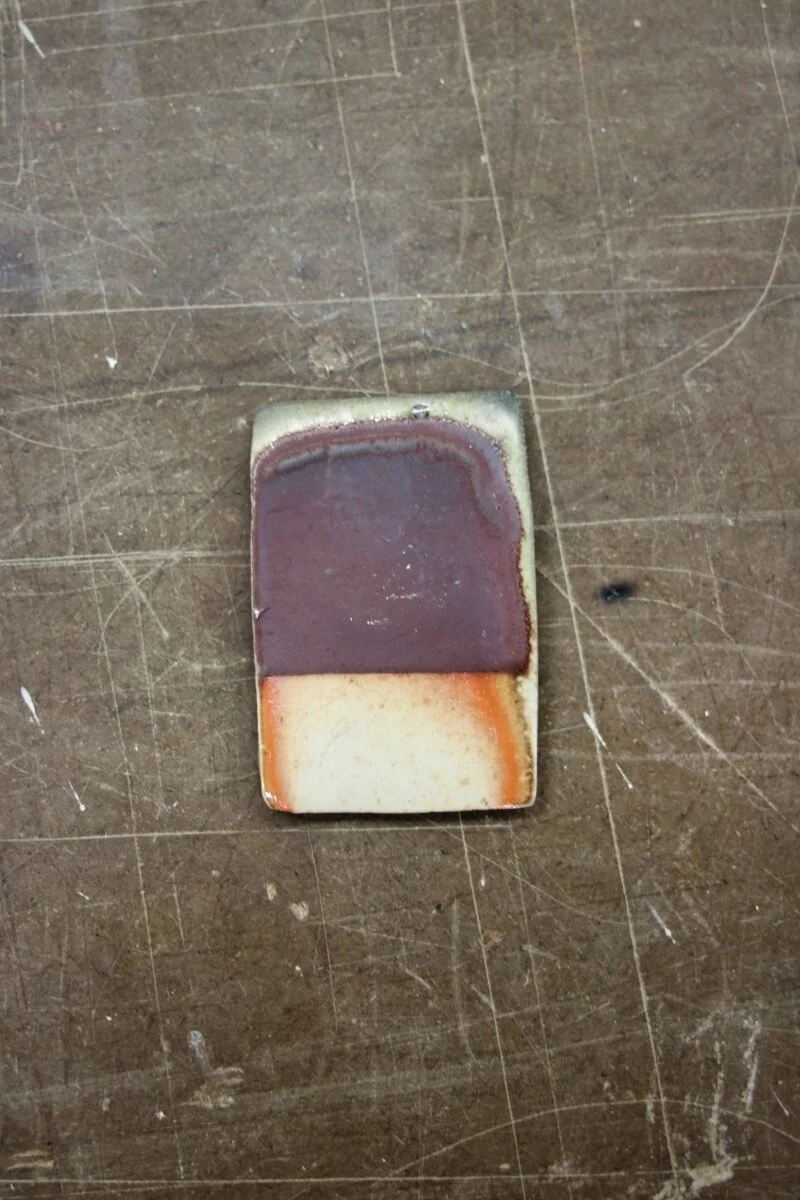
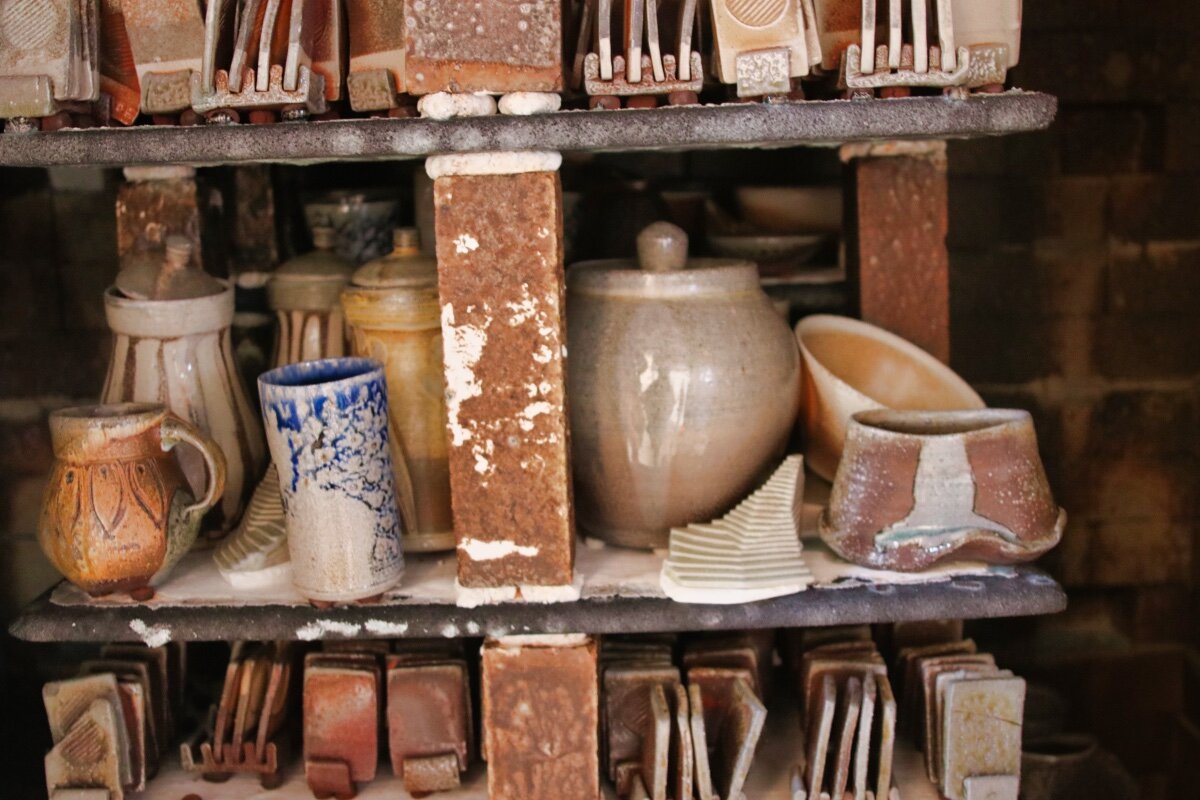
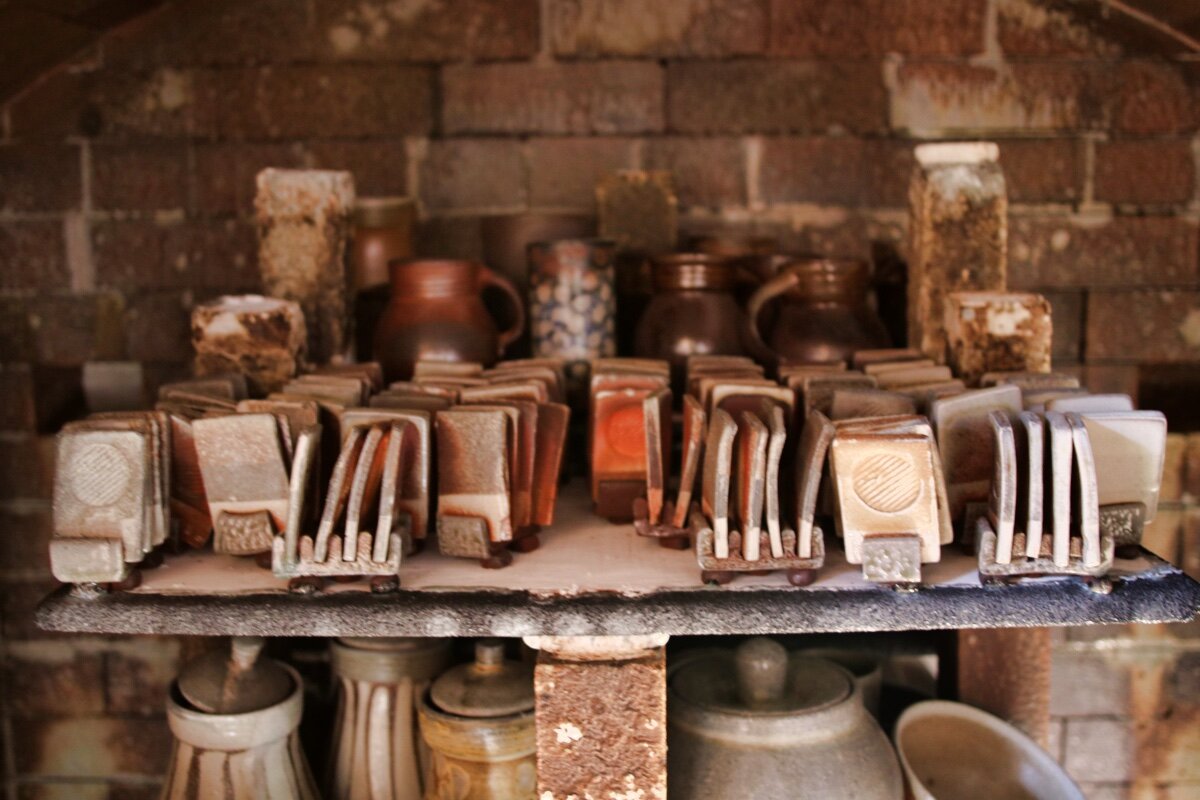
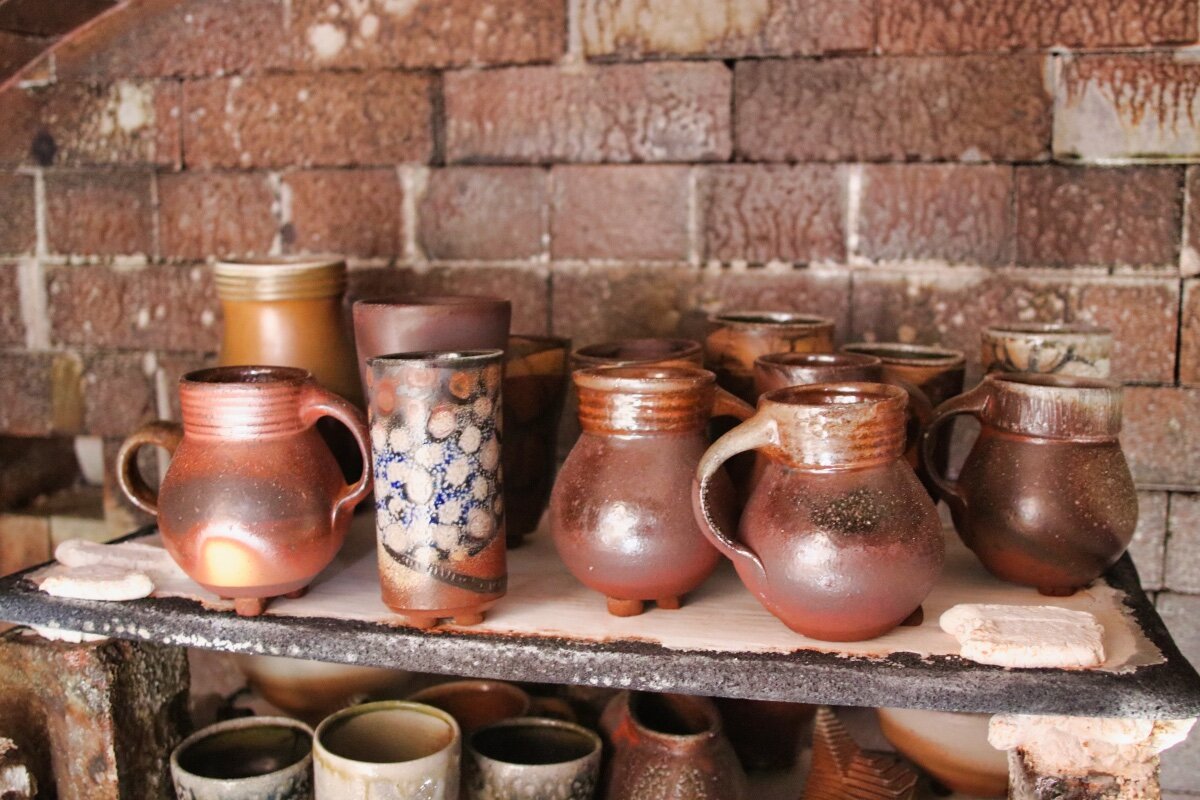
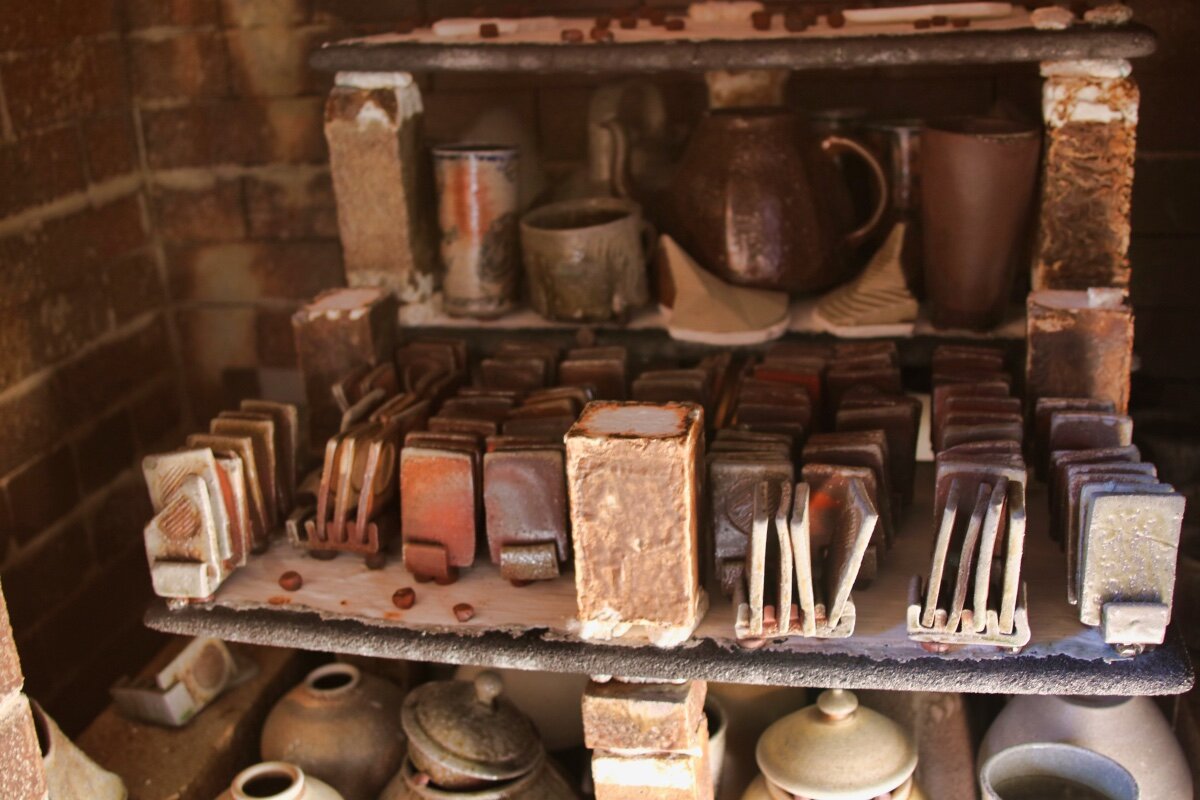
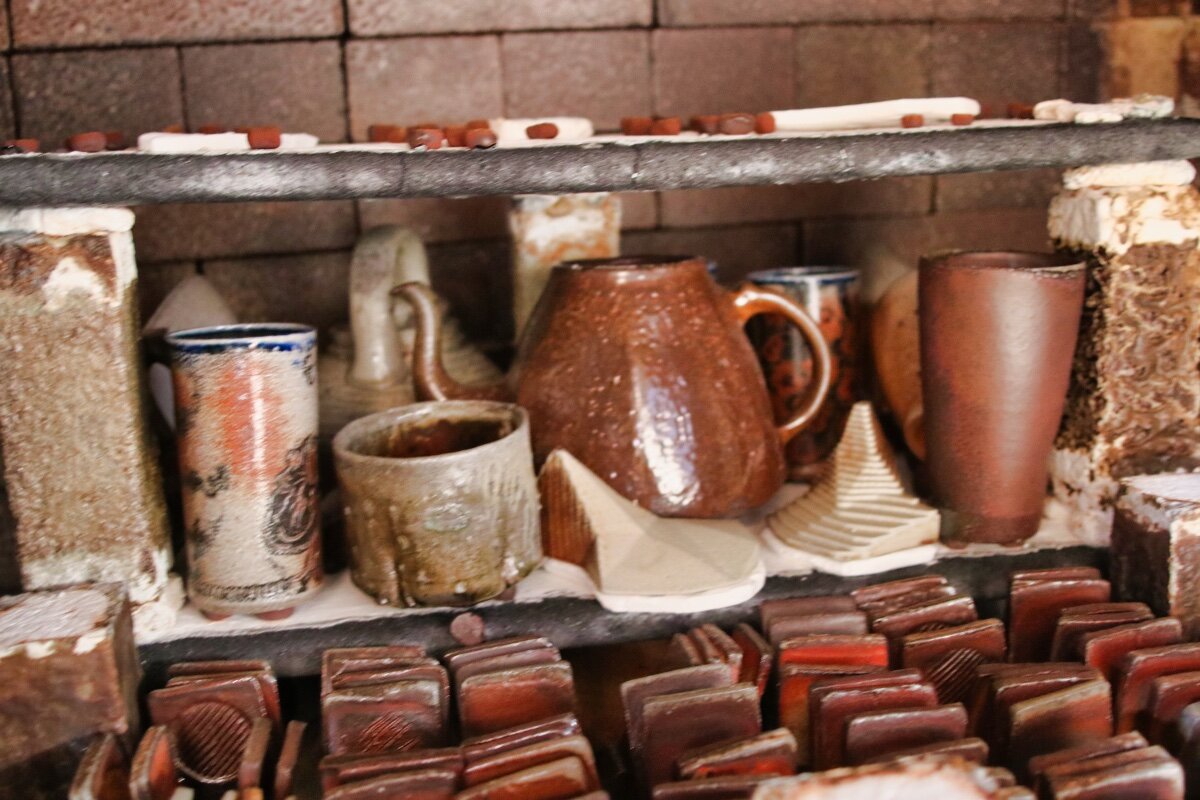
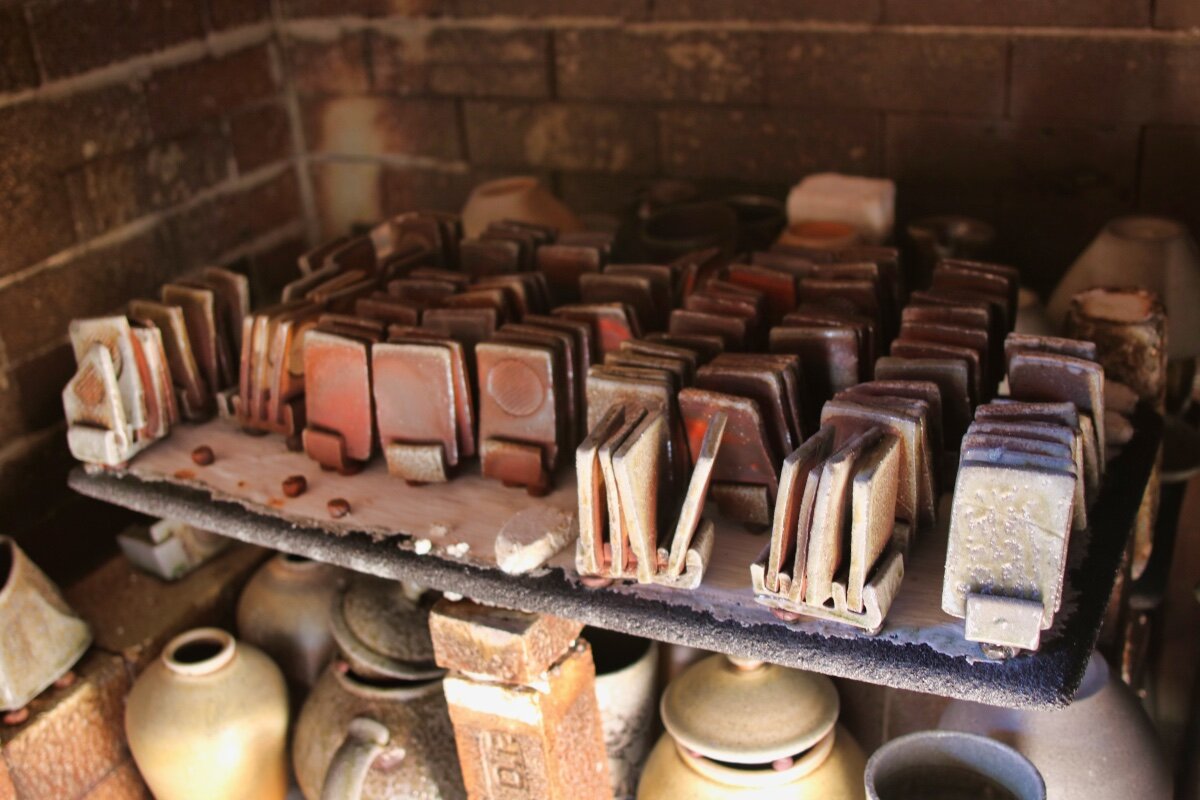
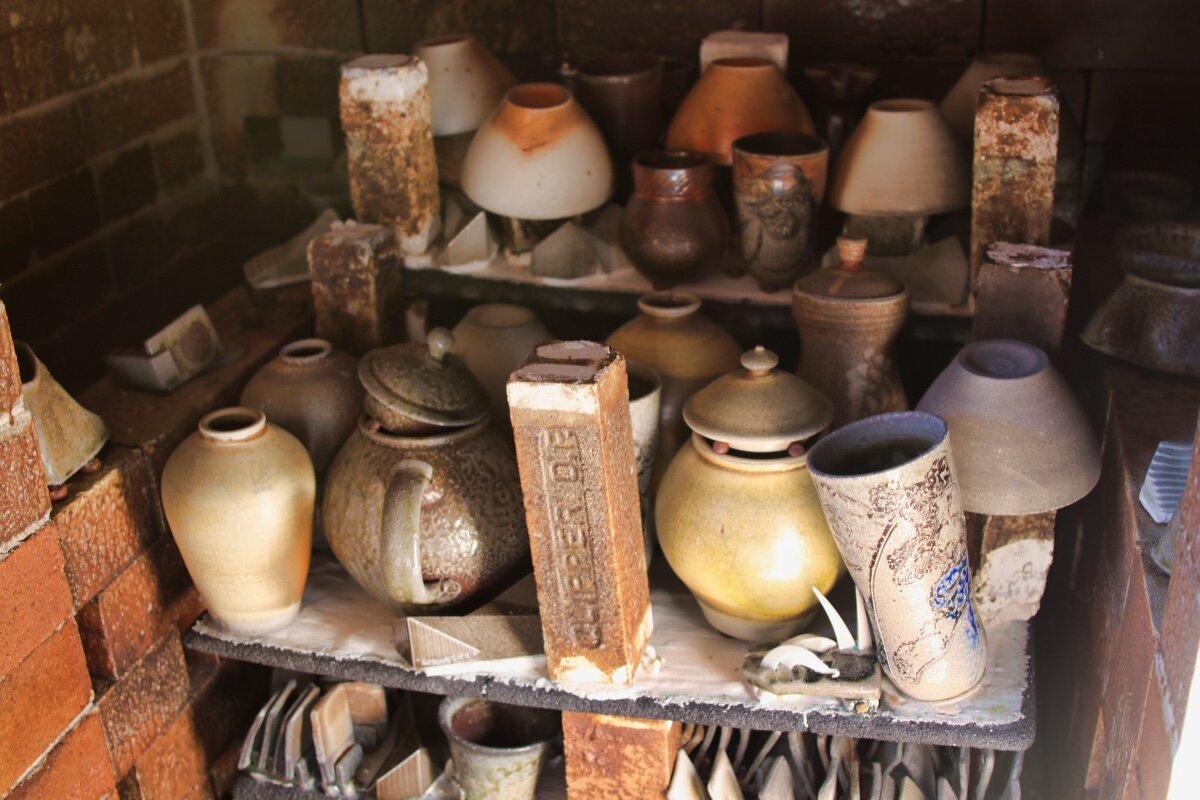
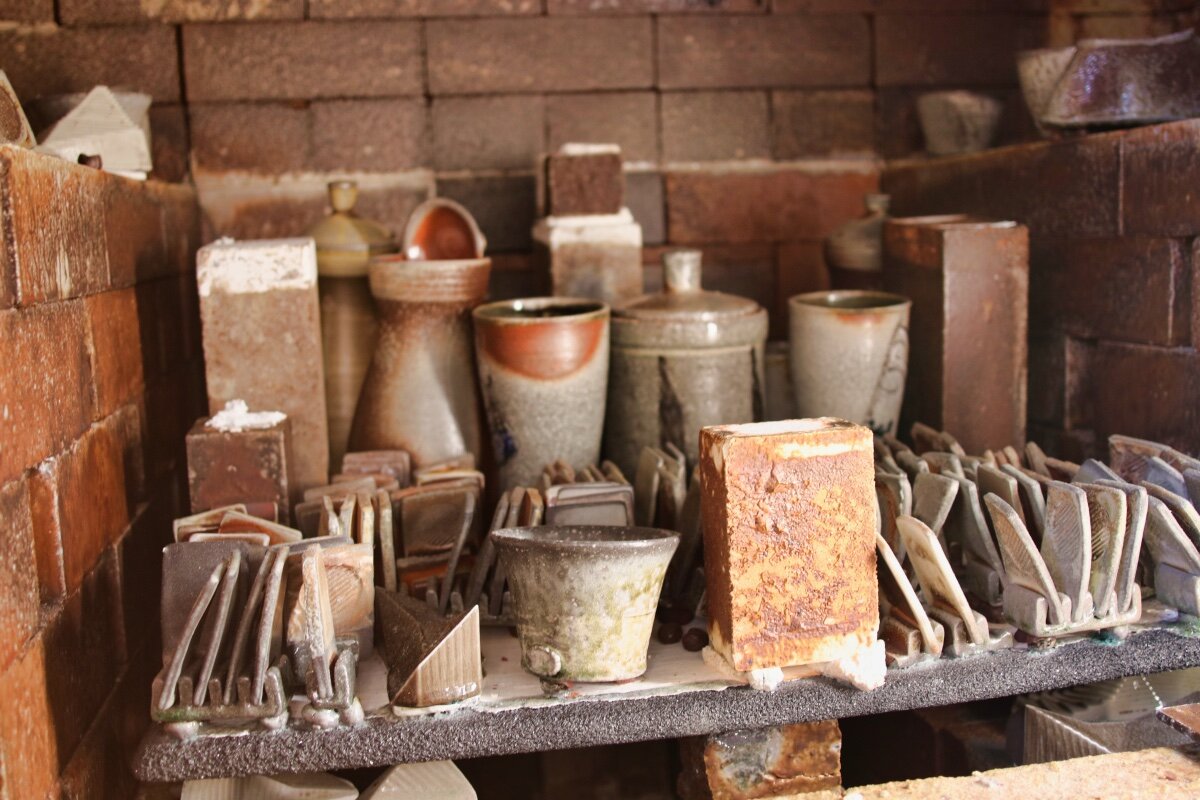
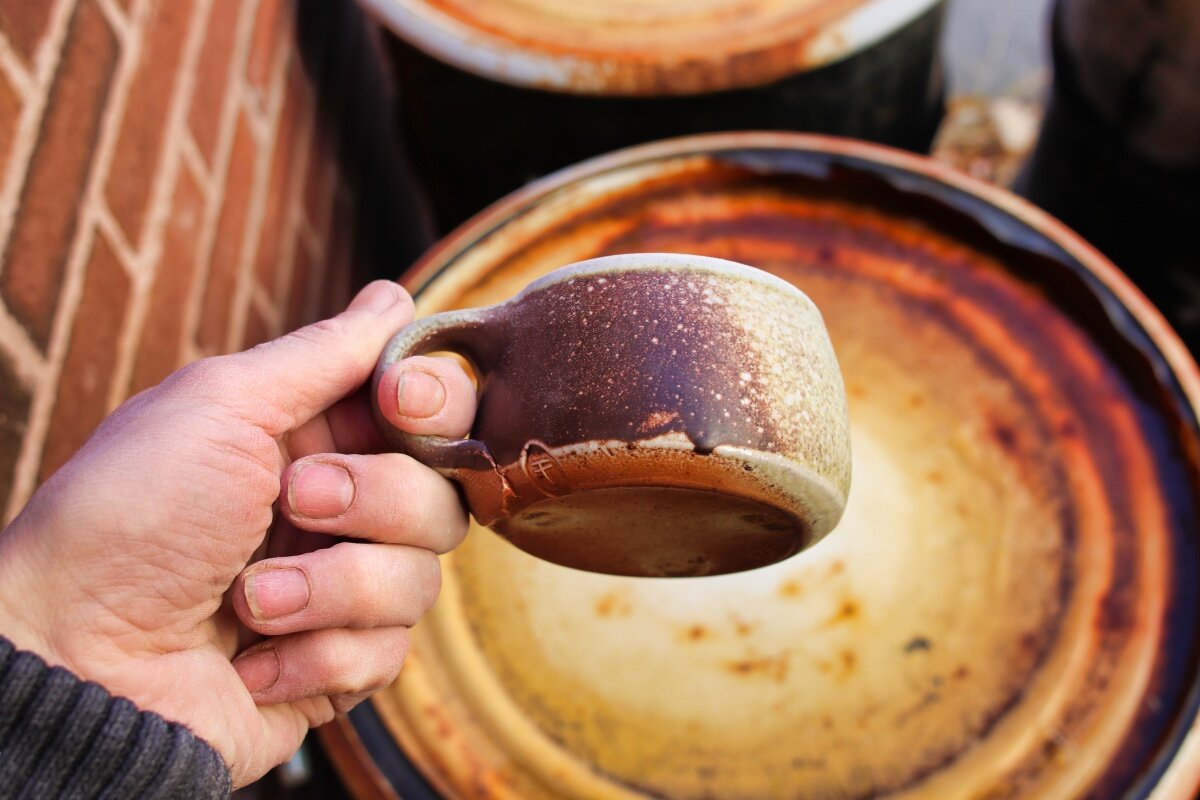
Some of the tests are based on a basic slip recipe (#6) with additions. #6 is 50% Helmar Kaolin : 50% OM4. Each test was dipped once to cover about 3/4 of the tile and then dipped again on the top 1/3. The tiles were packed in the kiln pretty tightly so often they only got dosed with soda on the edge/top corner. Most of the information about how the slip will act in soda is shown in these tight bands/gradients near the top of the tiles. I spent a lot of time staring at these tight lines of color to discern the results. Some of it is translatable in these pictures, but there is no substitute for handling the actual tiles. If only we had holographic technology!
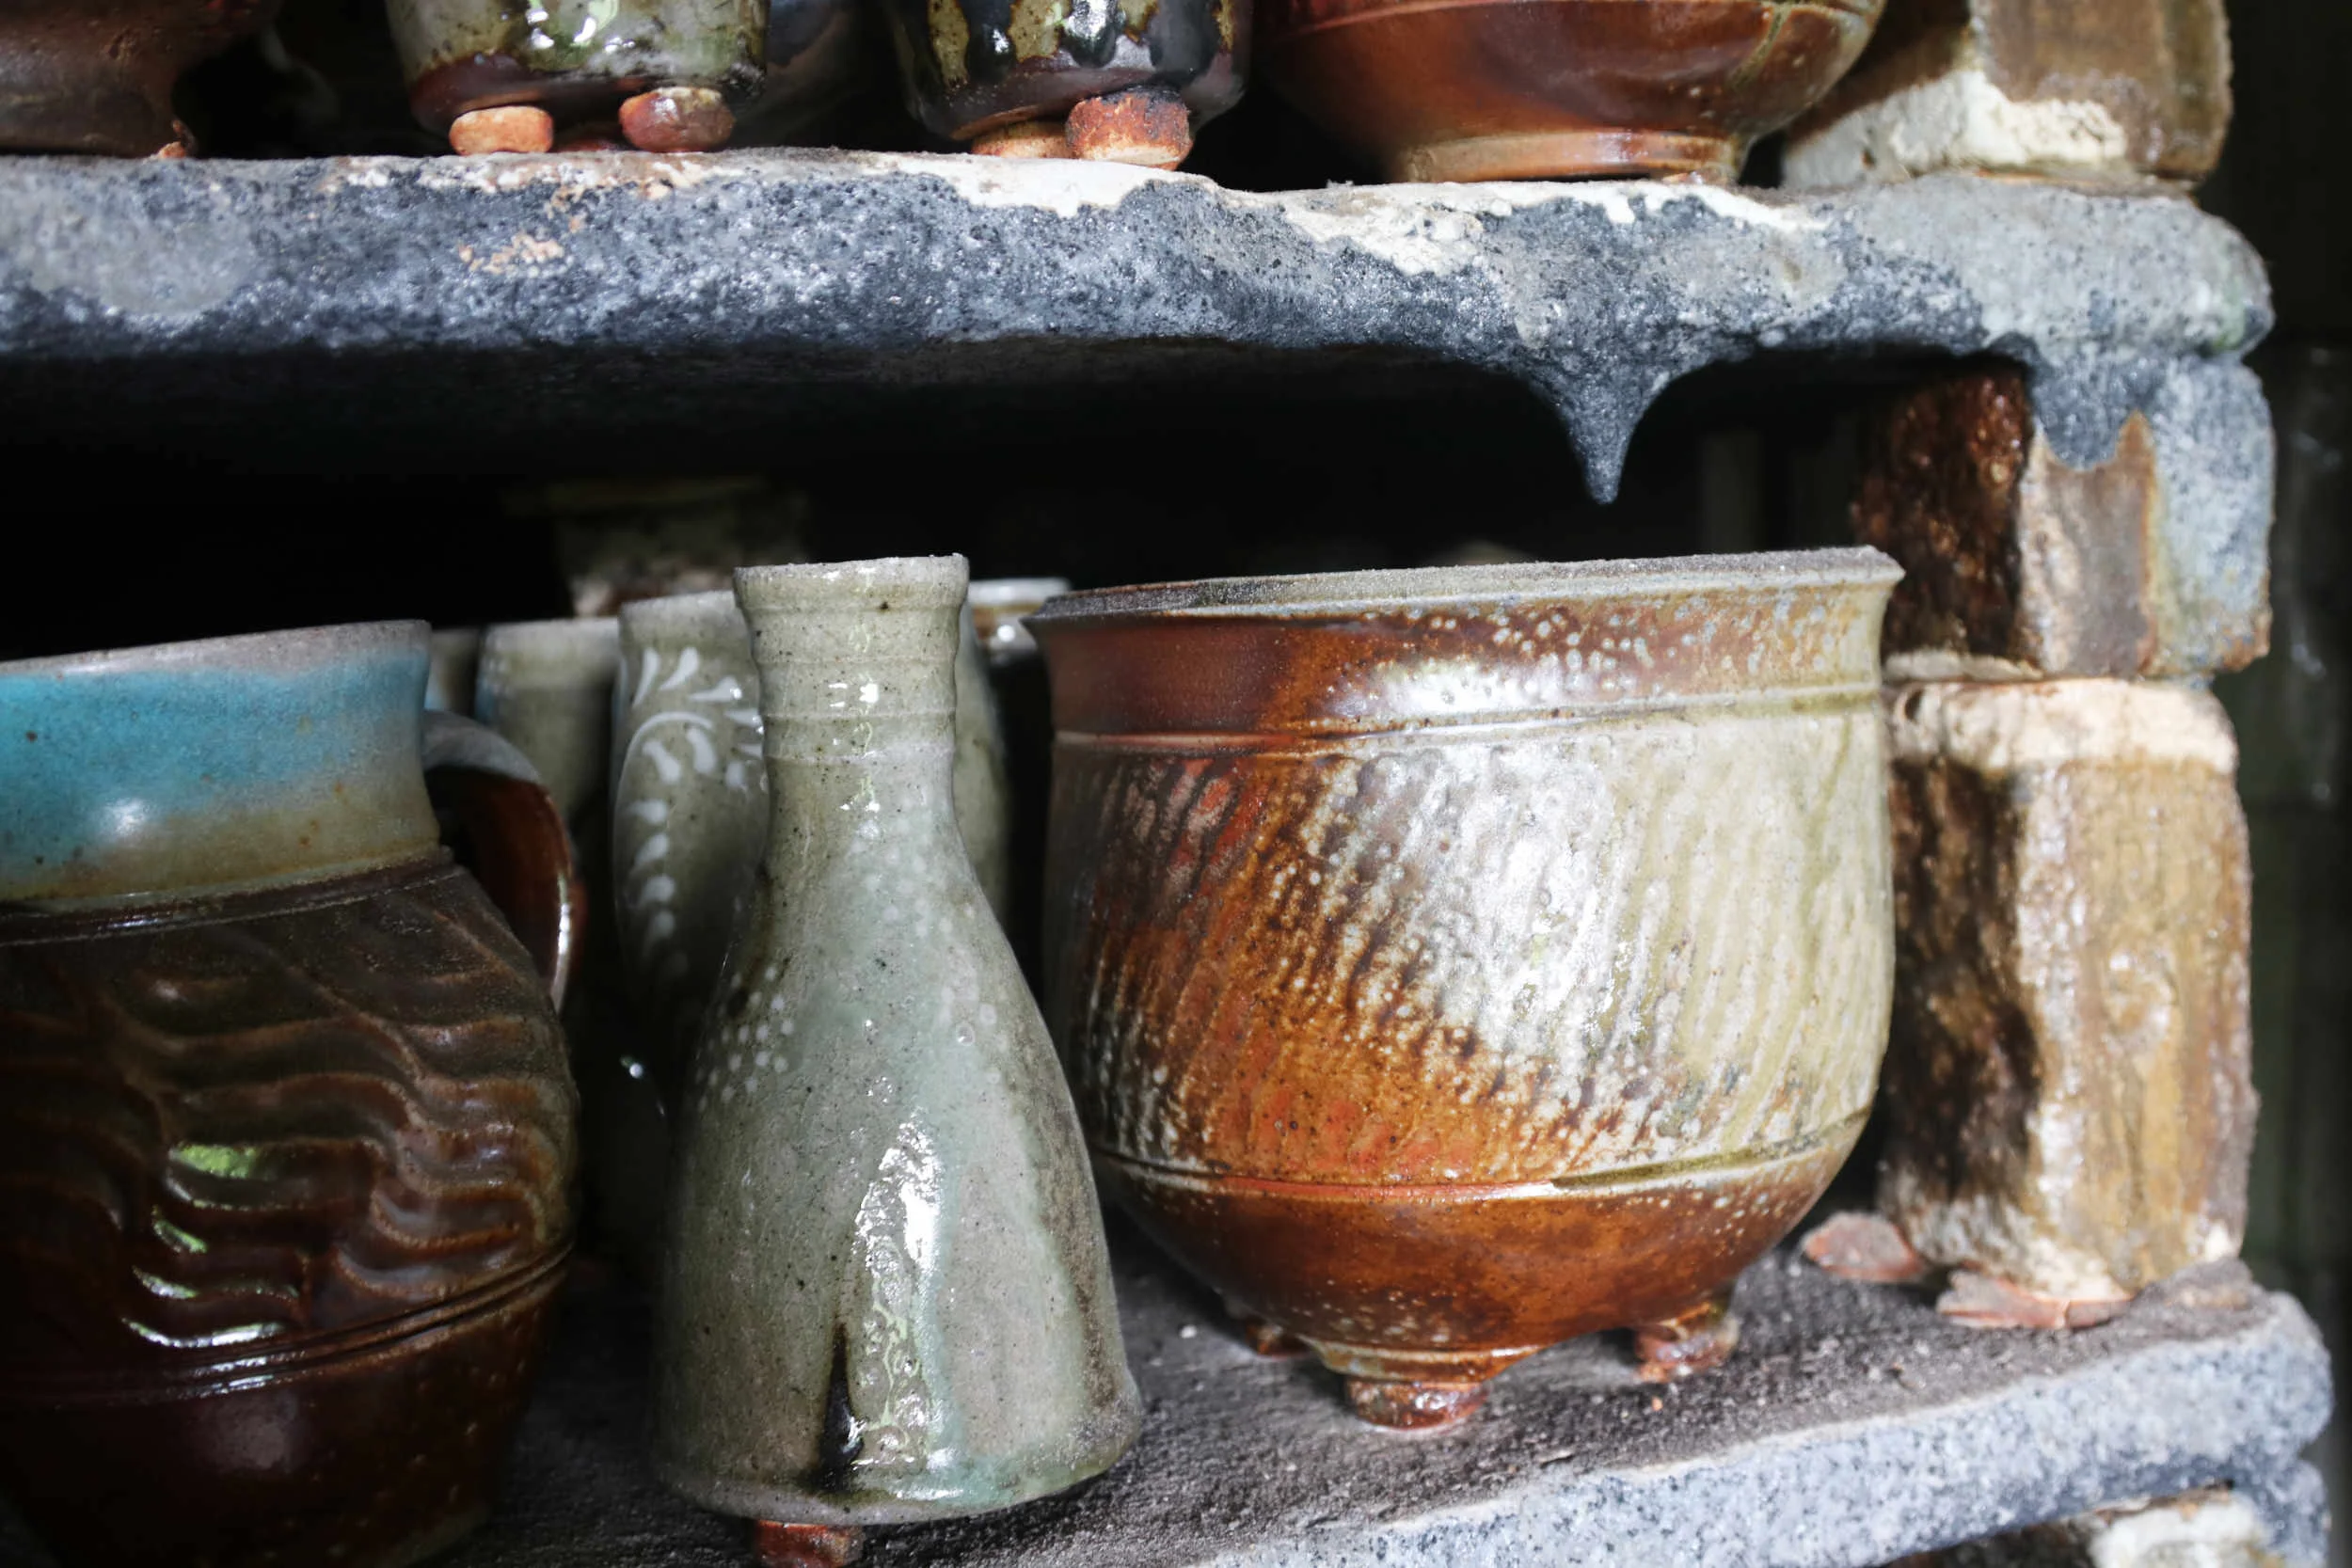
Each set of test tiles fit on a single shelf (12” x 24”). To easily keep track, I put the white stoneware tests up top, the iron rich stoneware in the middle and the porcelain down low.
I recommend clicking one of the images to open a pop up window to view them.


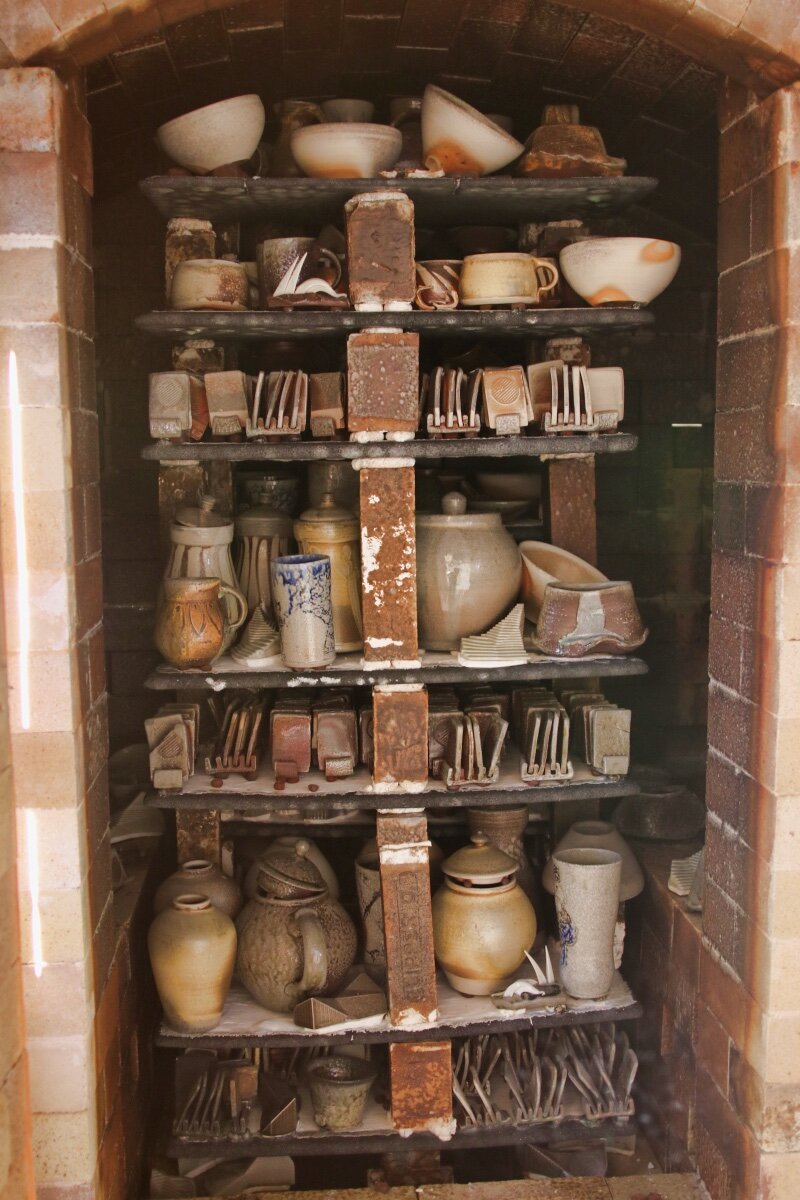
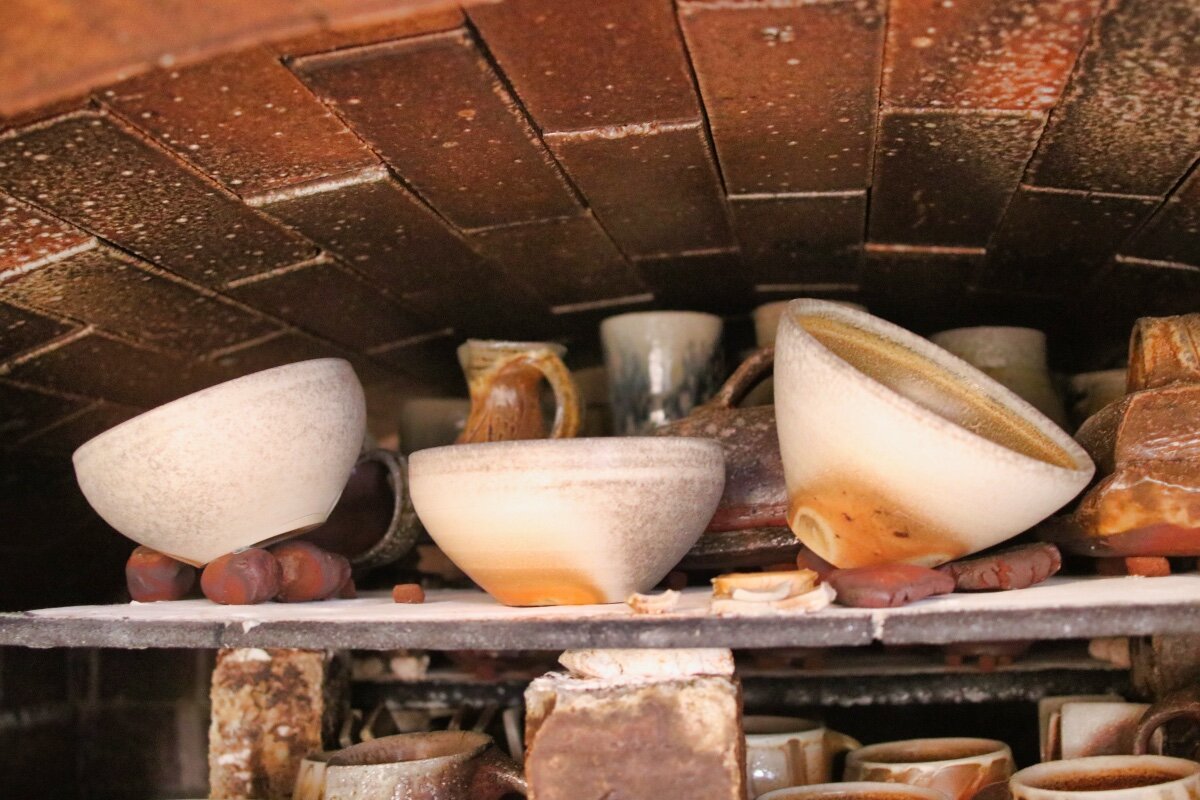
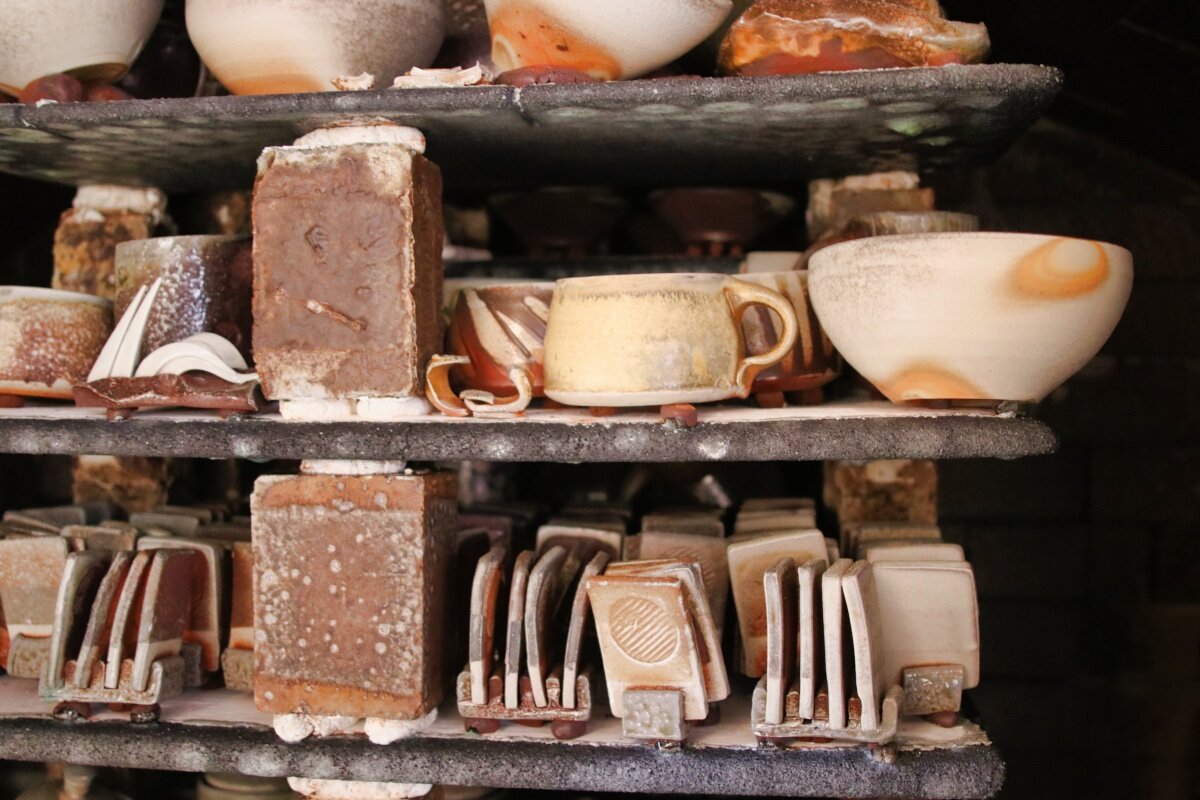
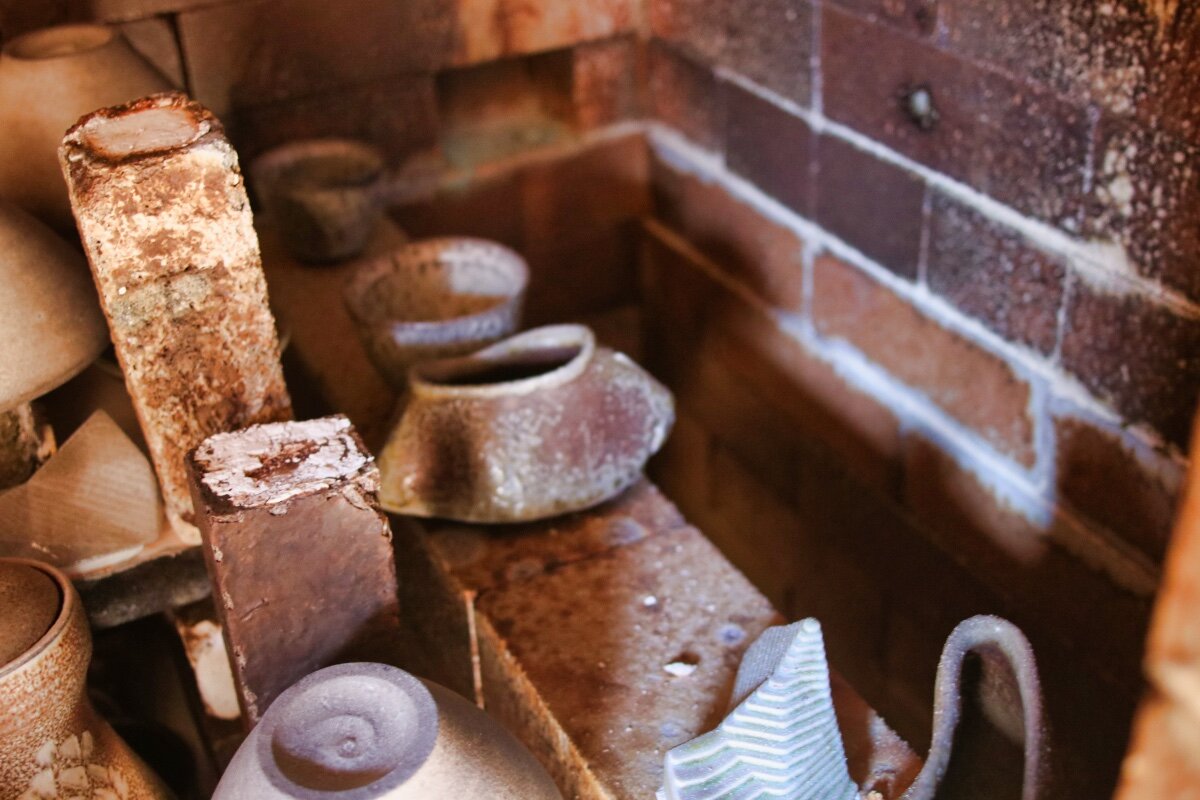
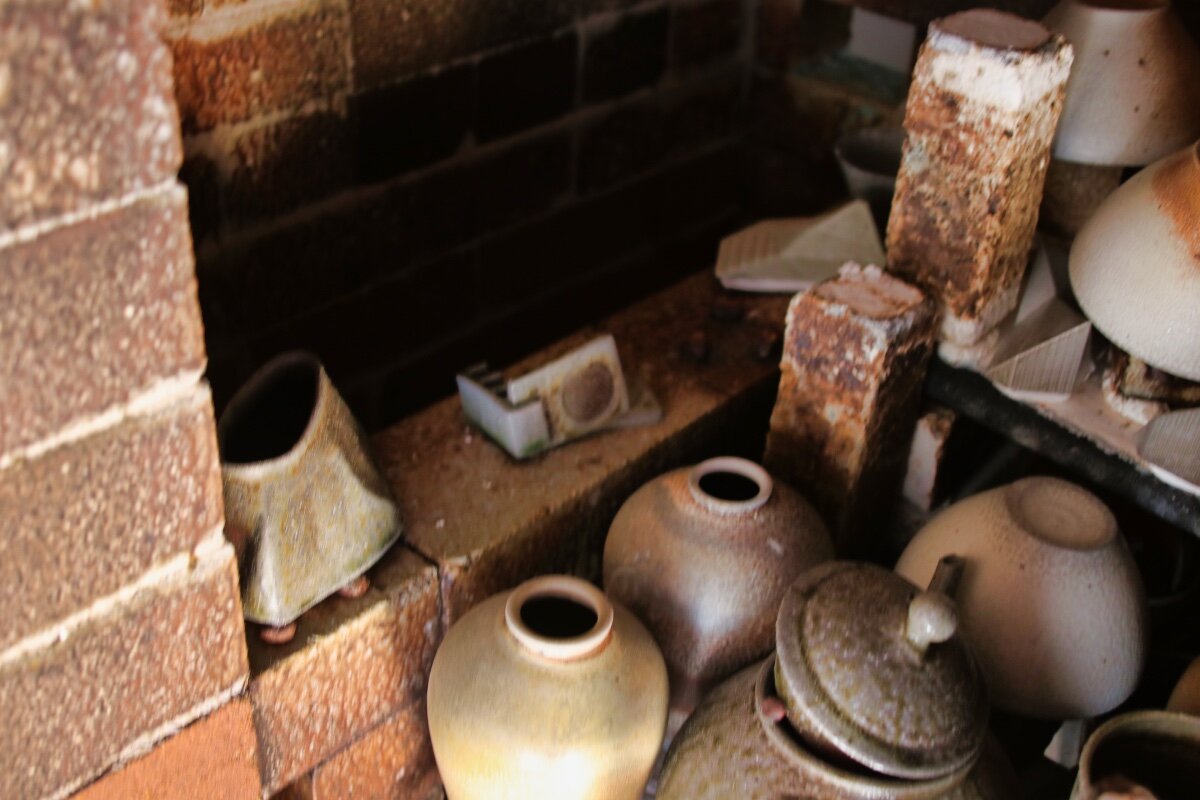
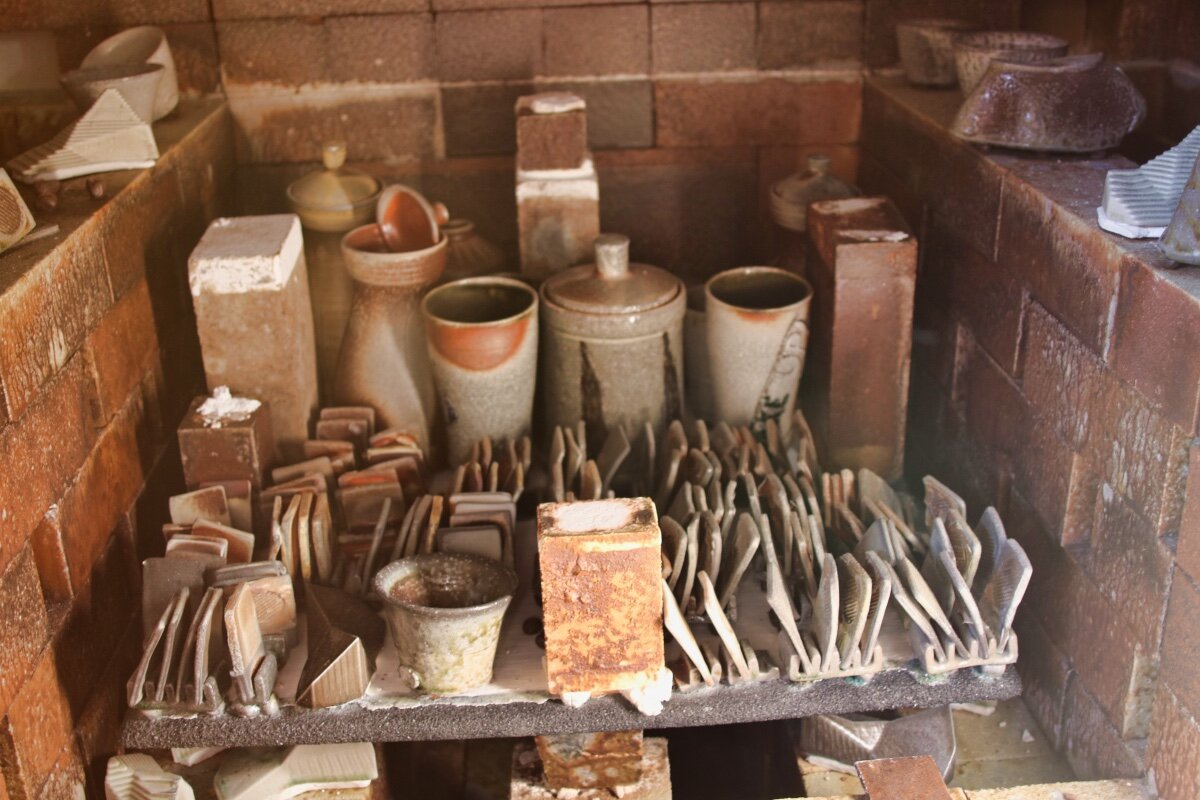
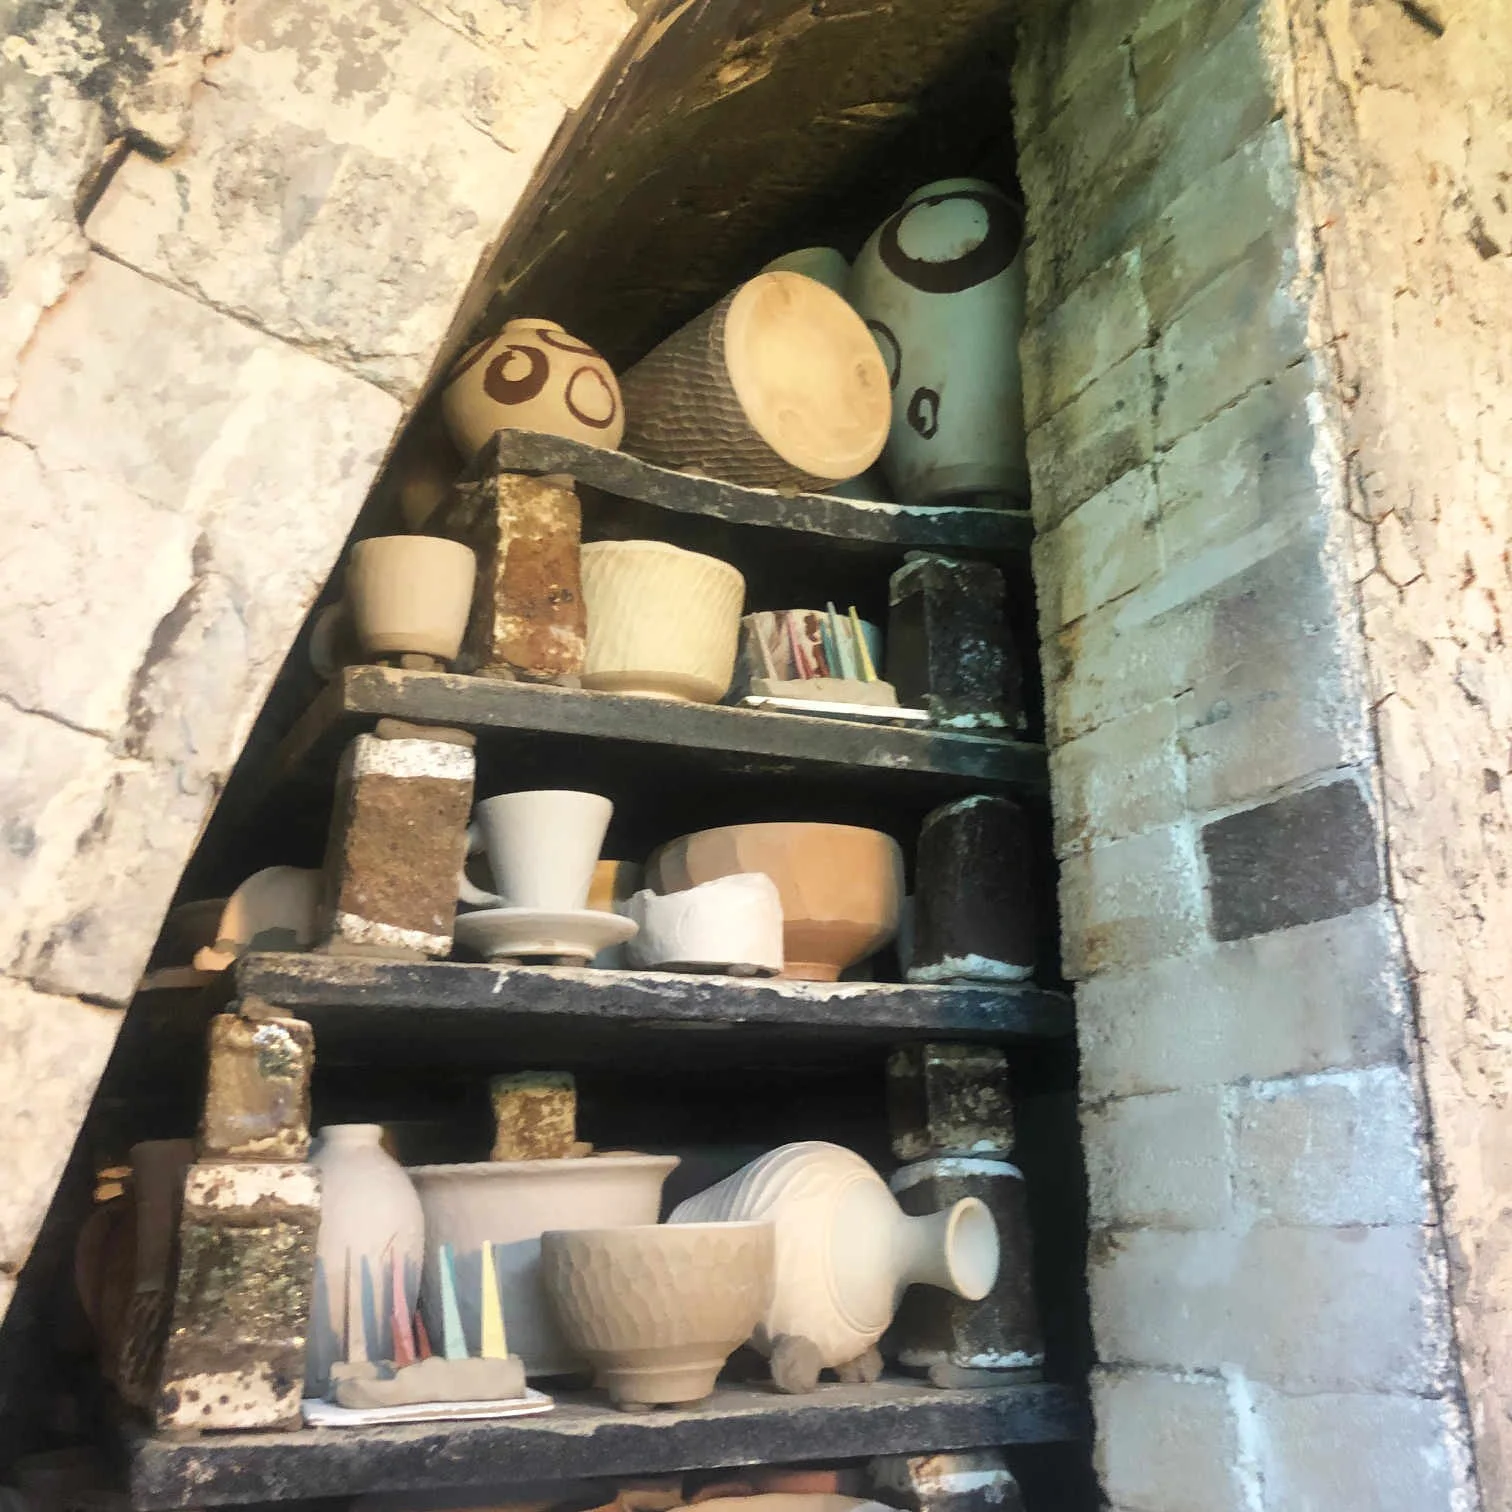
The kiln was not entirely full of test tiles. Below are some pics of the kiln as I unloaded it…
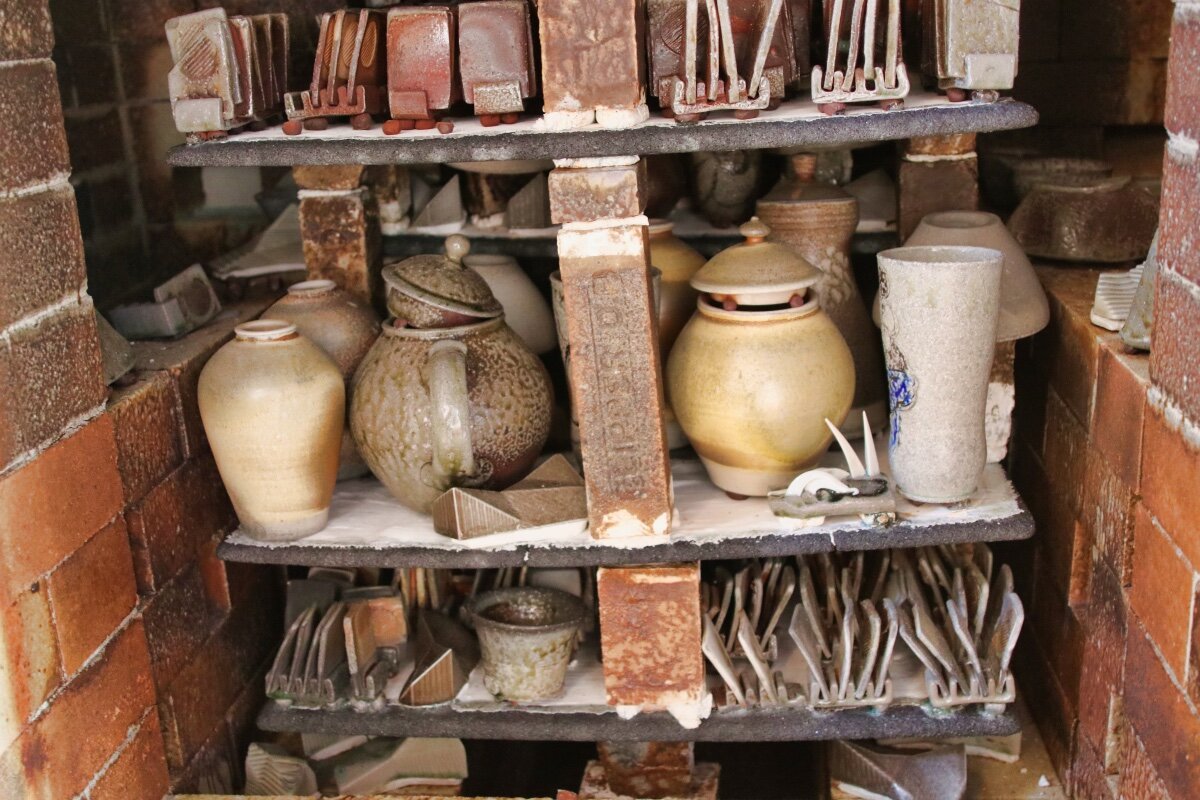
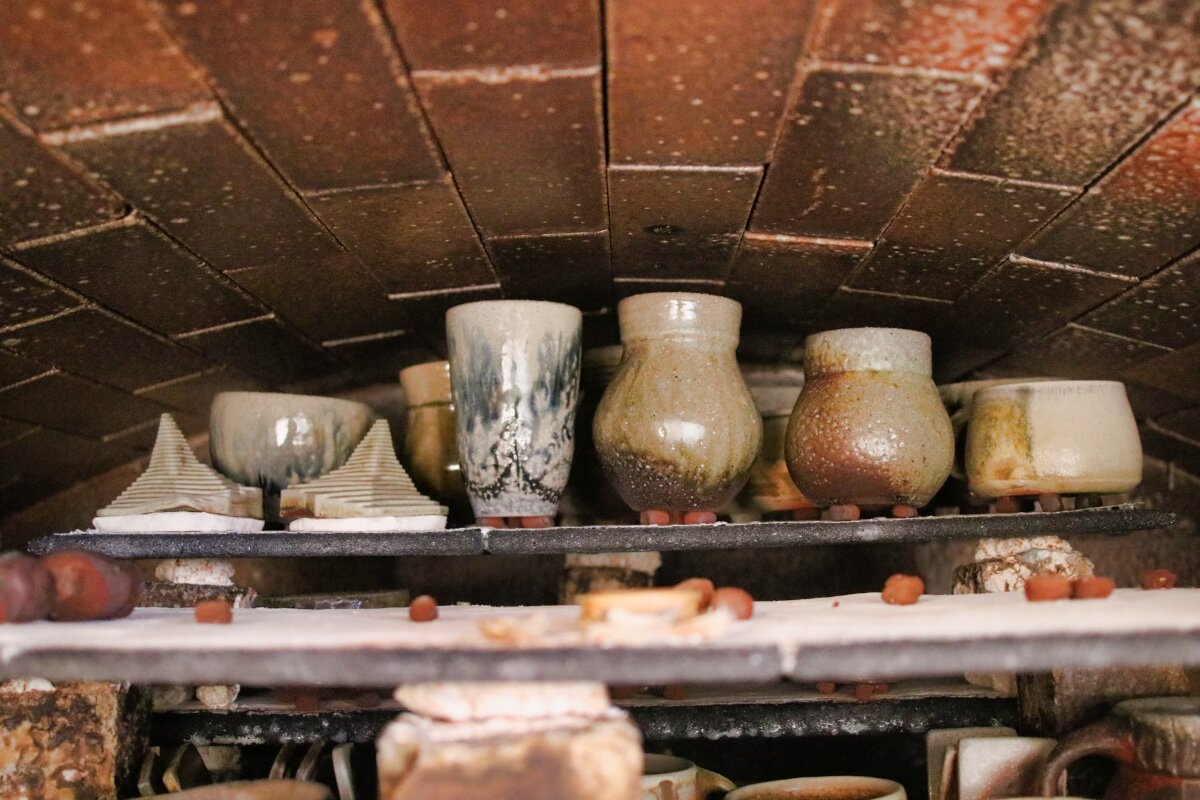

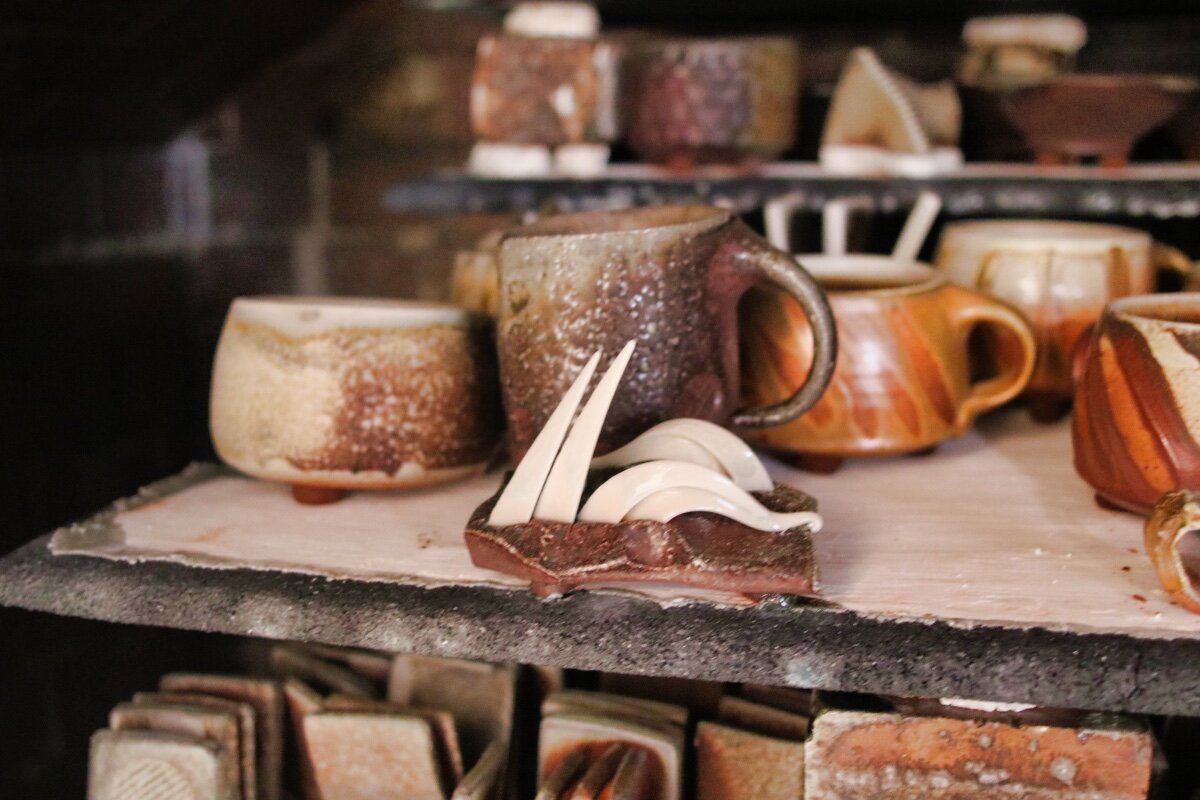
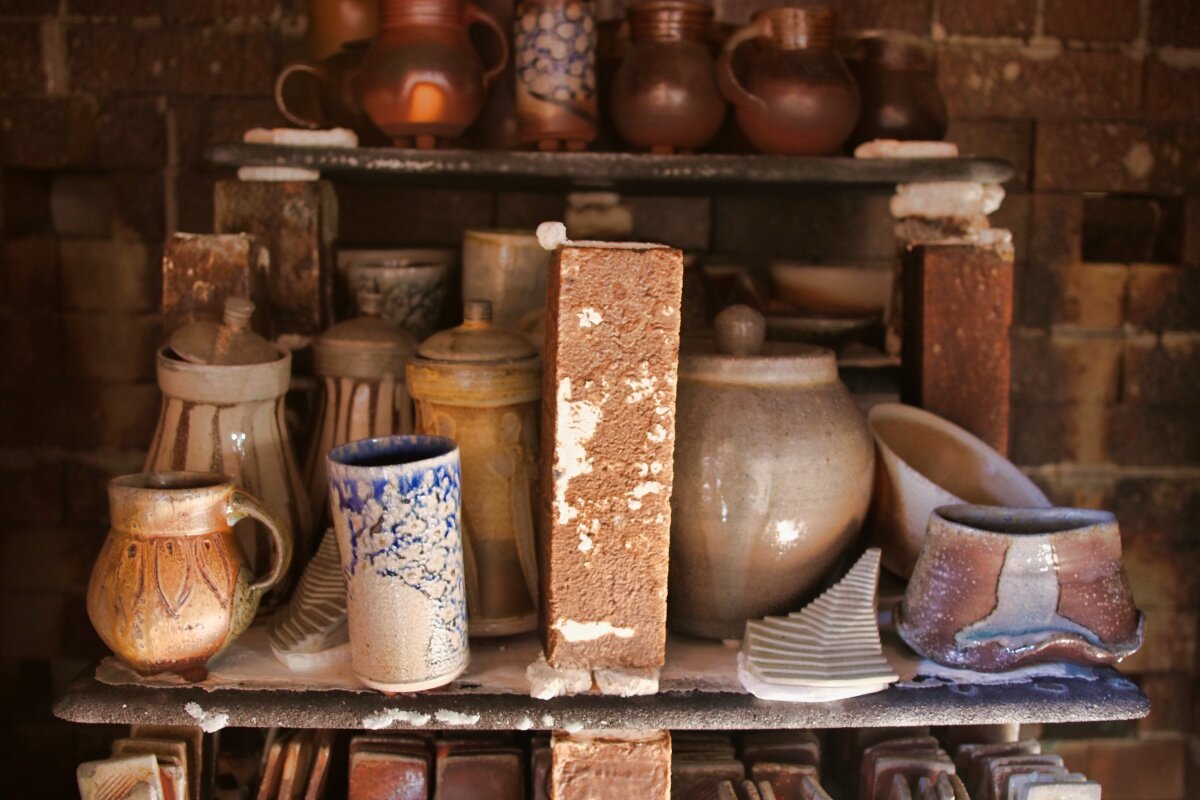
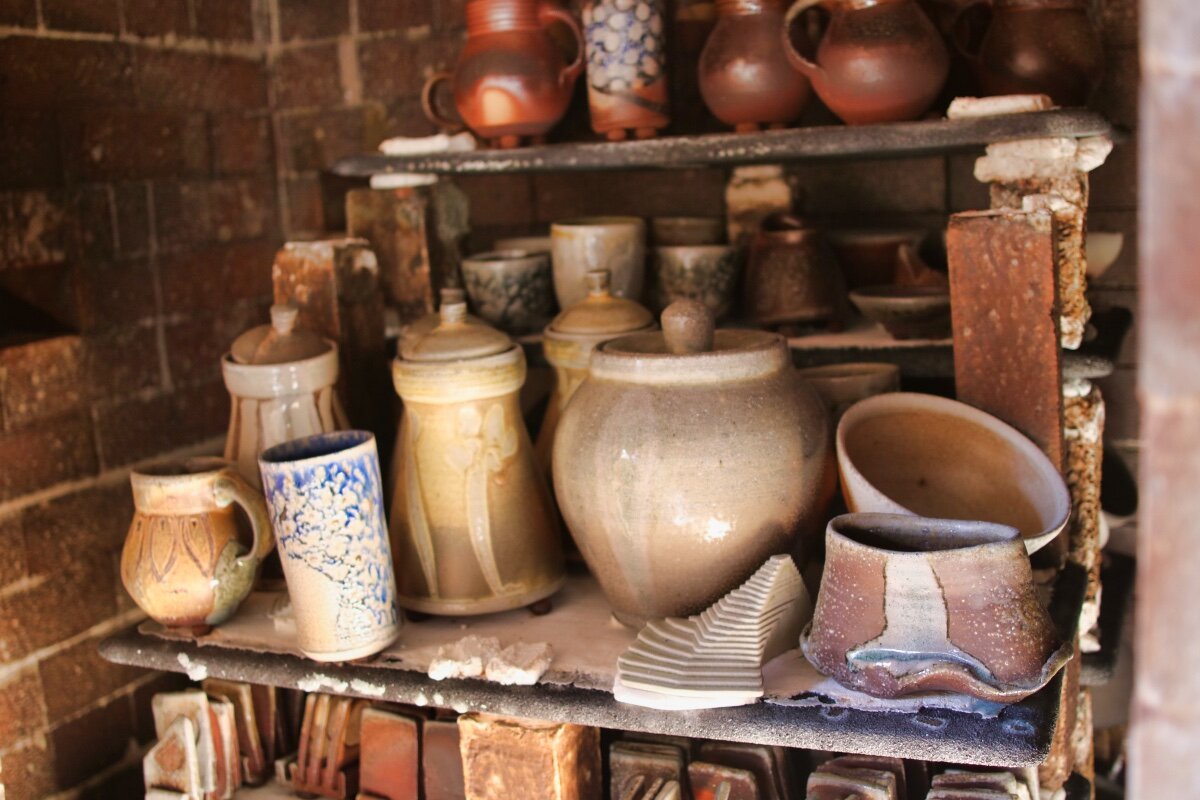
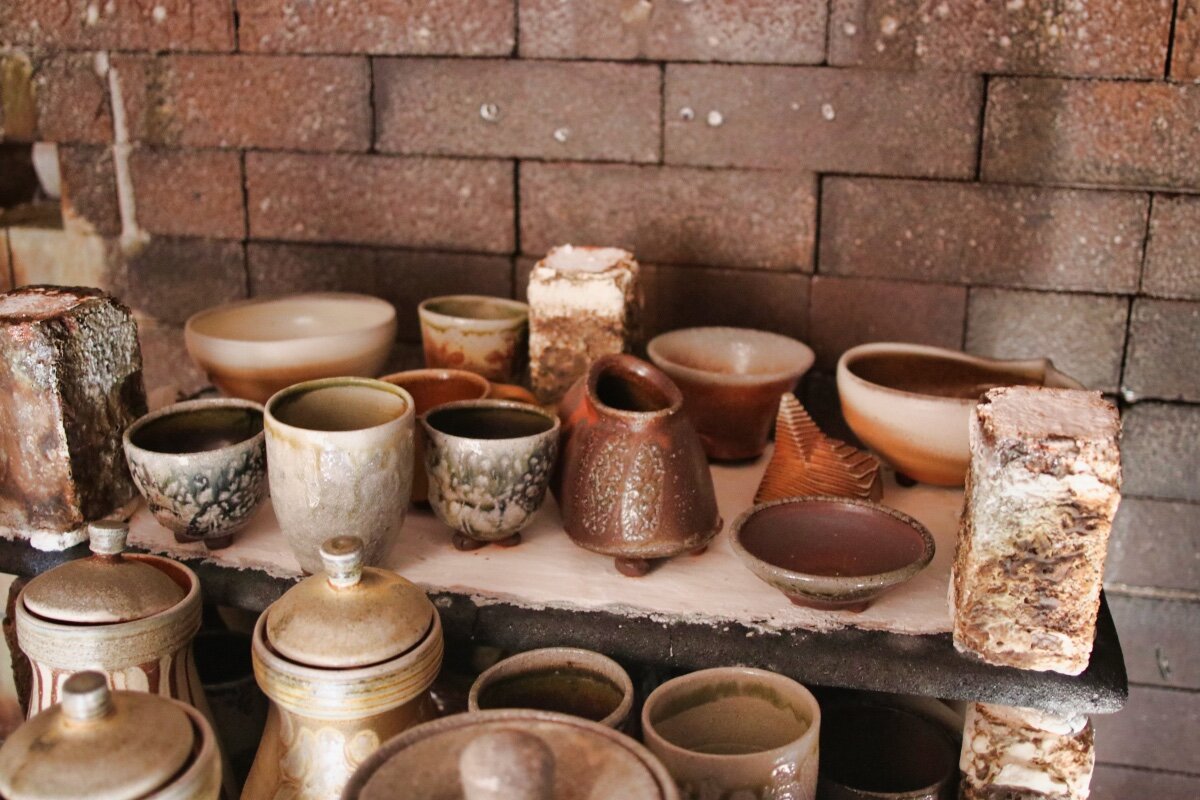
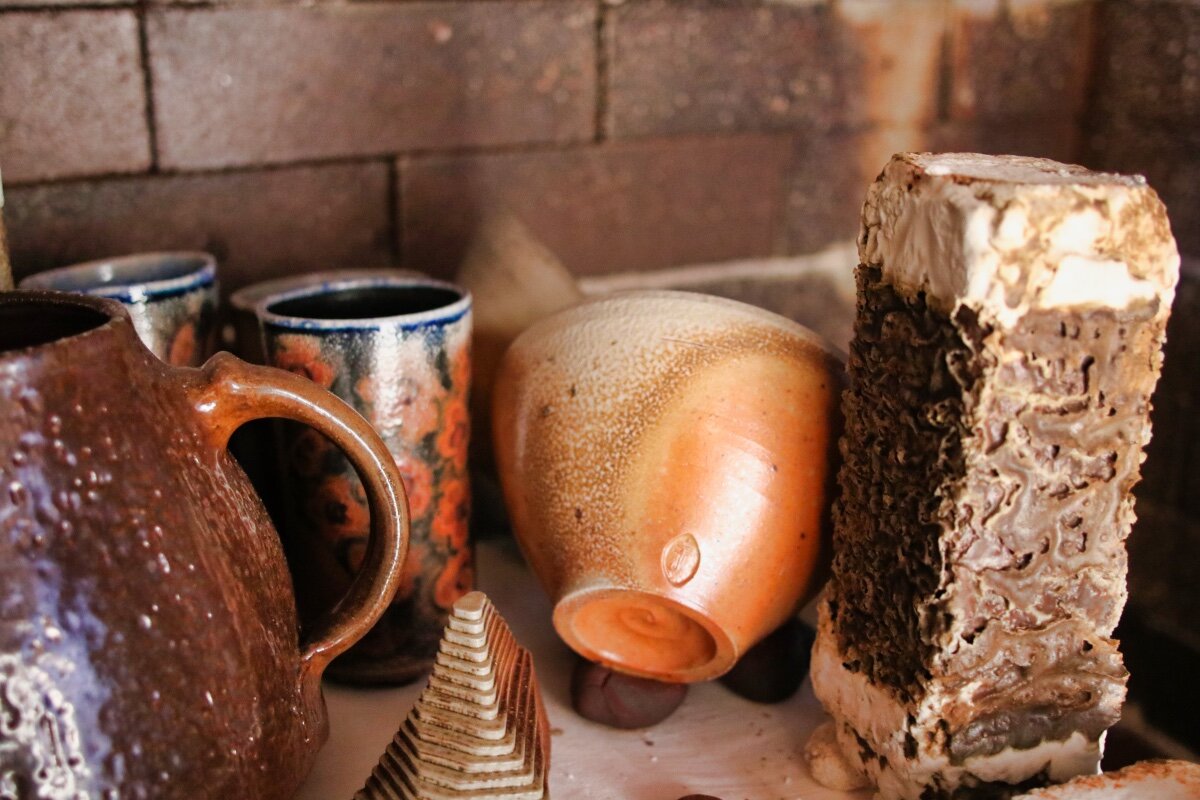
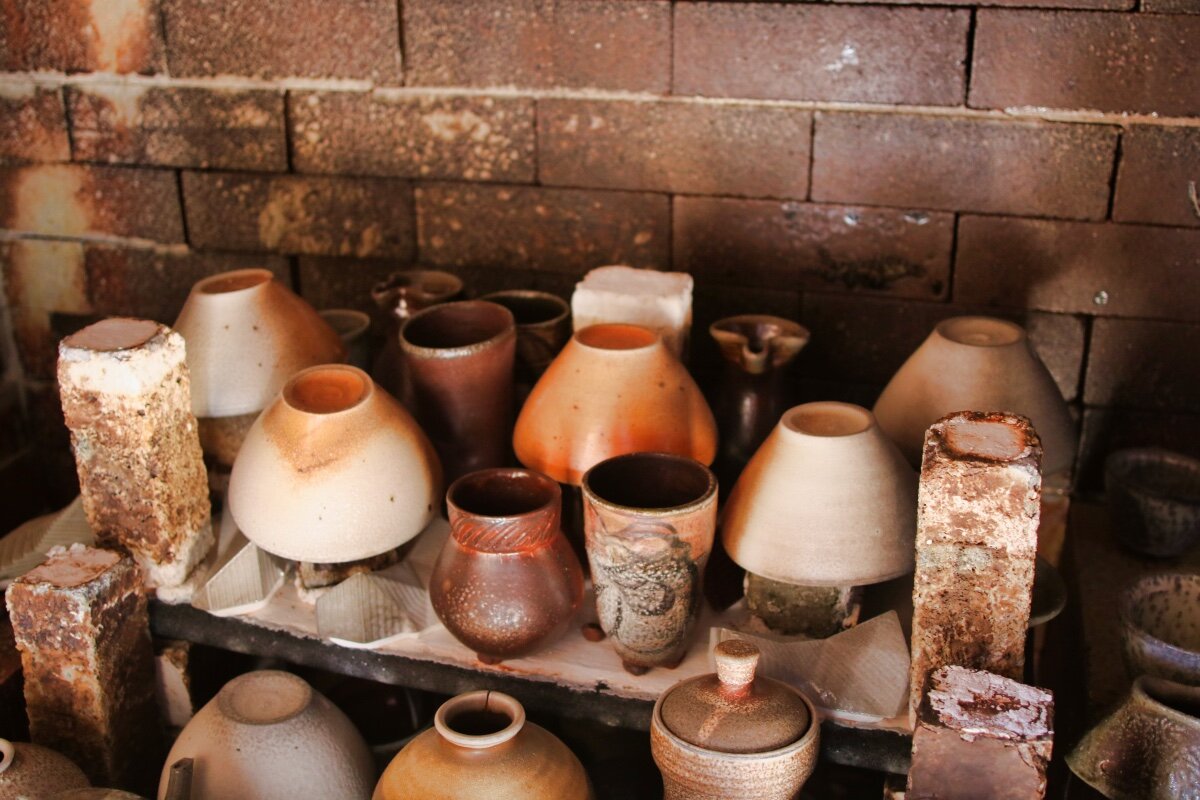
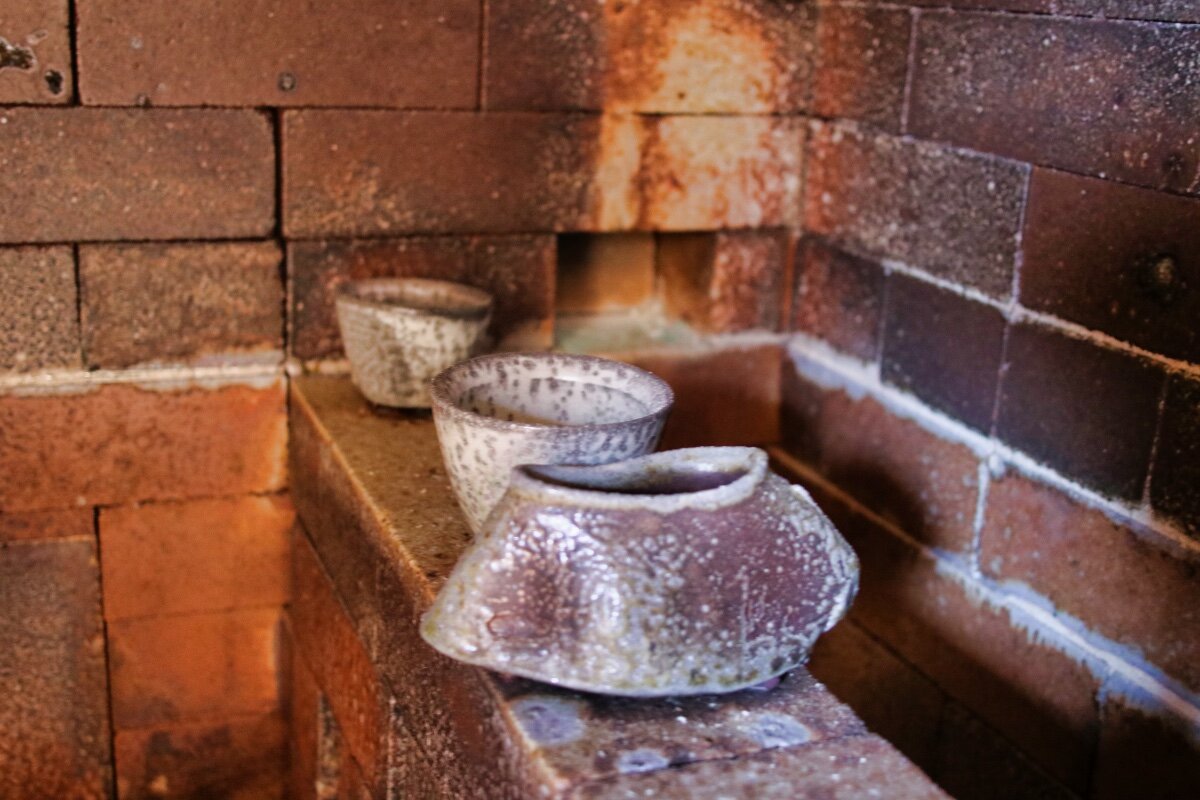
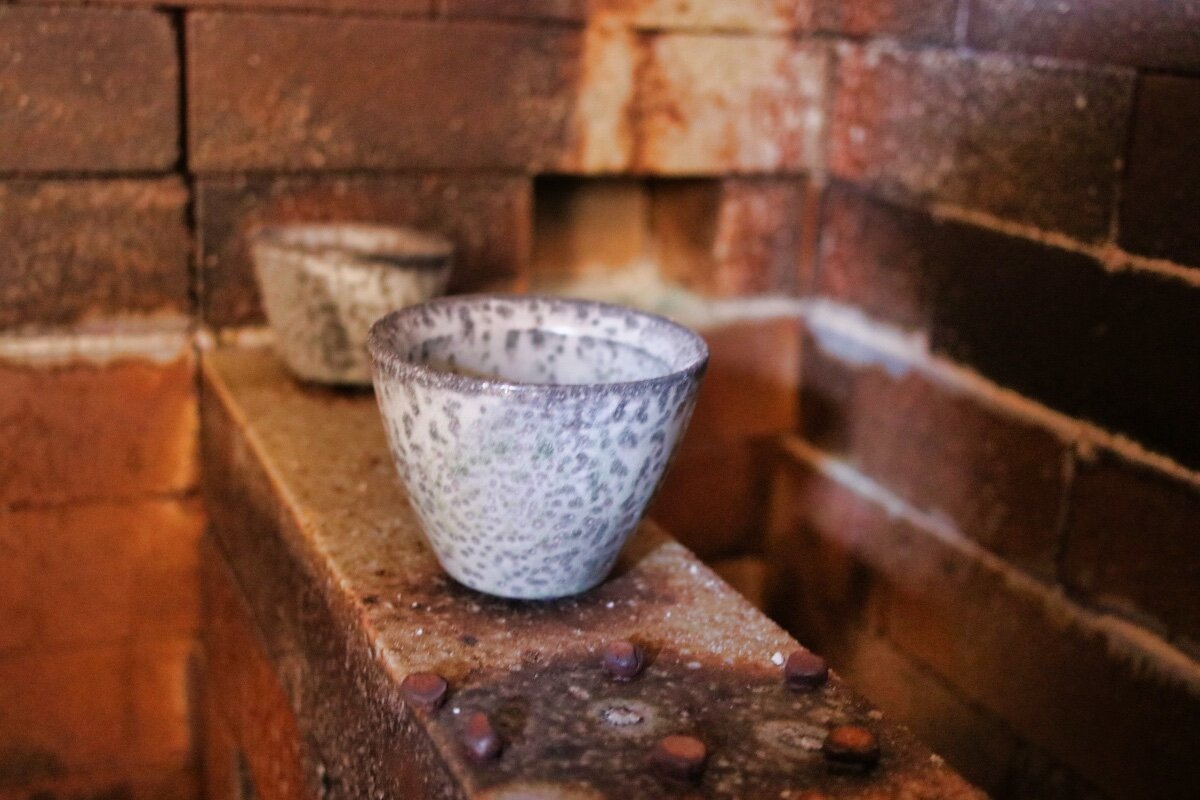
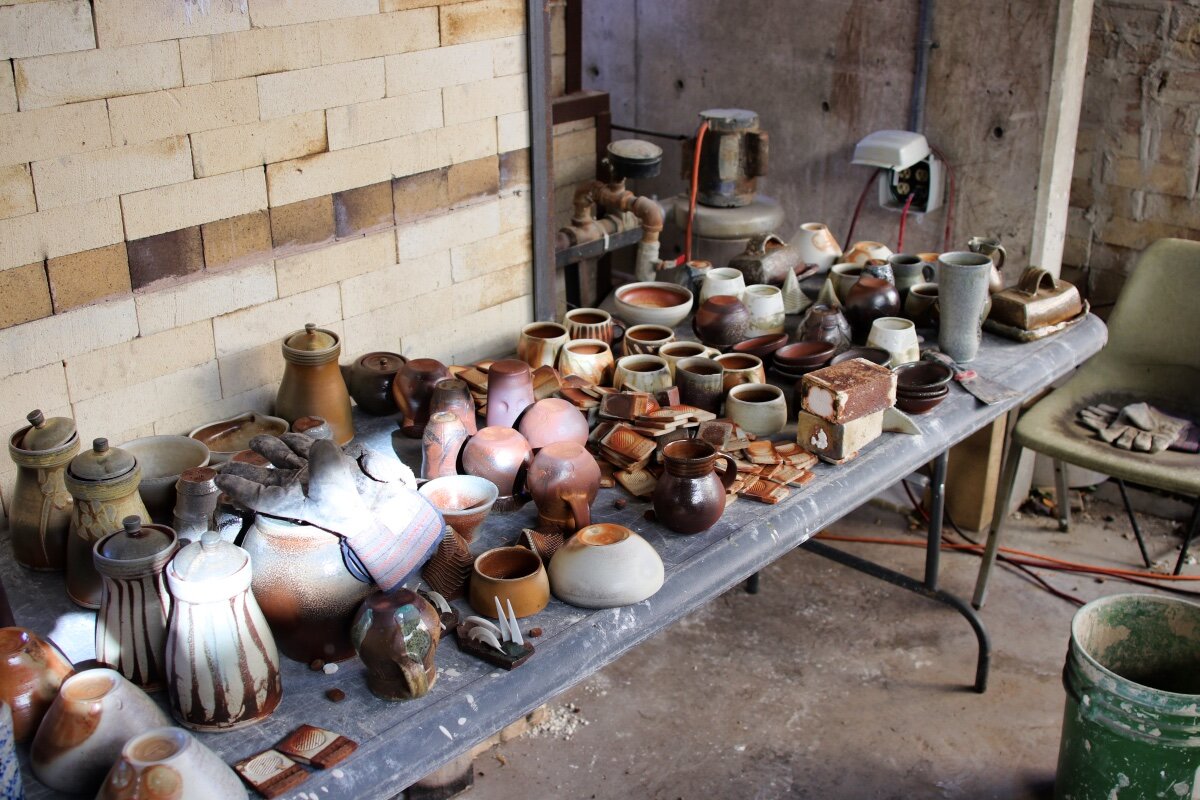
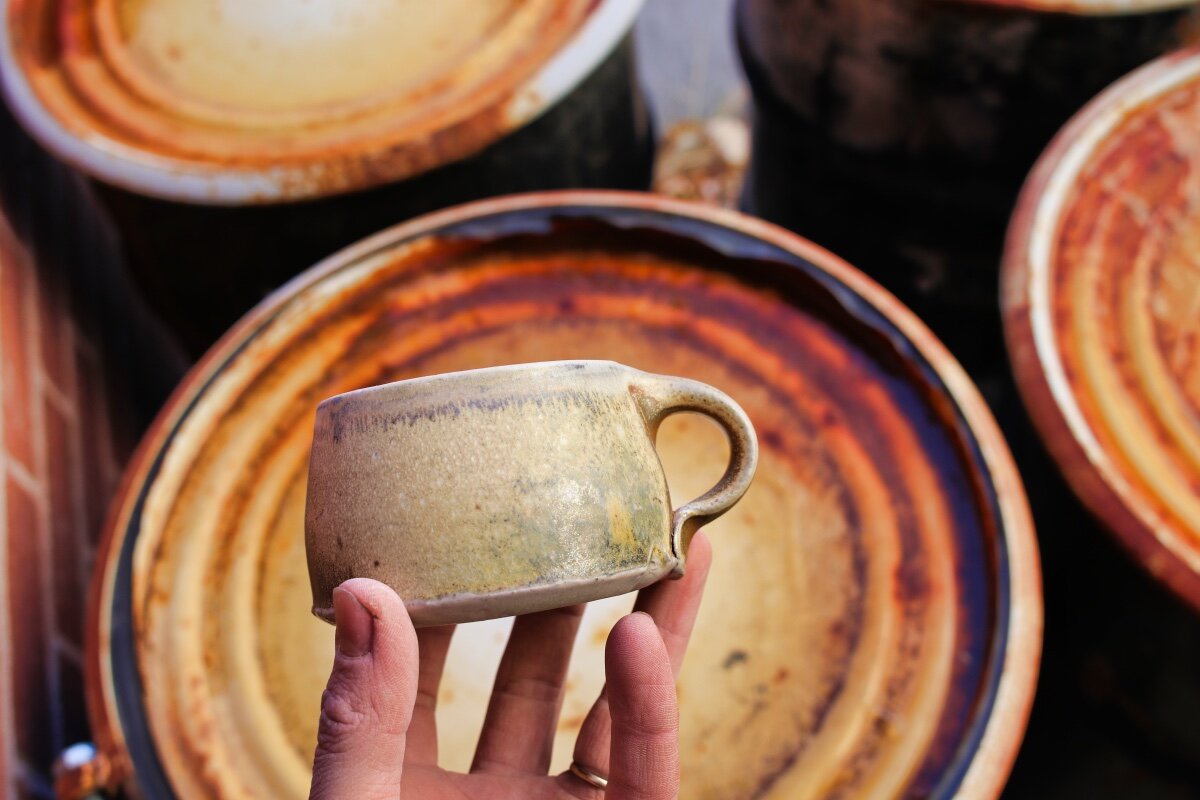
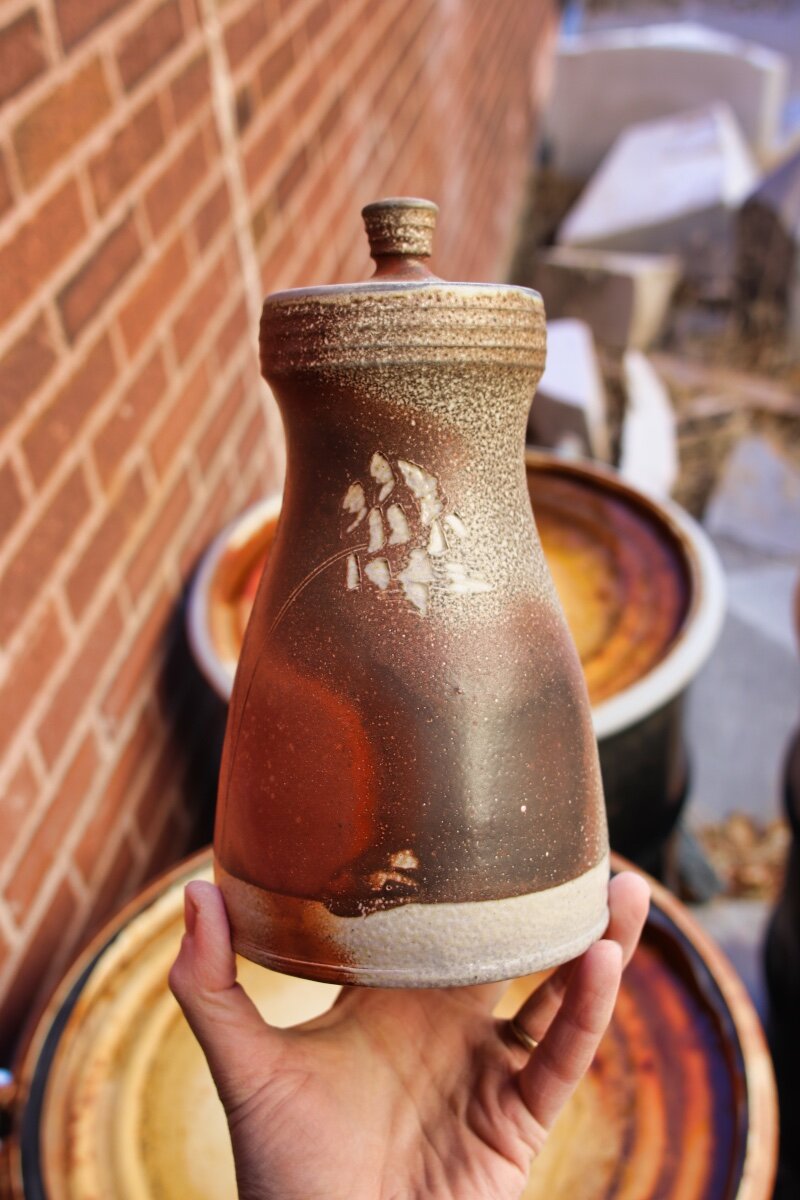
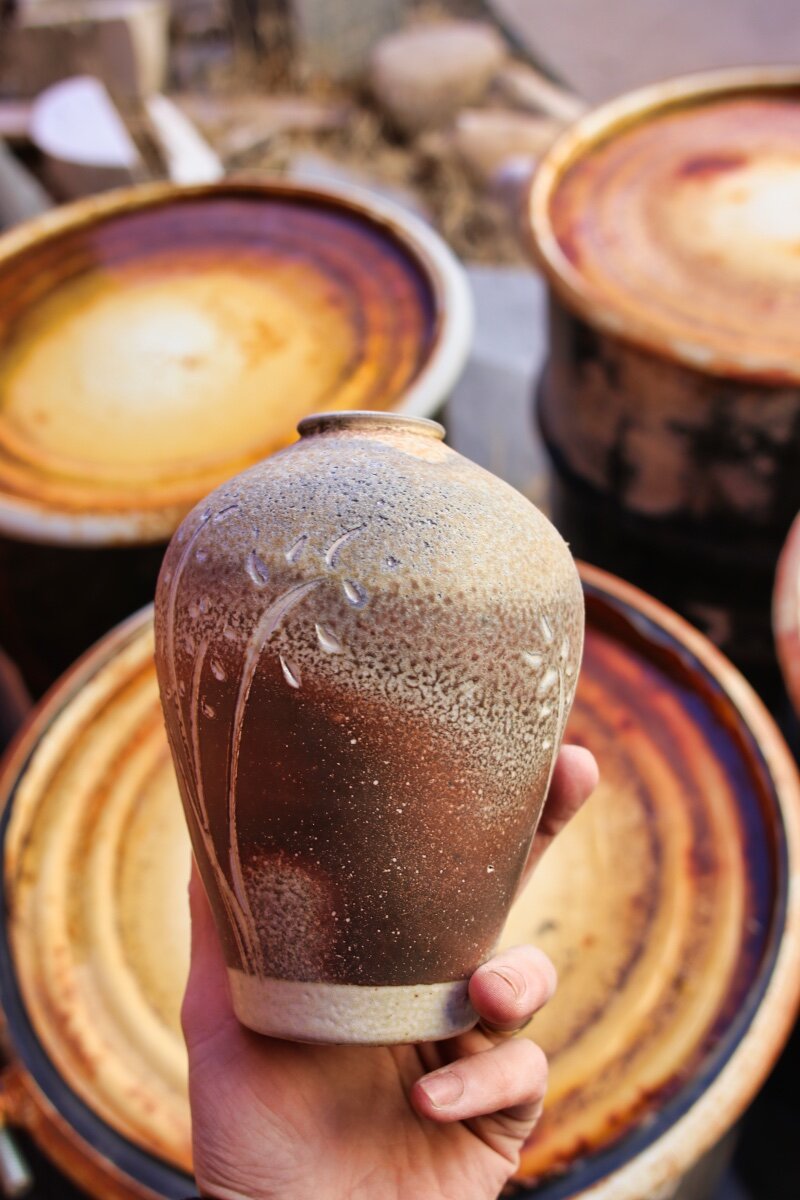
Here are a few pictures of pots that were dipped in a couple of different slips. You get a much better feel for what the slips might do seeing them on a form rather than a test tile.


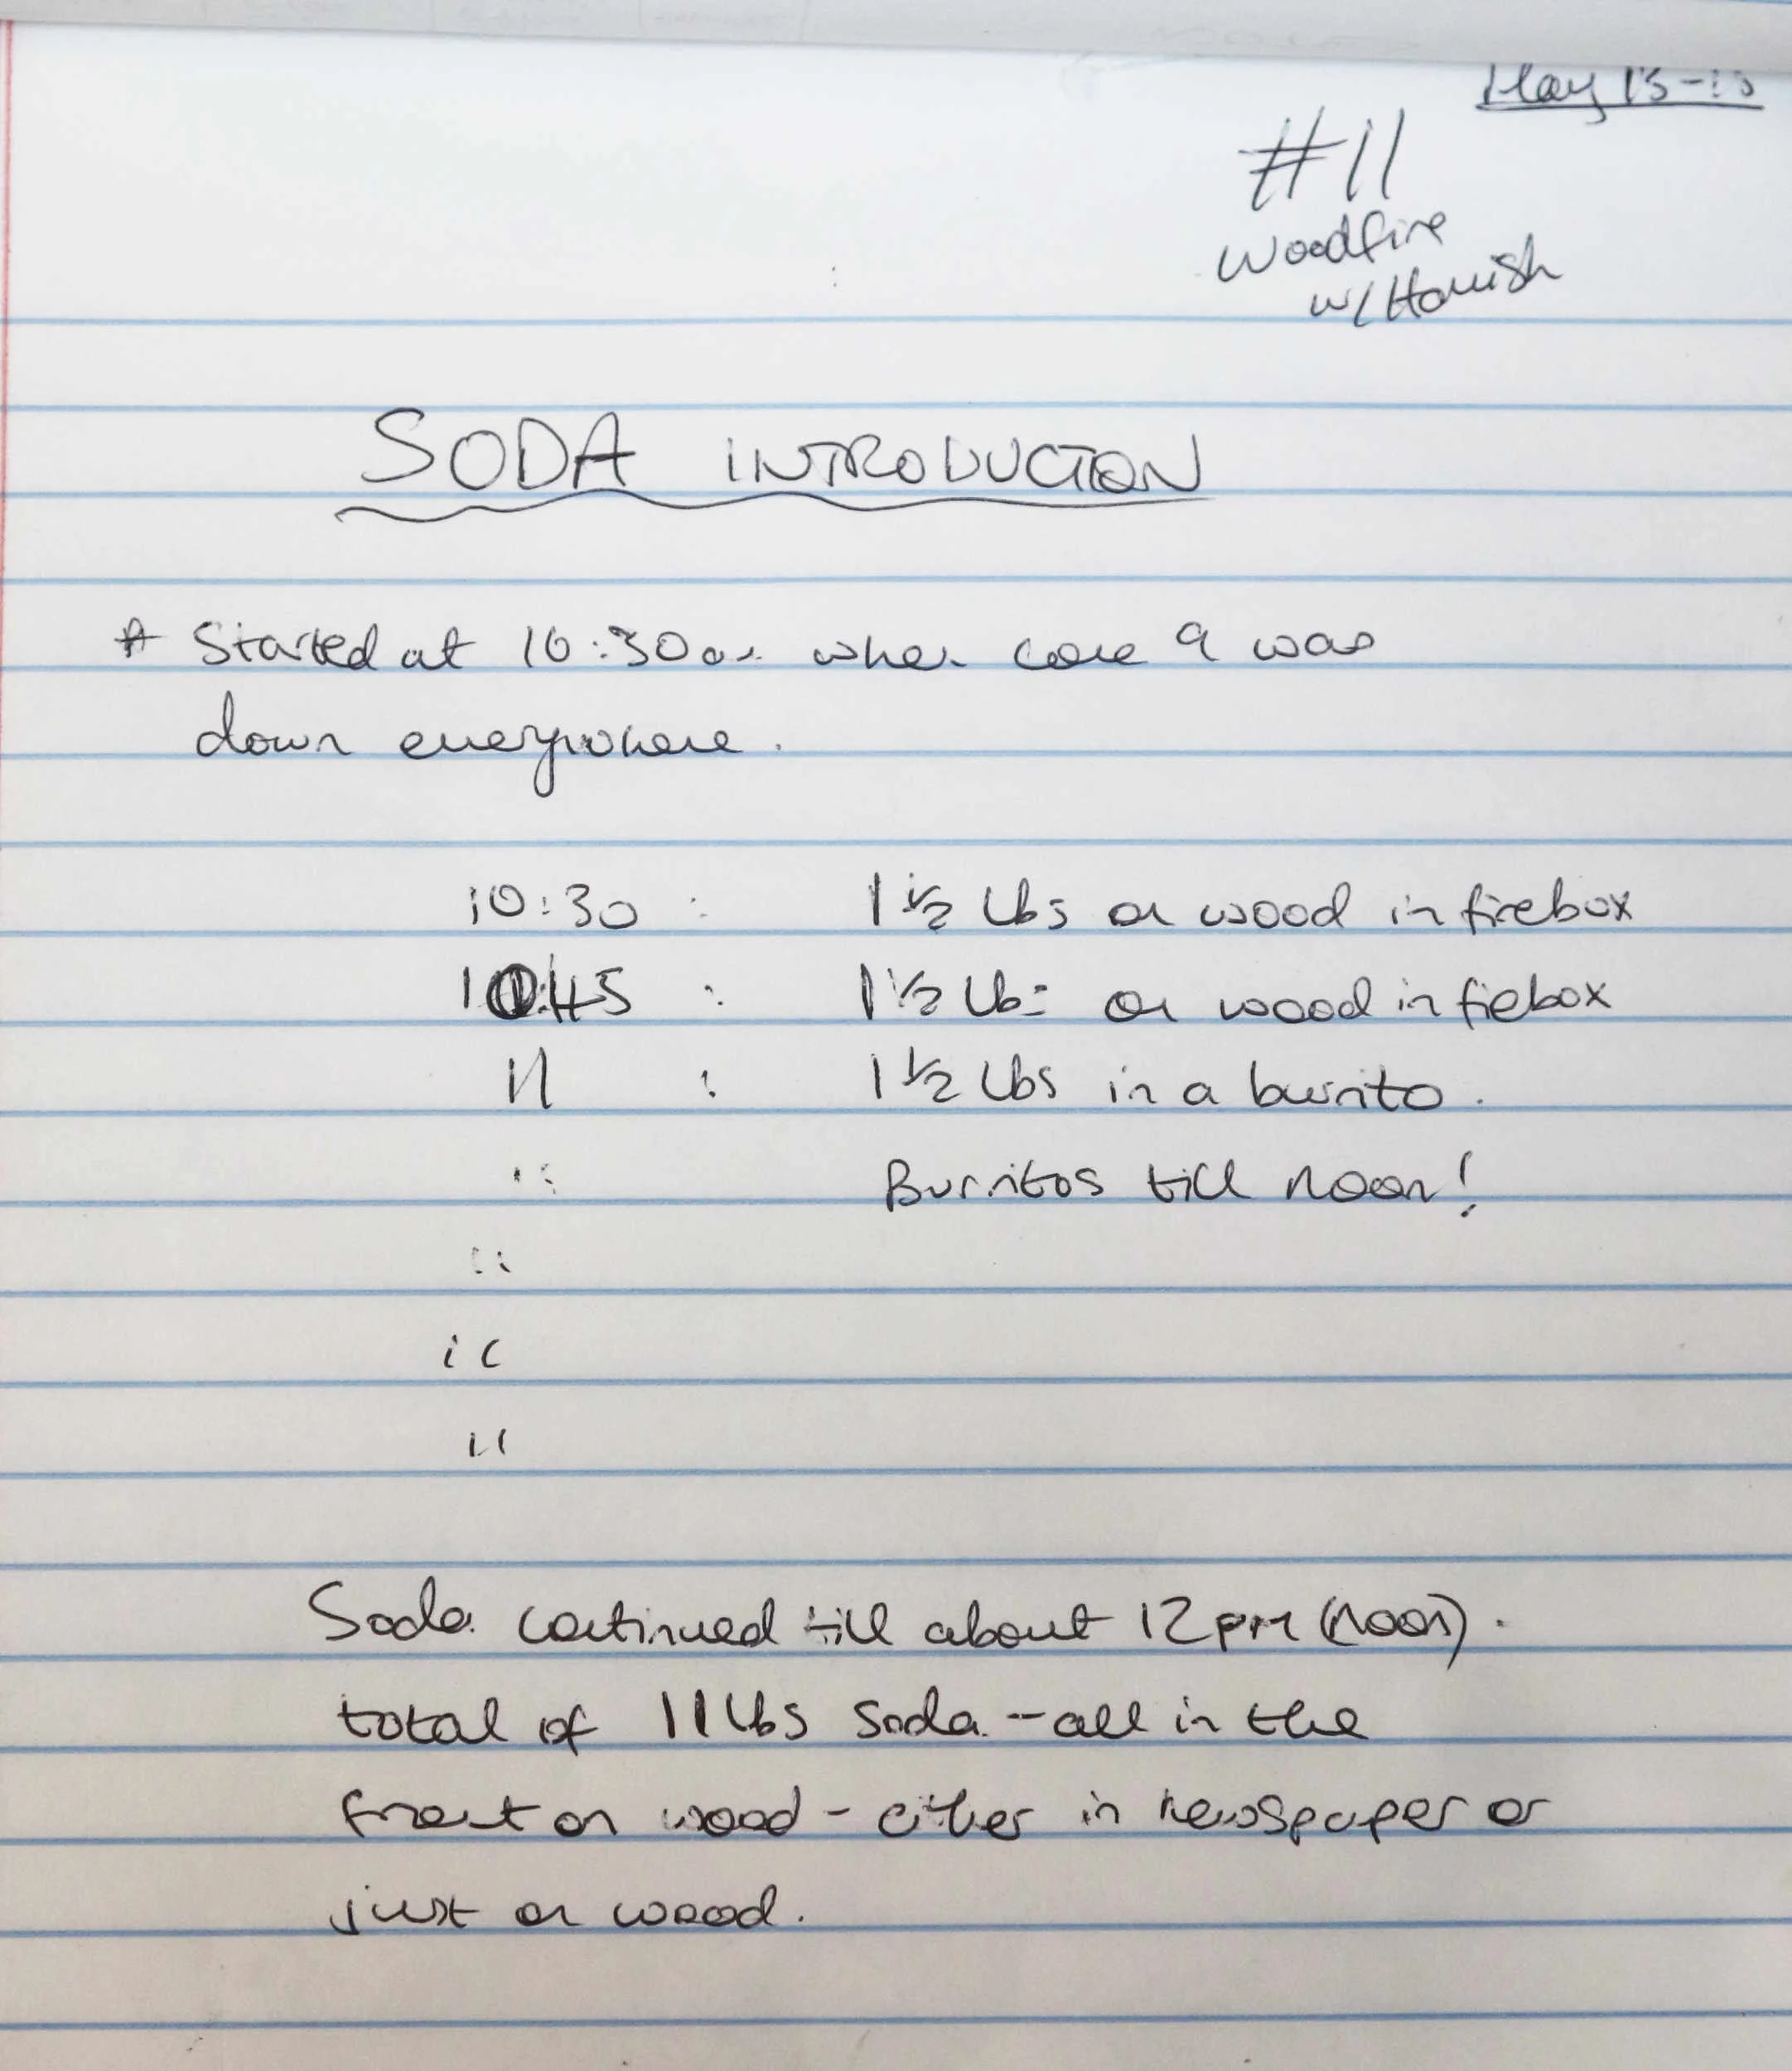
Finally, here’s the firing schedule and my initial notes from how it went (just in case I lose my notebook or someone burns it). I have summarized the notes below, so no need to zoom in and try and read my dodgy handwriting haha.


RESULTS/NOTES/CONCLUSIONS:
I will end with just some quick notes of the results:
Clay is of utmost importance. This was clearly shown by the test tiles. The iron rich clay was the most impacted by the reduction cooling (deep purples and reds). It was the least reactive/flashy, though. The porcelain flashed the brightest.
The white stoneware is definitely best for having slips applied over it. Many of them flaked off the porcelain and the stoneware is a white enough background to allow bright colorful slip action.
The porcelain on its own without a slip could be beautiful. Some of my favorite results were simply the plain porcelain clay ice cream and cereal bowls…


Brighter color where less soda: Heavy soda tends towards light or dark grey.
Neph sye brightens colors and flashes well. As you increase the quantity of it in a slip it fluxes it more and the flashing lines get more blurry'/less defined (above 35%).
Talc might be an interesting addition to a clay body: For color response and resist the soda.
PACK THE KILN BETTER! Try to use less shelves and stagger the pots on each shelf to allow soda to travel around more easily.
Placing pots very close together produced flashing, but you have to let the flame and soda get there.
Not sure how much of an effect the reduction cool had. Also not sure how much the wet wood that I introduced (water) affected the results.
Used 10lbs soda, all sprayed in to the fireboxes. The middle of the kiln was pretty dry, the top and bottom got a good bit of soda.
* * *
Thanks for reading. Especially if you got all the way this far reading it all! Happy Holidays to you and yours! I’ll be posting about my #2 SODA FIRING in the next day or so.
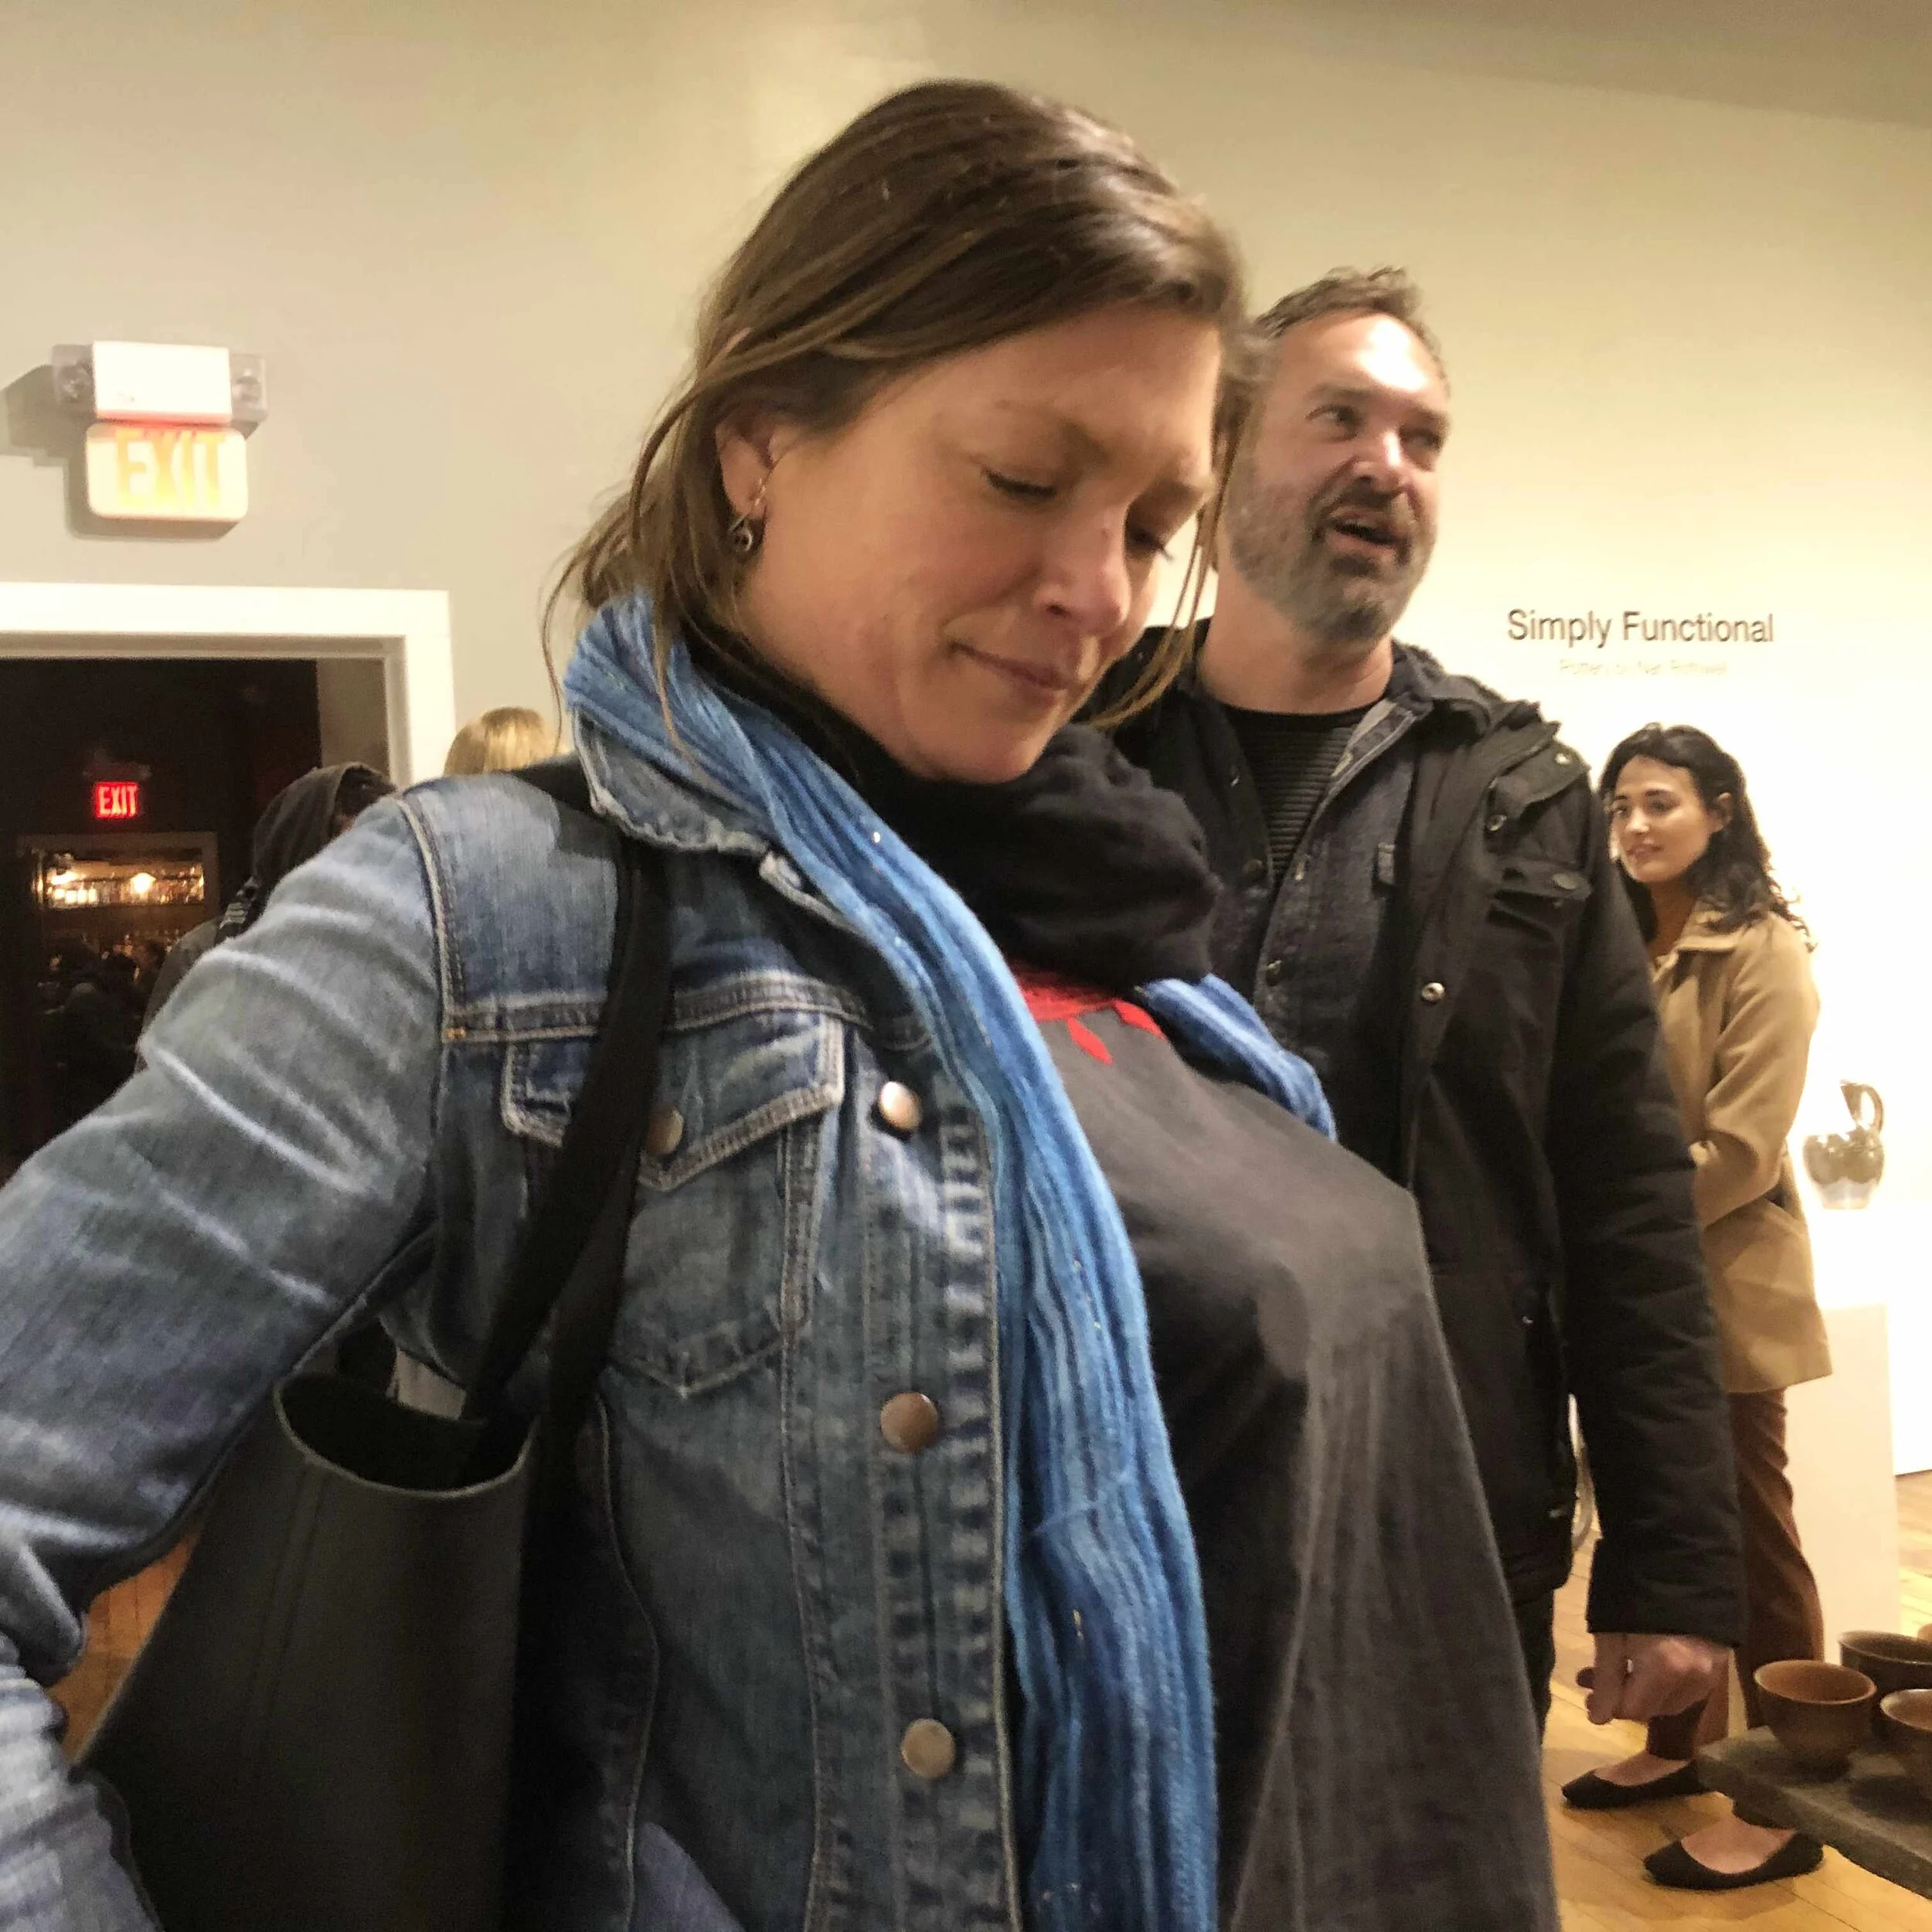
Opening Reception of the Juried Functional Teapot Show, Black Iris Gallery, Richmond 2020
I wanted to share a few of the photos from the opening reception, before the gallery closed (rightly so) due to the coronavirus pandemic.

The writing on the wall…


One lady came in with extremely cold hands. Tea was the perfect solution! She also may have put two teacups up her top…


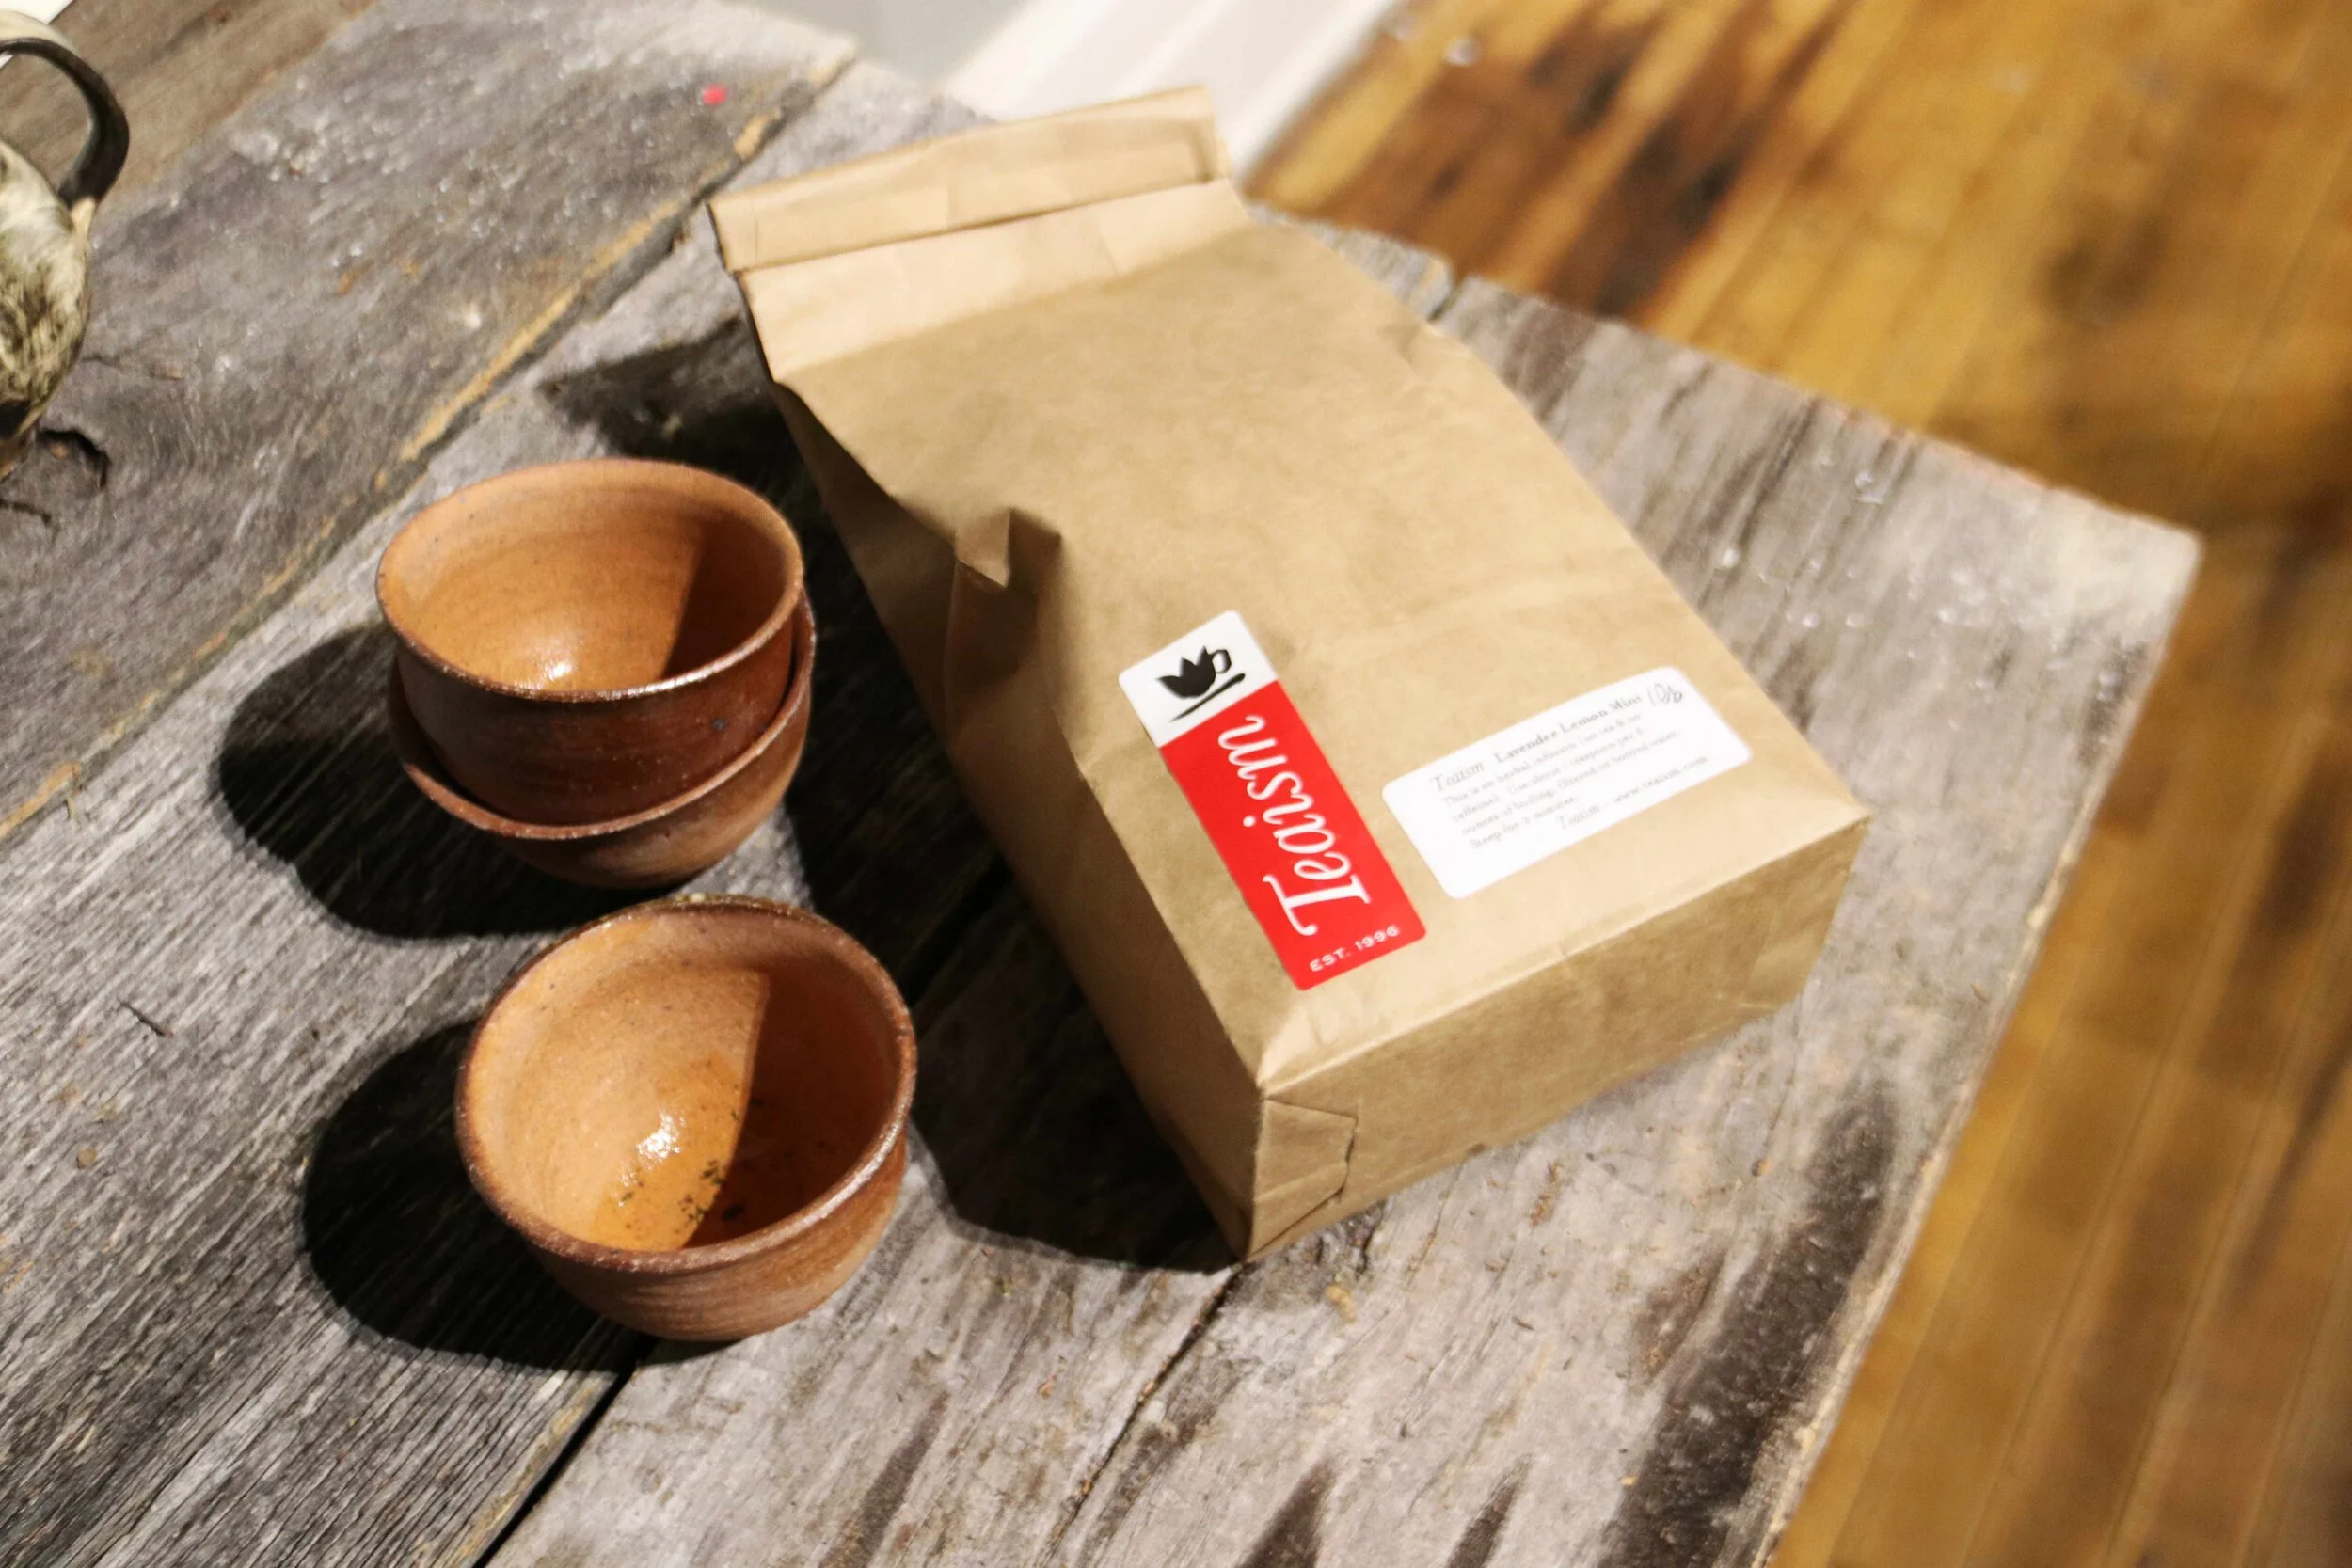
I had surveys/questionnaires out for people to fill out which teapots they liked the look of the most and which they thought would be the best functionality-wise. The completed surveys went in a beautiful pot made by Chad Brown (a 3rd generation Seagrove potter). Chad also kindly let me take the wood used for the shelves and tables from his grandad’s old barn that had recently fallen down.


We drank some glorious tea courtesy of our sponsor Teaism, a wonderful tea shop in Washington, DC. That night we drank mostly a lavender and mint blend that they make. Everyone thought it was delicious. I even turned some ardent non-tea-drinkers on to it.


Here are some more pics of the wood-fired teacups I made and the writing on the wall about them…


Here’s one final picture. This guy was great!

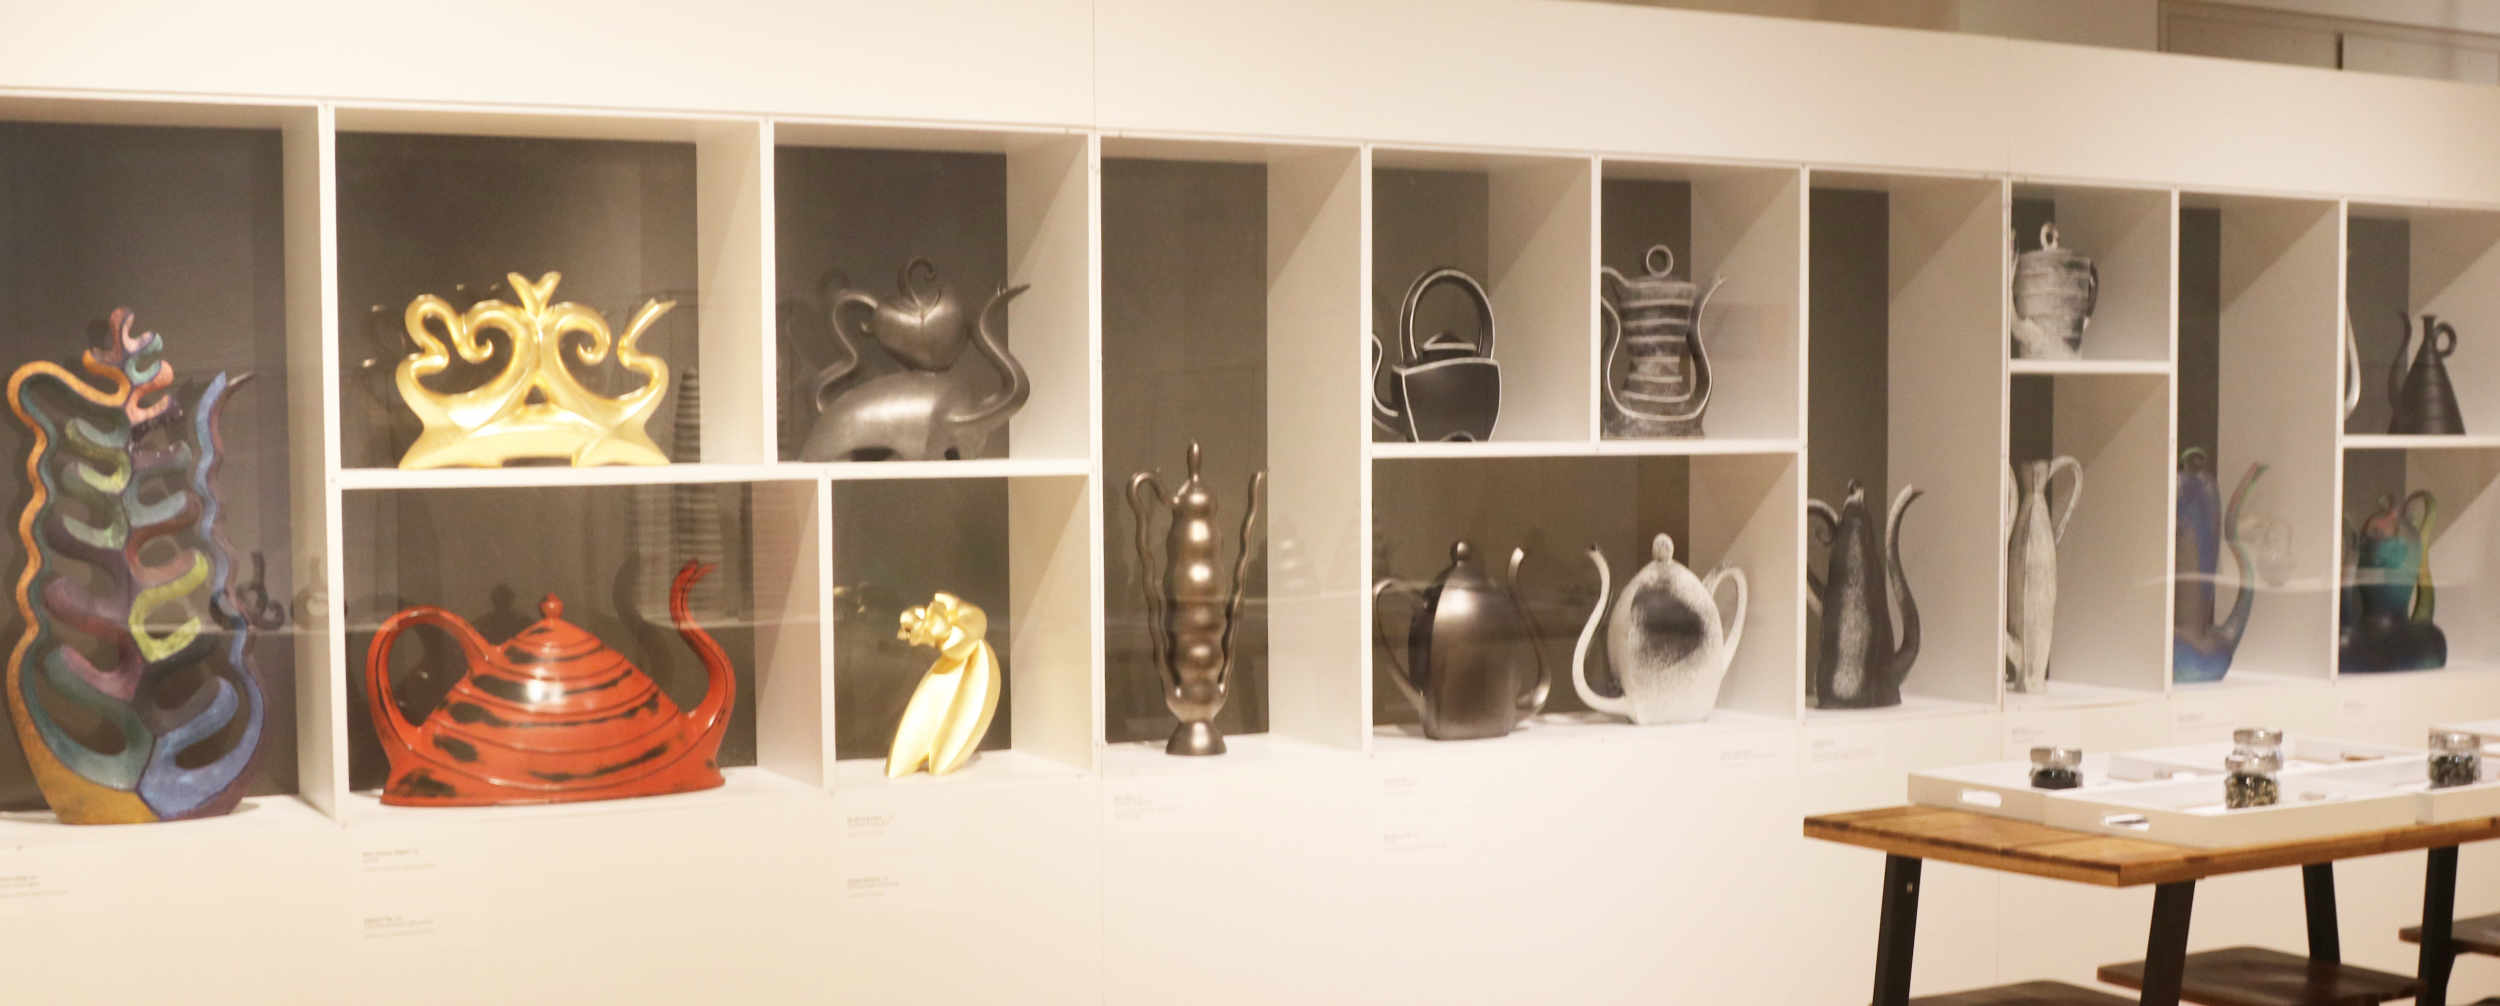
The Teapots of the Inaugural Juried Functional Teapot Show
Before the Corona Virus really took hold I was able to set up the teapot show and have it on display for a couple of weeks. Here’s the pots as they sat in the gallery.


Thanks for taking a look! I plan on bringing the Juried Functional Teapot Show back next year with all new teapots… it will be up in Cincinnati Ohio next March NCECA 2021, so hope to see some of you there!
The Inaugural Juried Functional Teapot Show, Richmond, March 2020.
Here’s a short video showing how the exhibition looked. Unfortunately the show was only up for a couple of weeks as the Black Iris Gallery closed due to the Corona virus. It is a shame not more folks could come and see the show but I am endeavoring to bring it to life online!
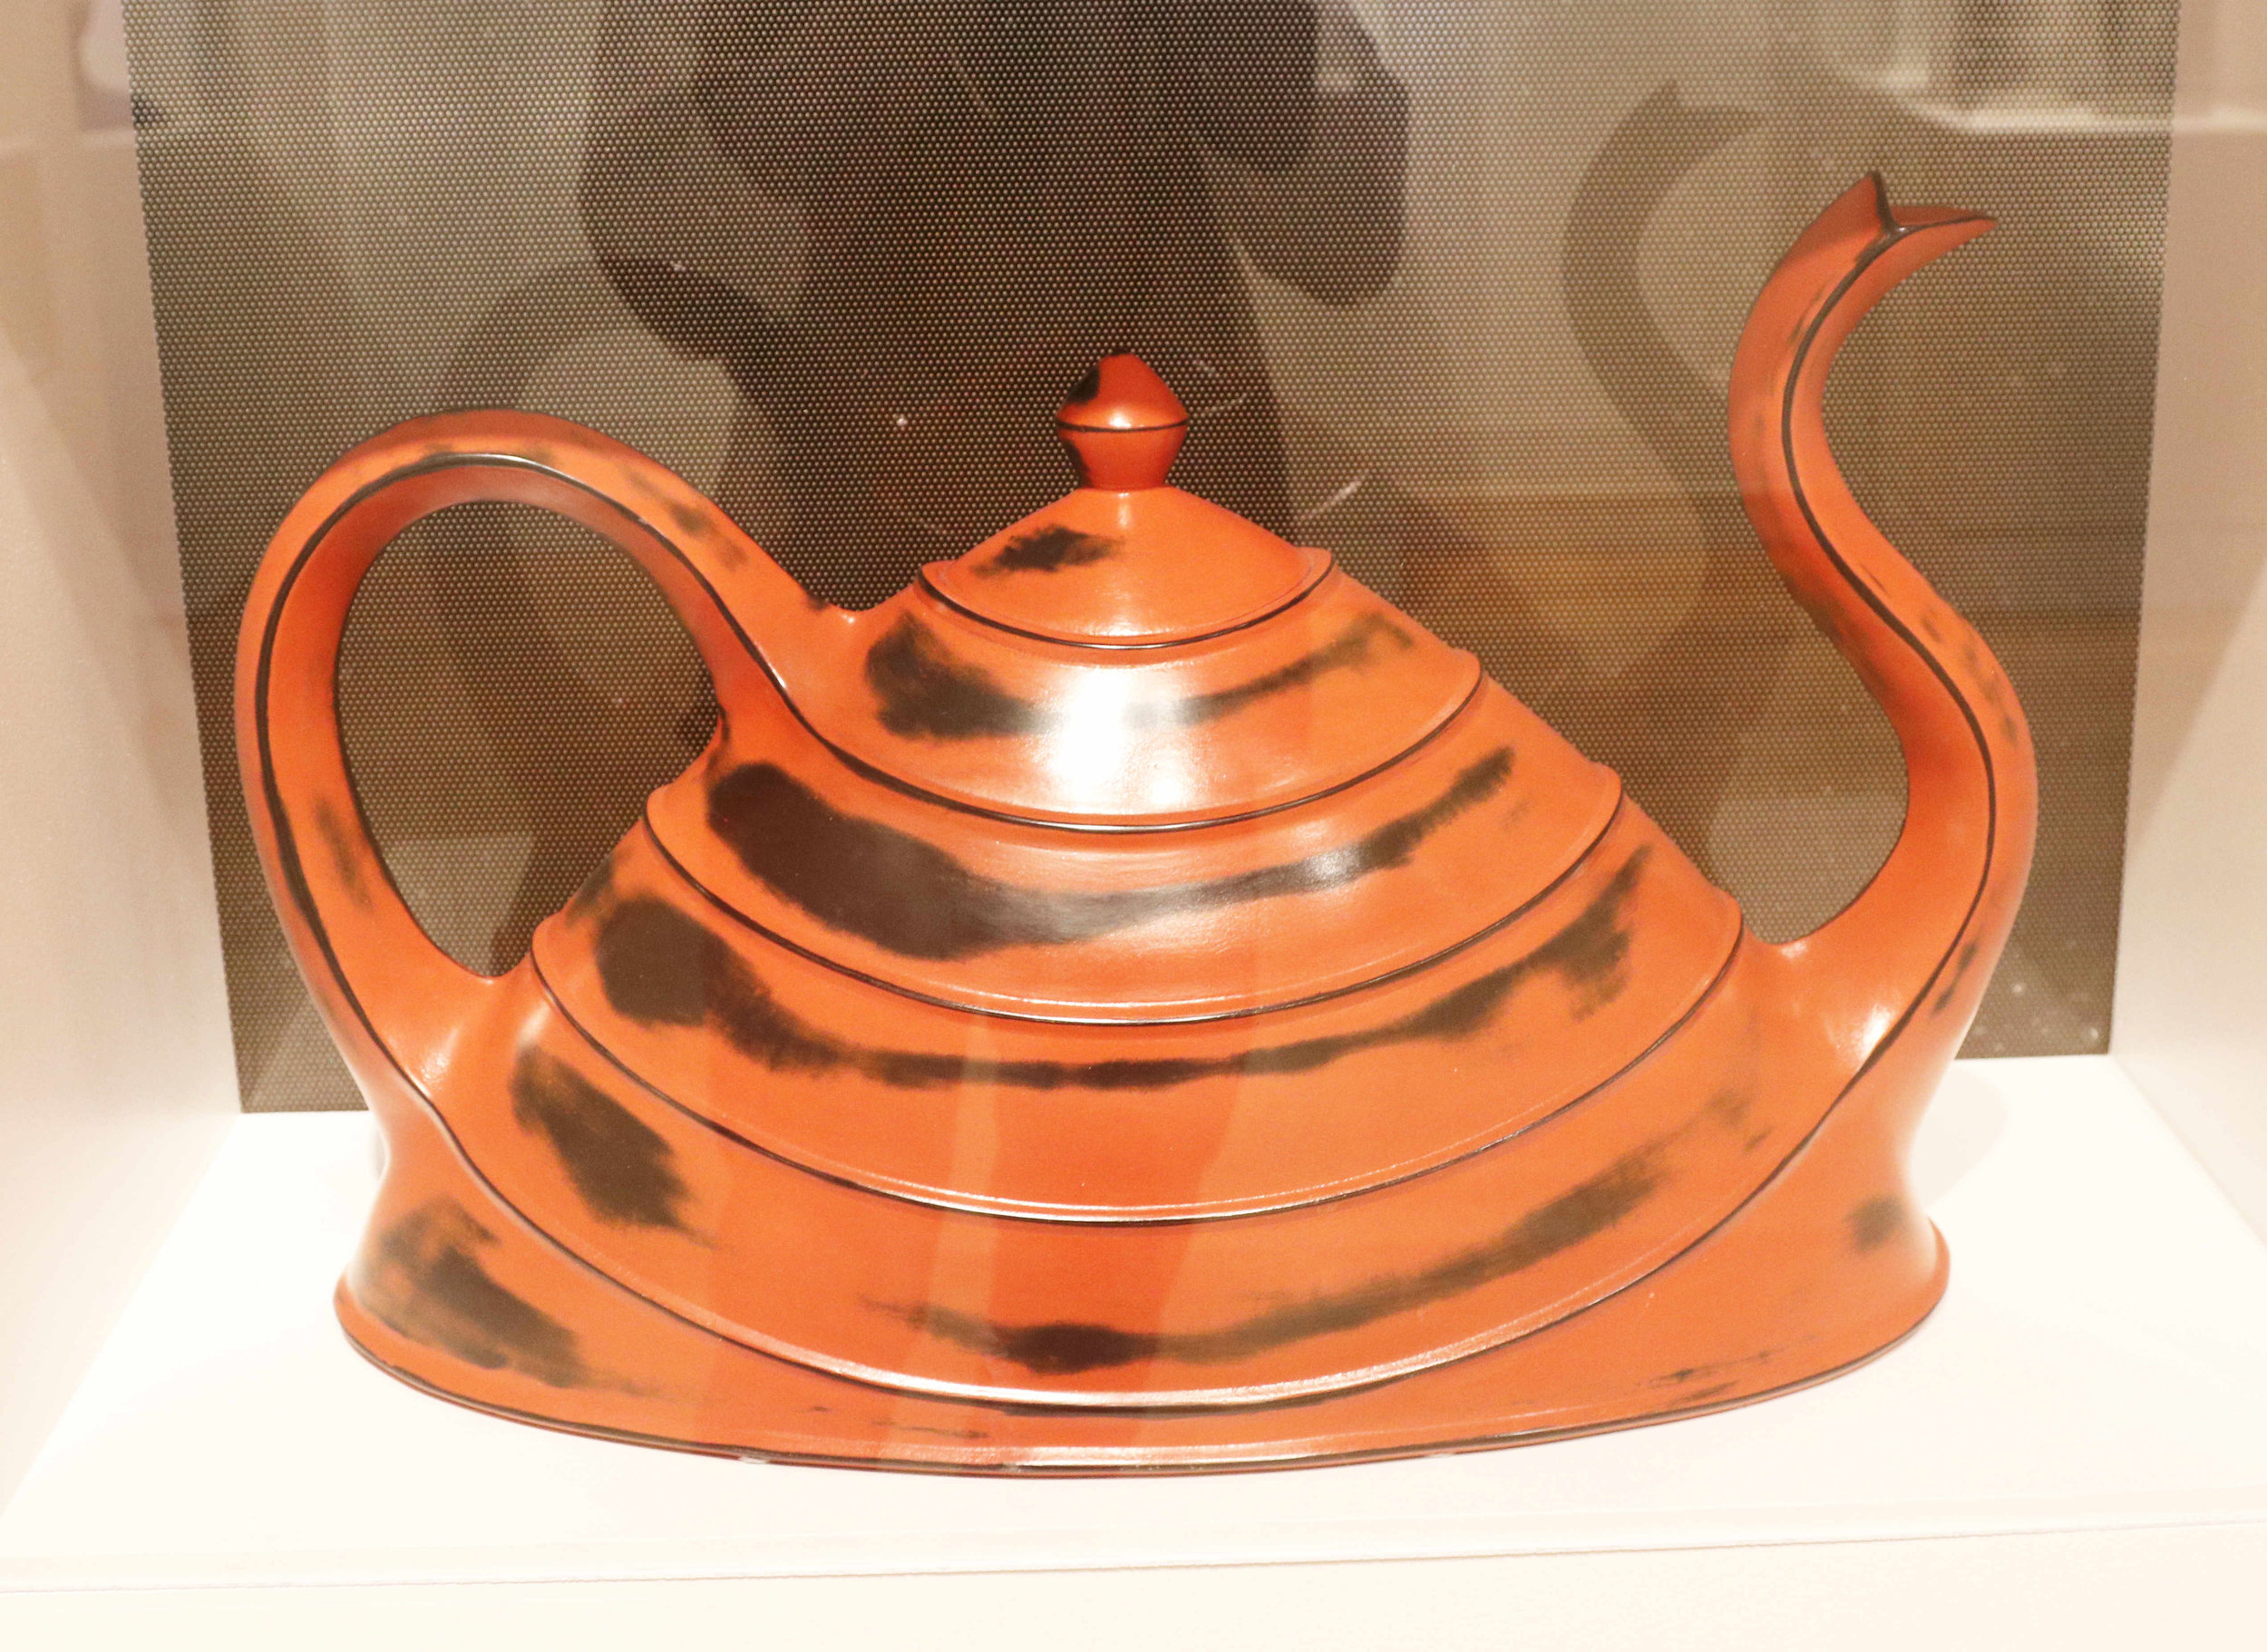
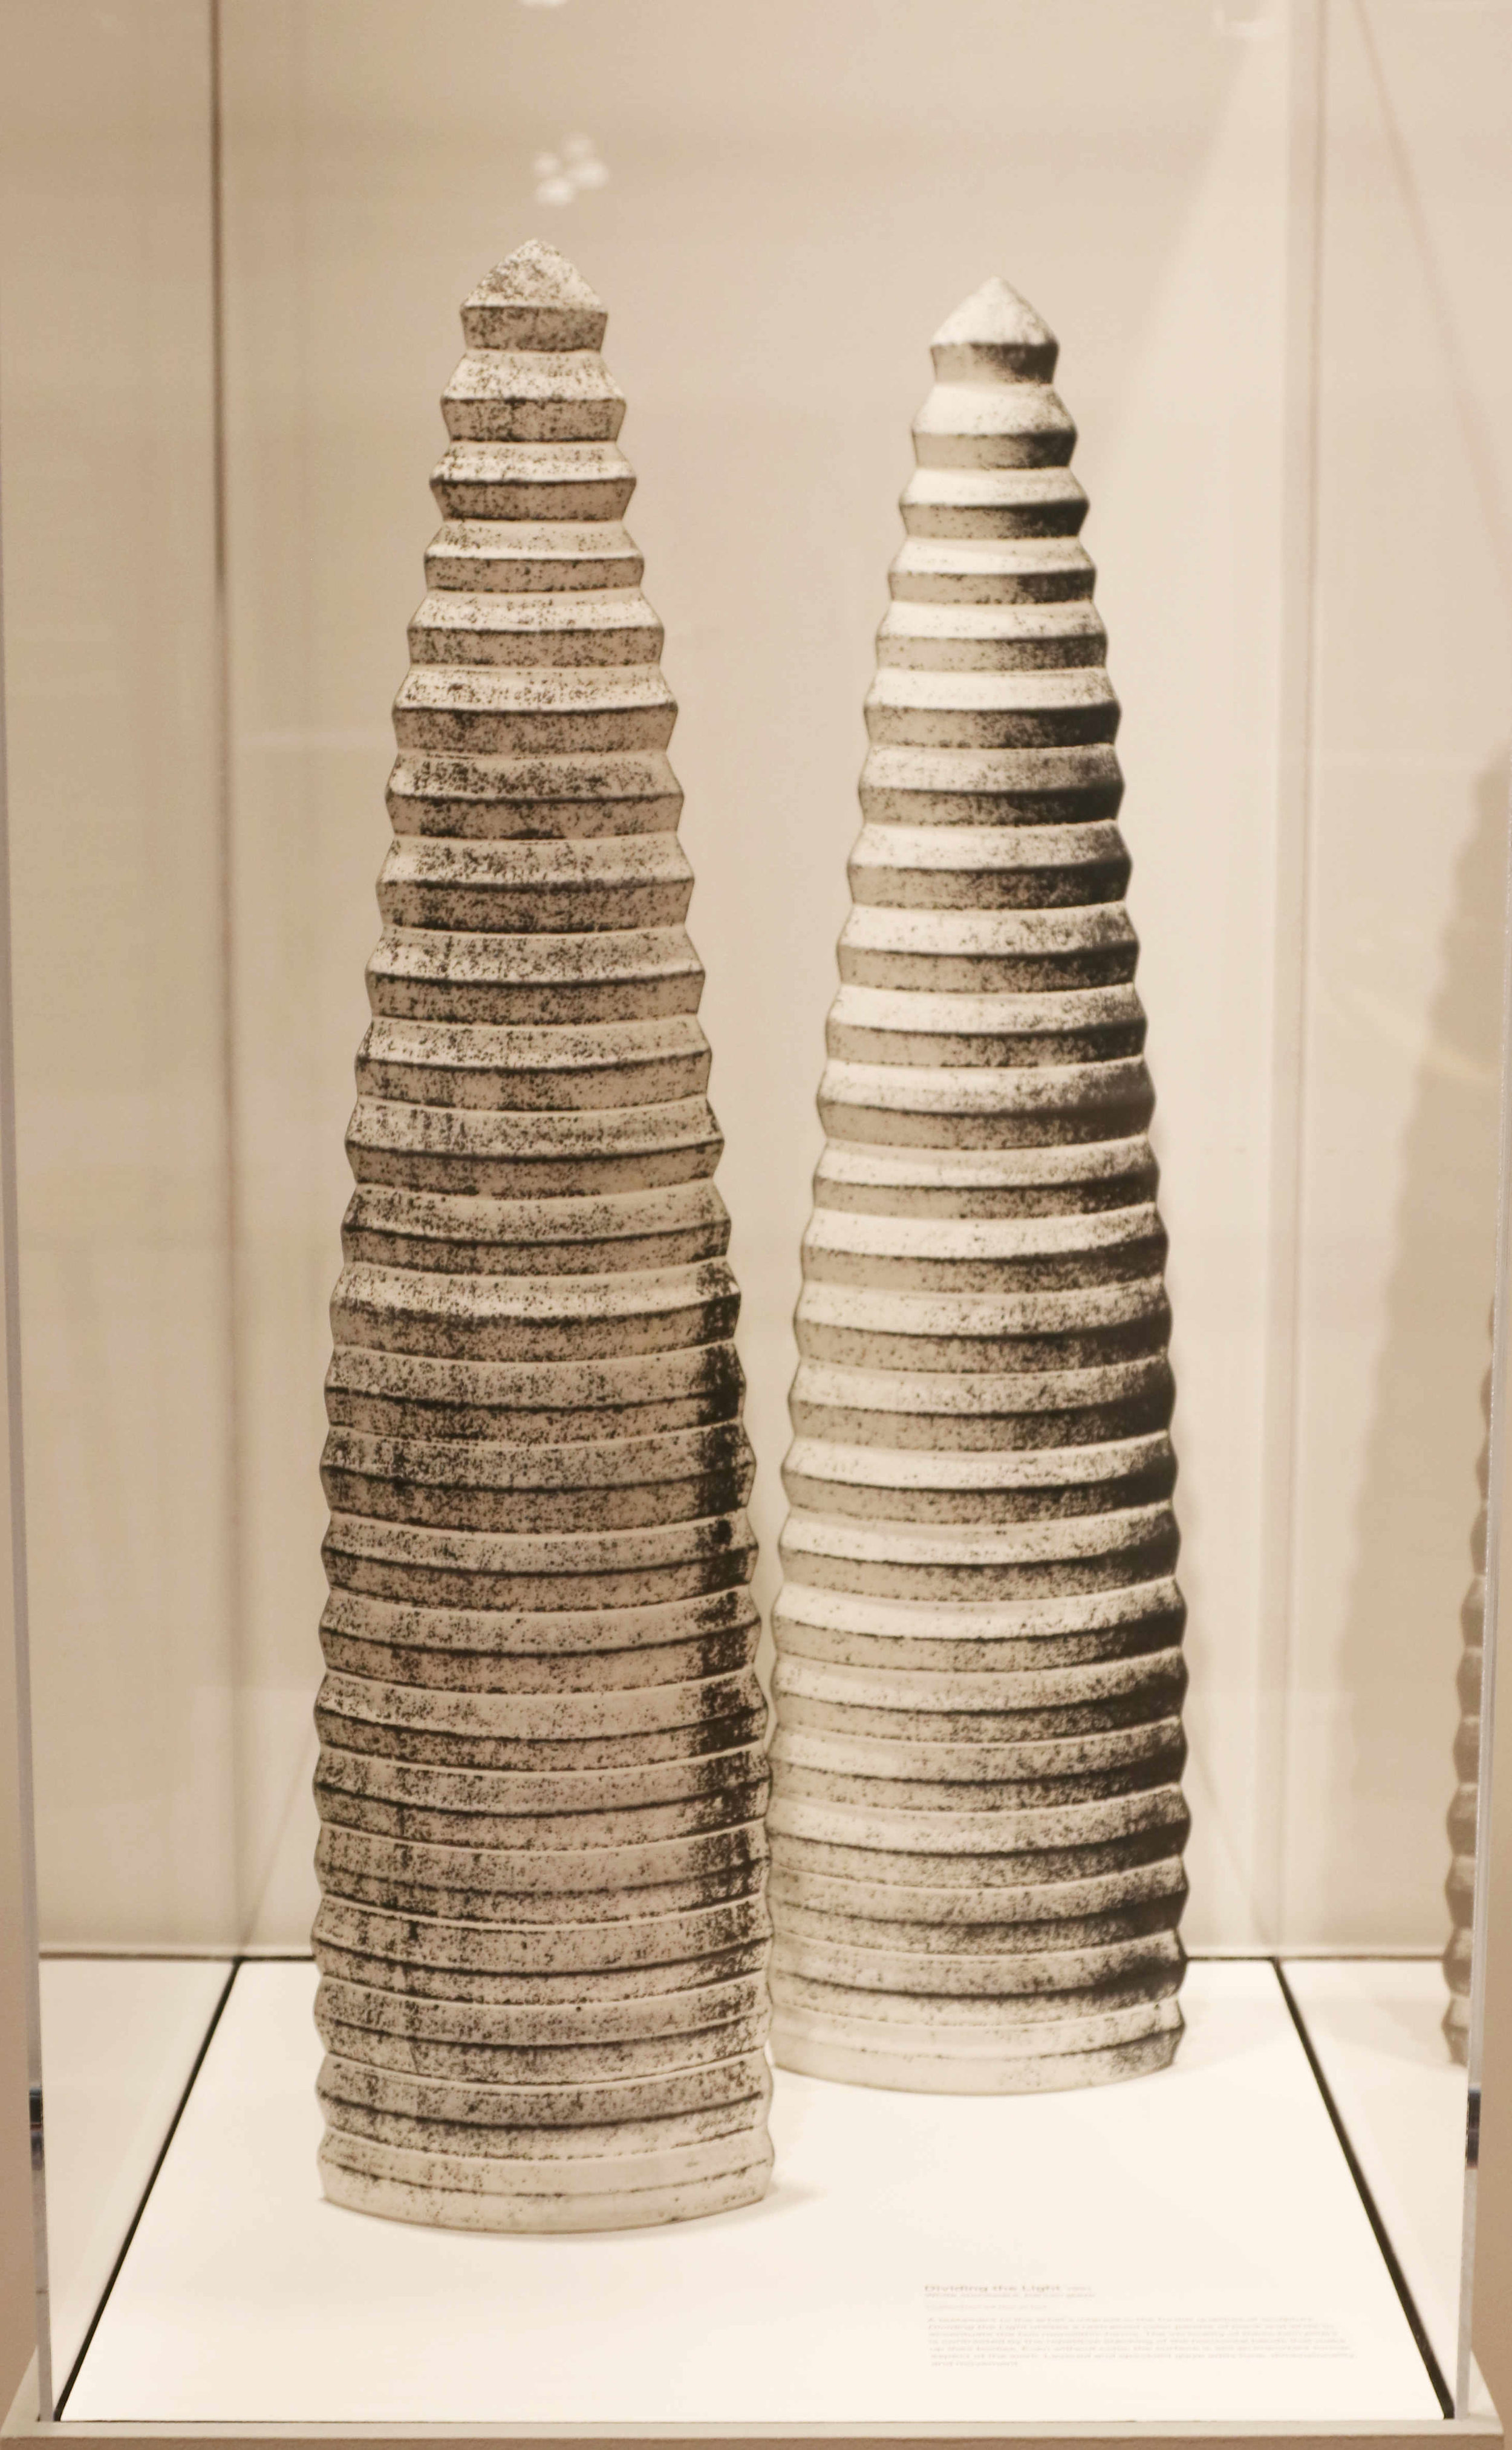
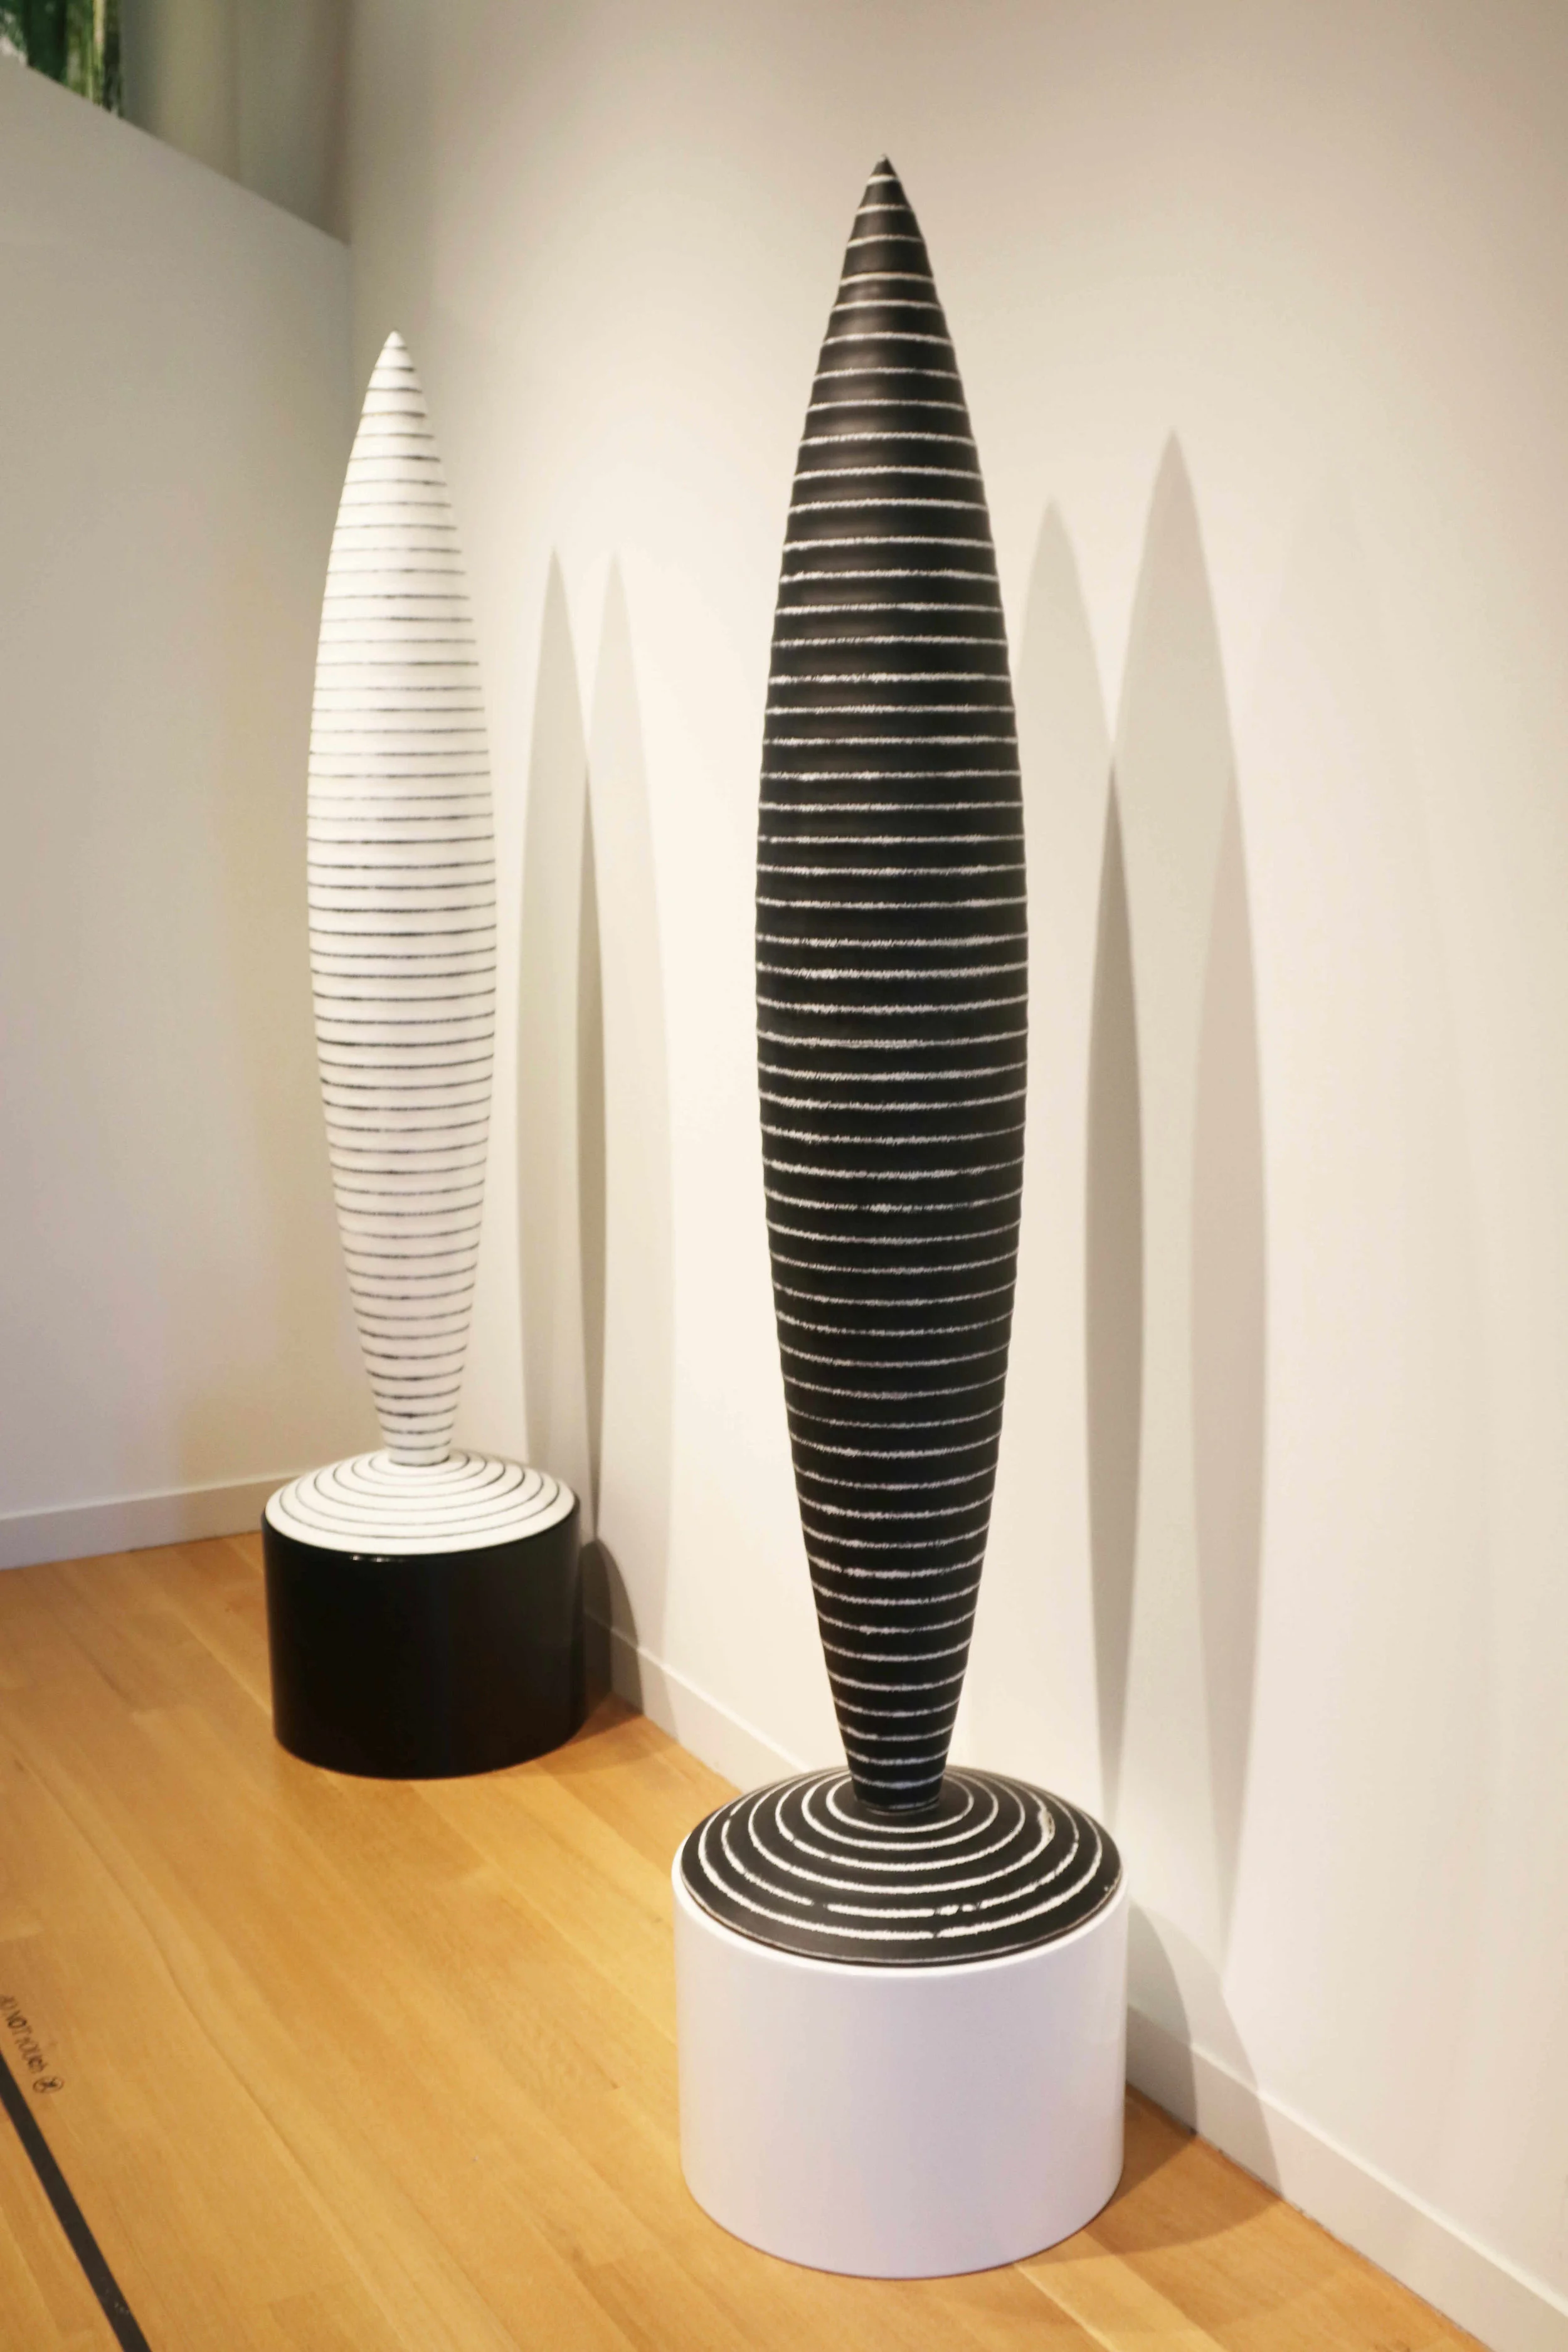
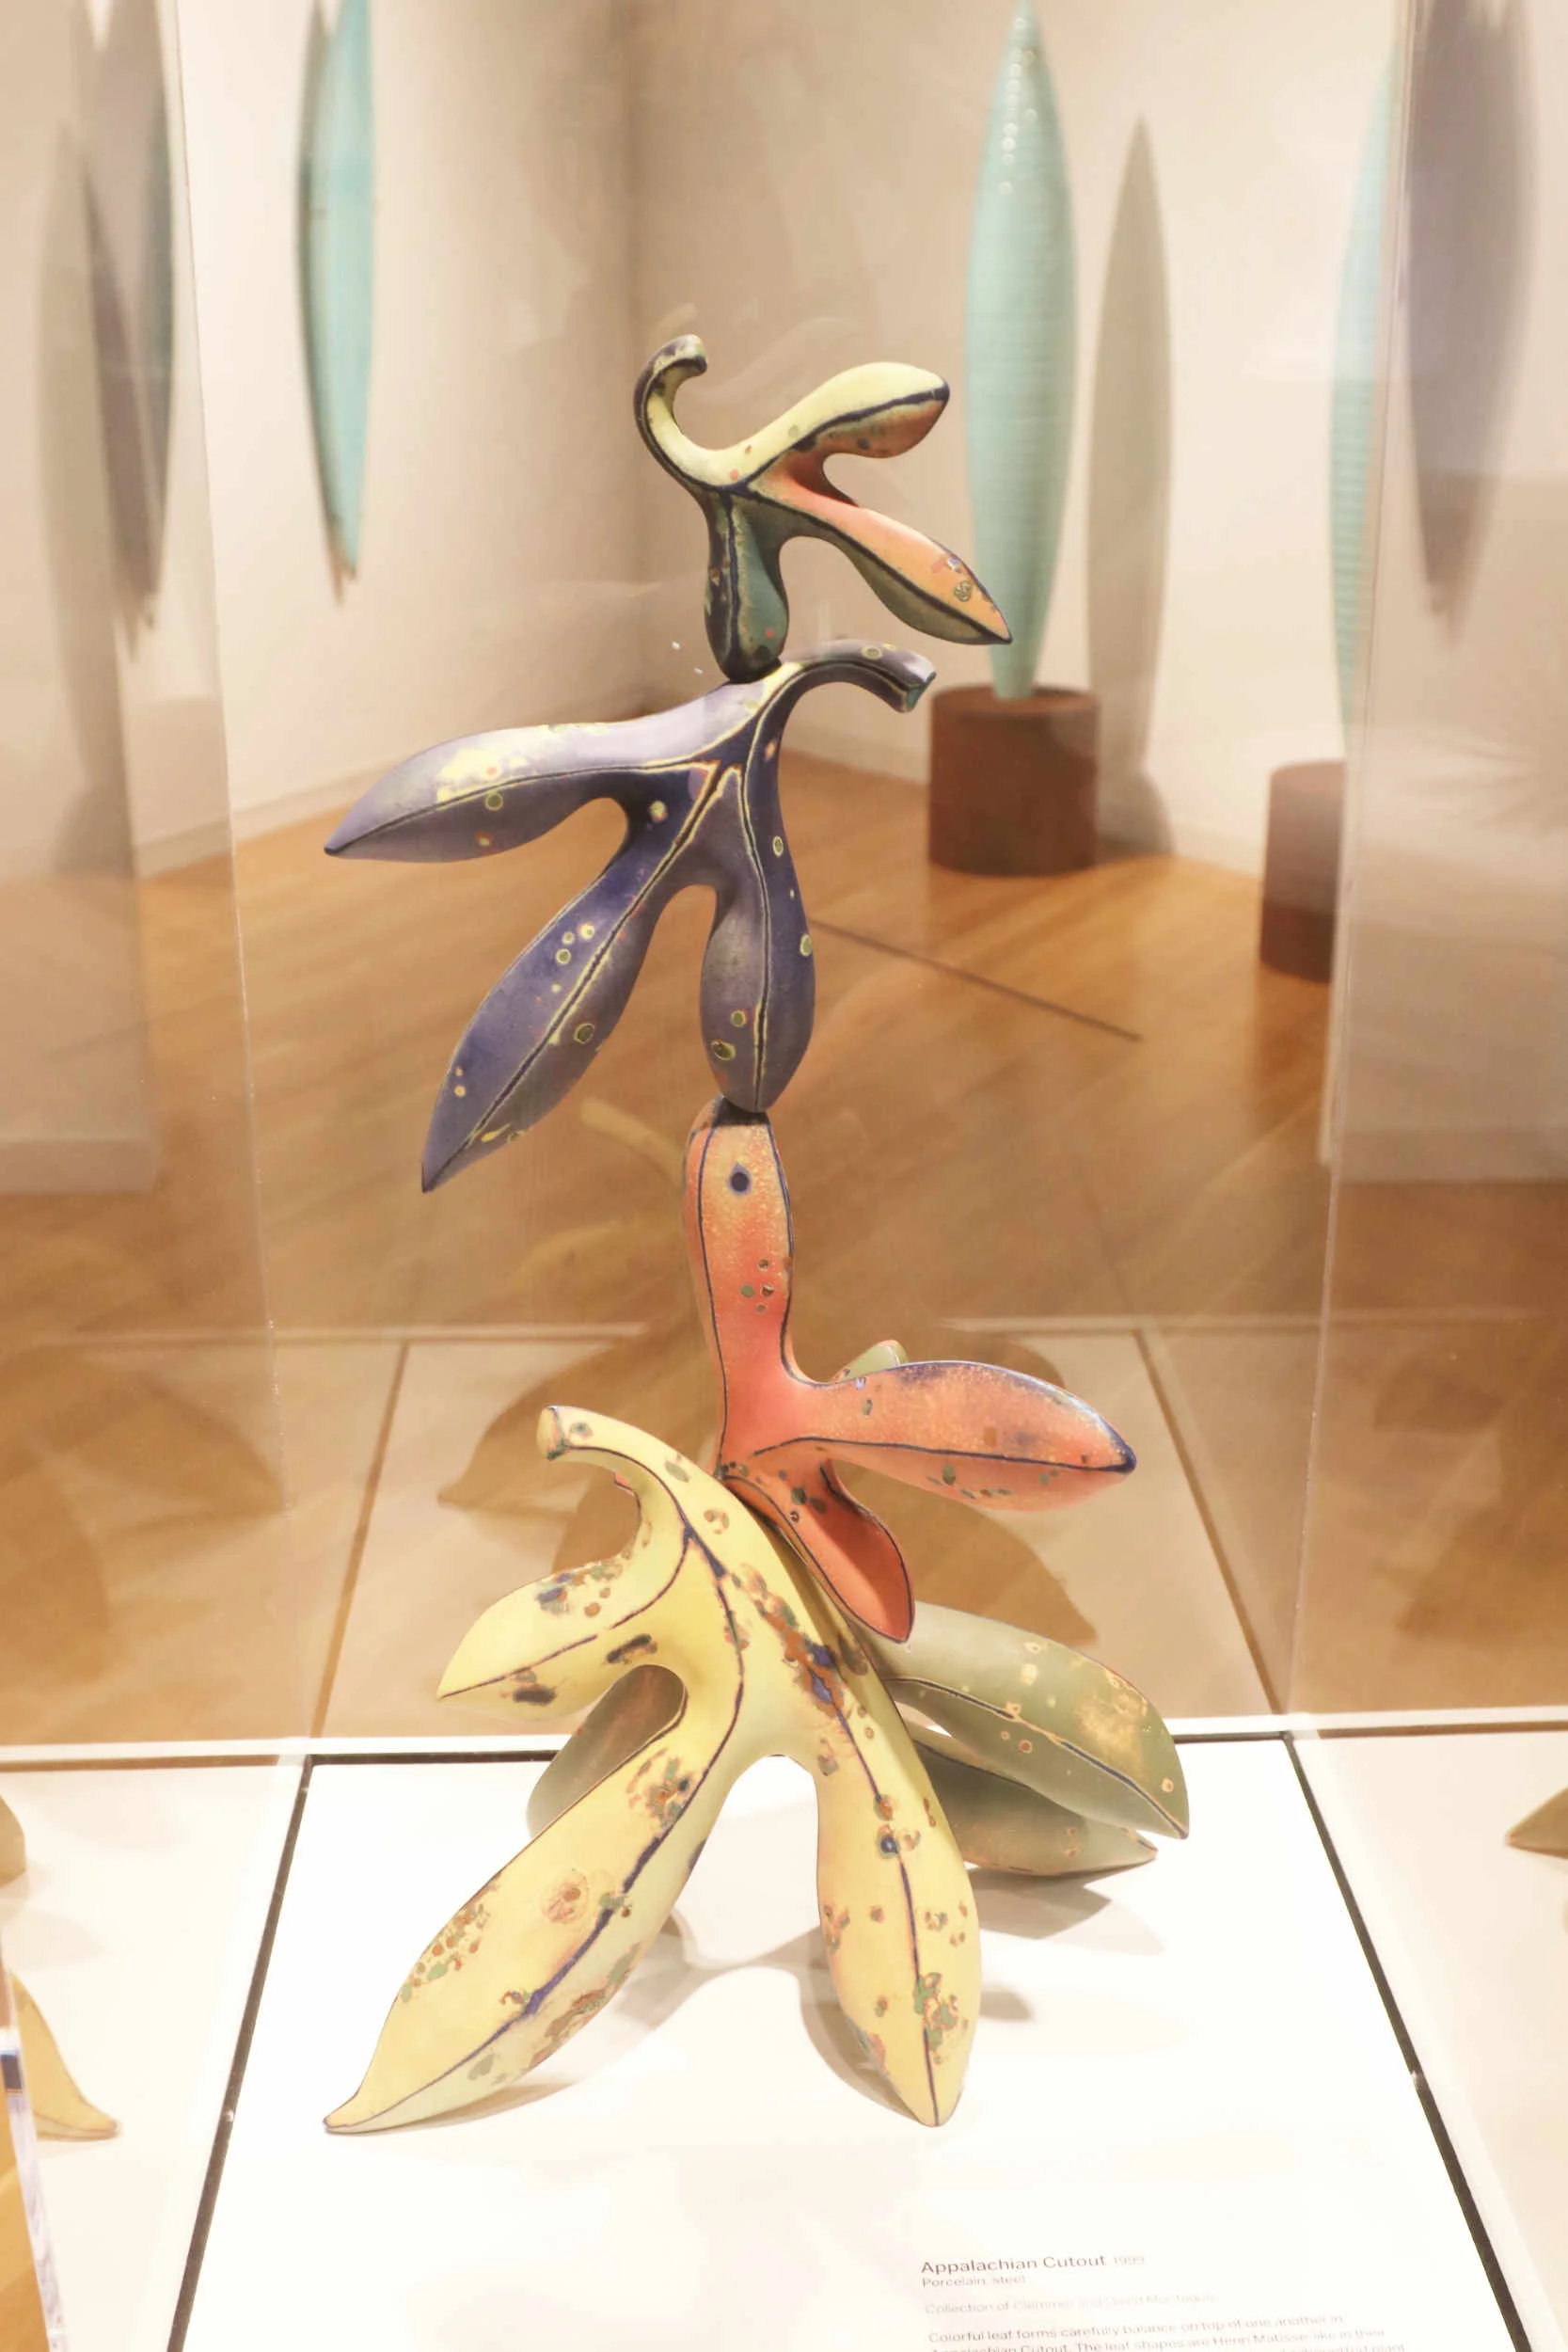
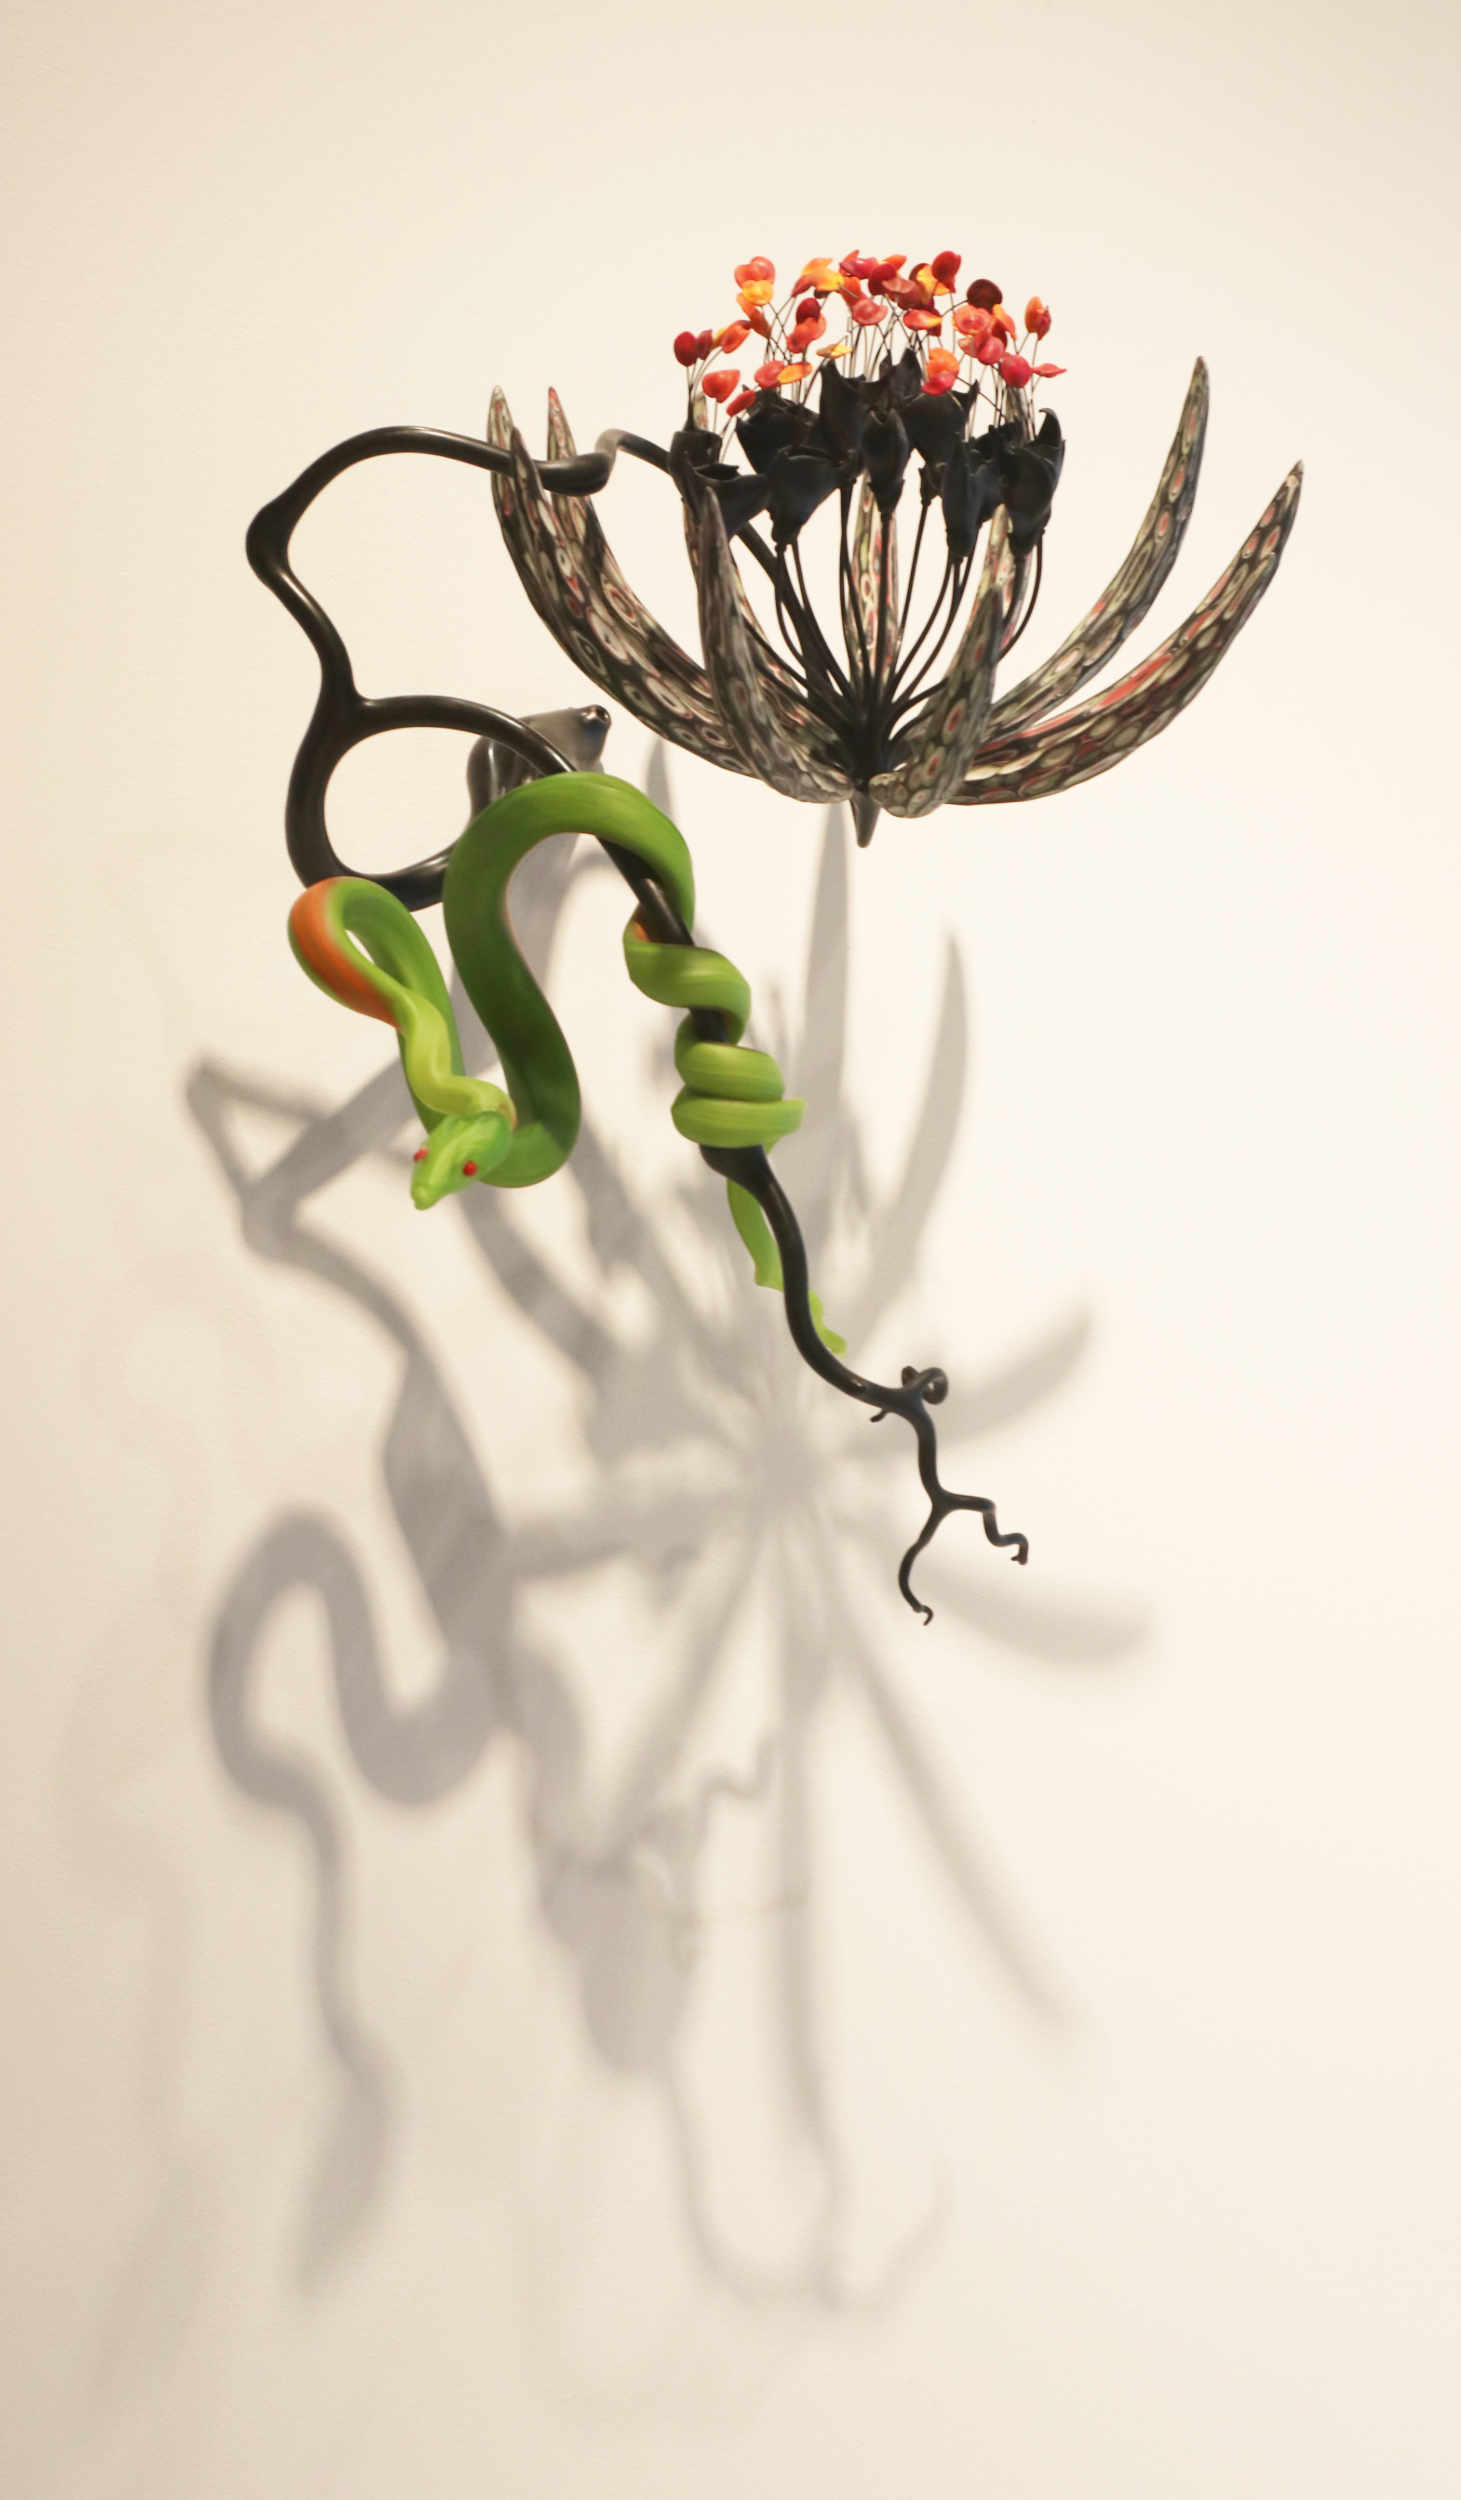
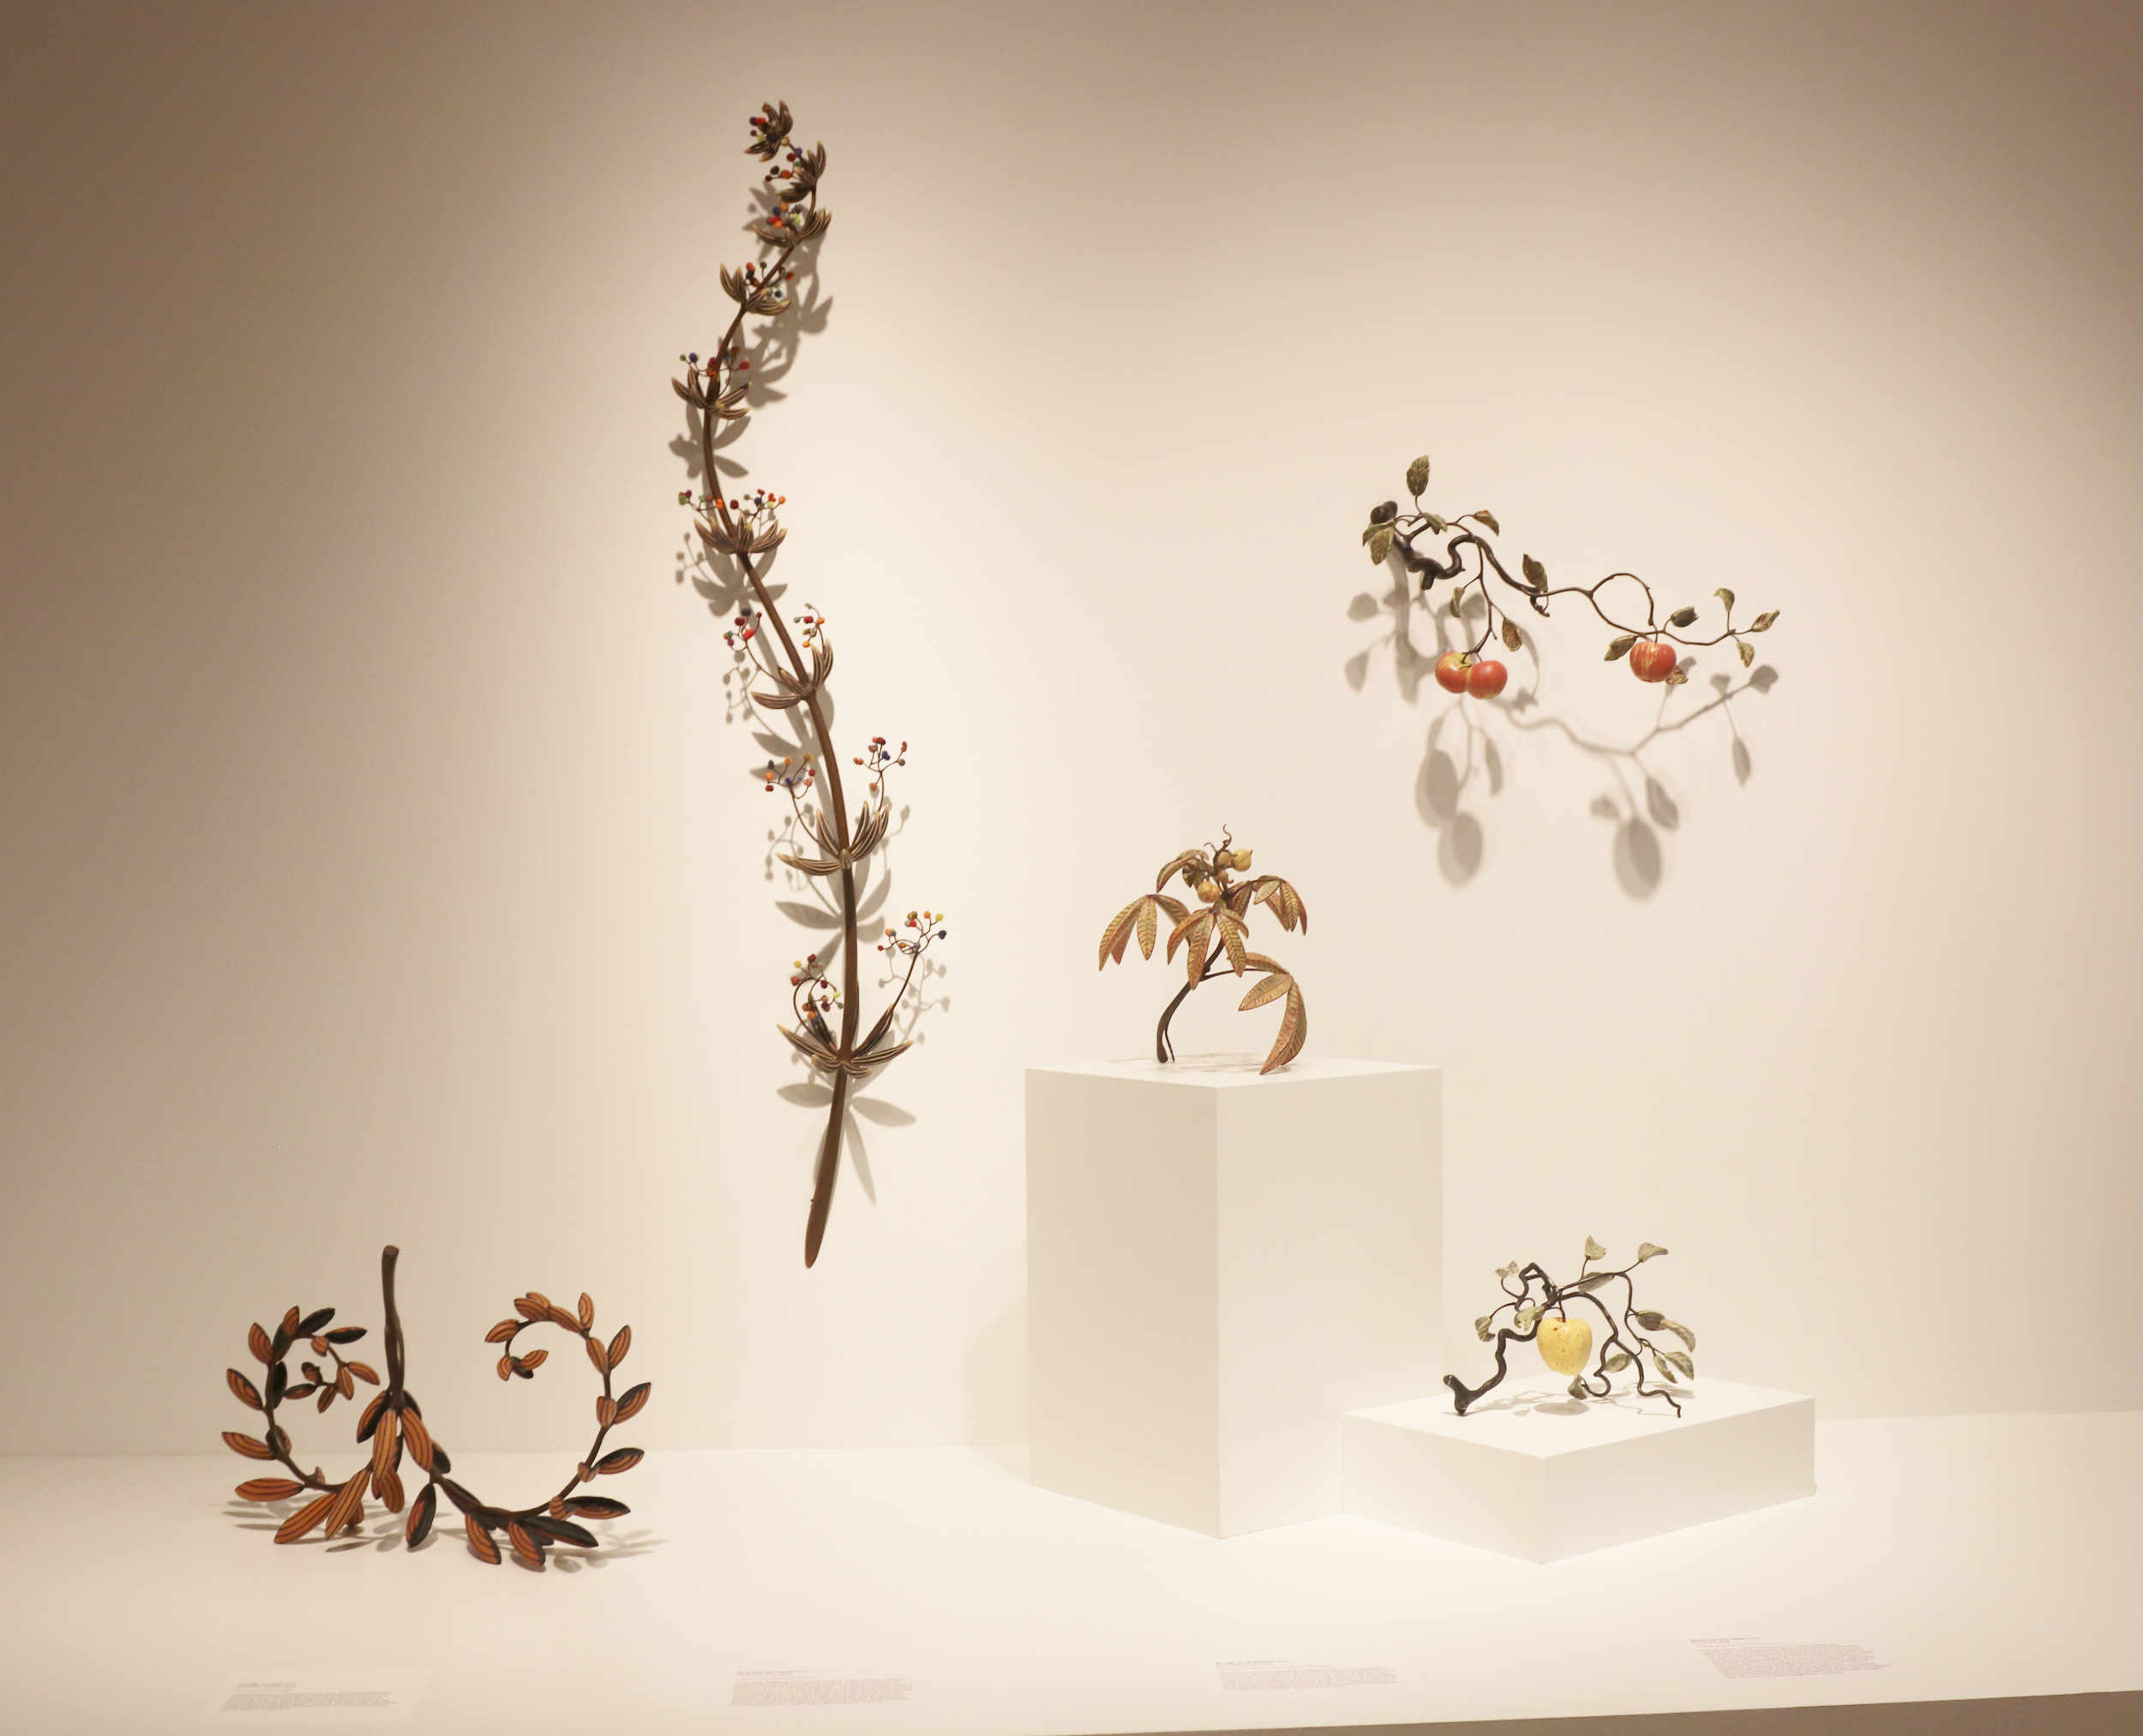
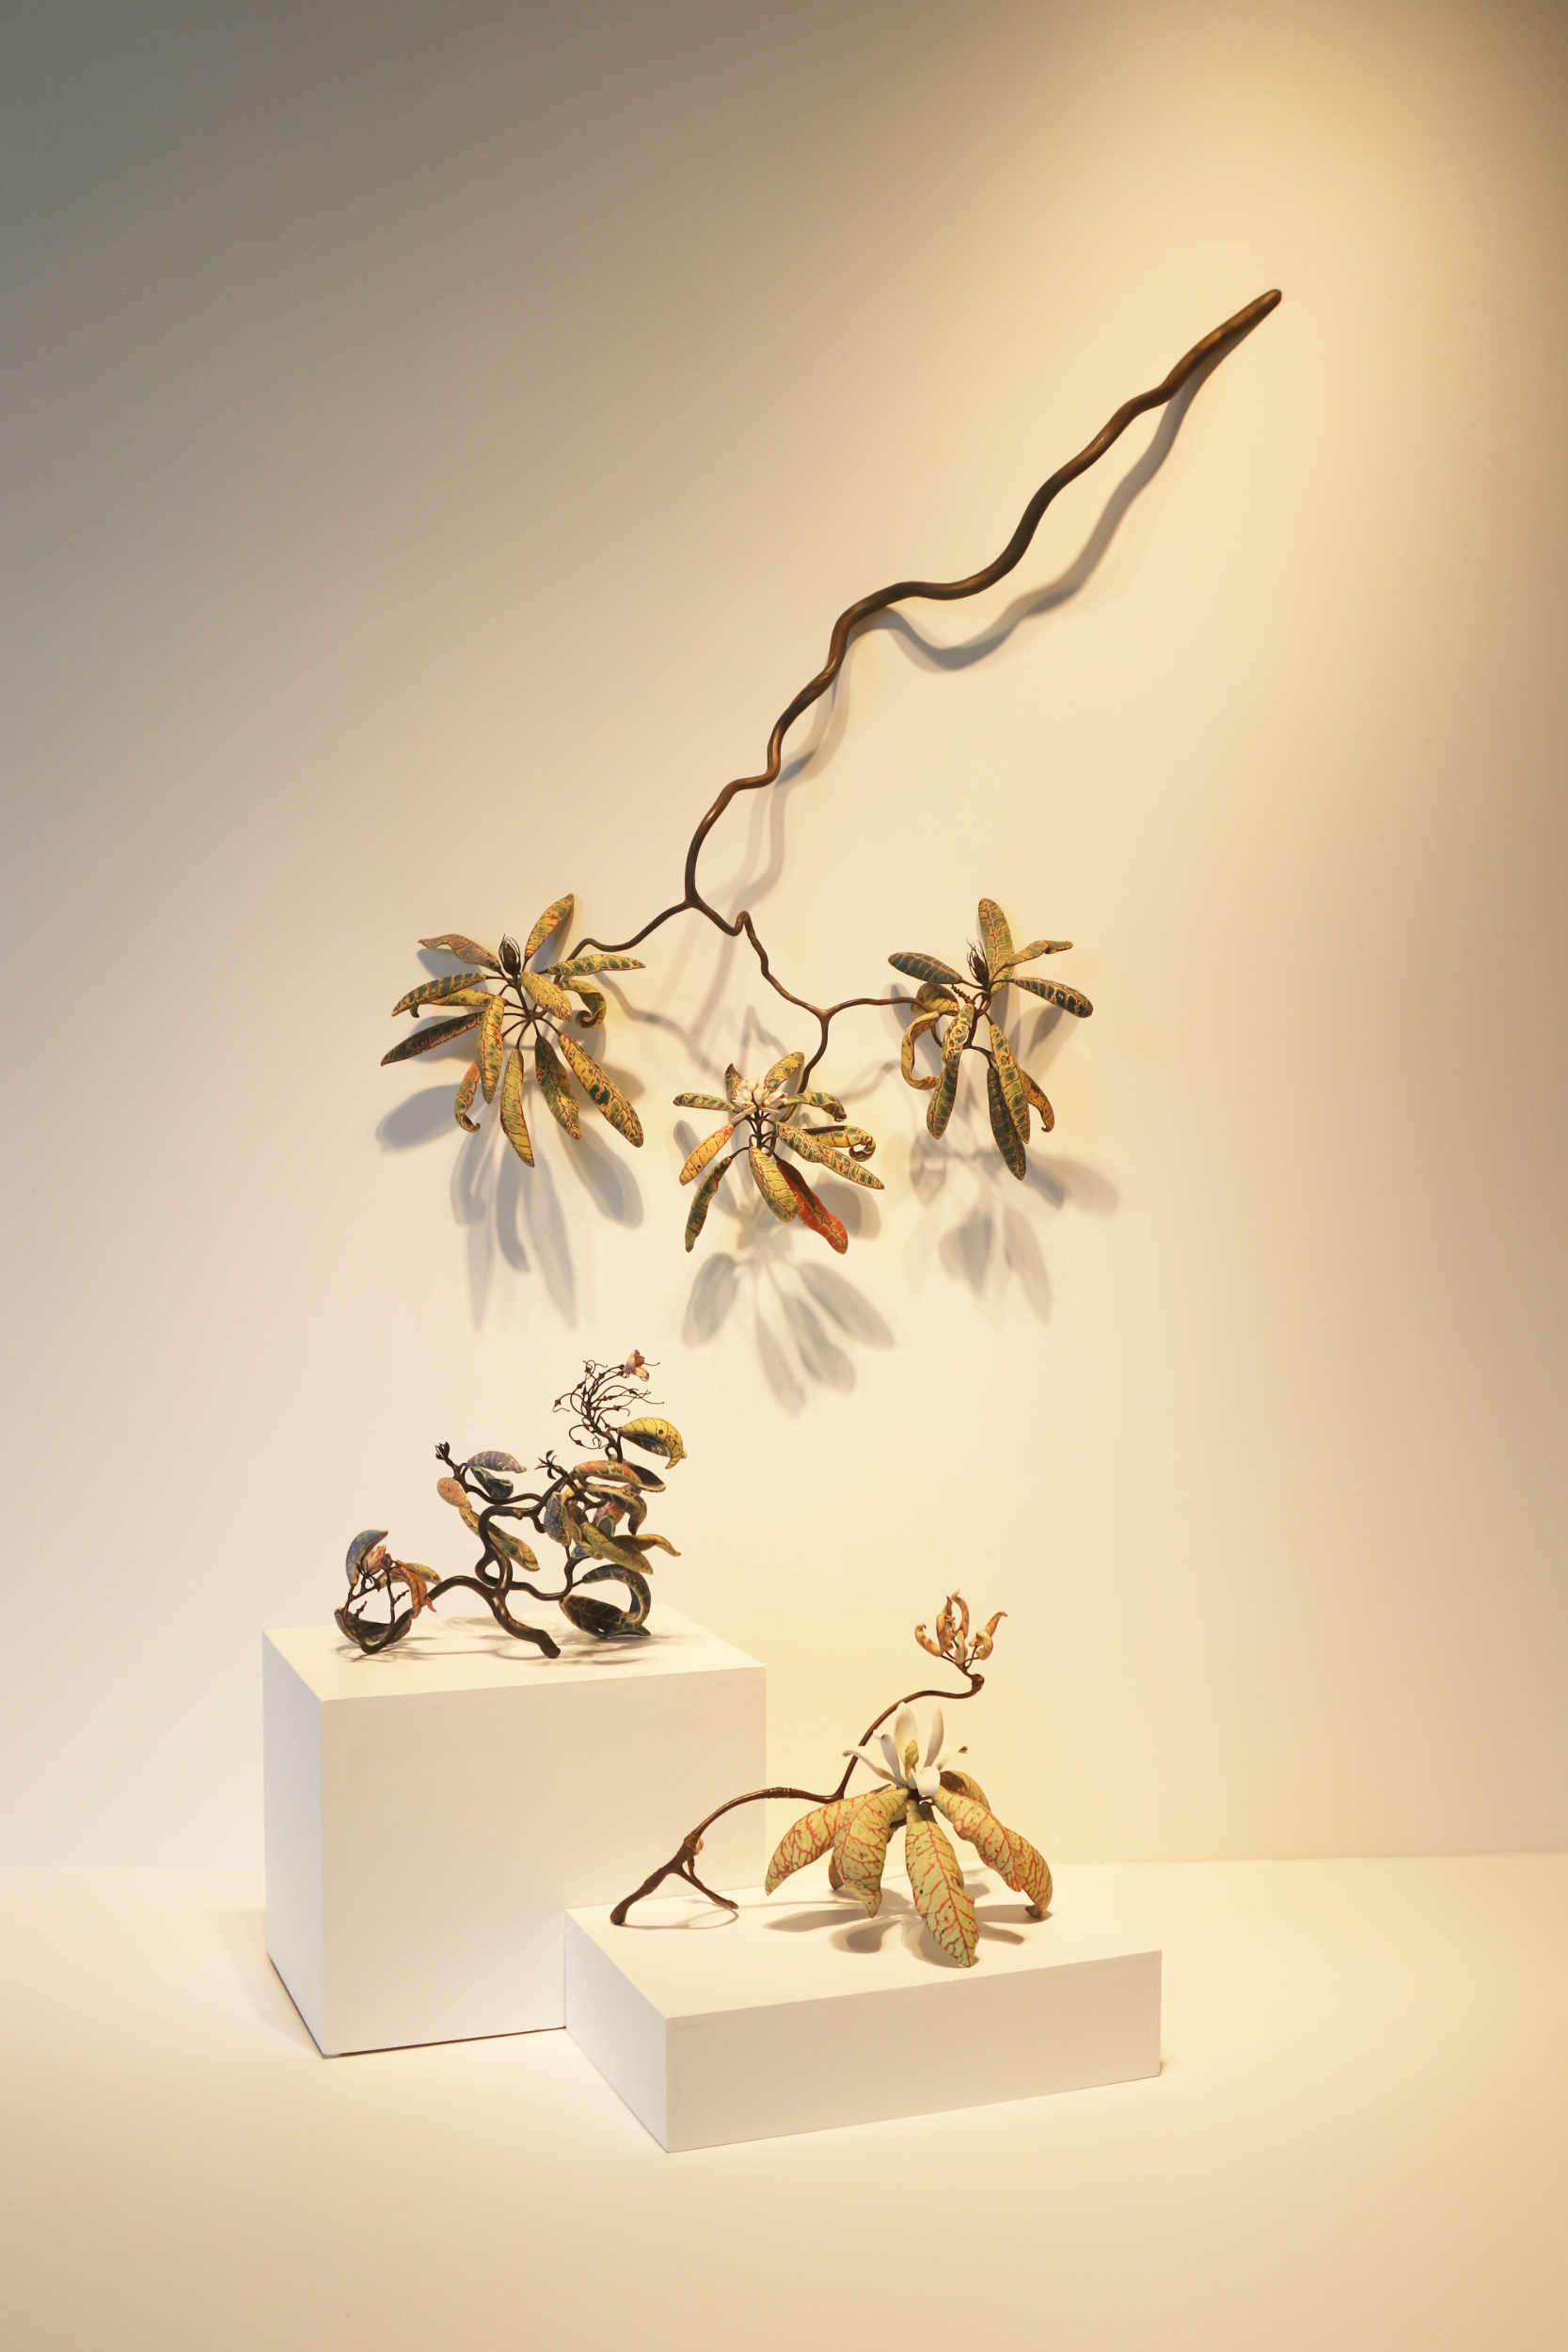
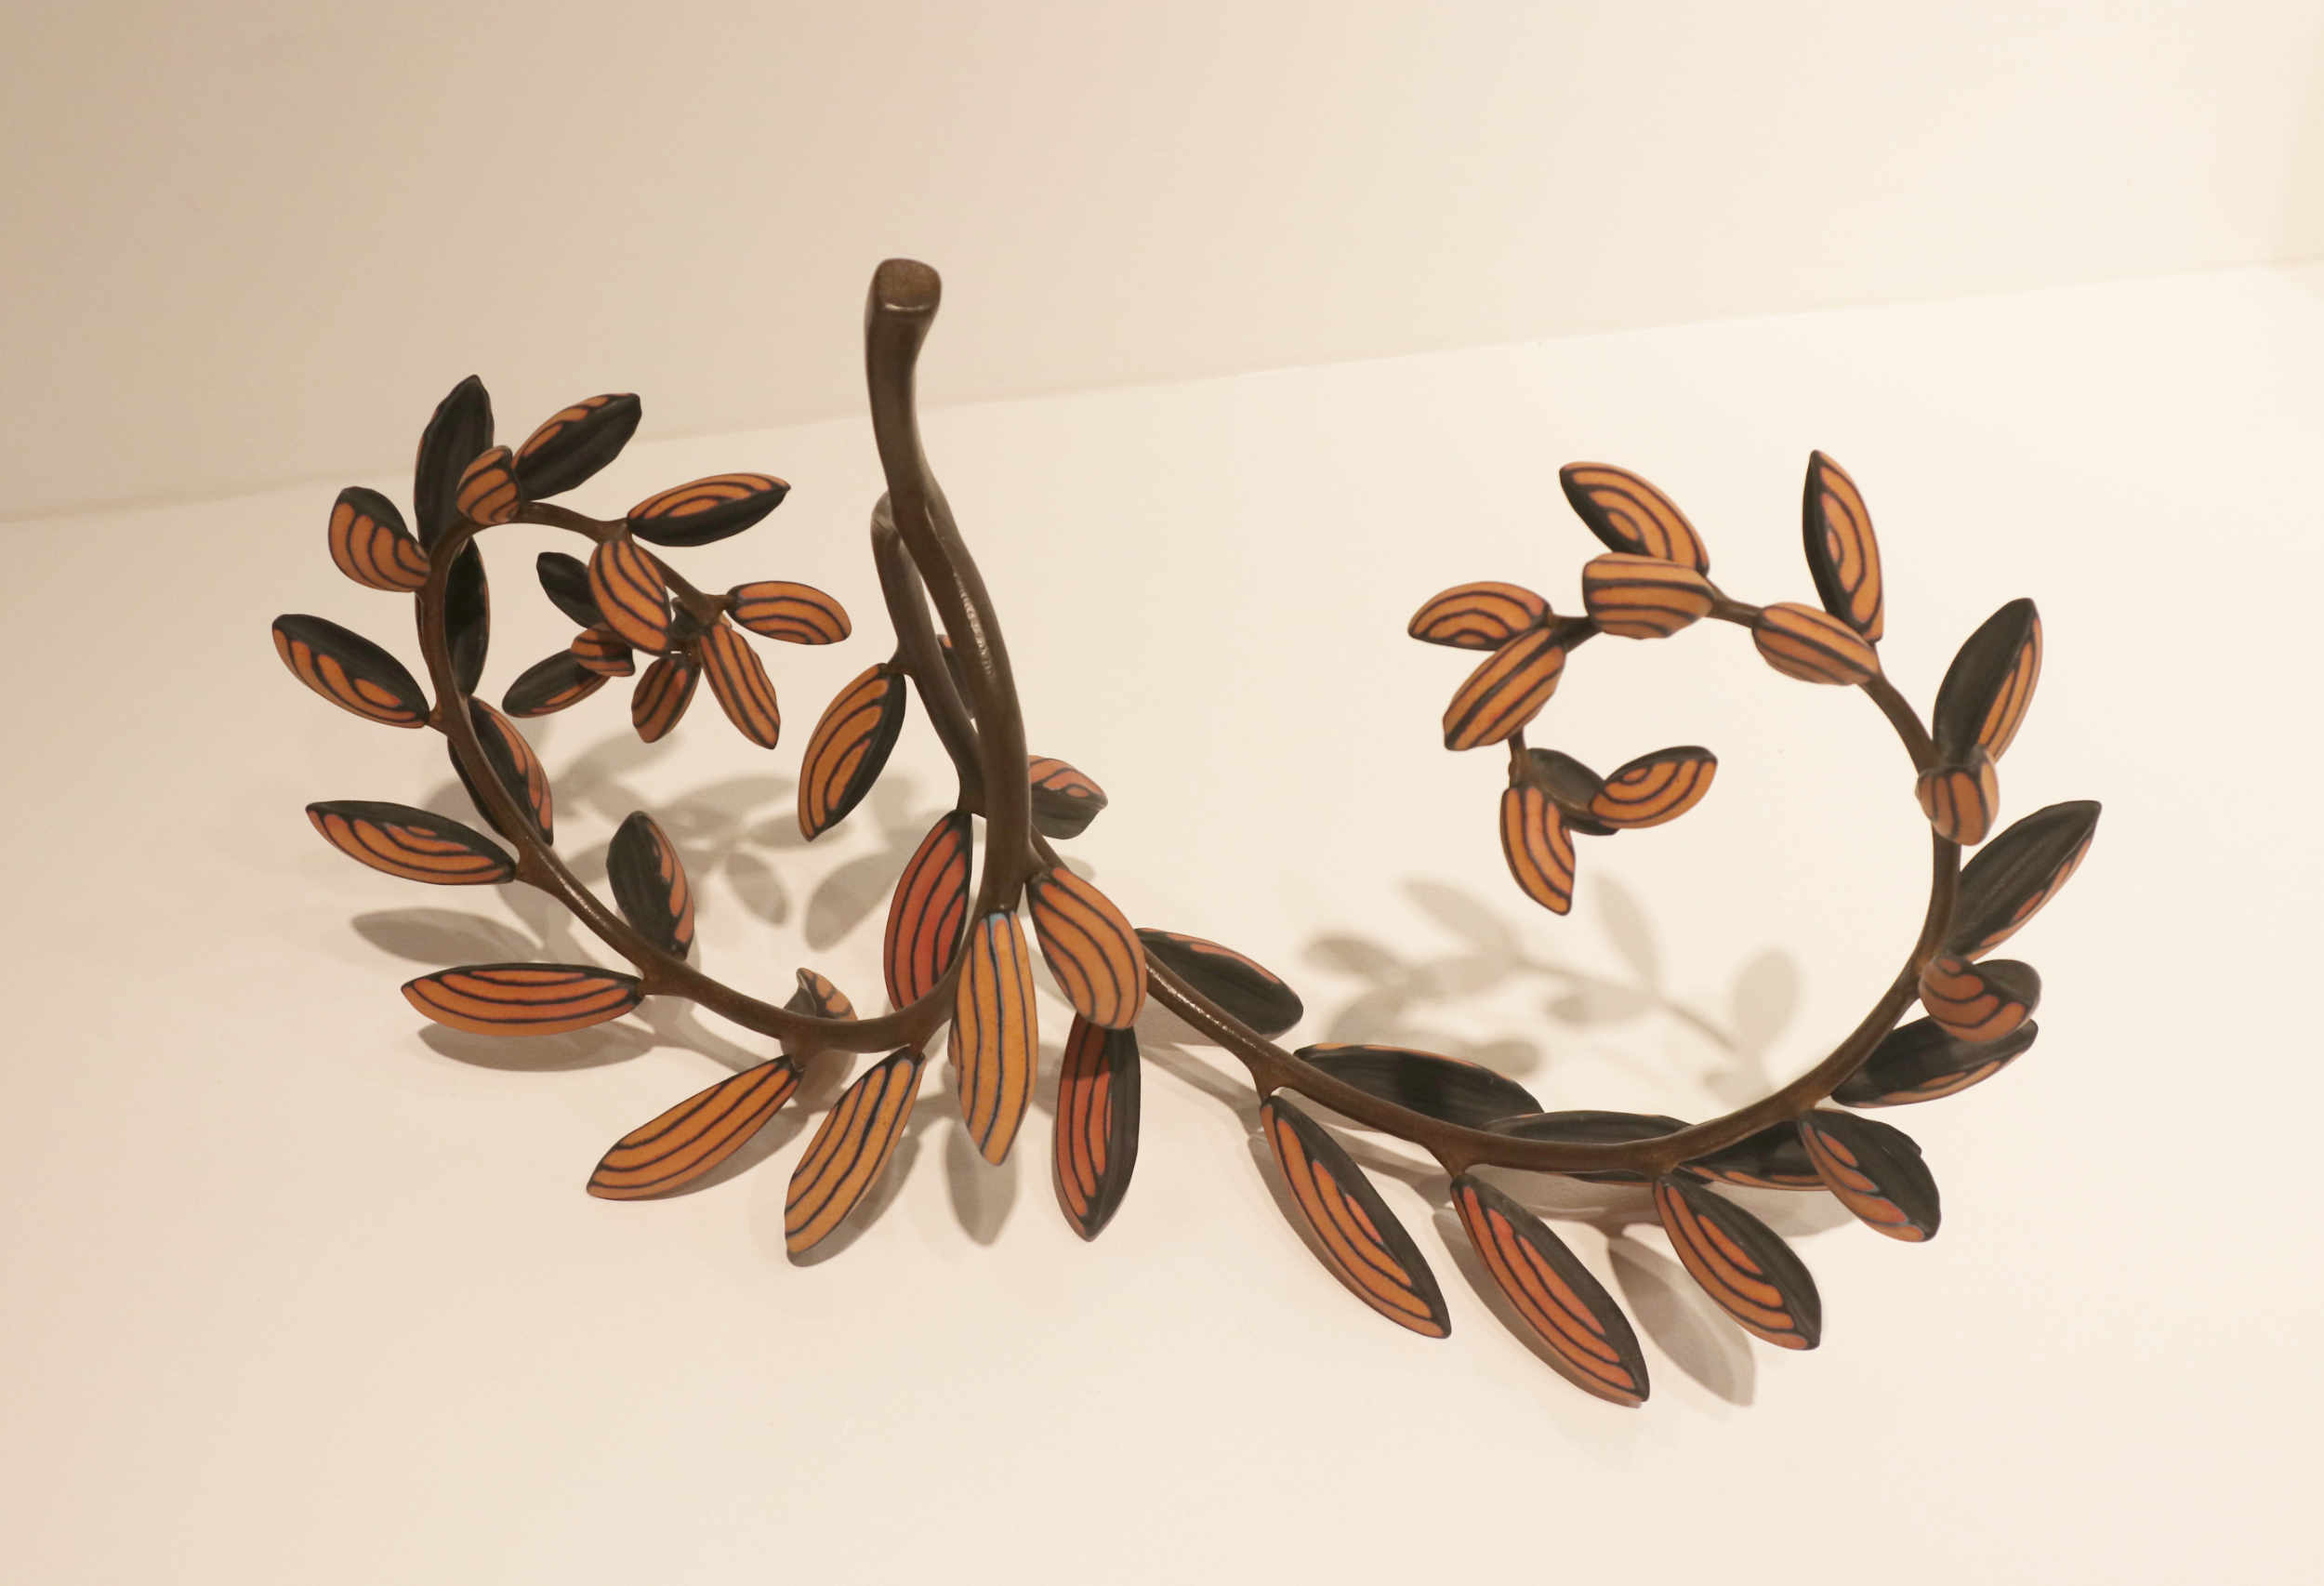
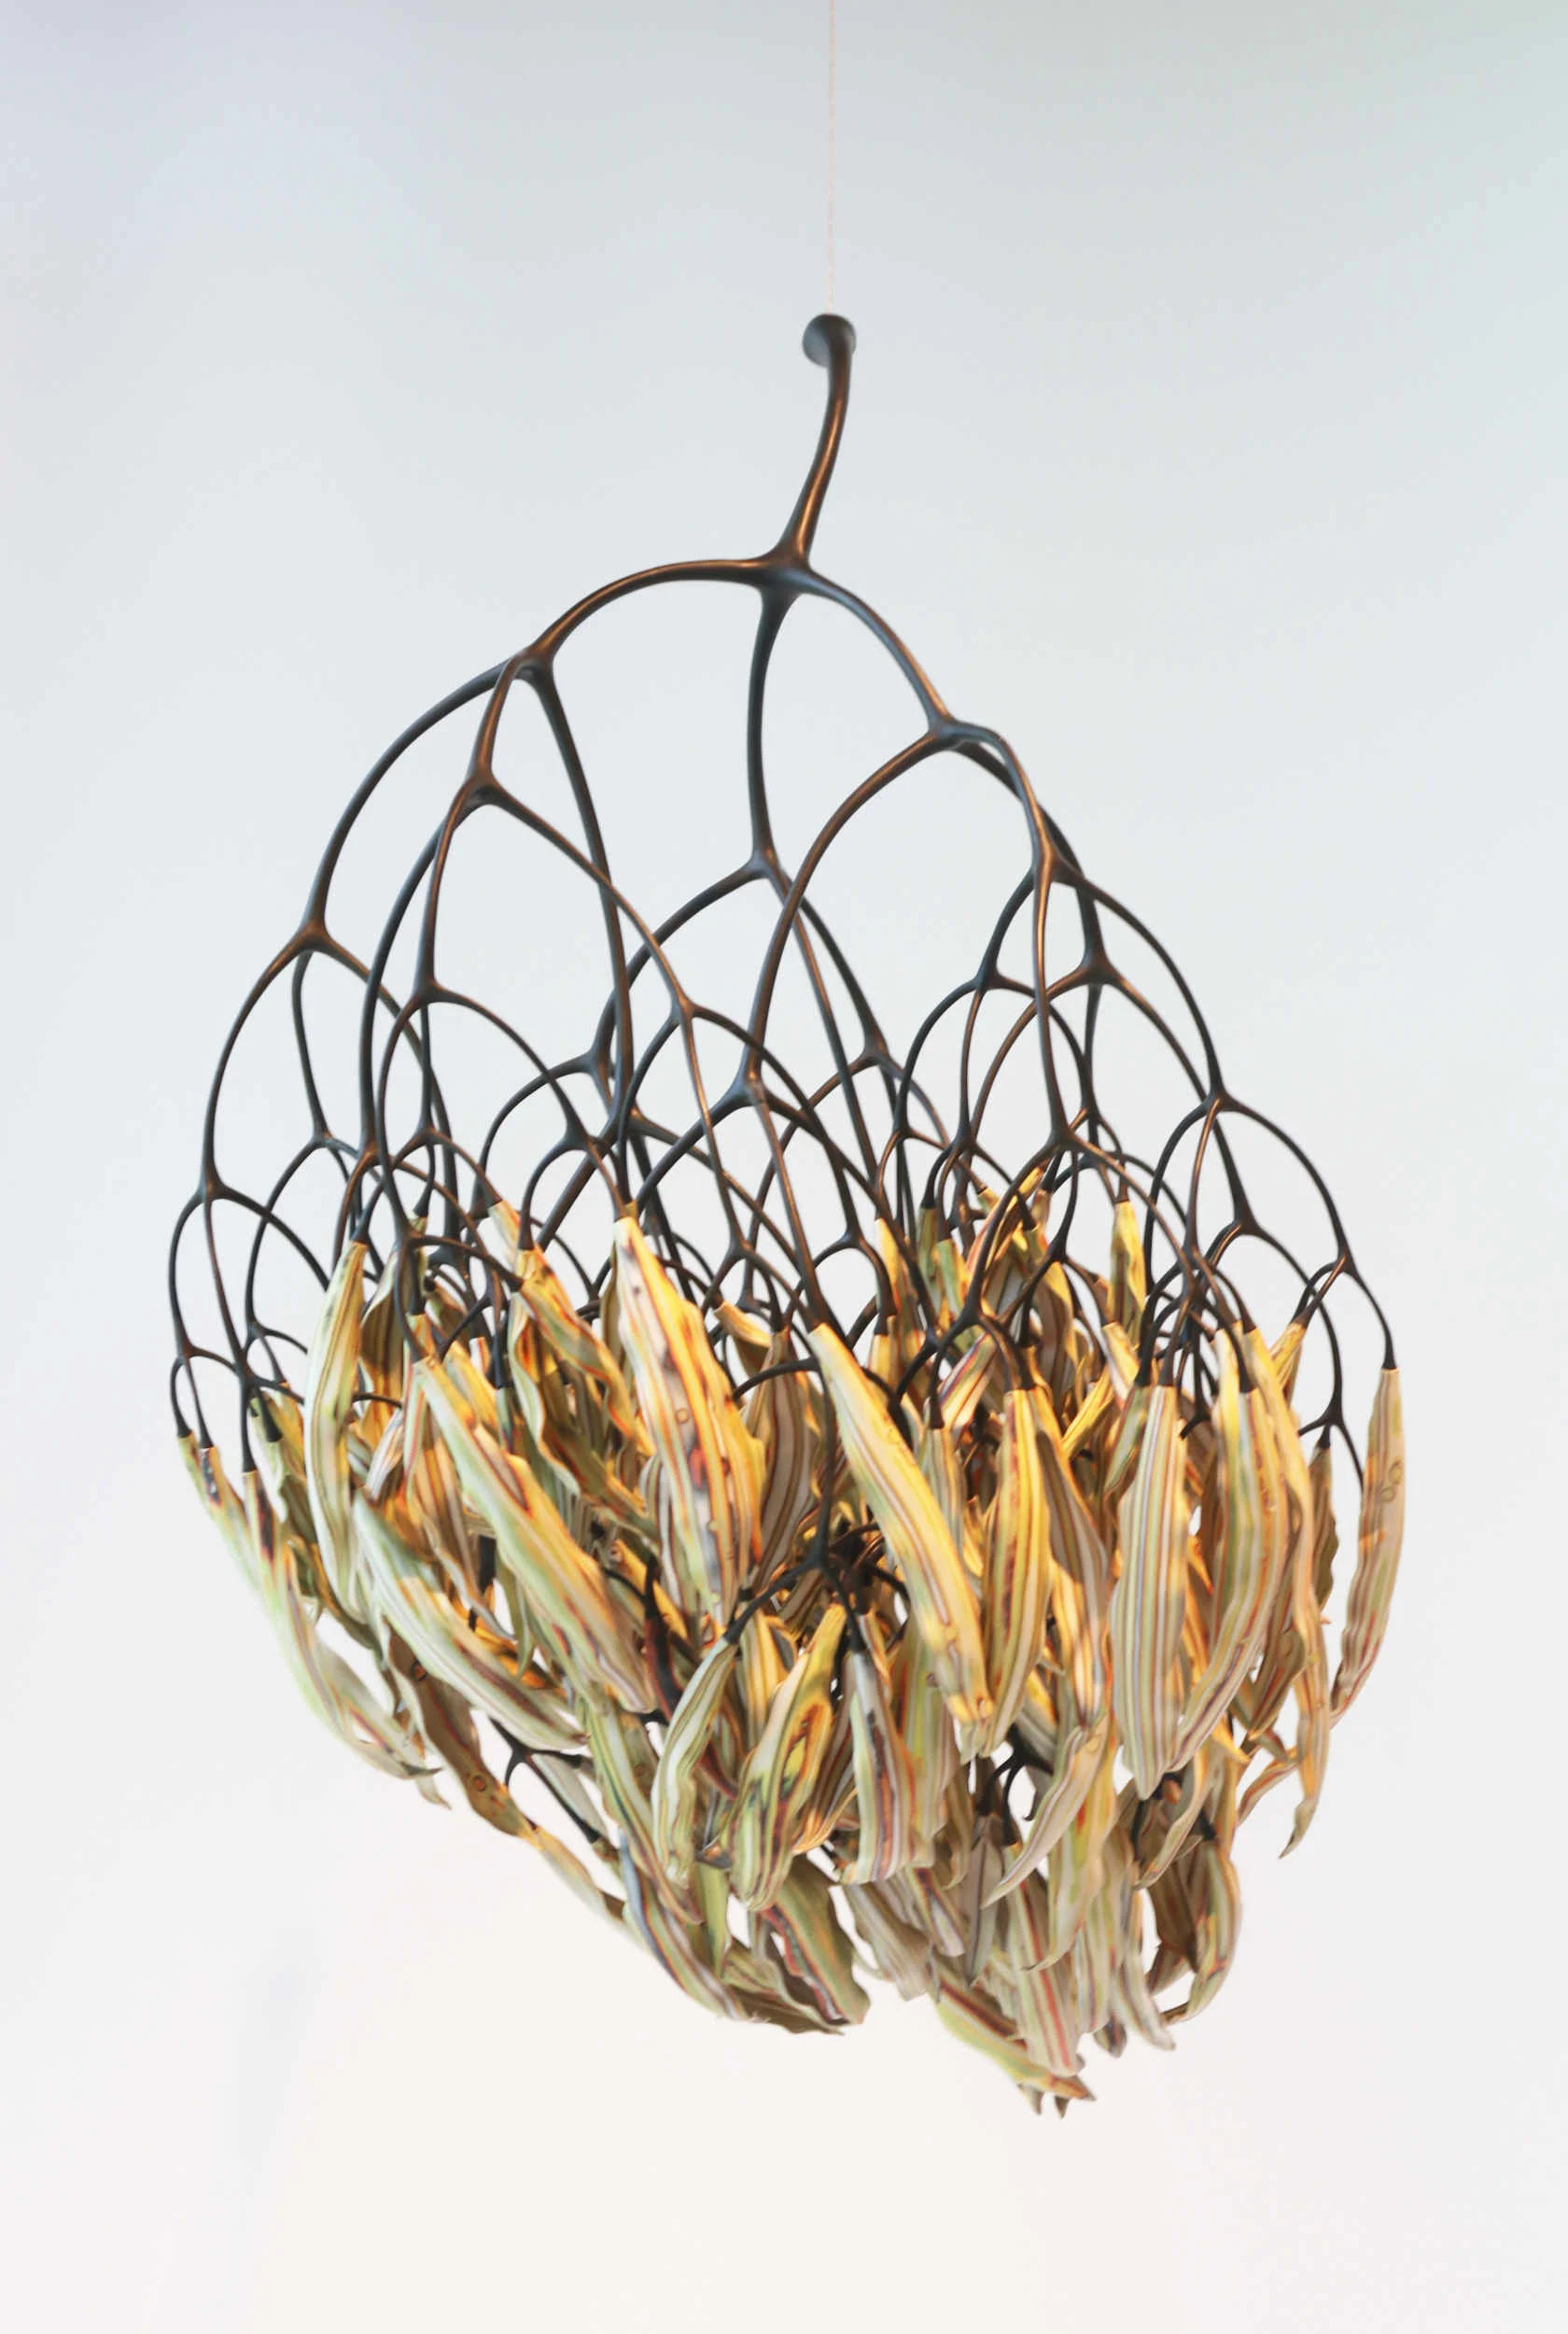
Michael Sherrill Retrospective at the Mint Museum, Charlotte, NC.
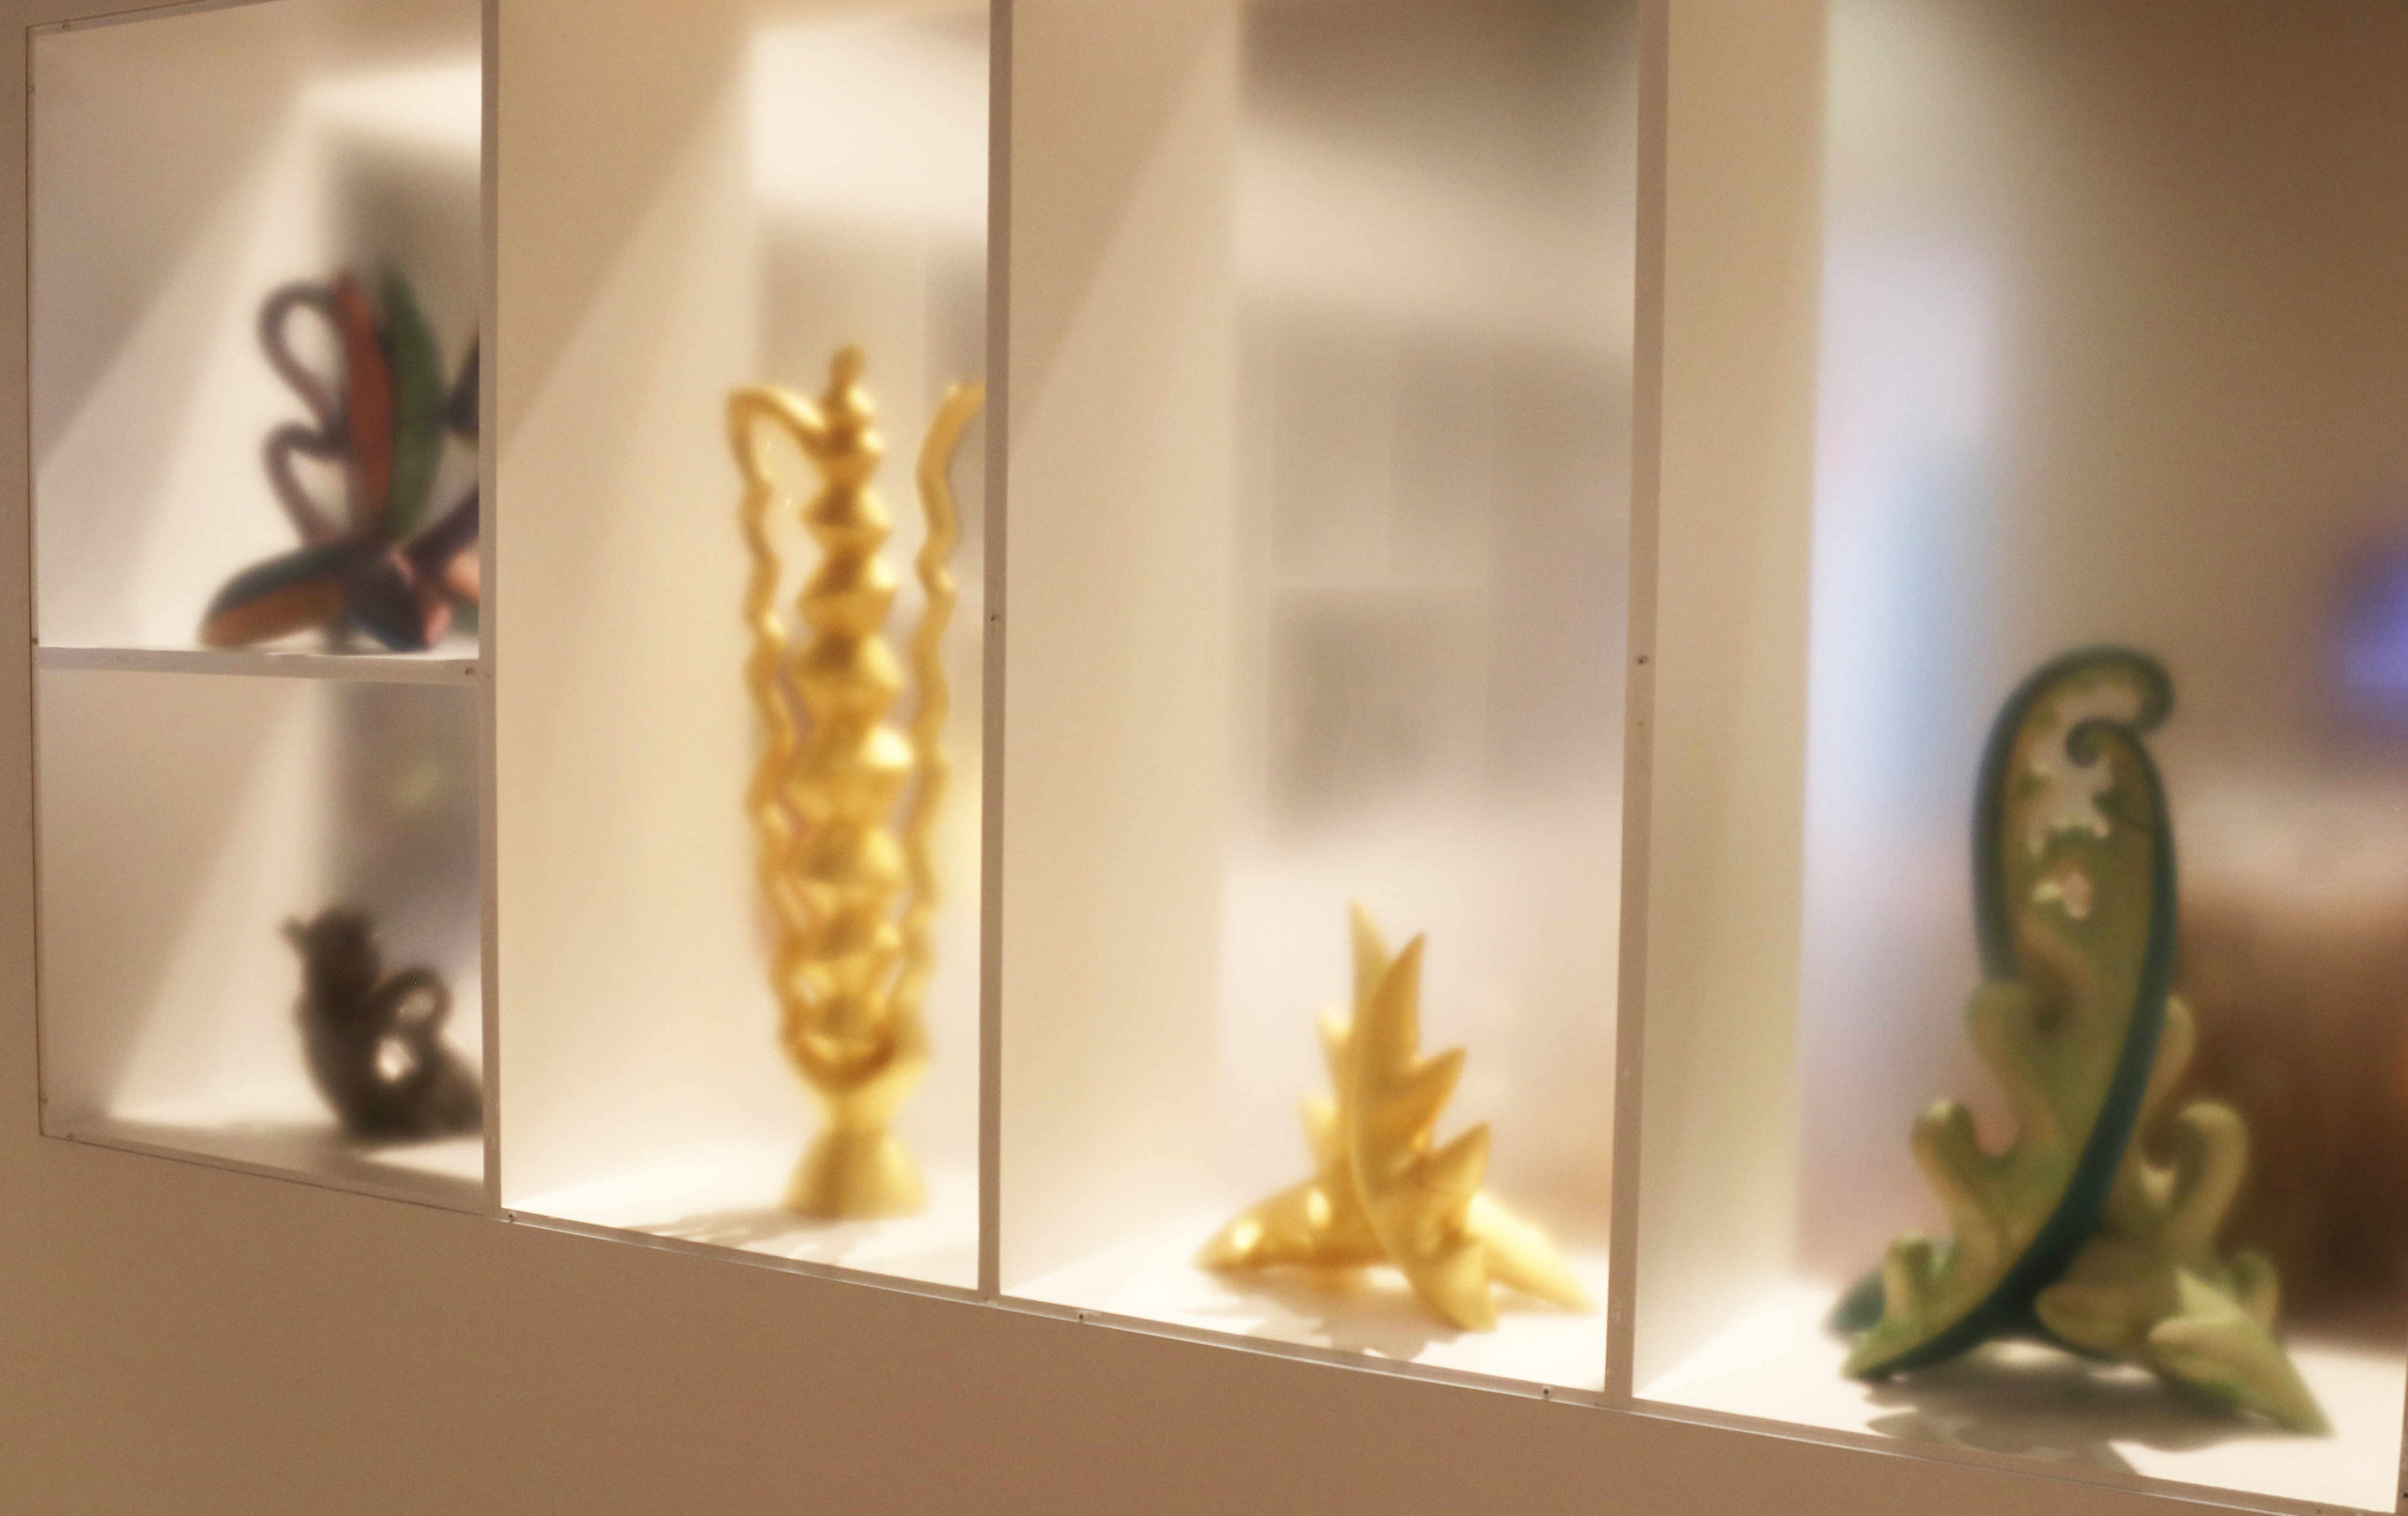
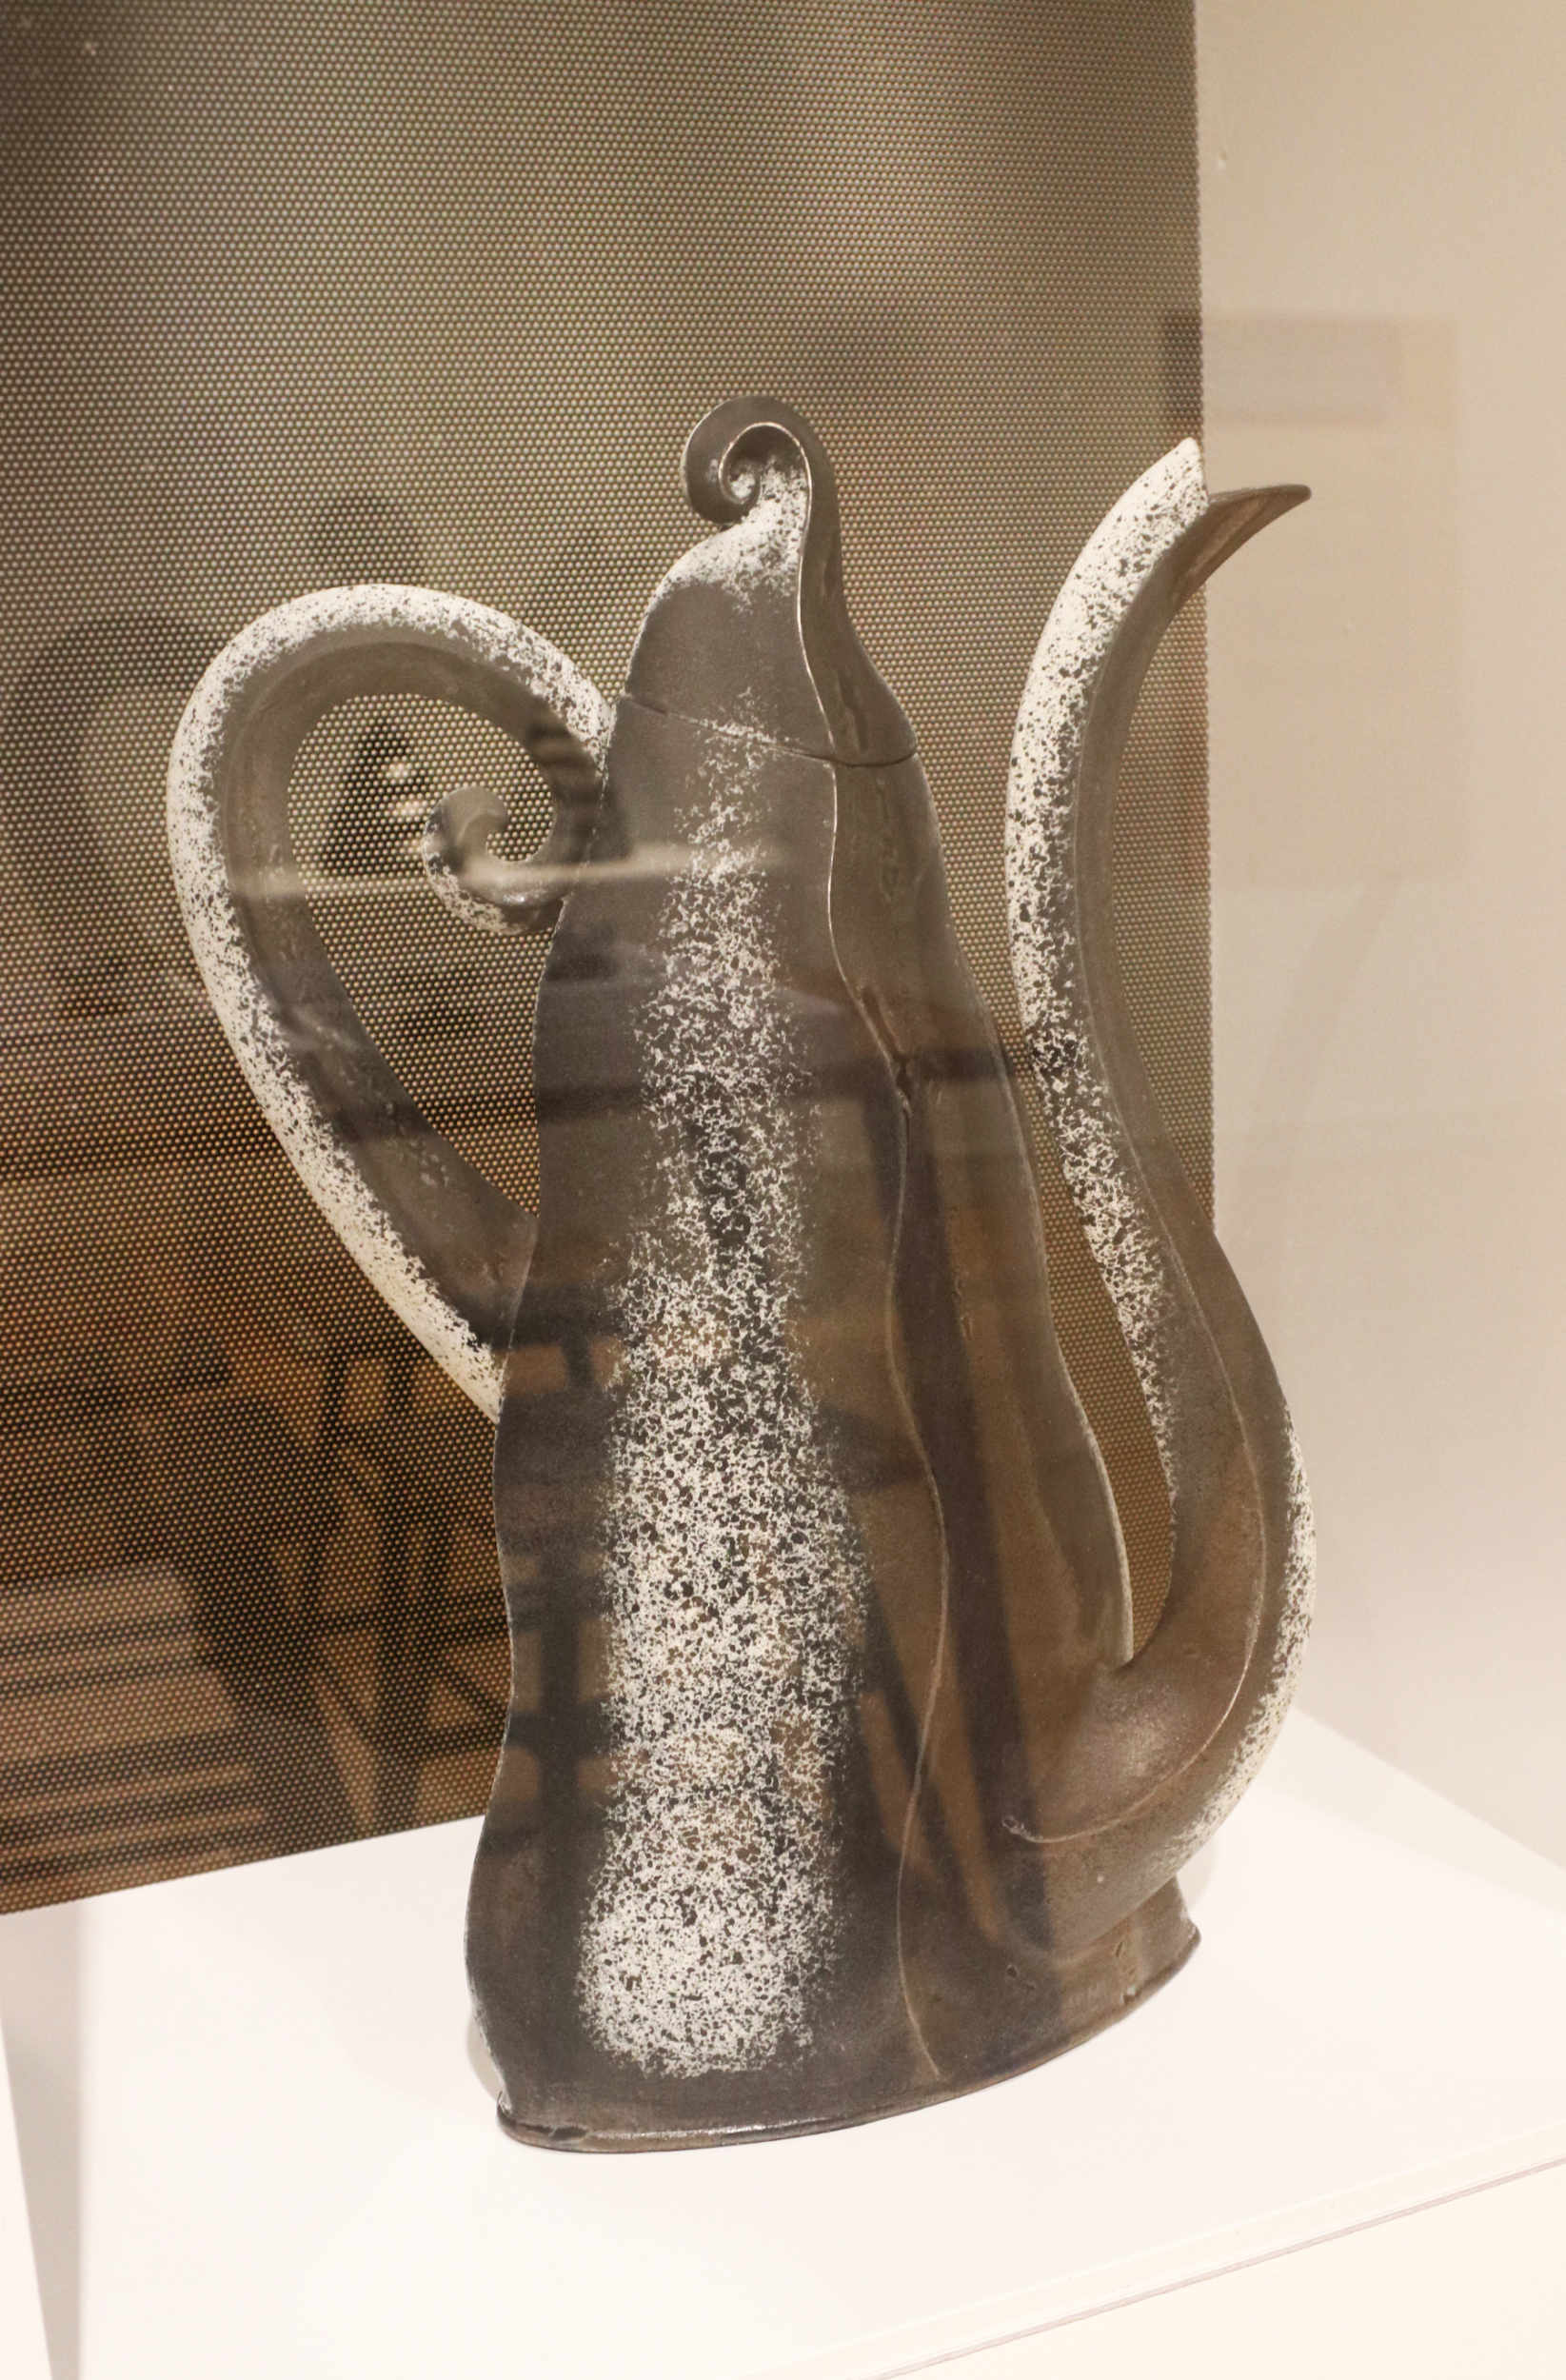
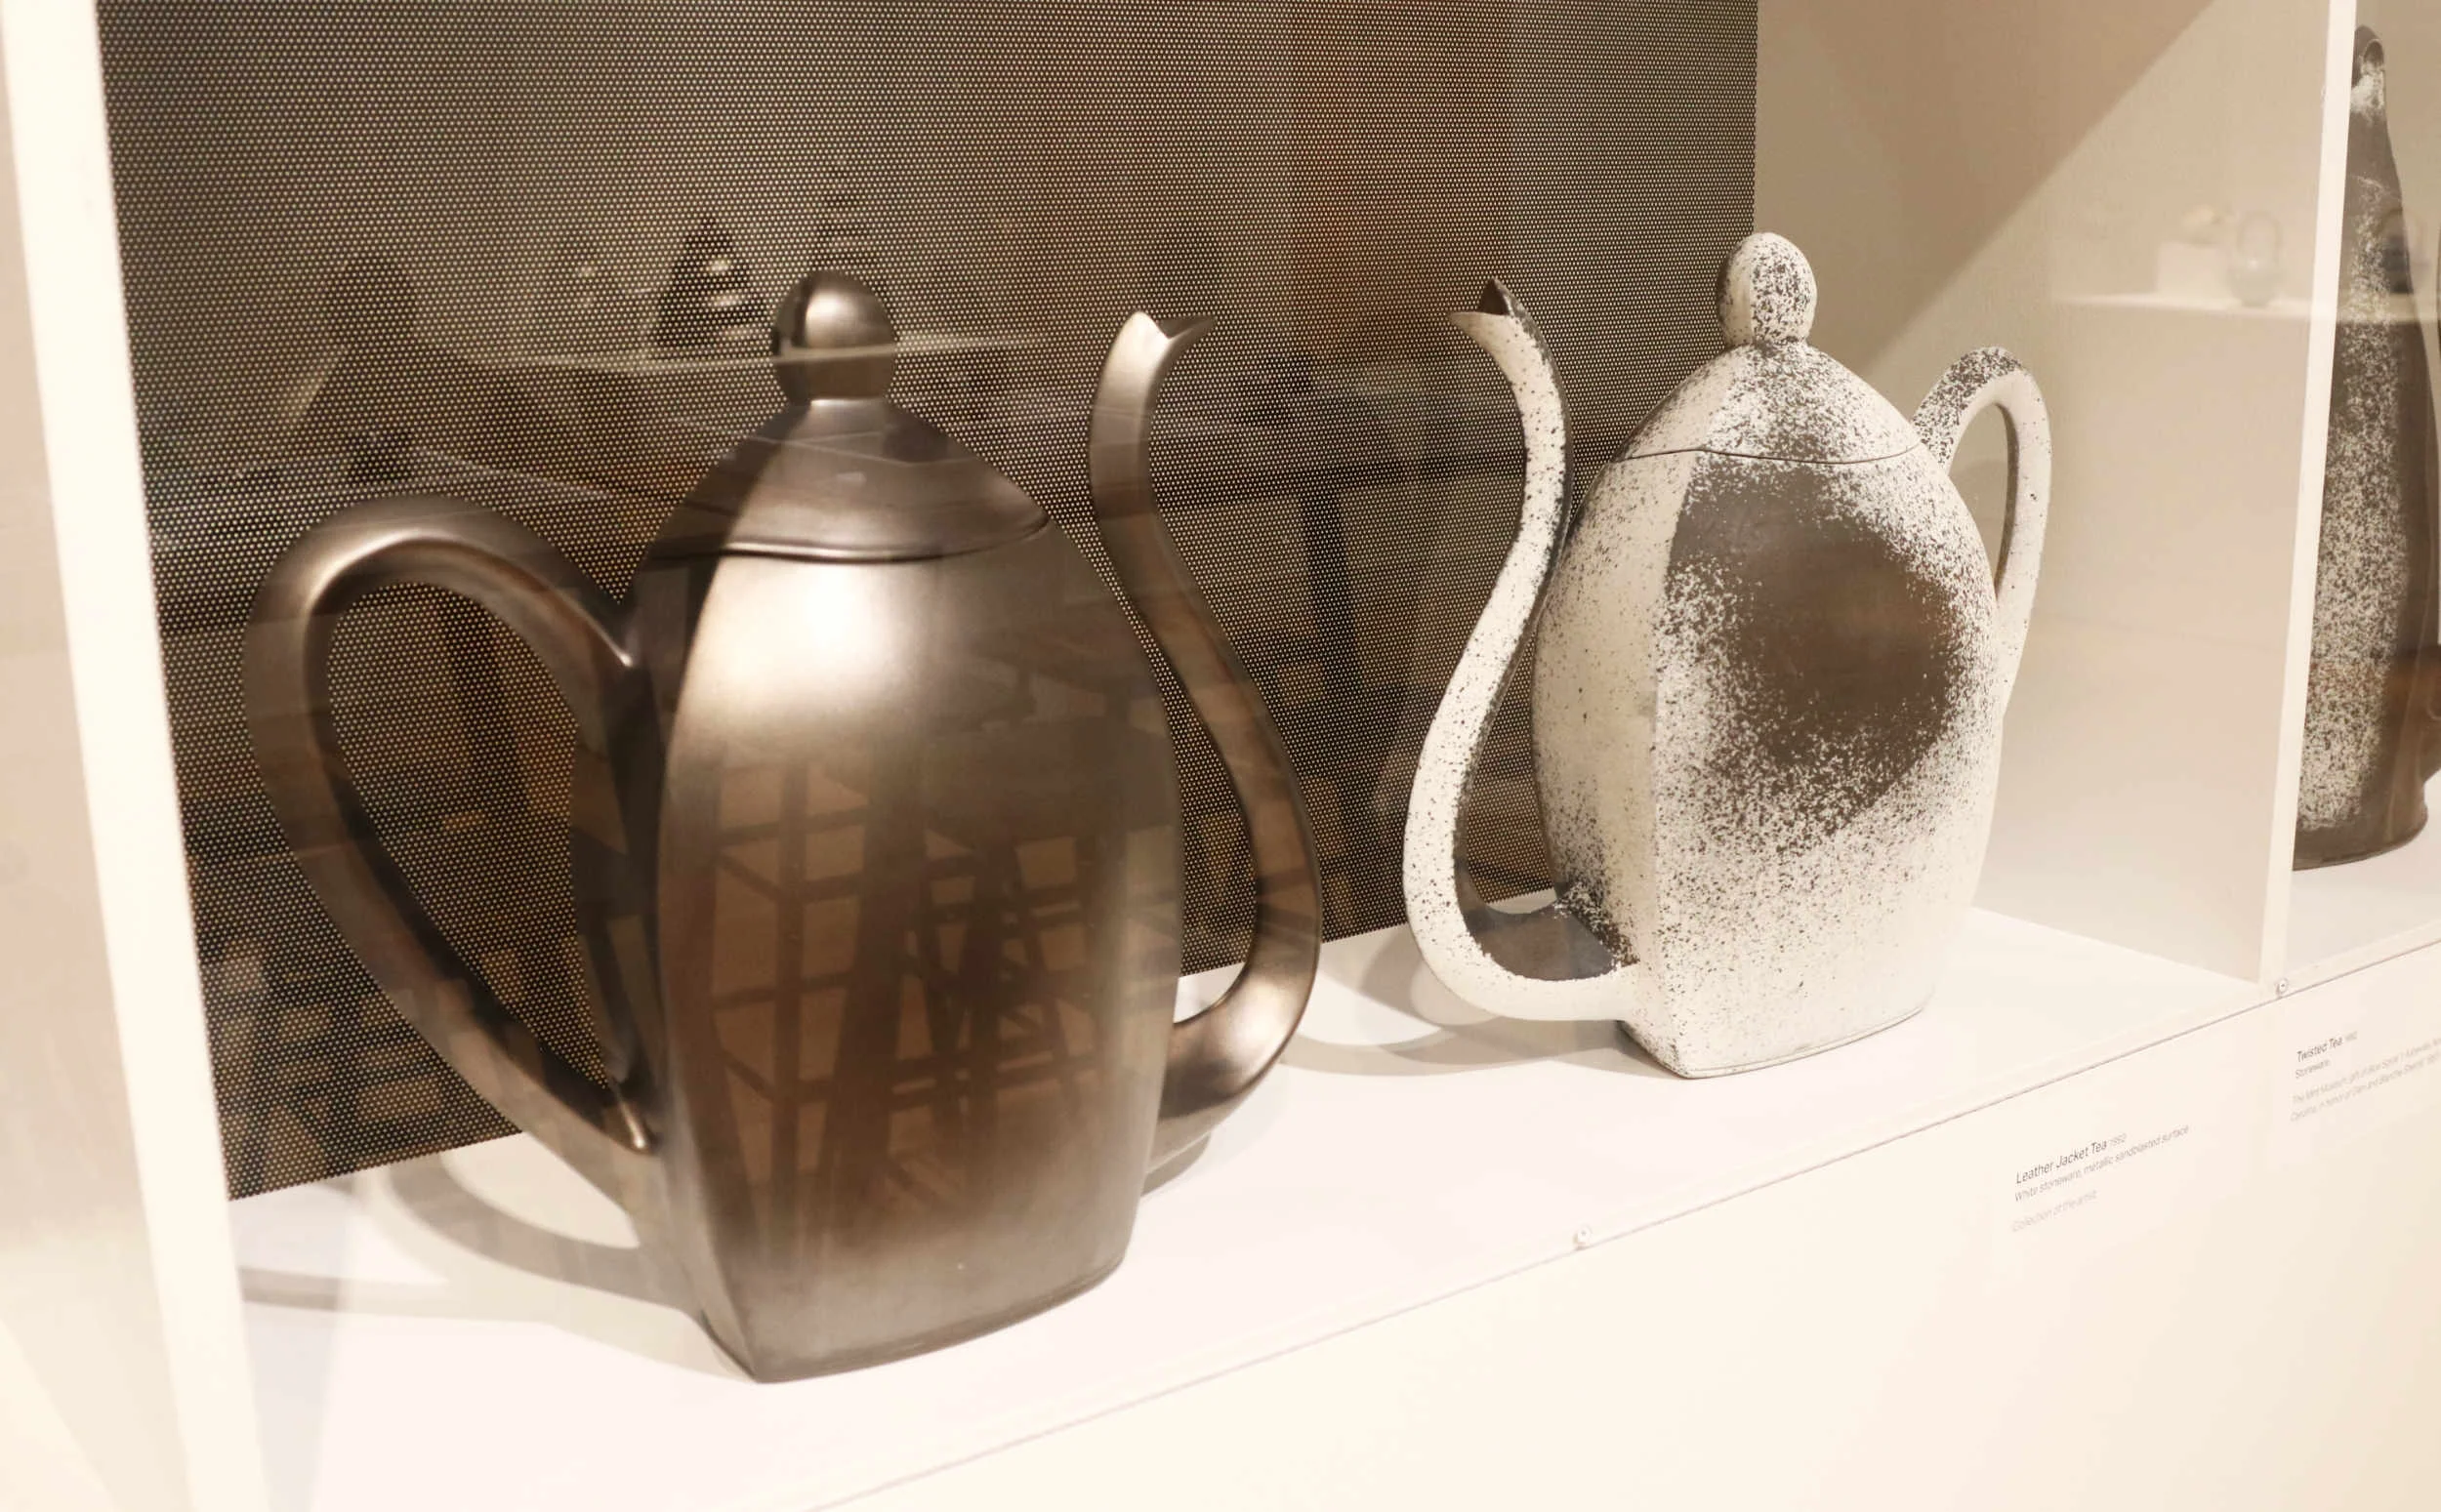
I took a Friday off from work to head over to Charlotte NC with a friend of mine who was visiting for a few days. I was slightly worried about how it was going to go to be honest… I was unsure about whether I should be inflicting a 2 1/2 hour drive on her that culminated in a ceramics show. Could be pretty boring. I had visions of a silent glum ride home, but I had heard good things so stuck to my guns and it proved to be well worth the drive. I loved it and Katie enjoyed it too. It was the exuberant sculptural teapots that really captured my imagination. “Elephant Leaf Tea” is just fabulous I think. The exhibition was so good in fact that I decided to document the whole thing in photographs.

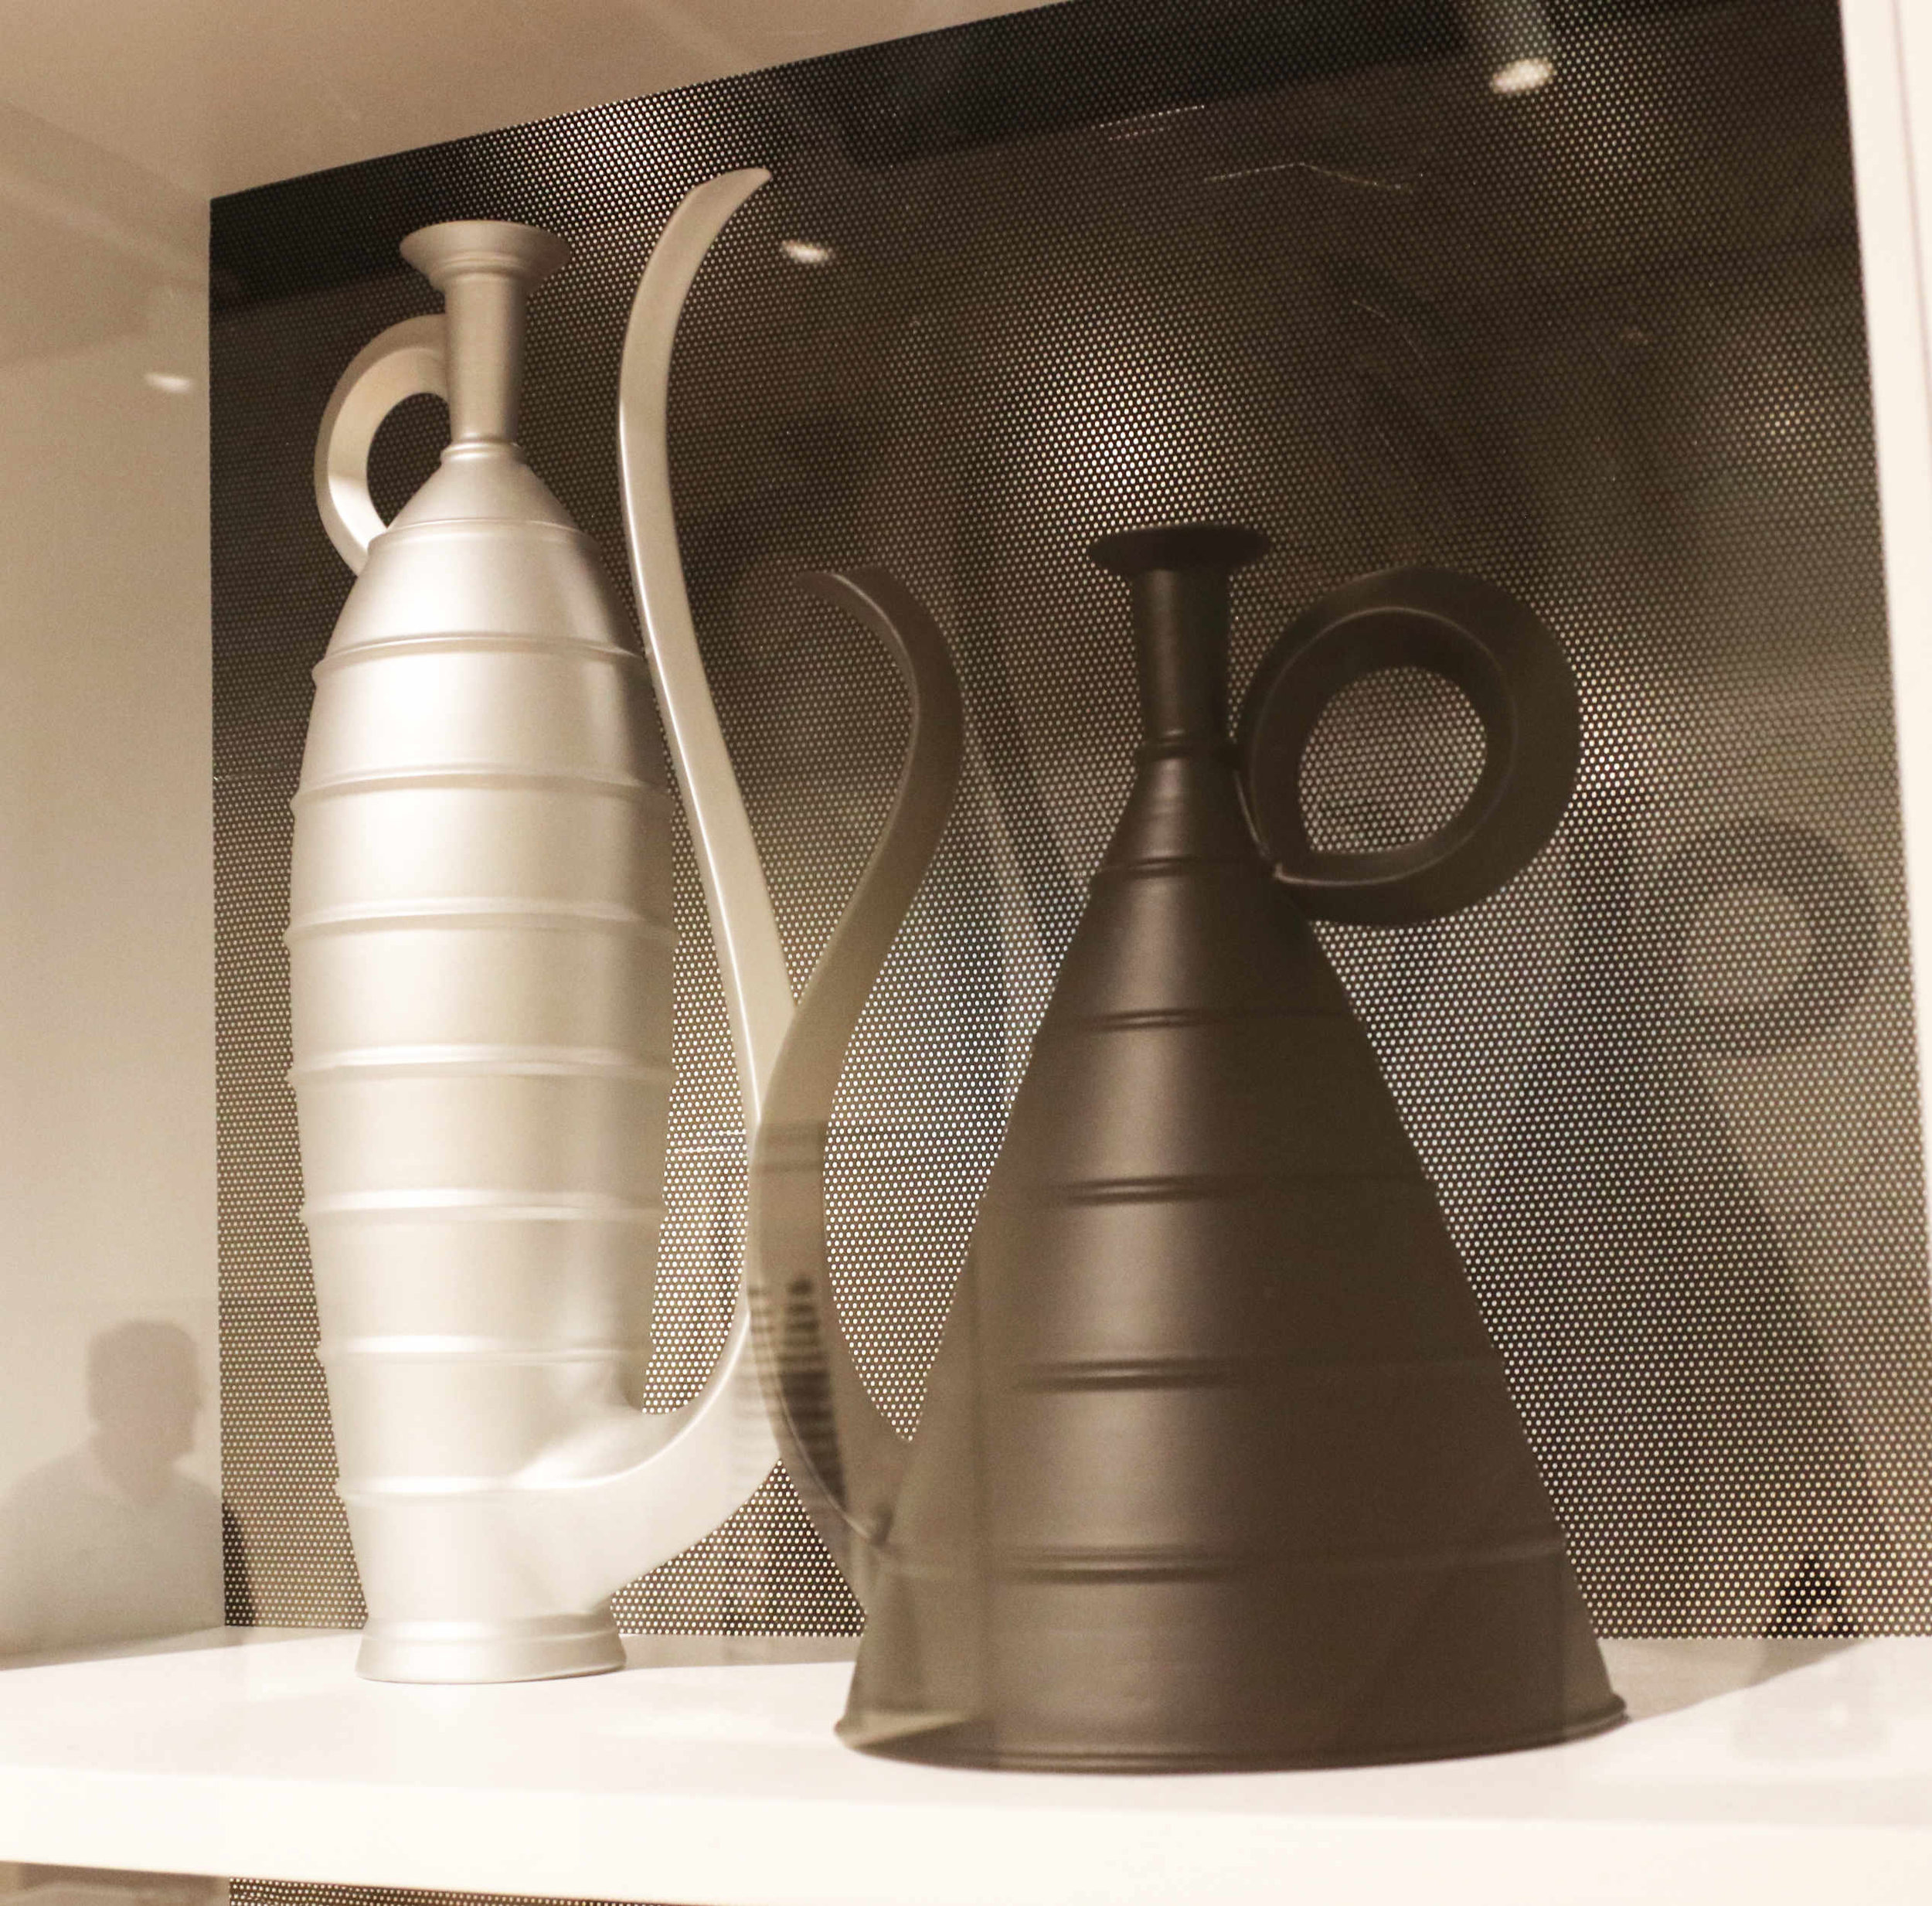
The show is now on tour and set to open at The Renwick Gallery in Washington D.C June 28-January 5 (https://michaelsherrill.net/calendar/2018/6/28/michael-sherrill-retrospective-5wm76). In 2020 it will go to Arizona State University Art Museum. I would definitely recommend going to see it in person if you can. Photographs don’t catch the details or breadth of the work. But in case you don’t live close to either of these places, here’s a virtual version…


Here’s a collection of bottle forms from the show. Bottles are a shape Michael comes back to over the years.


Finally, here’s the short film that accompanies the exhibition:
Wood Firing Course at the Rochester Folk Art Guild
A couple of weeks ago I was up at the Rochester Folk Art Guild teaching a wood firing course. Lauren and I went together and had a wonderful time. The area of Naples is beautiful—rolling hills, lots of lakes and wooded areas. The grounds and facilities of the Guild itself are quite amazing, too. I mostly wanted to write this post to show pictures of the Guild and encourage people to go and visit or stay and learn there. Back in its heyday, 40 people lived and worked at the Guild, farming, making art and music. There are studios for weaving, pottery, wood working, black smithing, boat building and graphic arts. They have a meditation hall, a tremendous kitchen, a gallery, a bookshop, a root cellar, an orchard, plenty of farming land and pasture, and I’m sure I’m forgetting plenty of other facilities. Oh the best part is the wood-fired sauna, sat up atop the hill, right next to a pond.


Everywhere you look and everything you touch is an intentionally made piece of craft. You can really feel the love that went into making each door knob or bench or cup. It’s a pleasure to use things that have been made with intention and care, softening with age and use. I was very charmed by the aging crafts, whether it is the oily patina developed on a spatula made from a pruned apple tree branch or a few loose threads on a weaving hanging on the wall. The master craftsmen who run their respective studios are also aging with grace. Perhaps they are a little less productive than years ago, but they make beautiful work with finely honed skills. I would really encourage anyone looking for an apprenticeship in weaving, wood working, turning or pottery to contact the Guild. They are looking for people to come and help out in the studios in exchange for teaching what they know. Apprentices come and go but right now they are looking for students.
Here’s a few pictures of the kitchen. I dream of having such a well appointed kitchen…


I just want to give a little history of the Guild for those who don’t know much about it and are interested. These are words from Annie Schliffer, who invited us up, and who currently runs the Guild’s Pottery:
“In 1967 on July 4th we bought the farm. There had been a Gurdjieff group in Rochester with Louise March visiting once a month from NY. Mrs March had been Gurdjieff’s secretary and translator at the Institute for Harmonious Development of Man near Paris, France. She helped to translate his chief work, Beelzebub’s Tales to his Grandson, or All and Everything. When she met with the group she felt it was imperative to focus the attention, using the various crafts as a means. She wished us to farm, garden, and have a relationship with the land and the earth. So the farm was purchased by a small group and the younger ones moved out and began building.
2 feet of chicken manure was shoveled out and the pottery wheels (handmade at first) were moved in. A kiln built. A wood shop built lovingly from old barn wood. And the land cultivated and planted. There was non stop work and the joy that comes from feeling perhaps for the first time a sense of the possibilities that life offers.
The group from Rochester continued to come out for “work weekends” and slowly as the outer work progressed the inner life grew more vibrant. The Gurdjieff work flourished, meetings, sacred dance, meditation, and always hard work.
When I arrived in 1972, the farm was full of people, students, and the weekend people. I was searching for an apprenticeship. I had first taken Ceramics at Skidmore my last year as an elective and was entranced. But the throwing proved too difficult and later even when I was living with a potter in Berkeley, I didn’t take it up again.
It wasn’t until 2 years of Zen Buddhist training that I had the discipline to learn to throw. The training was rigorous, making clay and glazes, throwing hundreds of mugs and bowls daily, trimming or handling them the next day.
I learned that the great value of repetition throwing. The form enters the body, and I am freed from the tyranny of the head. Our goal in this Gurdjieff work is to harmonize the head, the heart, and the body. And the attention that is required in order to learn a craft, helps in this pursuit of a finer attention.”
Here are some of Mrs March’s artworks which hang in the dining room…


Righto, on to the wood firing class. This was the first class I have taught of this sort and I have to say I think it went pretty well on the whole. On Monday morning the students busily glazed and wadded their pots. We managed to get all of our pots wadded and transported up to the kiln before lunch. Loading went pretty fast as everything was already wadded. I had each student load some pots and lay out a layer of furniture too. It was very chilly out so afternoon tea was a welcome event.


Got the door bricked up and lit the fire. I stayed up with it till midnight and then Emma Silverstein took over till 4am (Emma was doing work study for the class and proved very helpful indeed—she is getting an MFA from Ohio State University and regularly fires a catenary arch kiln at school). Everyone took four-hour shifts on the kiln, during which I would pop in to see all was on track, but tried to let them get on with it. I wrote out a schedule so their job was to try and keep us on track. All was plain sailing through Tuesday and into Tuesday night. 8-midnight was our reduction shift and then the goal was to slowly gain temp and have medium reduction from then on. Wednesday morning we were battling for temperature, adding soda when cone 8/9 went down top and bottom. We put in 11lbs soda, at first just sprinkled on top of wood and then wrapped in newspaper as burritos. We soaked at top temp around cone 10/11 for a few hours and called it quits around 2:30pm.


After our firing was over I went and took a swim in the pond up the hill. It was instantly refreshing. The water was very cold but felt glorious after the past three days of fire.
Whilst we waited for the kiln to cool we got in the studio and did some wet work. It’s a beautiful studio. First I had the students make cylinders as a warm up and then we moved on to teapots. It was nice being around pots left by previous potters who have worked at the Guild.


On to the unloading. It’s always nerve-wracking unloading a kiln, particularly when you are in charge and have led the thing. Thankfully we got some very nice pots out. The soda really made a difference, and I want to experiment more with it.


Here are just a few pictures from the gallery at the Guild to end on:


