Devil's Playground Granite Glaze Tests Round 3: Video
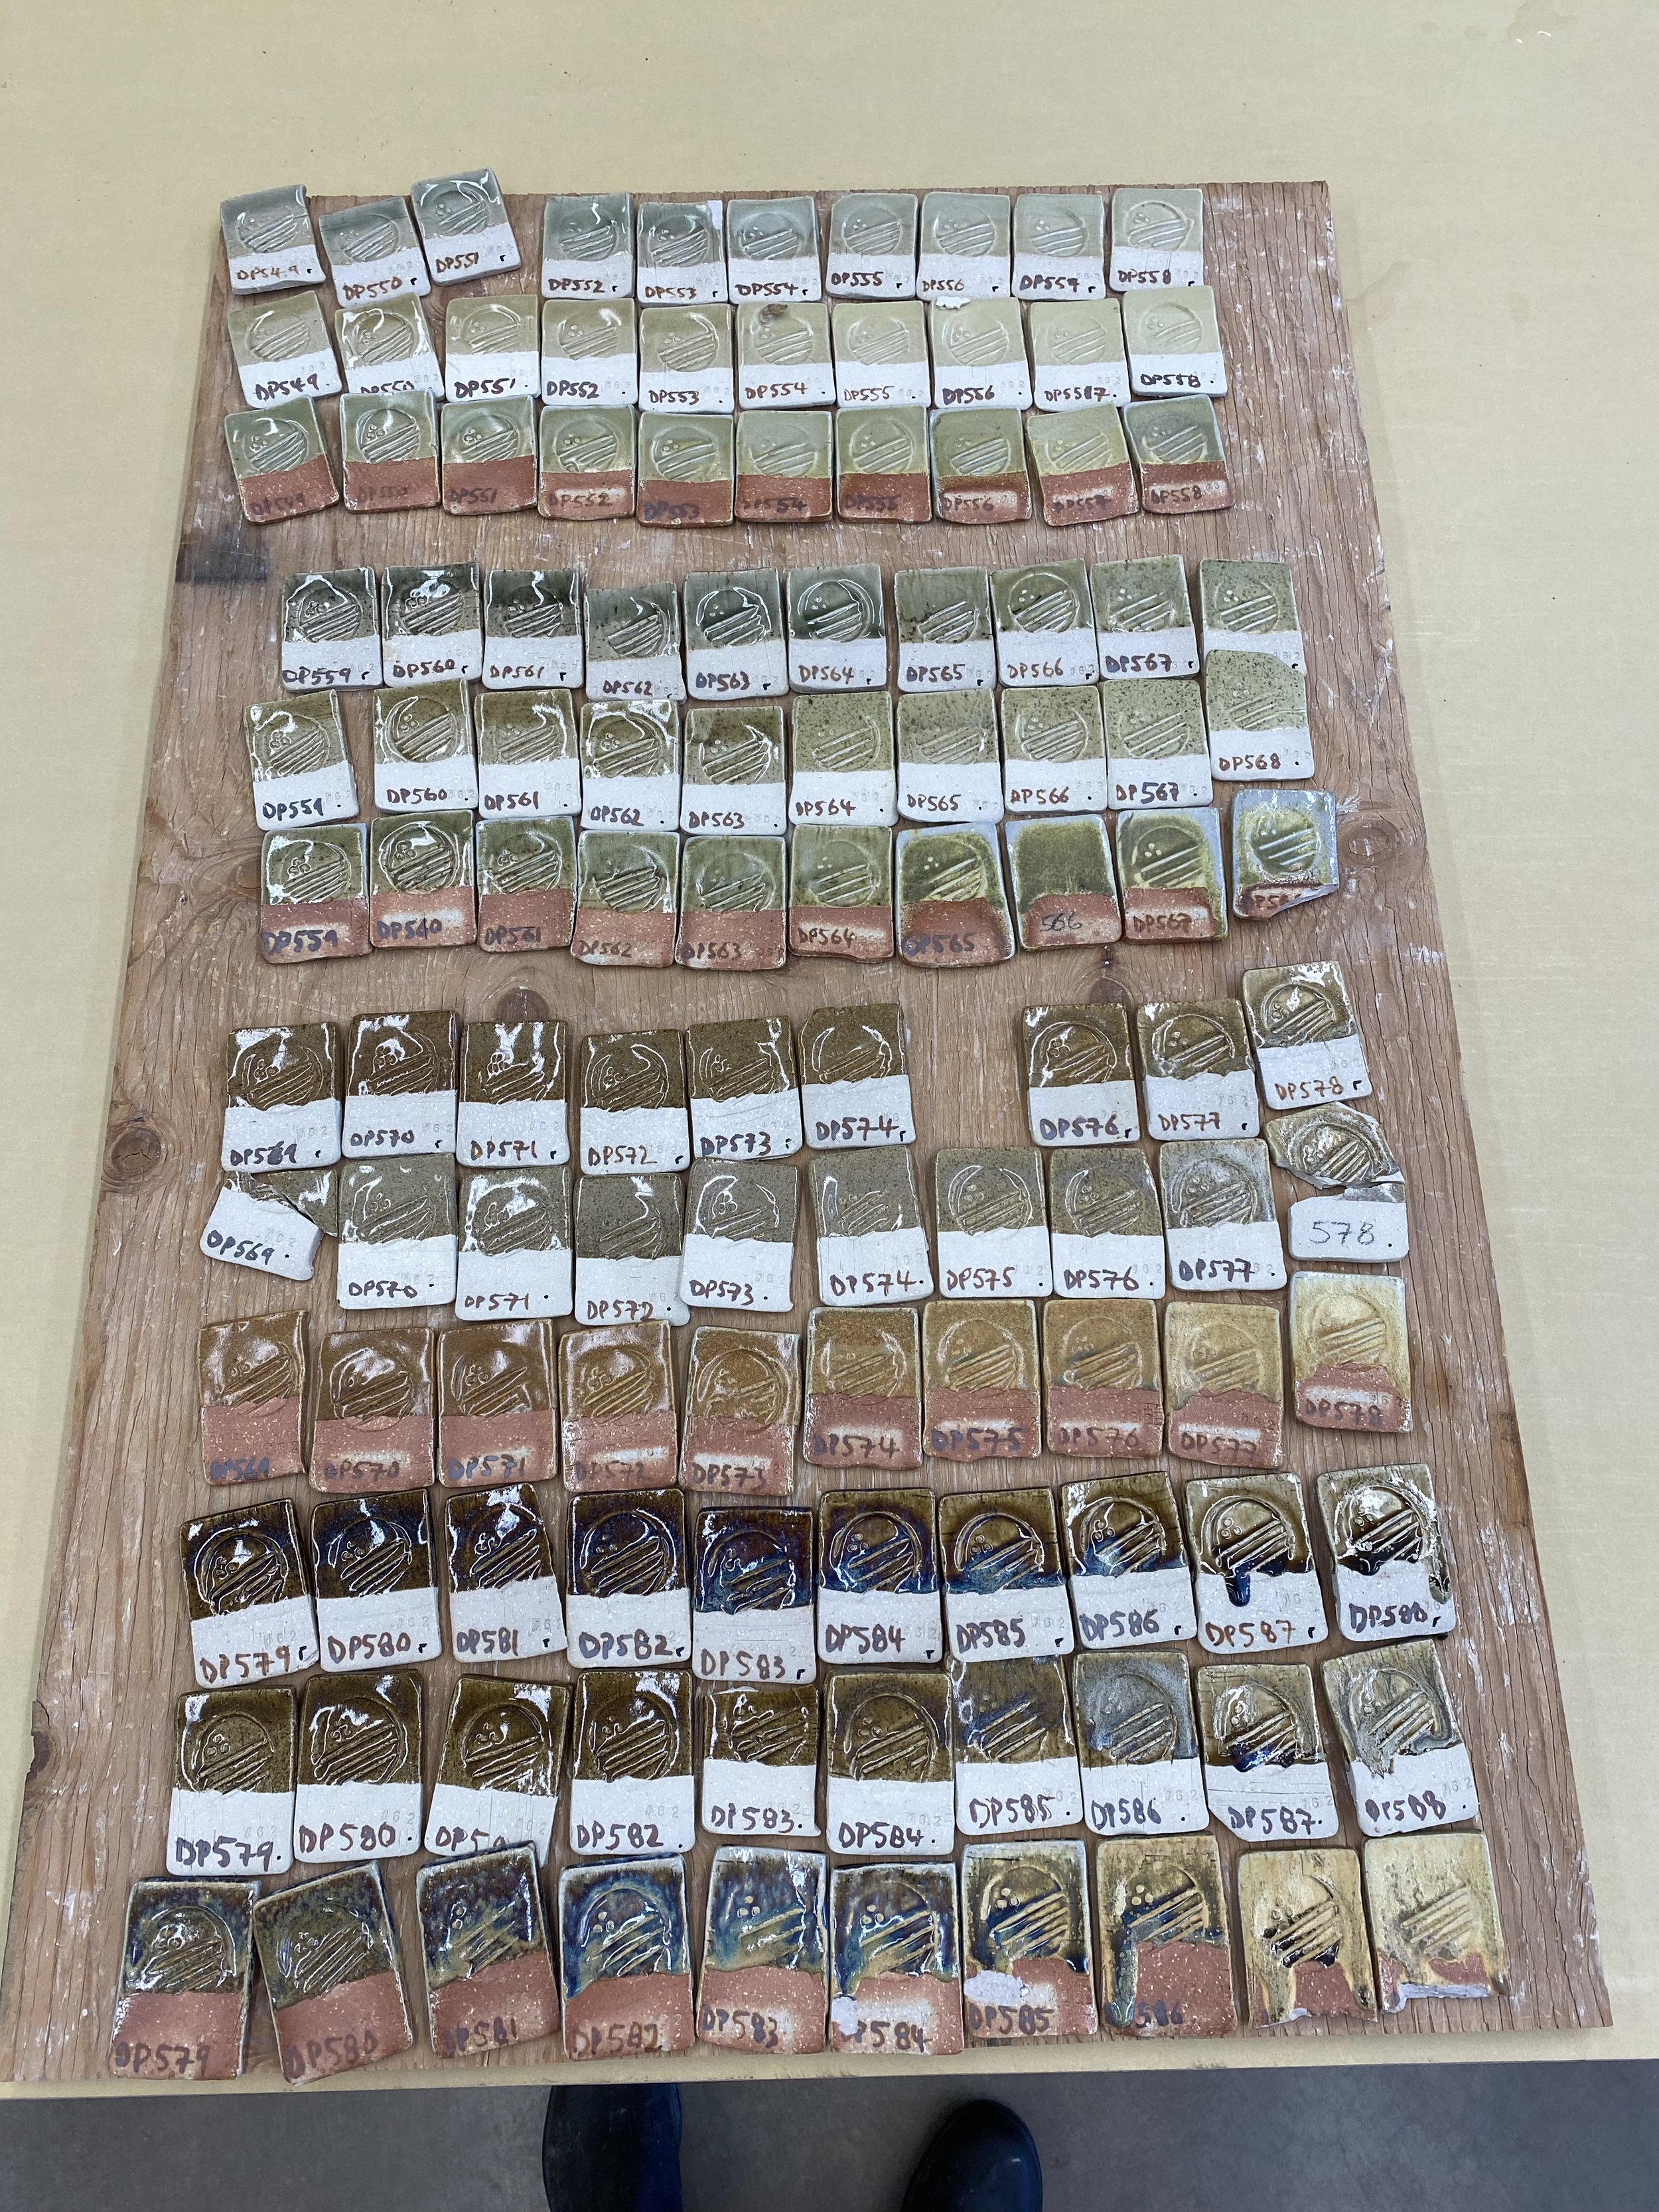
From my first and second round of testing, I realized that my granite needed more flux. It was too stiff and this was making the glazes uninteresting. So I set out to test every flux I could think of in the Utah State University materials store room. I added 5%, 10%, 15%, 20%, 25%, 30%, 35%, 40%, 45% and 50% of each of these fluxing materials to my Devil’s Playground granite (which accordingly went from 95% down to 50%).
This was a broad test and I was hoping to hit on some interesting things, but I also just wanted to see the effect of different materials. When I leave USU, I am not going to have access to such a range of potential ceramic ingredients. The granite offers a blank slate with which to experiment, in a way; it is a stiff grey translucent glaze on its own at cone 10.
I was particularly interested to see the differences that the fluxes had on the granite. For example, the difference between minspar and custer feldspar (very minimal difference) or between lime and wollastonite (a marked difference, lime being much more green and faster at matting out the surface, the wollastonite being much bluer).
I also decided to add 4% iron to every test, in order to see how the added iron content played with these various fluxes, too.
This video is about 25 minutes long and takes you through the results of each set.
Check out my next post for all the notes and photos of this batch of tests.
Devil's Playground Granite Glaze Tests Round 2: Pictures with notes
The first test here is to see how the granite responded to increases in silica and alumina. Basically this was to see if the granite was deficient in either. I used Ian Currie’s sample Earthenware set but subbed in my granite for the ferro frit. I made up 4 corner glazes and then mixed 35 glazes from these. Each corner glaze is made from 300g material and topped up to 500ml.
Corner A Glaze contains 120g EPK (Edgar Plastic Kaolin) to 180g granite. This is our high alumina corner.
Corner B Glaze contains 75g EPK, 120g silica and 105g granite. This is our high alumina, high silica corner (low flux).
Corner C Glaze contains 300g granite. This is our high flux corner.
Corner D Glaze contains 150g silica and 150g granite. This is our high silica corner.
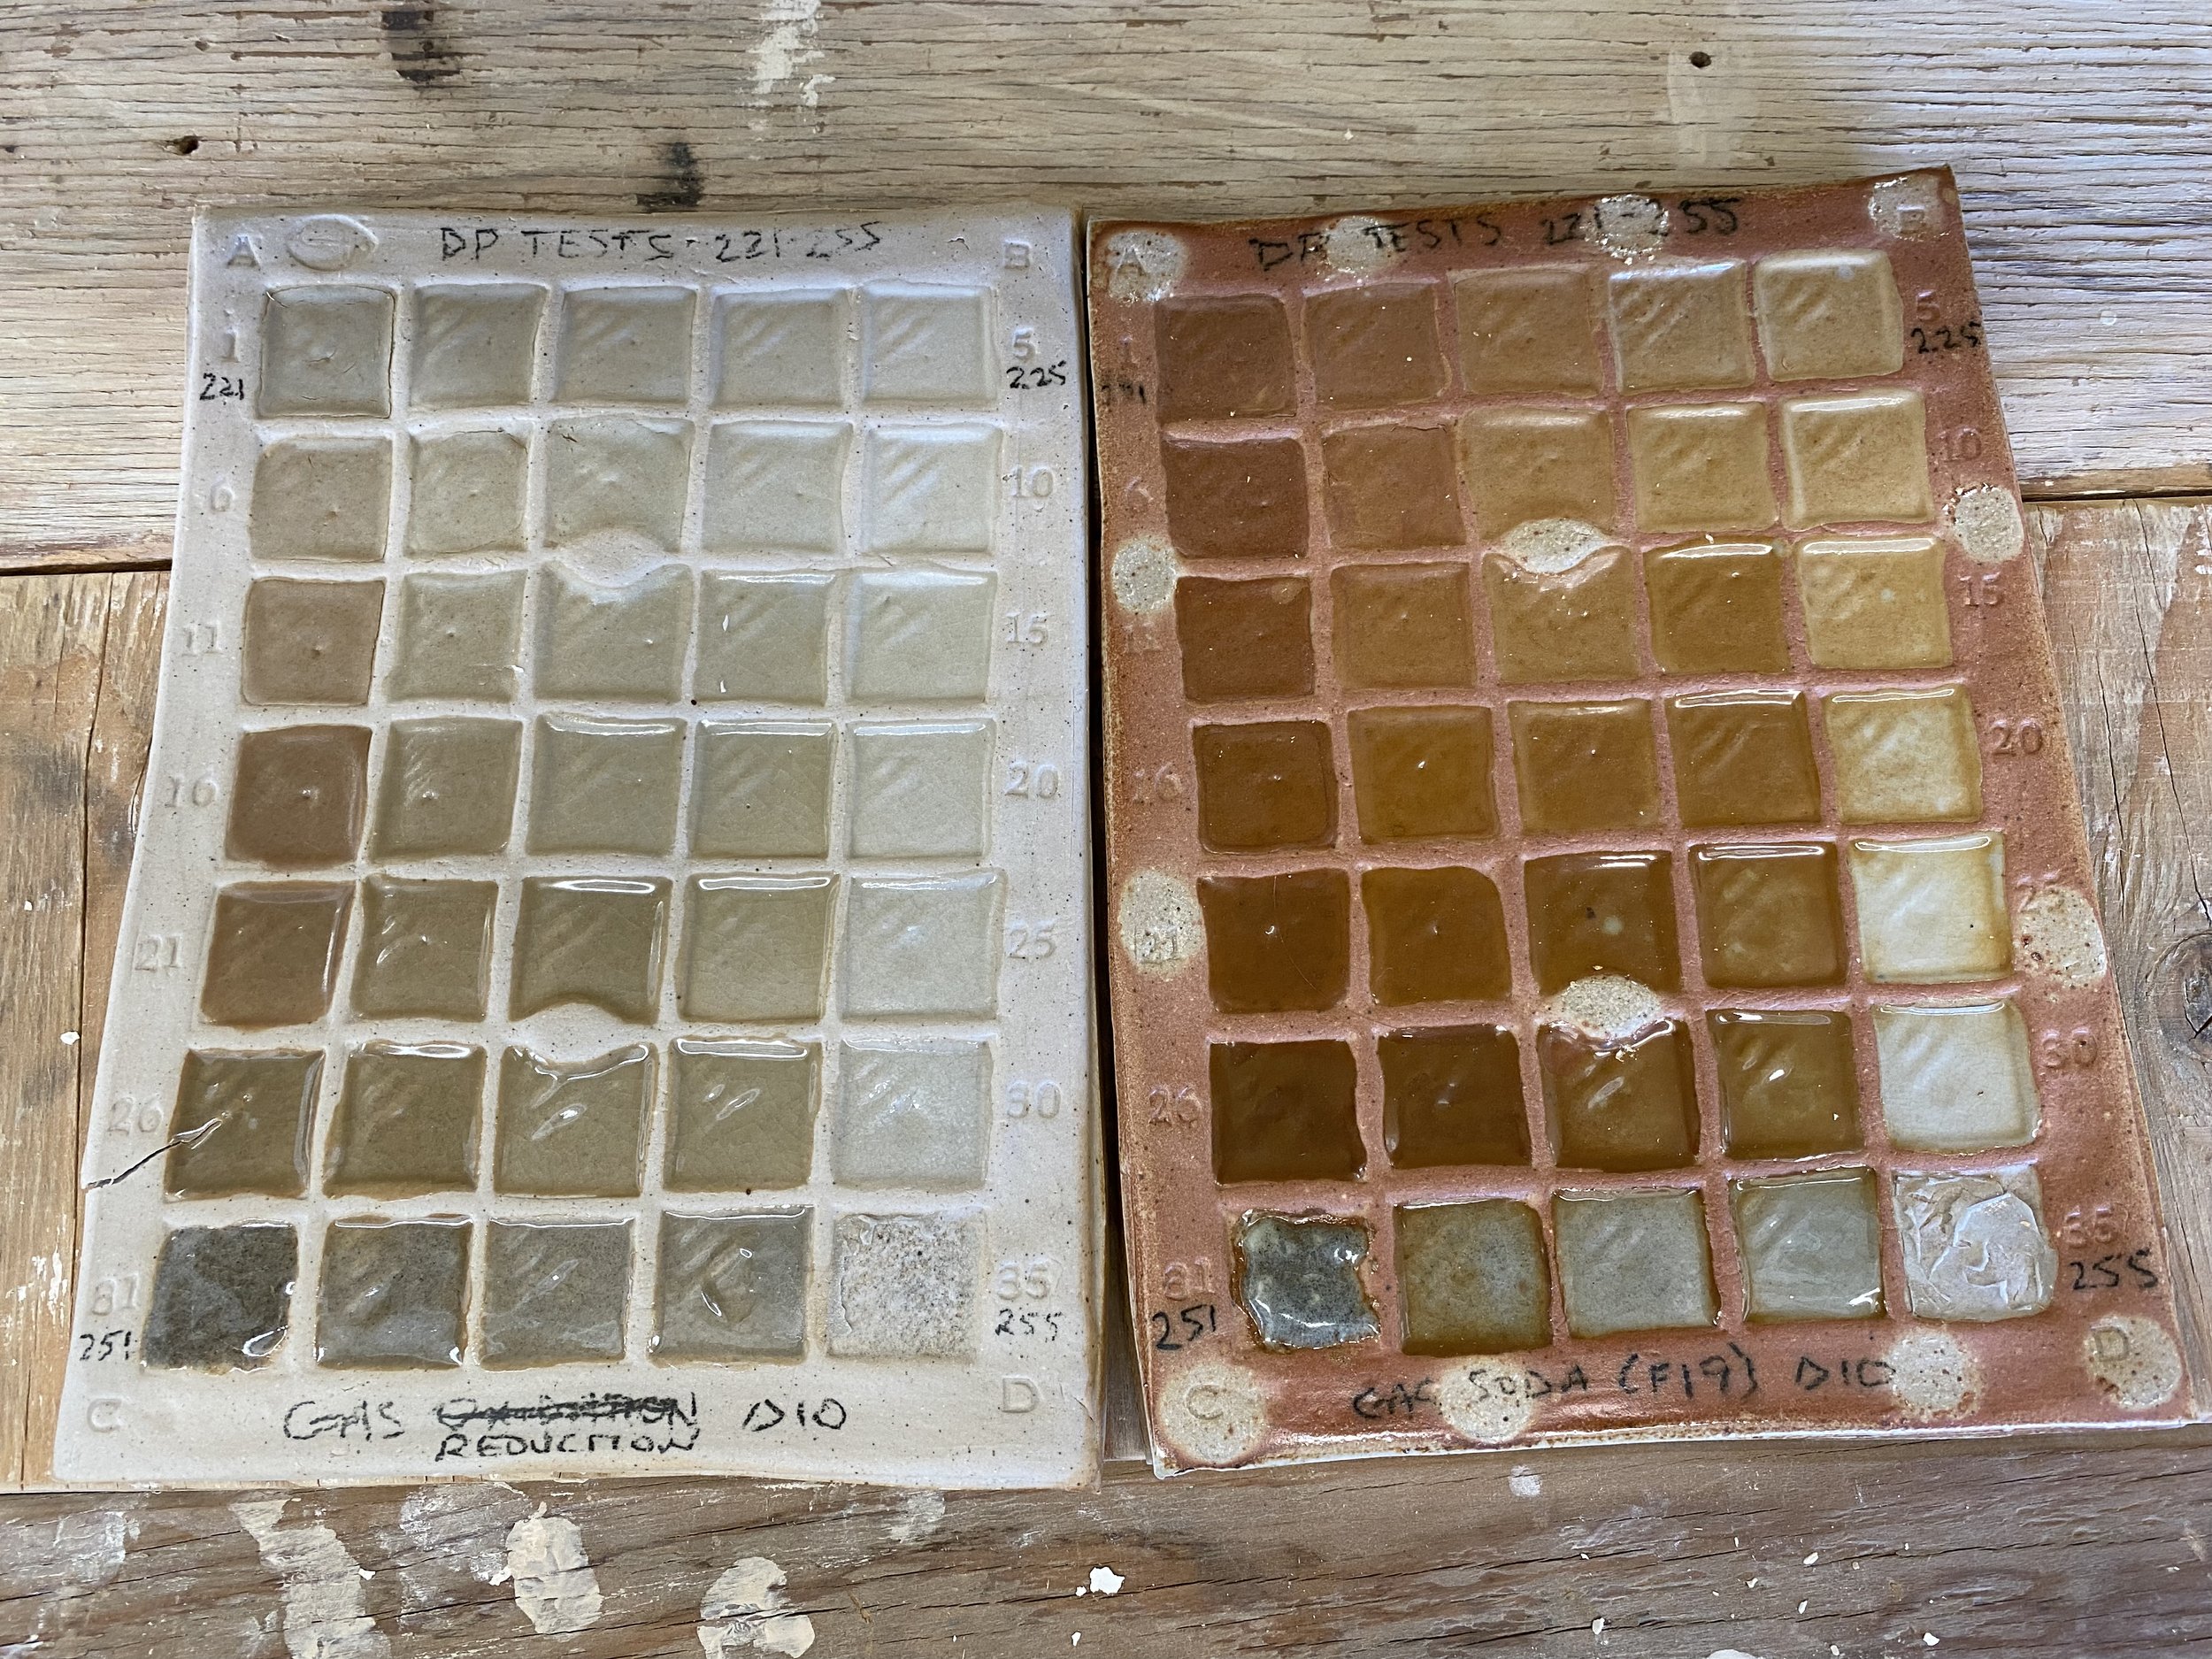
DP 221-255
What do we notice from these tests?
Corner C is the granite on its own. It melts at cone 10 and is pretty much a glaze on its own! In fact out of all of these tests corner c is about the nicest.
As we might expect, the corners A, B and D were not successful glazes. They were each too refractory and did not melt. In fact, from this initial test I can conclude that the granite has plenty of alumina and silica already. But it can take some alumina and silica, which may be helpful if I need to adjust it to fit the body better: ie. if I have crazing issues I can add some silica to the glaze without it drastically altering it.
The soda seems to be encouraging a more chestnutty brown color overall. Not particularly pleasant! Number 25 in this grid of 35 looks like a potentially nice shino style glaze in soda though.
Overall far too many of these tests are dry… the whole set needs more flux added.I can conclude from this that my granite needs flux added.
Here is the sheet showing the % of what each of these glazes are. This grid method comes from Ian Currie by the way. He has a couple of excellent books out there detailing how to do it.
Adding iron to this initial set did not improve matters. It needs more flux clearly. Below is the same grid test but with 4%, 7% and then 9% yellow iron oxide.
DP 256-290 (same grid as 221-255 with 4% iron oxide added).
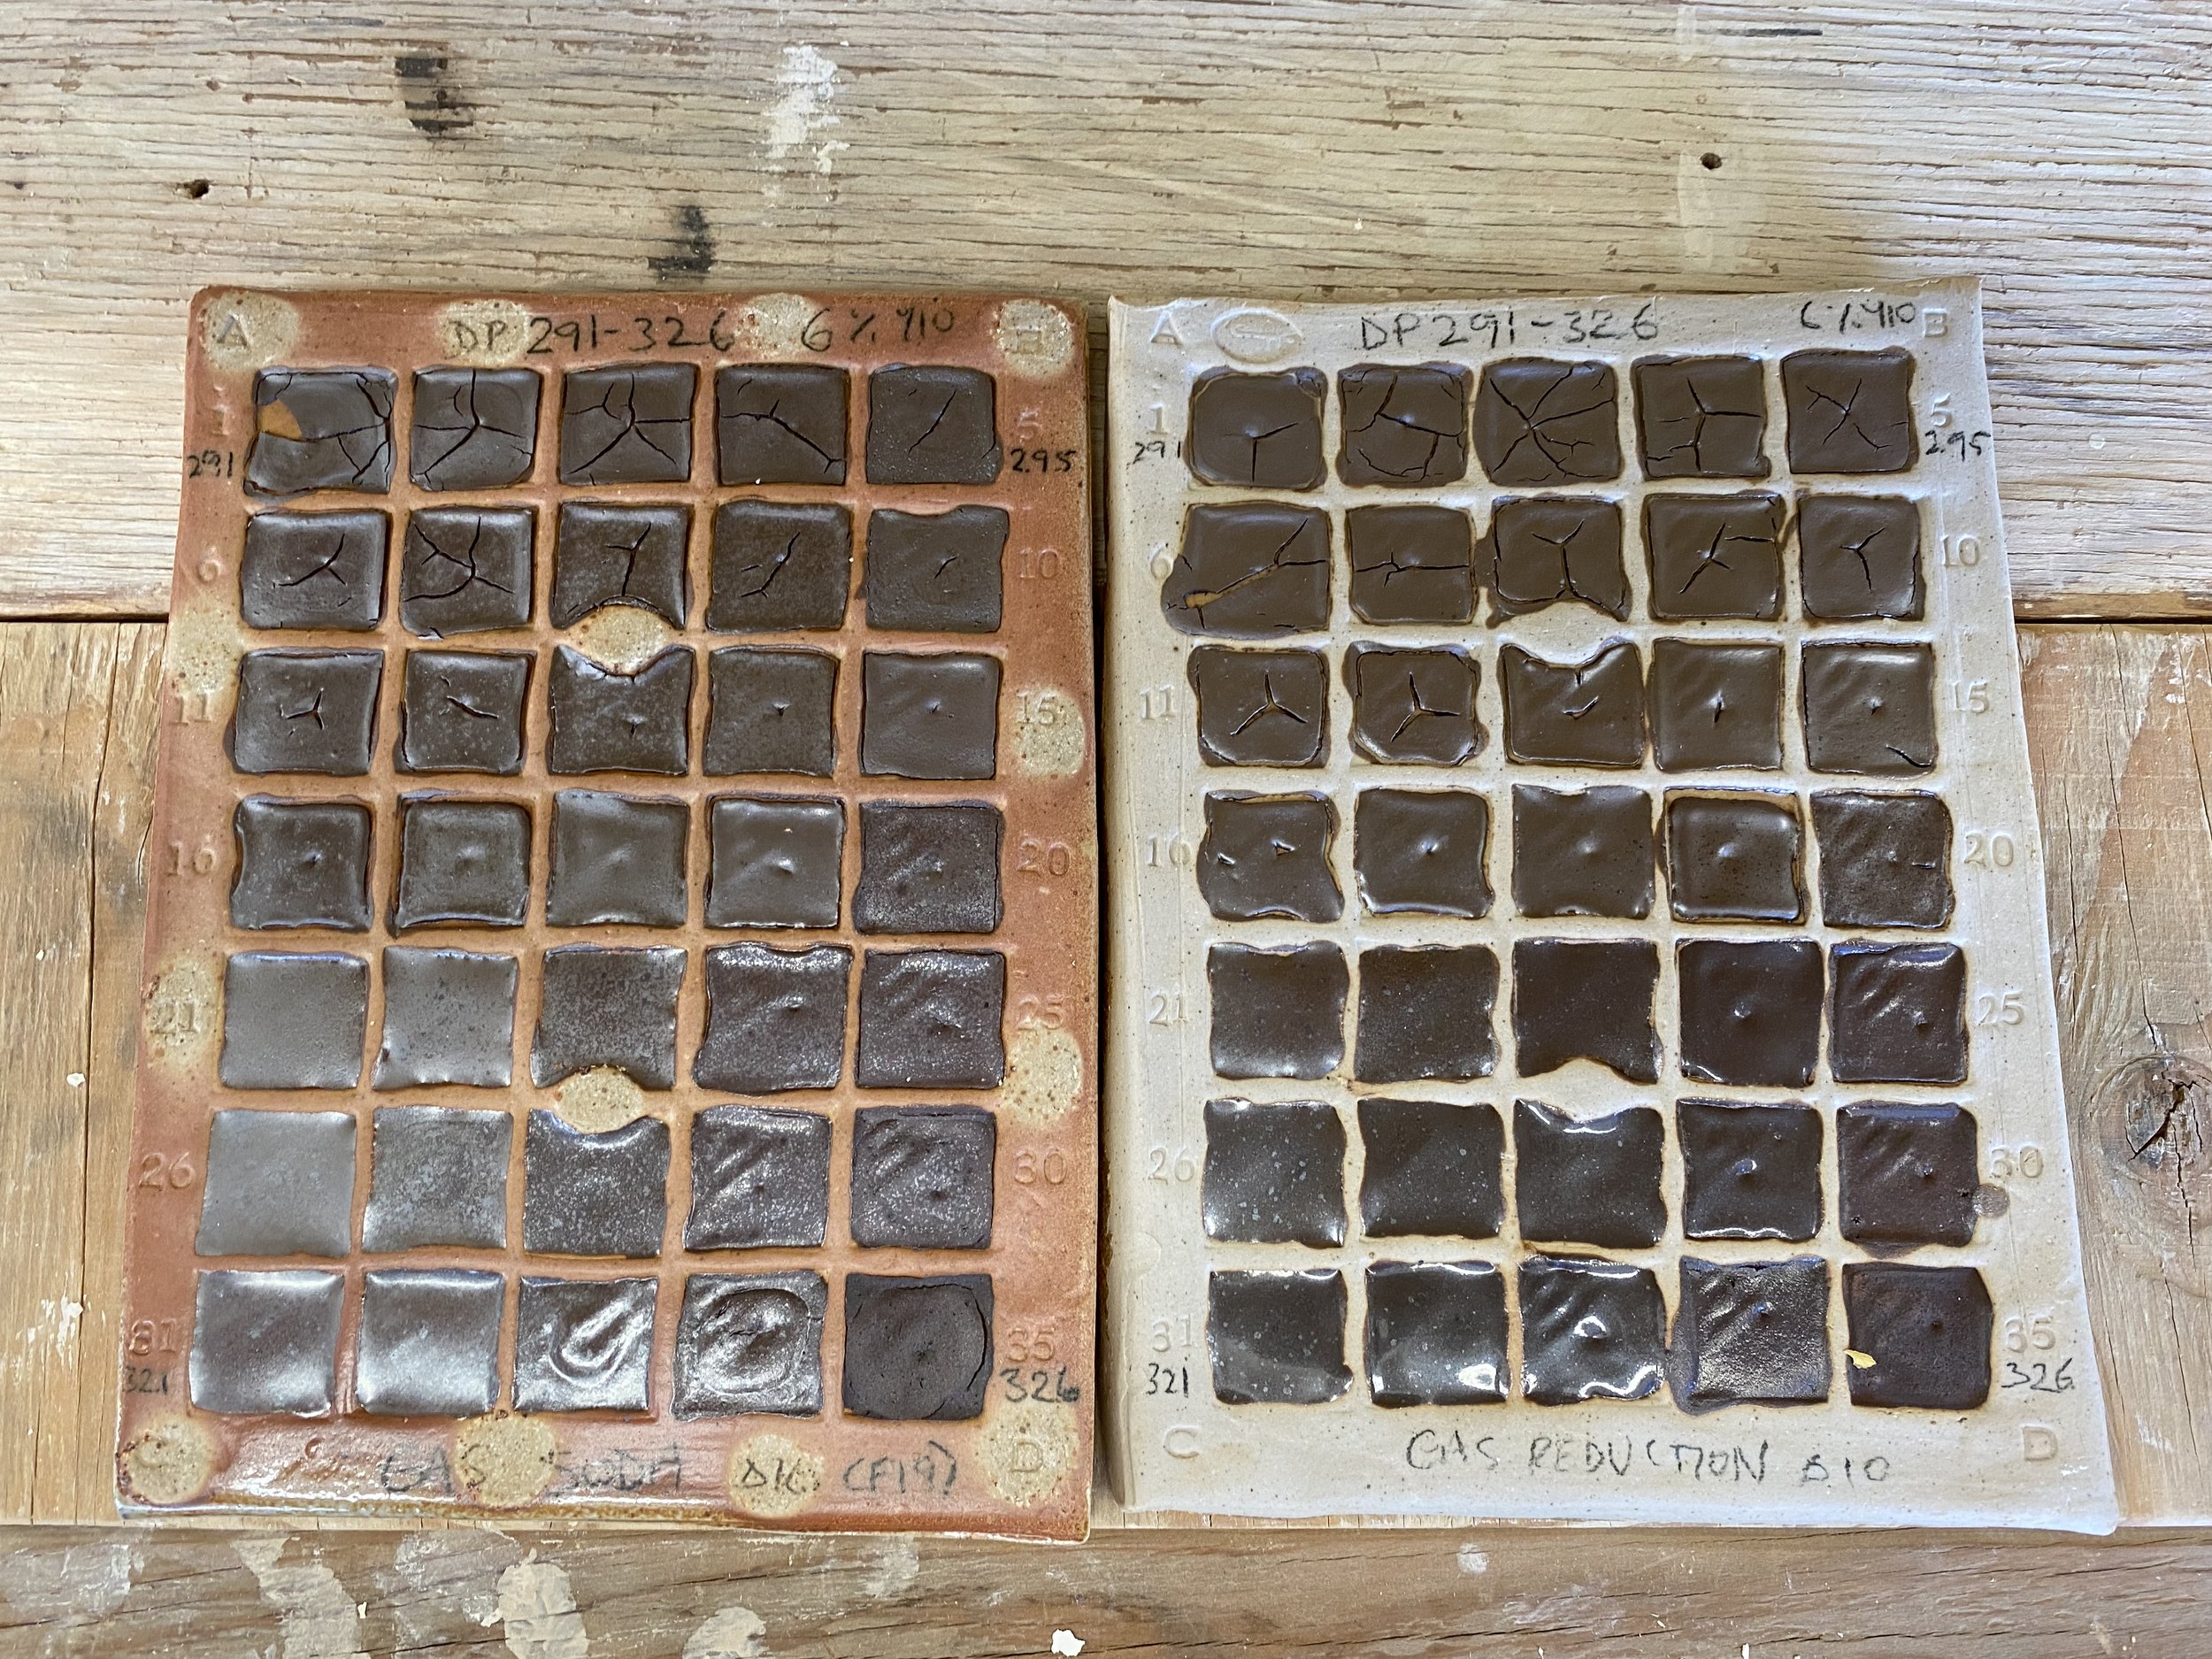
DP 291-326 (same grid as 221-255 with 7% iron oxide added).
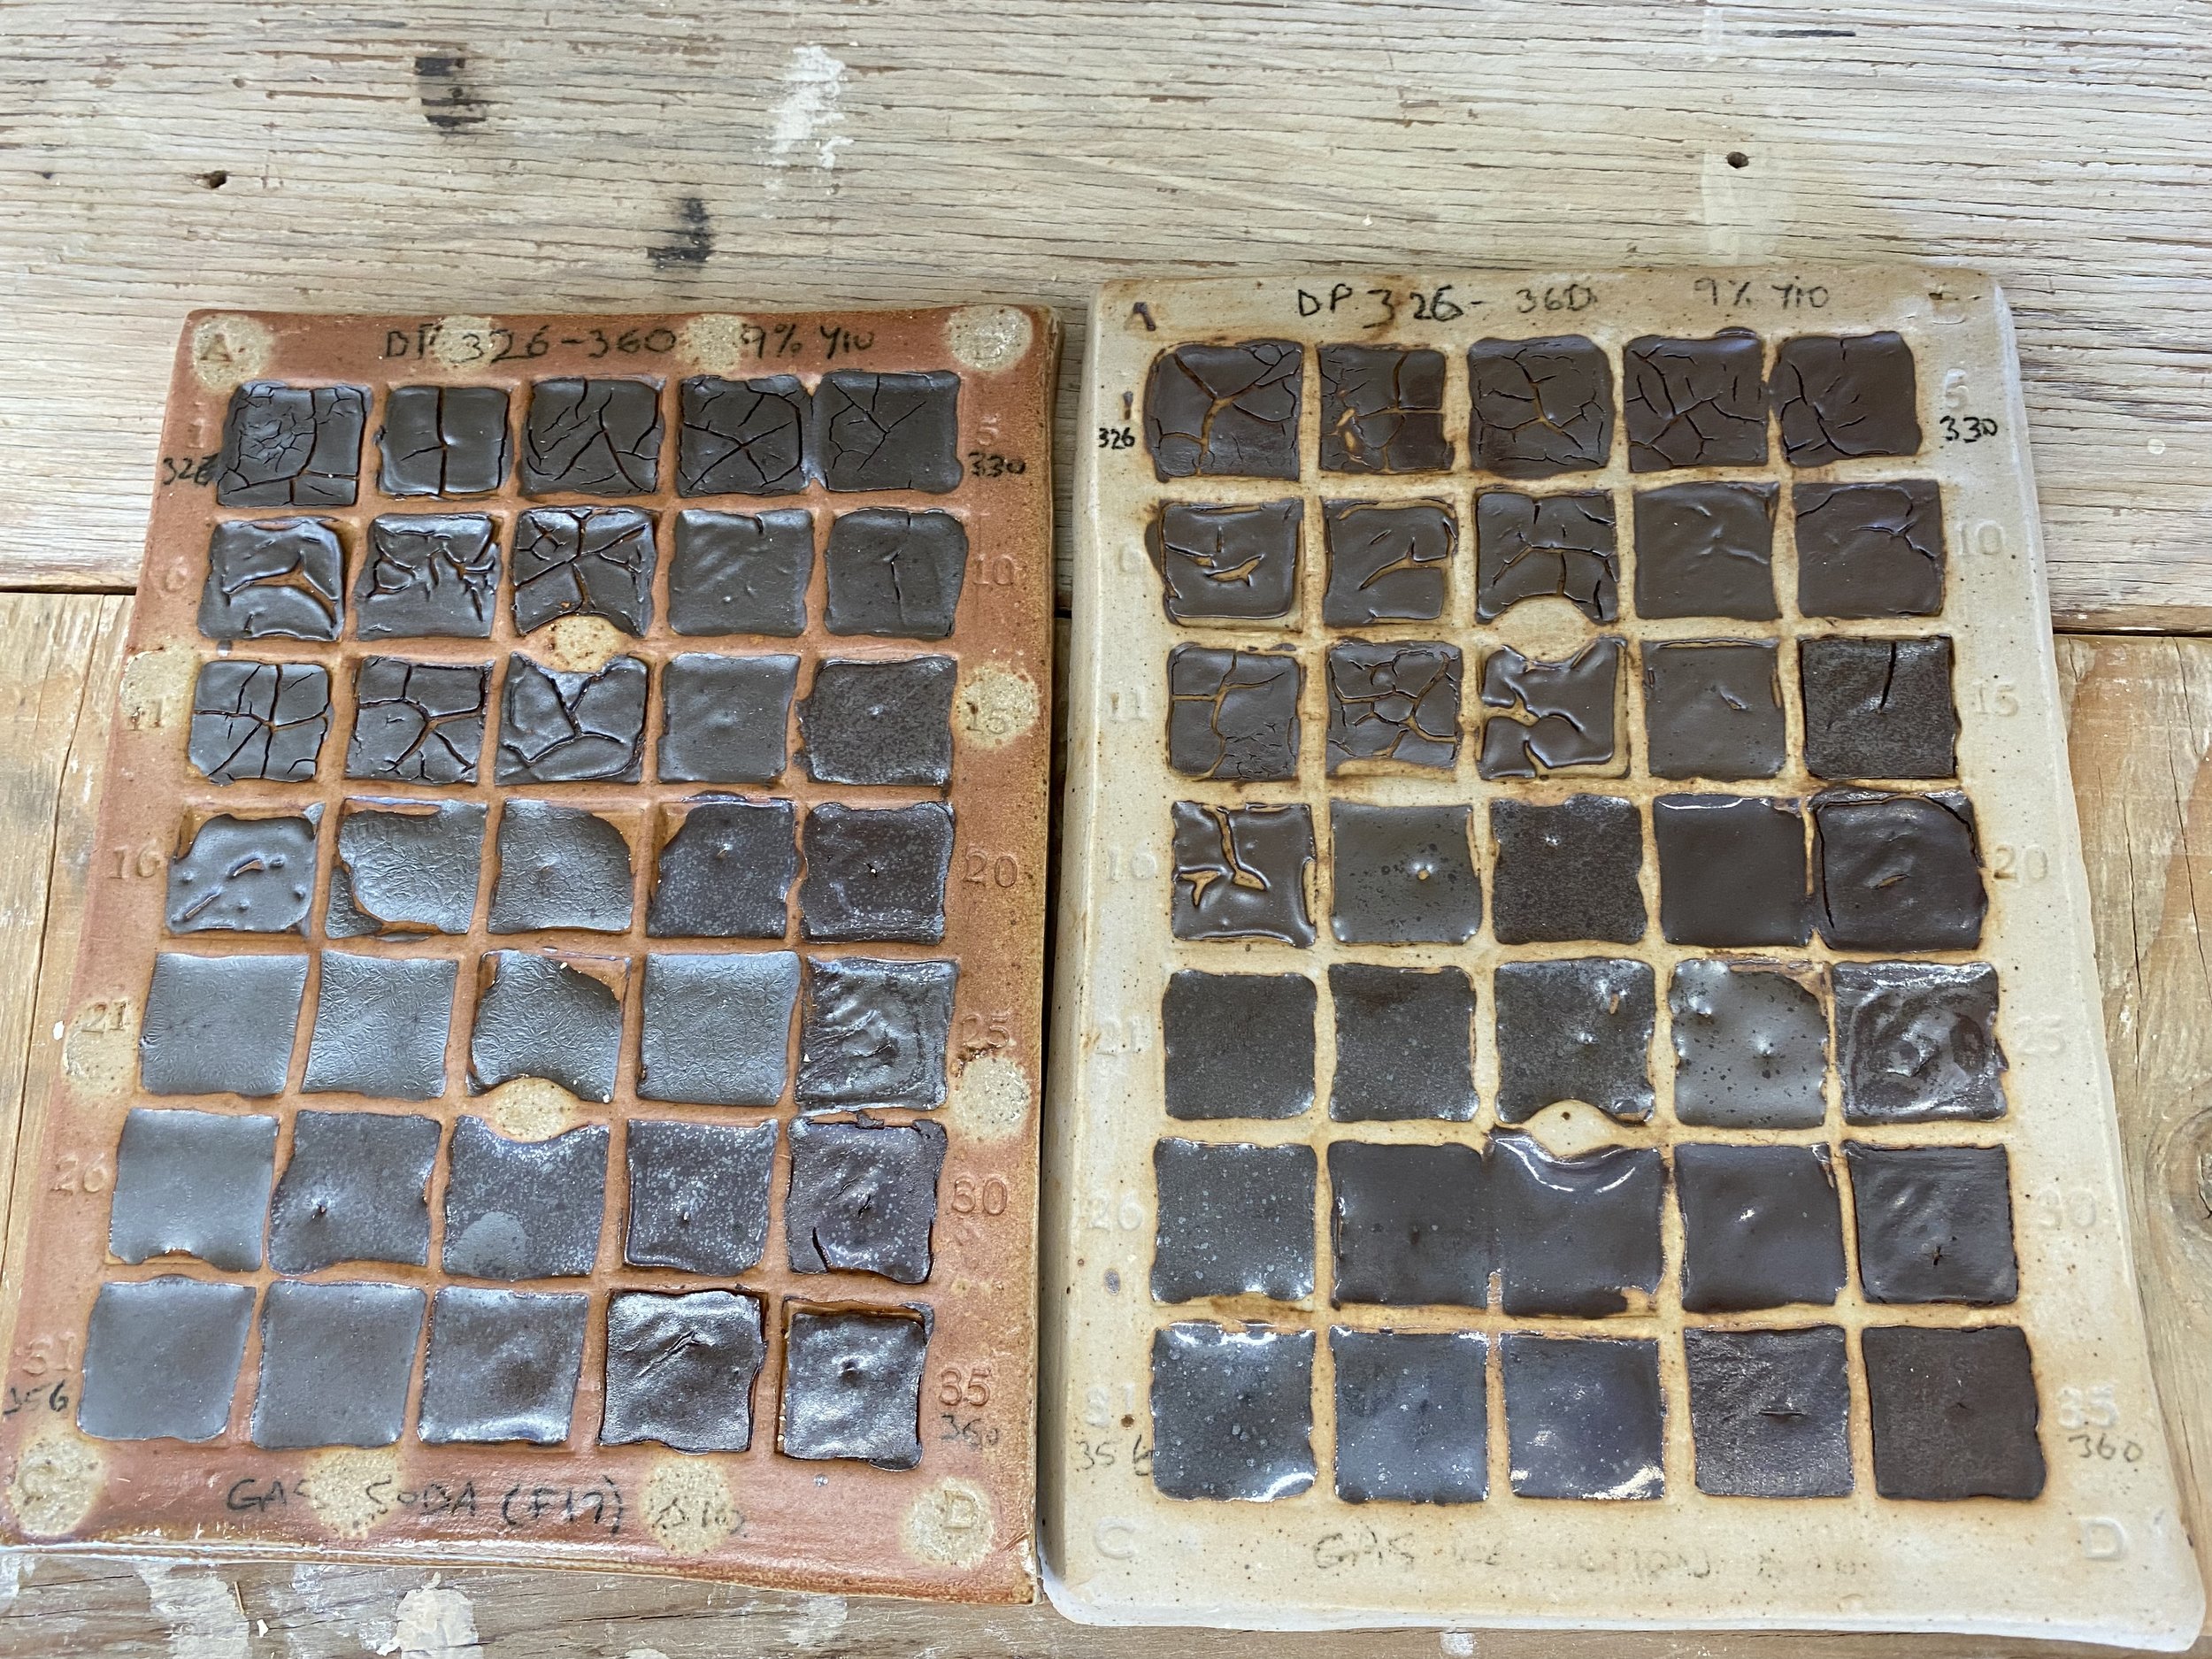
DP 326-360 (same grid as 221-255 with 9% iron oxide added).
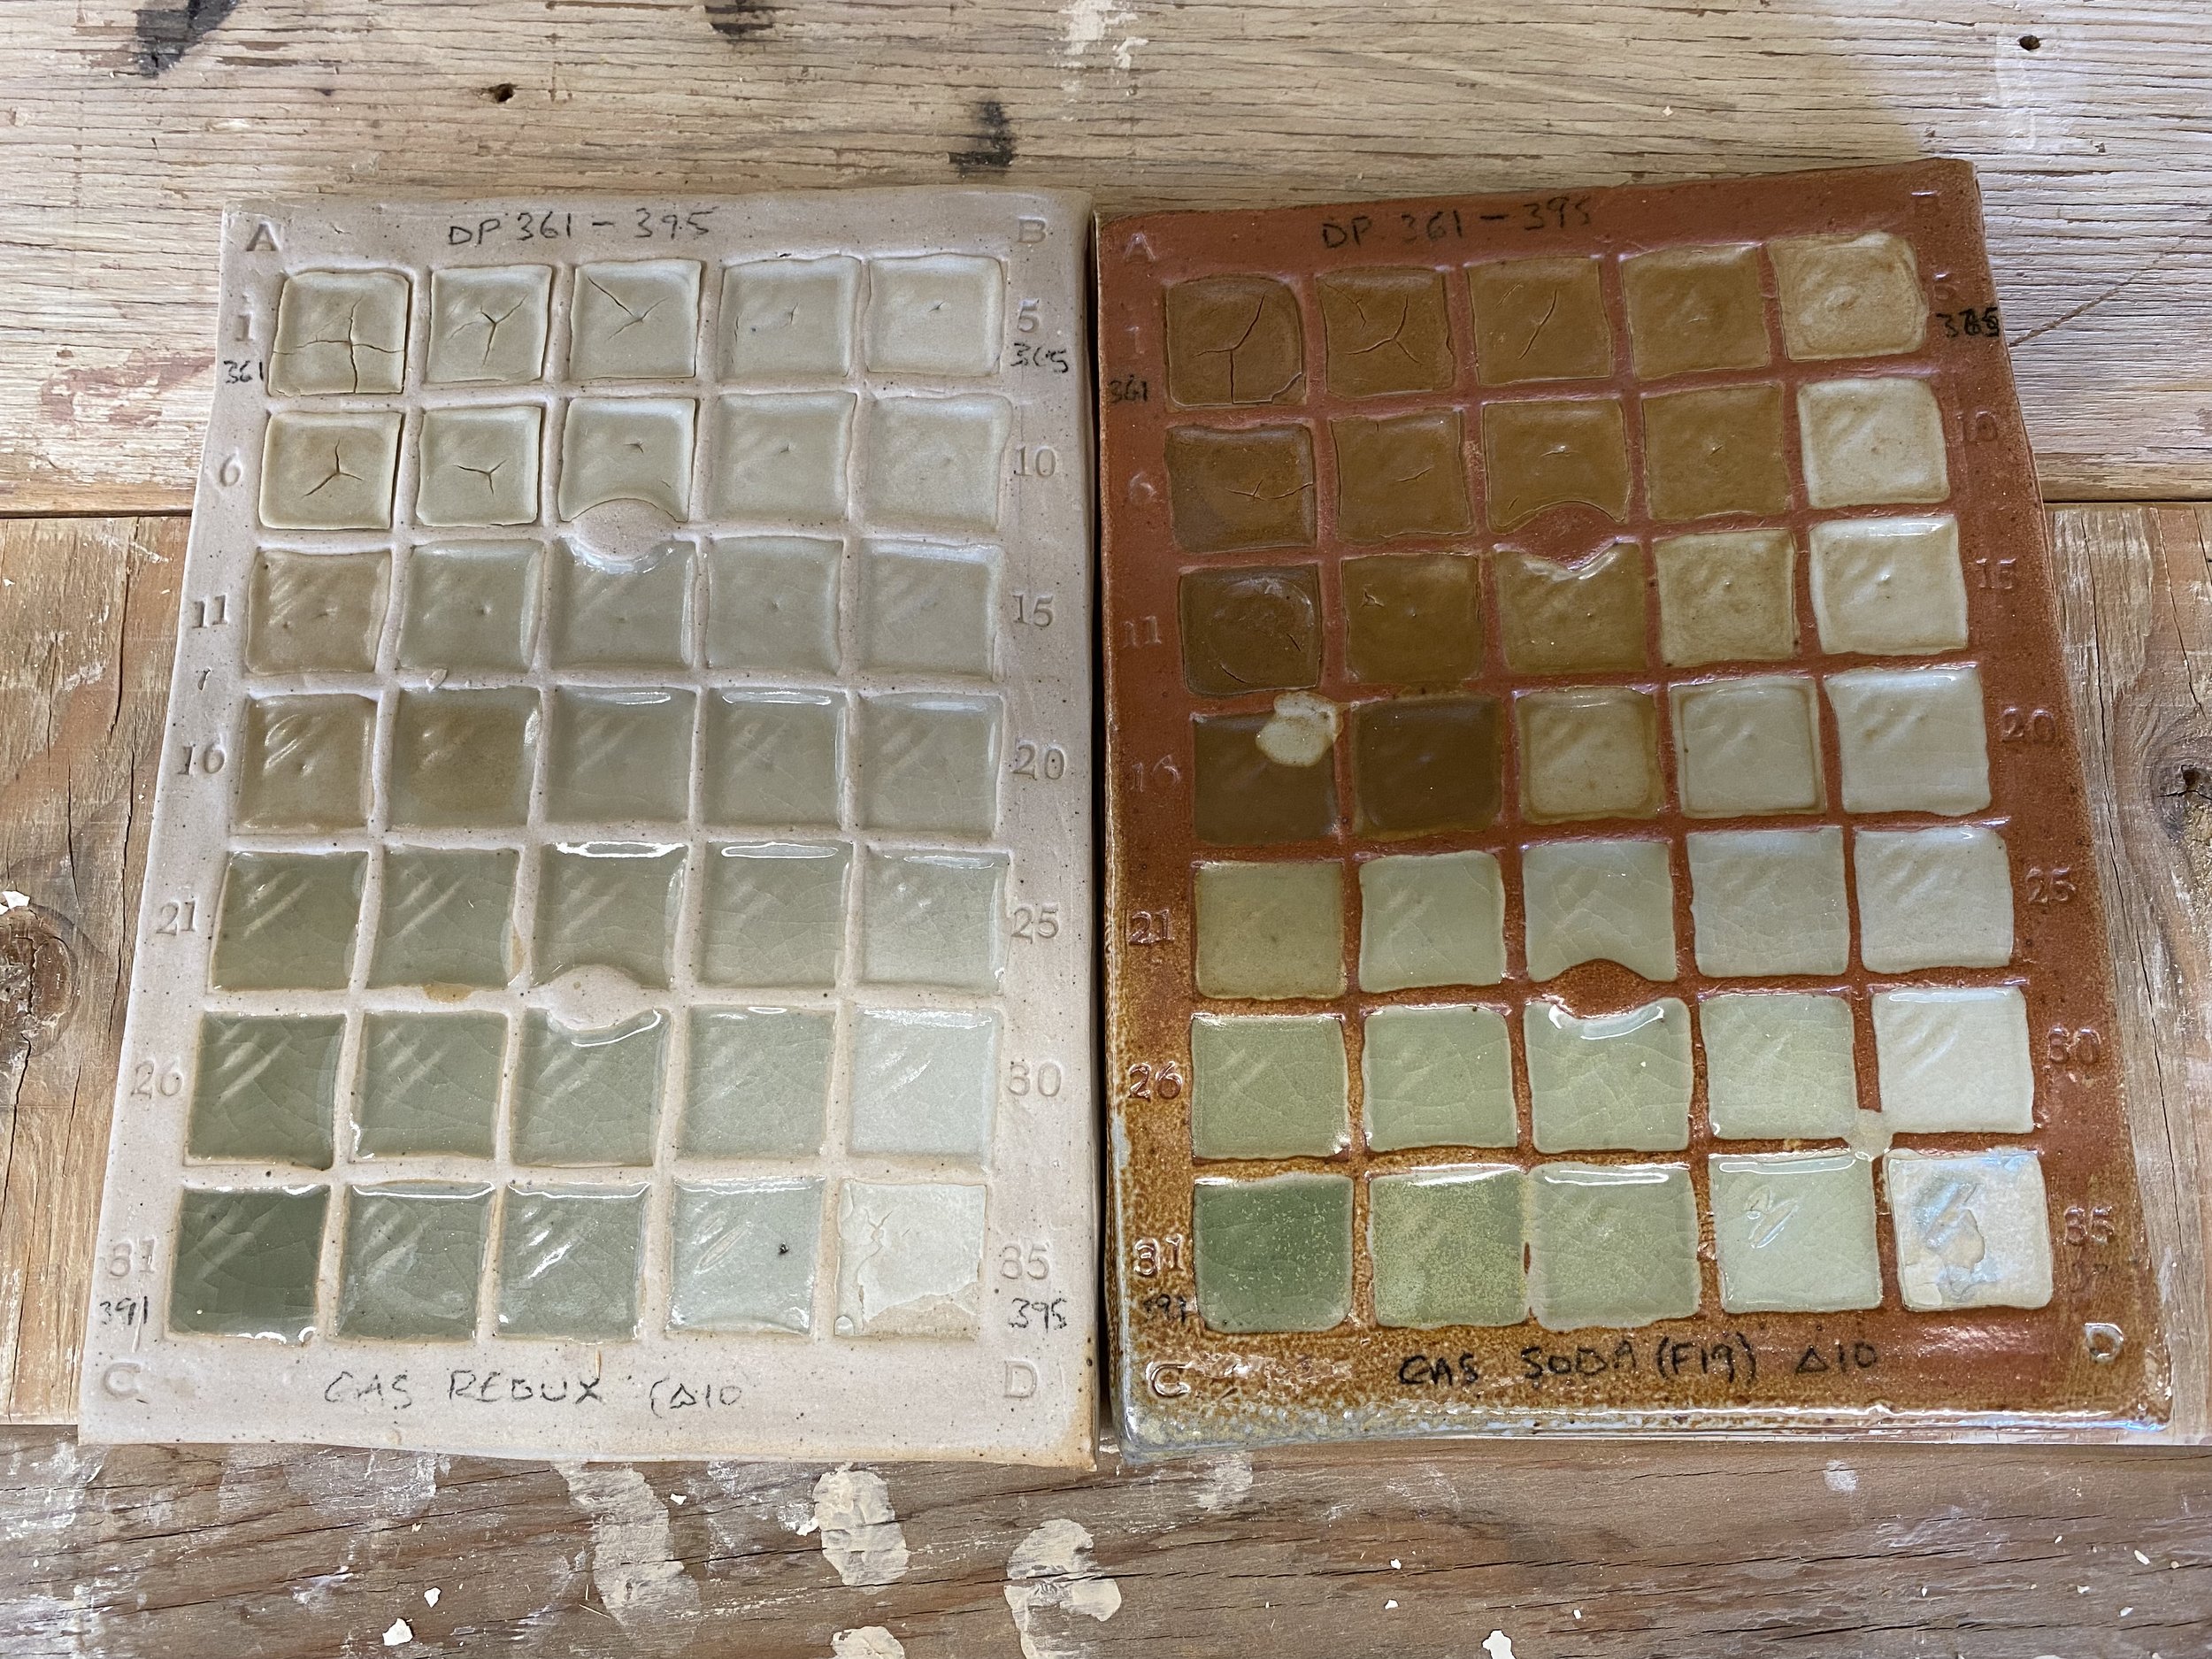
In this next set I used the same exact table of kaolin and silica but added 10% lime and 10% minspar to the base granite (DP31). Using this as my corner C I ran the same set of tests. These were more successful, with the 9 glazes in the bottom left of the grid all being reasonably successful. Adding more flux certainly helped.
Compare this with the first picture of the blog… this is the difference in adding just 10% lime and 10% minspar. Much nicer results… the brown swathe of glazes is receding! I could push this further though-adding more than just 10% lime and minspar.
Here is the sheet showing the % of what each of these glazes are.
Below is this same set (DP361-395) with 4%, 7% and then 9% yellow iron oxide added.
DP 396-430 (same grid as 361-395 with 4% iron oxide added).
DP 431-465 (same grid as 361-395 with 7% iron oxide added).
DP 466-500 (same grid as 361-395 with 10% iron oxide added).
What do we note from these iron additions?
10% is overkill… the glaze becomes oversaturated and goes a kind of gun metal matte brown/black. The 4% ones look the brightest to me, more so than the 6% gang.
There was some exciting red spots in the bottom row of the 6% tests though. This happened more in the 4$ tests in soda. In general the soda tends to matte out the glazes a bit. Definitely a tenmoku to be found here though! Quite excited about some of these results.
. . .
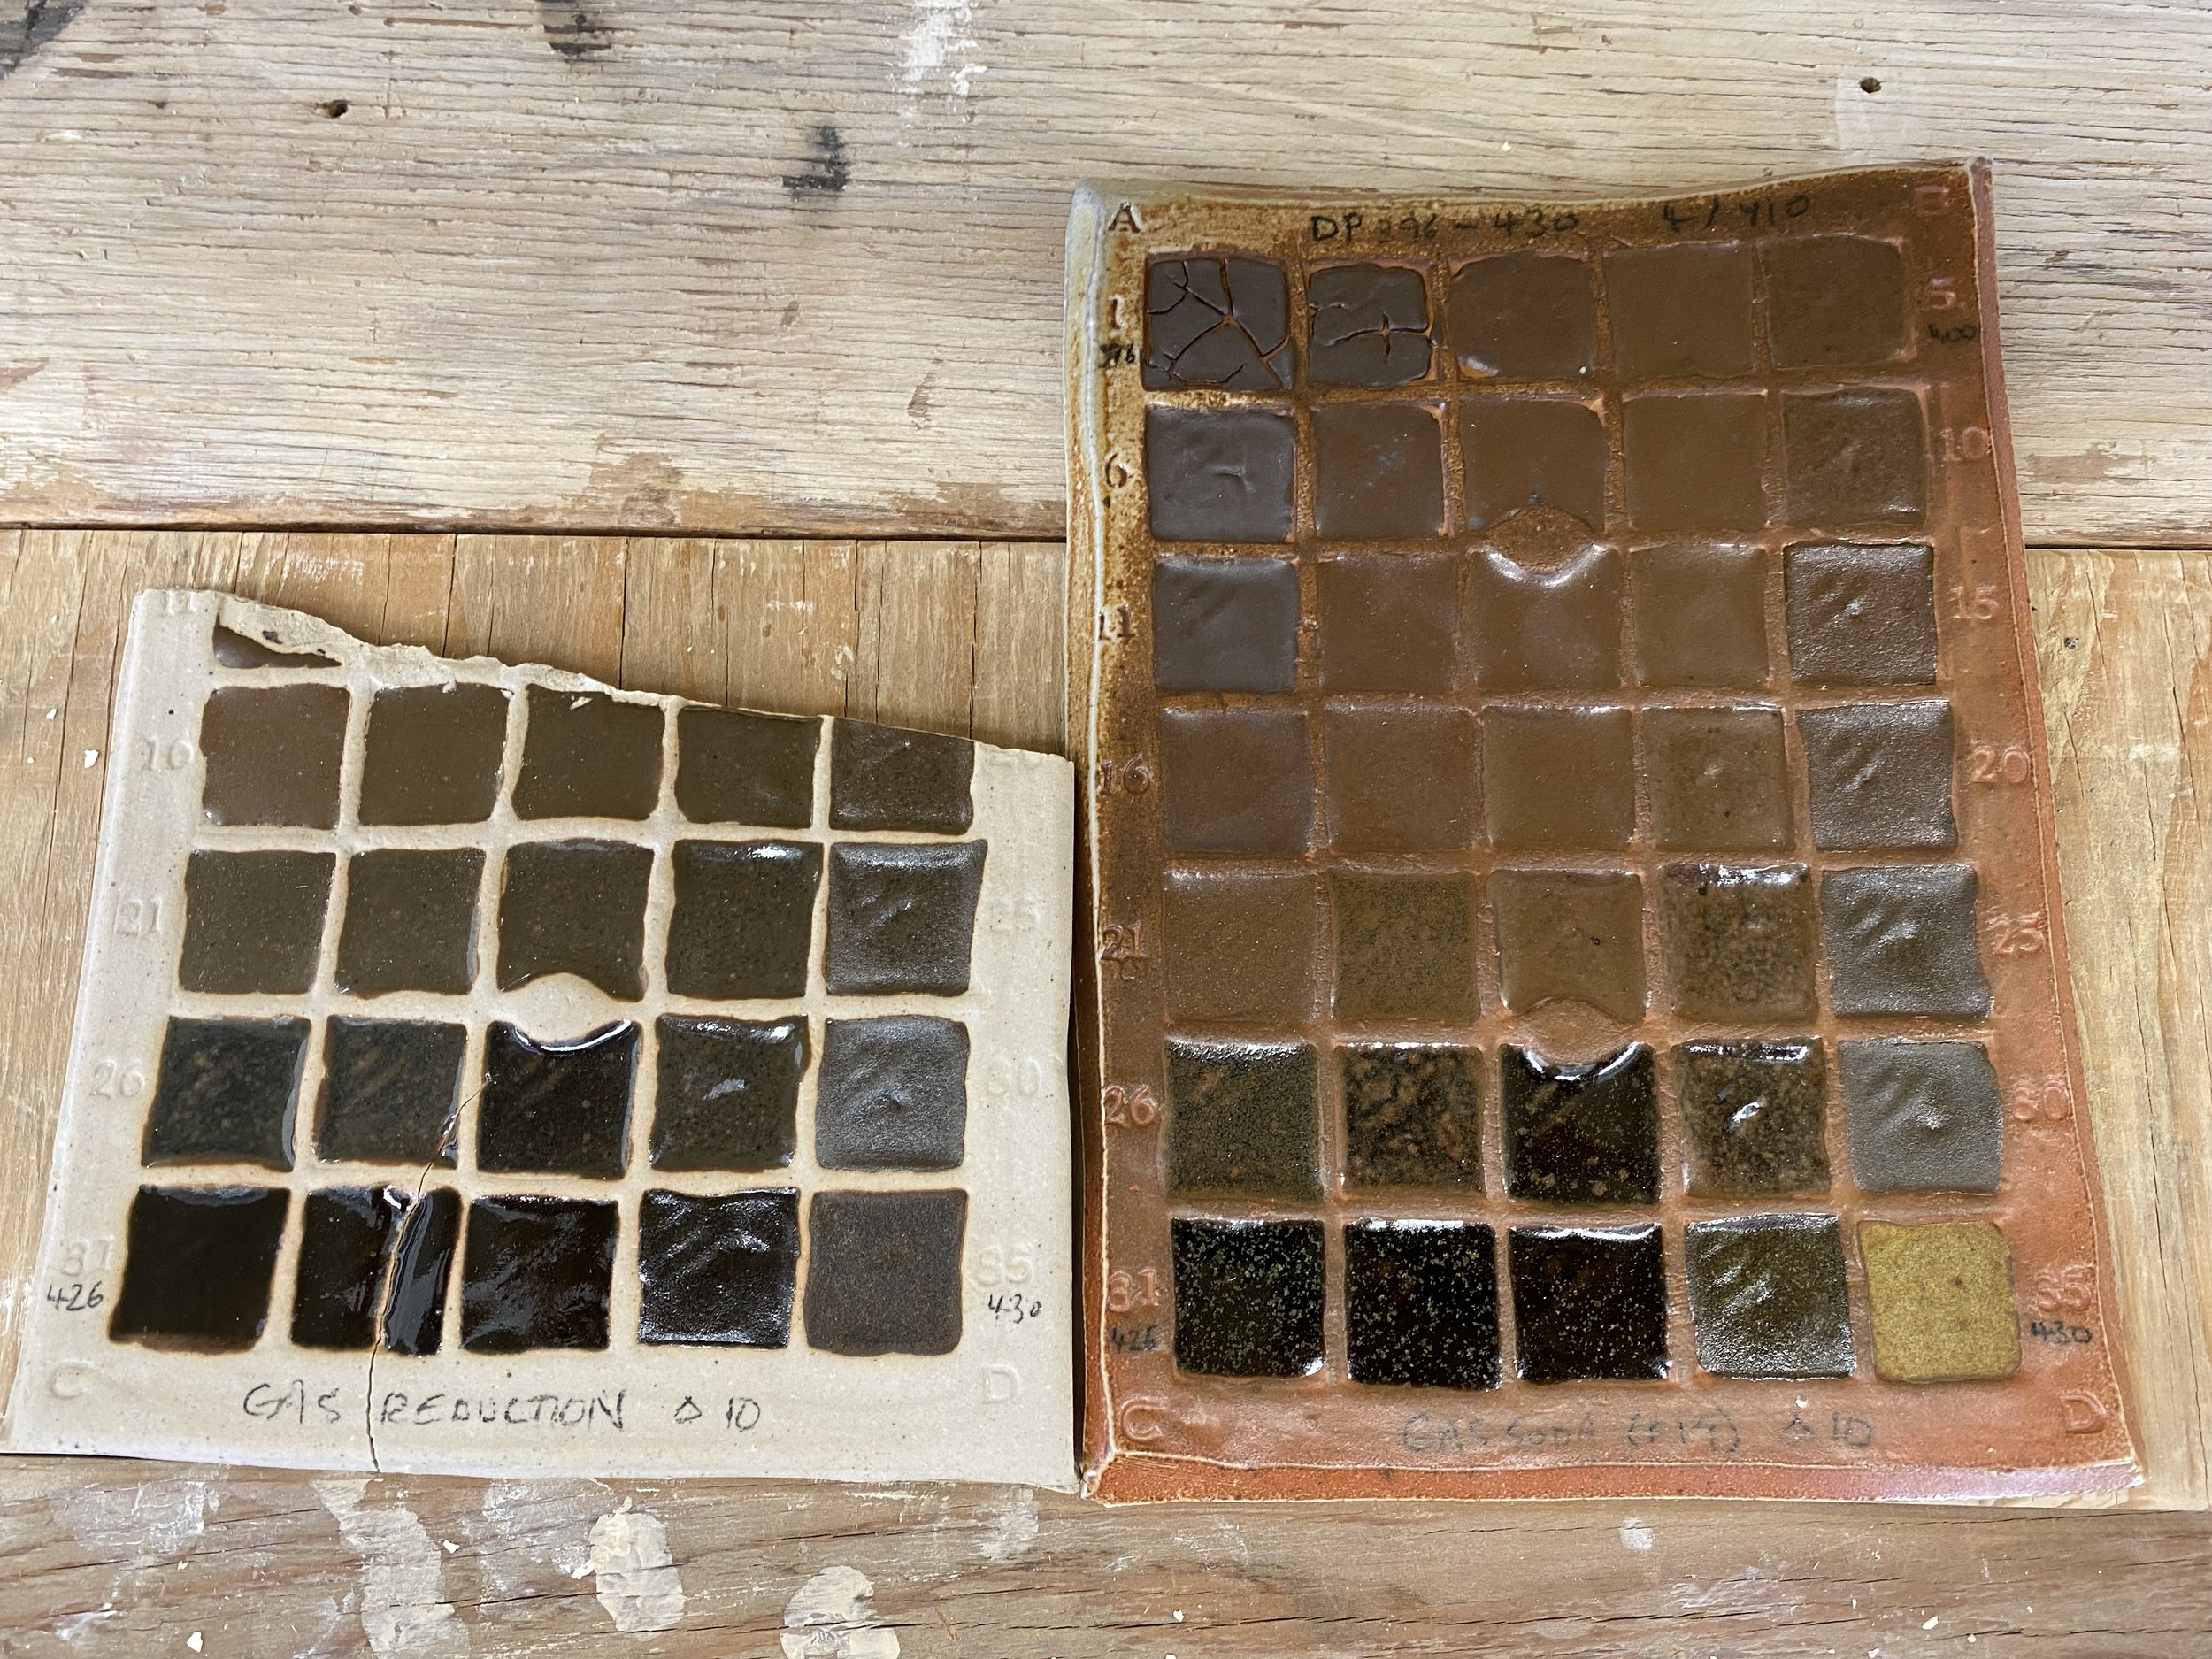
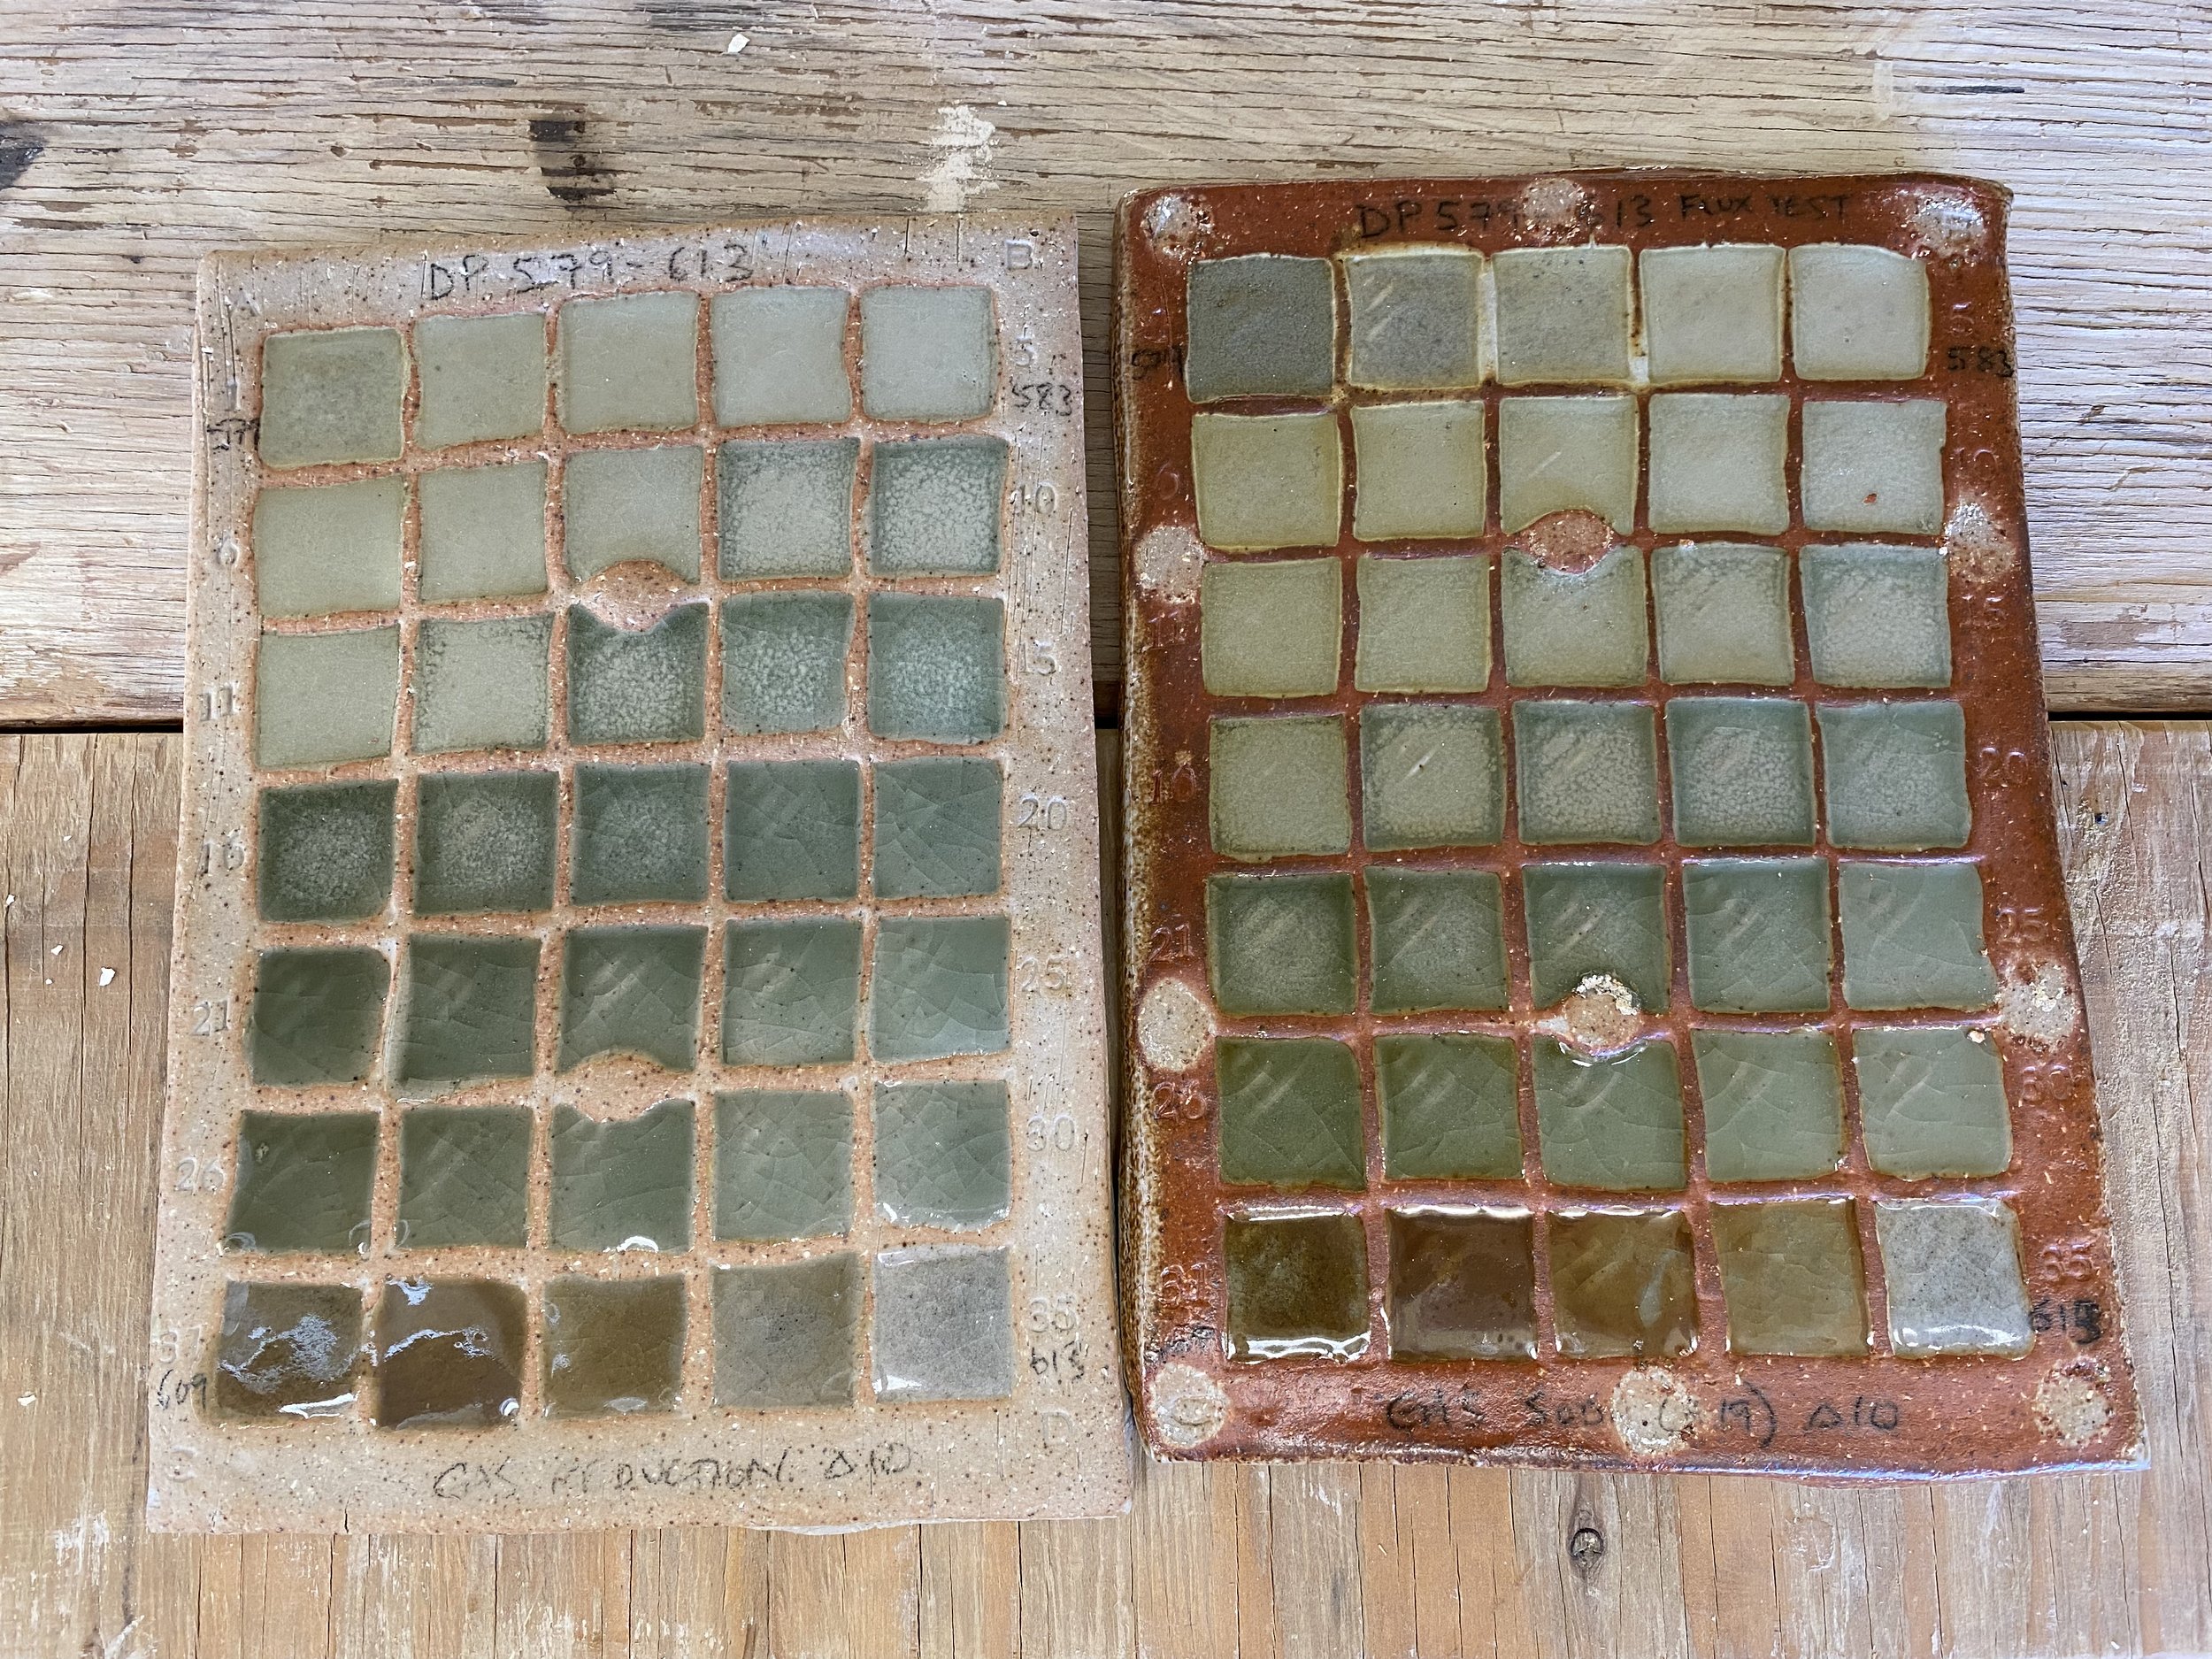
In this grid set I made a fluxier test. I have been using 10% lime and 10% minspar as a basic addition to my Devil’s Playground granite (DP31) but wanted to see what happened if I added more than this.
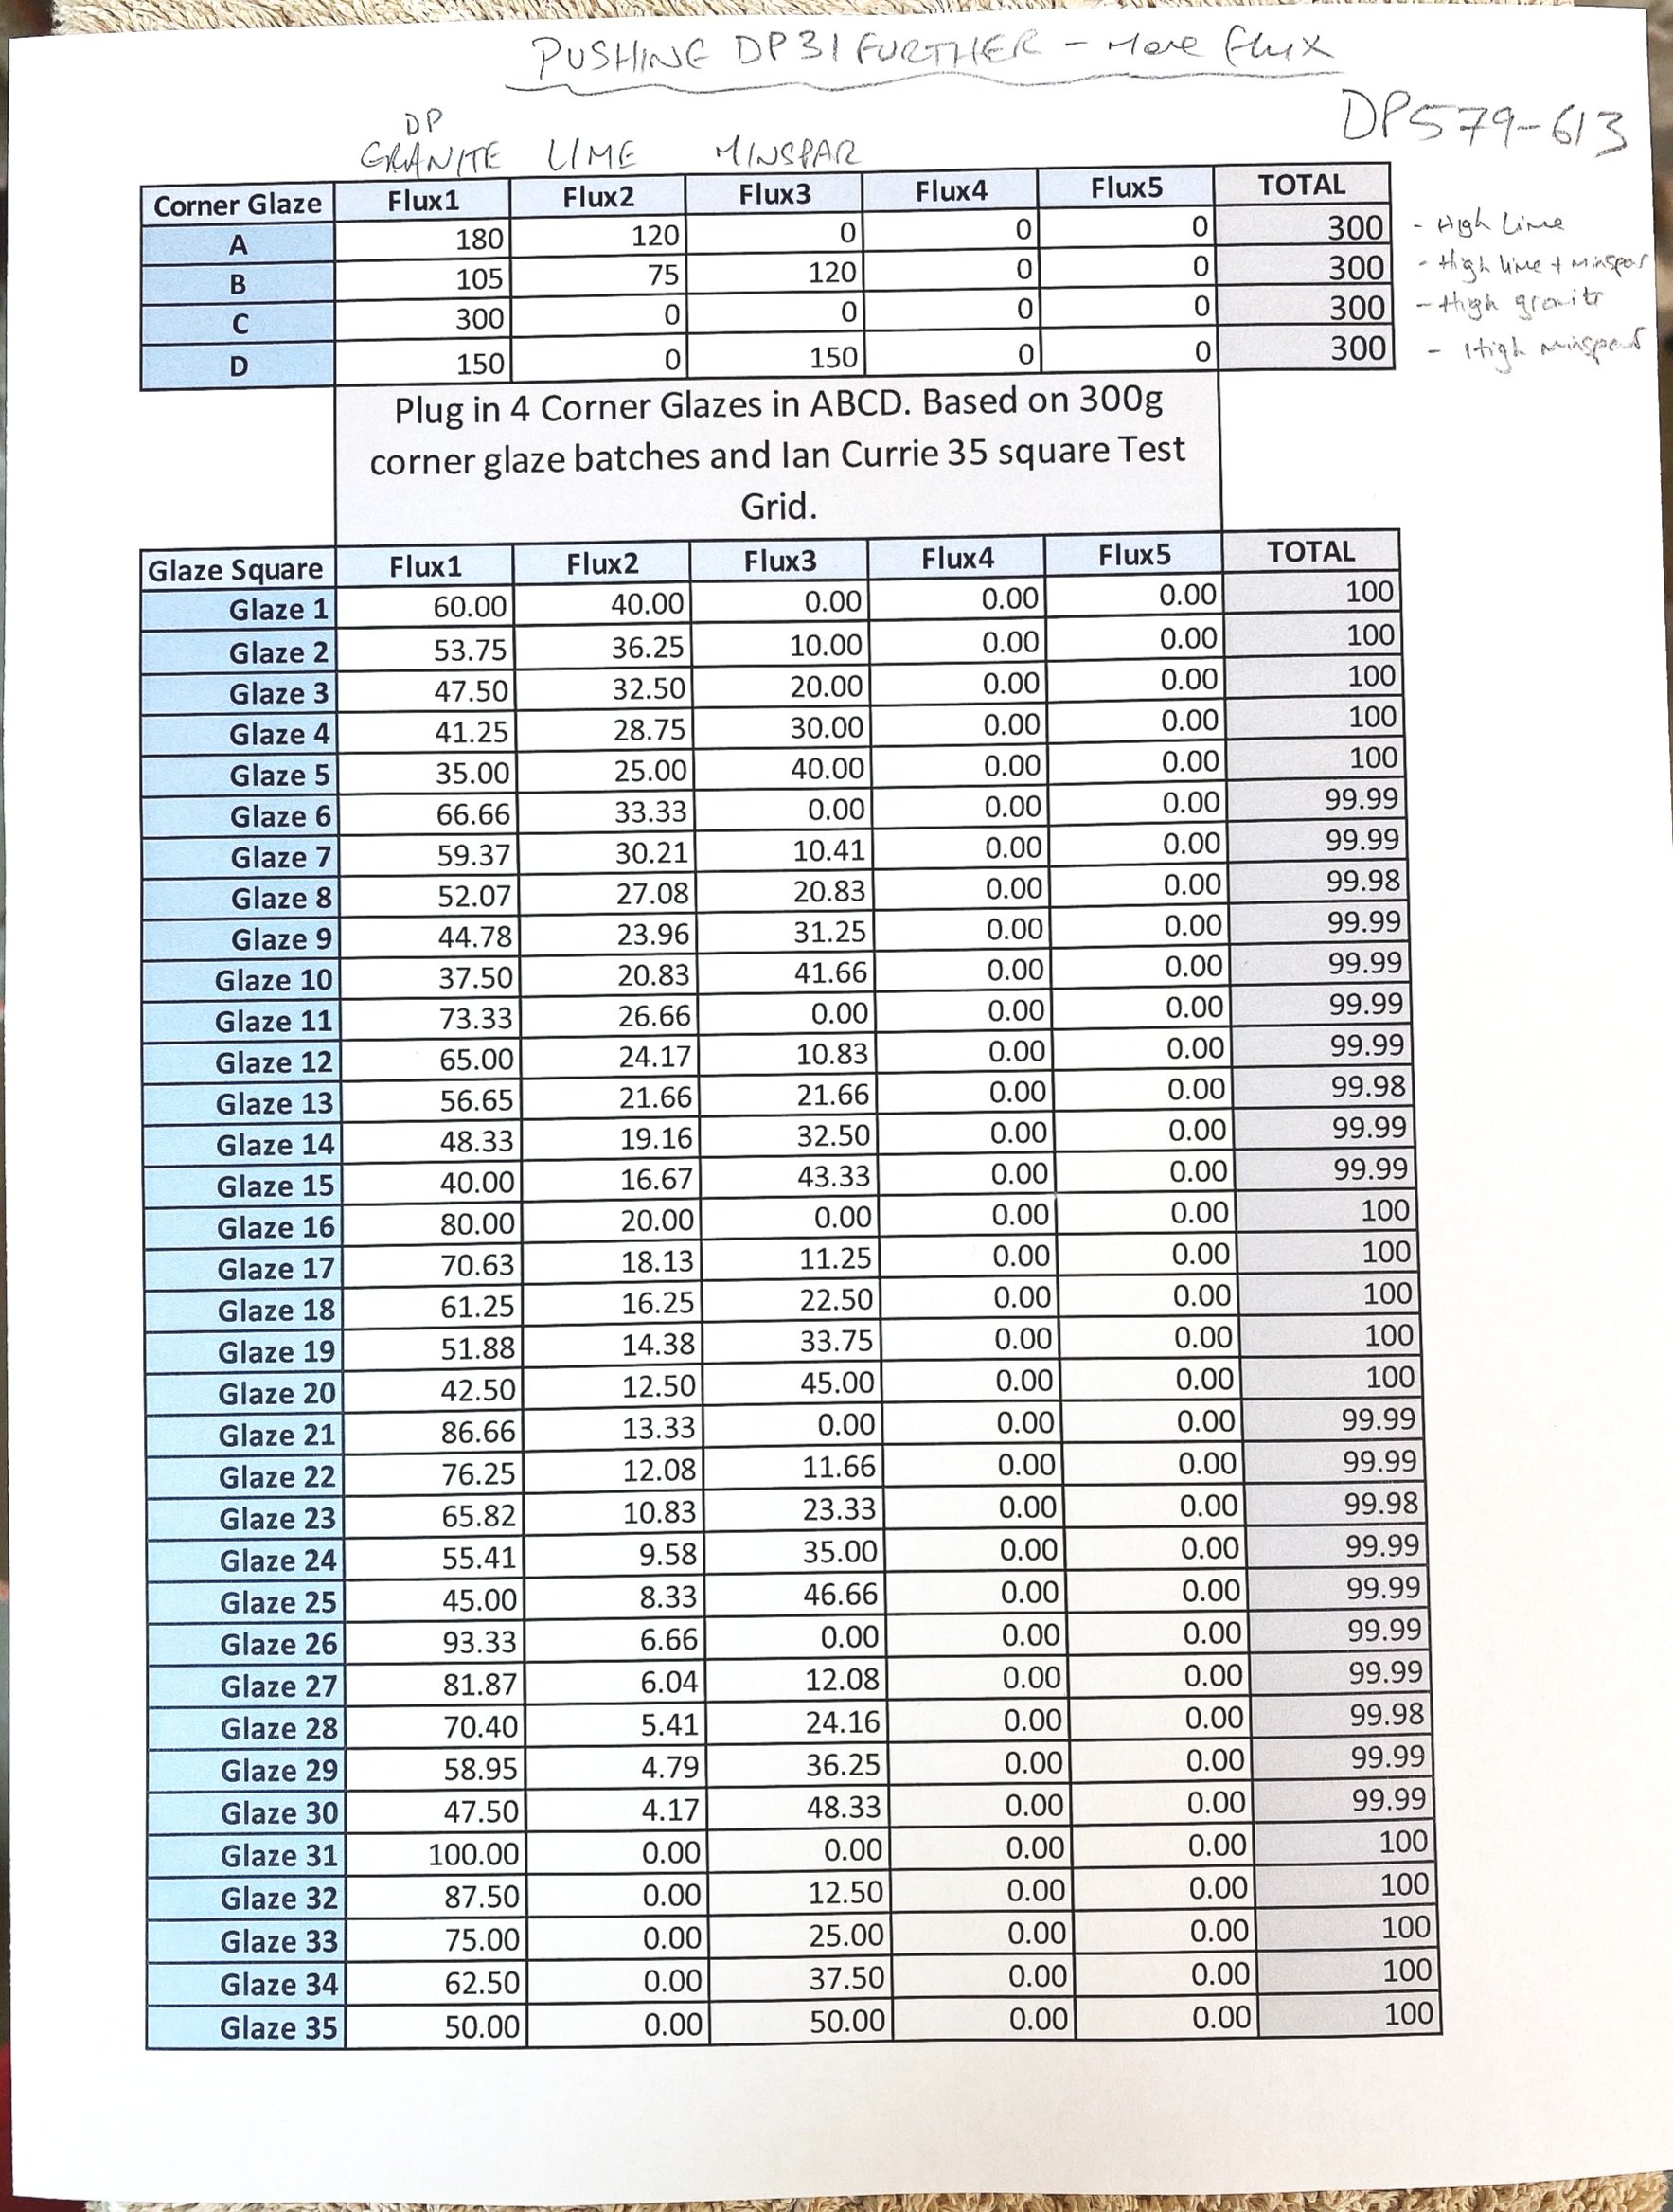
Corner A Glaze contains 120g lime/whiting (40%) to 180g granite (60%). This is our high lime corner.
Corner B Glaze contains 75g lime (25%), 120g minspar (40%) and 105g granite (35%). This is our really high flux corner.
Corner C Glaze contains 300g granite (100%). This is our pure granite glaze.
Corner D Glaze contains minspar (50%) and 150g granite (50%). This is our high soda feldspar corner.
Results of the test above: curious results! Where too much lime is included we get matte glazes, even in reduction (around corner A). The same does not happen around Corner D. This is the high minspar corner. In general the soda makes the glaze more matte and more green compared to the straight gas reduction.
There are quite a few decent glazes in this grid test though. We can conclude that the granite wants more flux but not too much (in terms of lime we start to get matte crystals at glaze 18 which has 16.25% lime and 22.5% minspar. For the pure lime it starts to get cloudy at 20%. I can conclude from this that 15% is probably the max lime content I want unless I am shooting for a matte glaze. The grid tests are fantastic but don’t show how drippy the glazes will be. I need to run this test with vertical test tiles too.
Minspar tends to send the glaze grey on its own so a blend with lime is good for the bluer color.
Here is the sheet showing the % of what each of these glazes are.
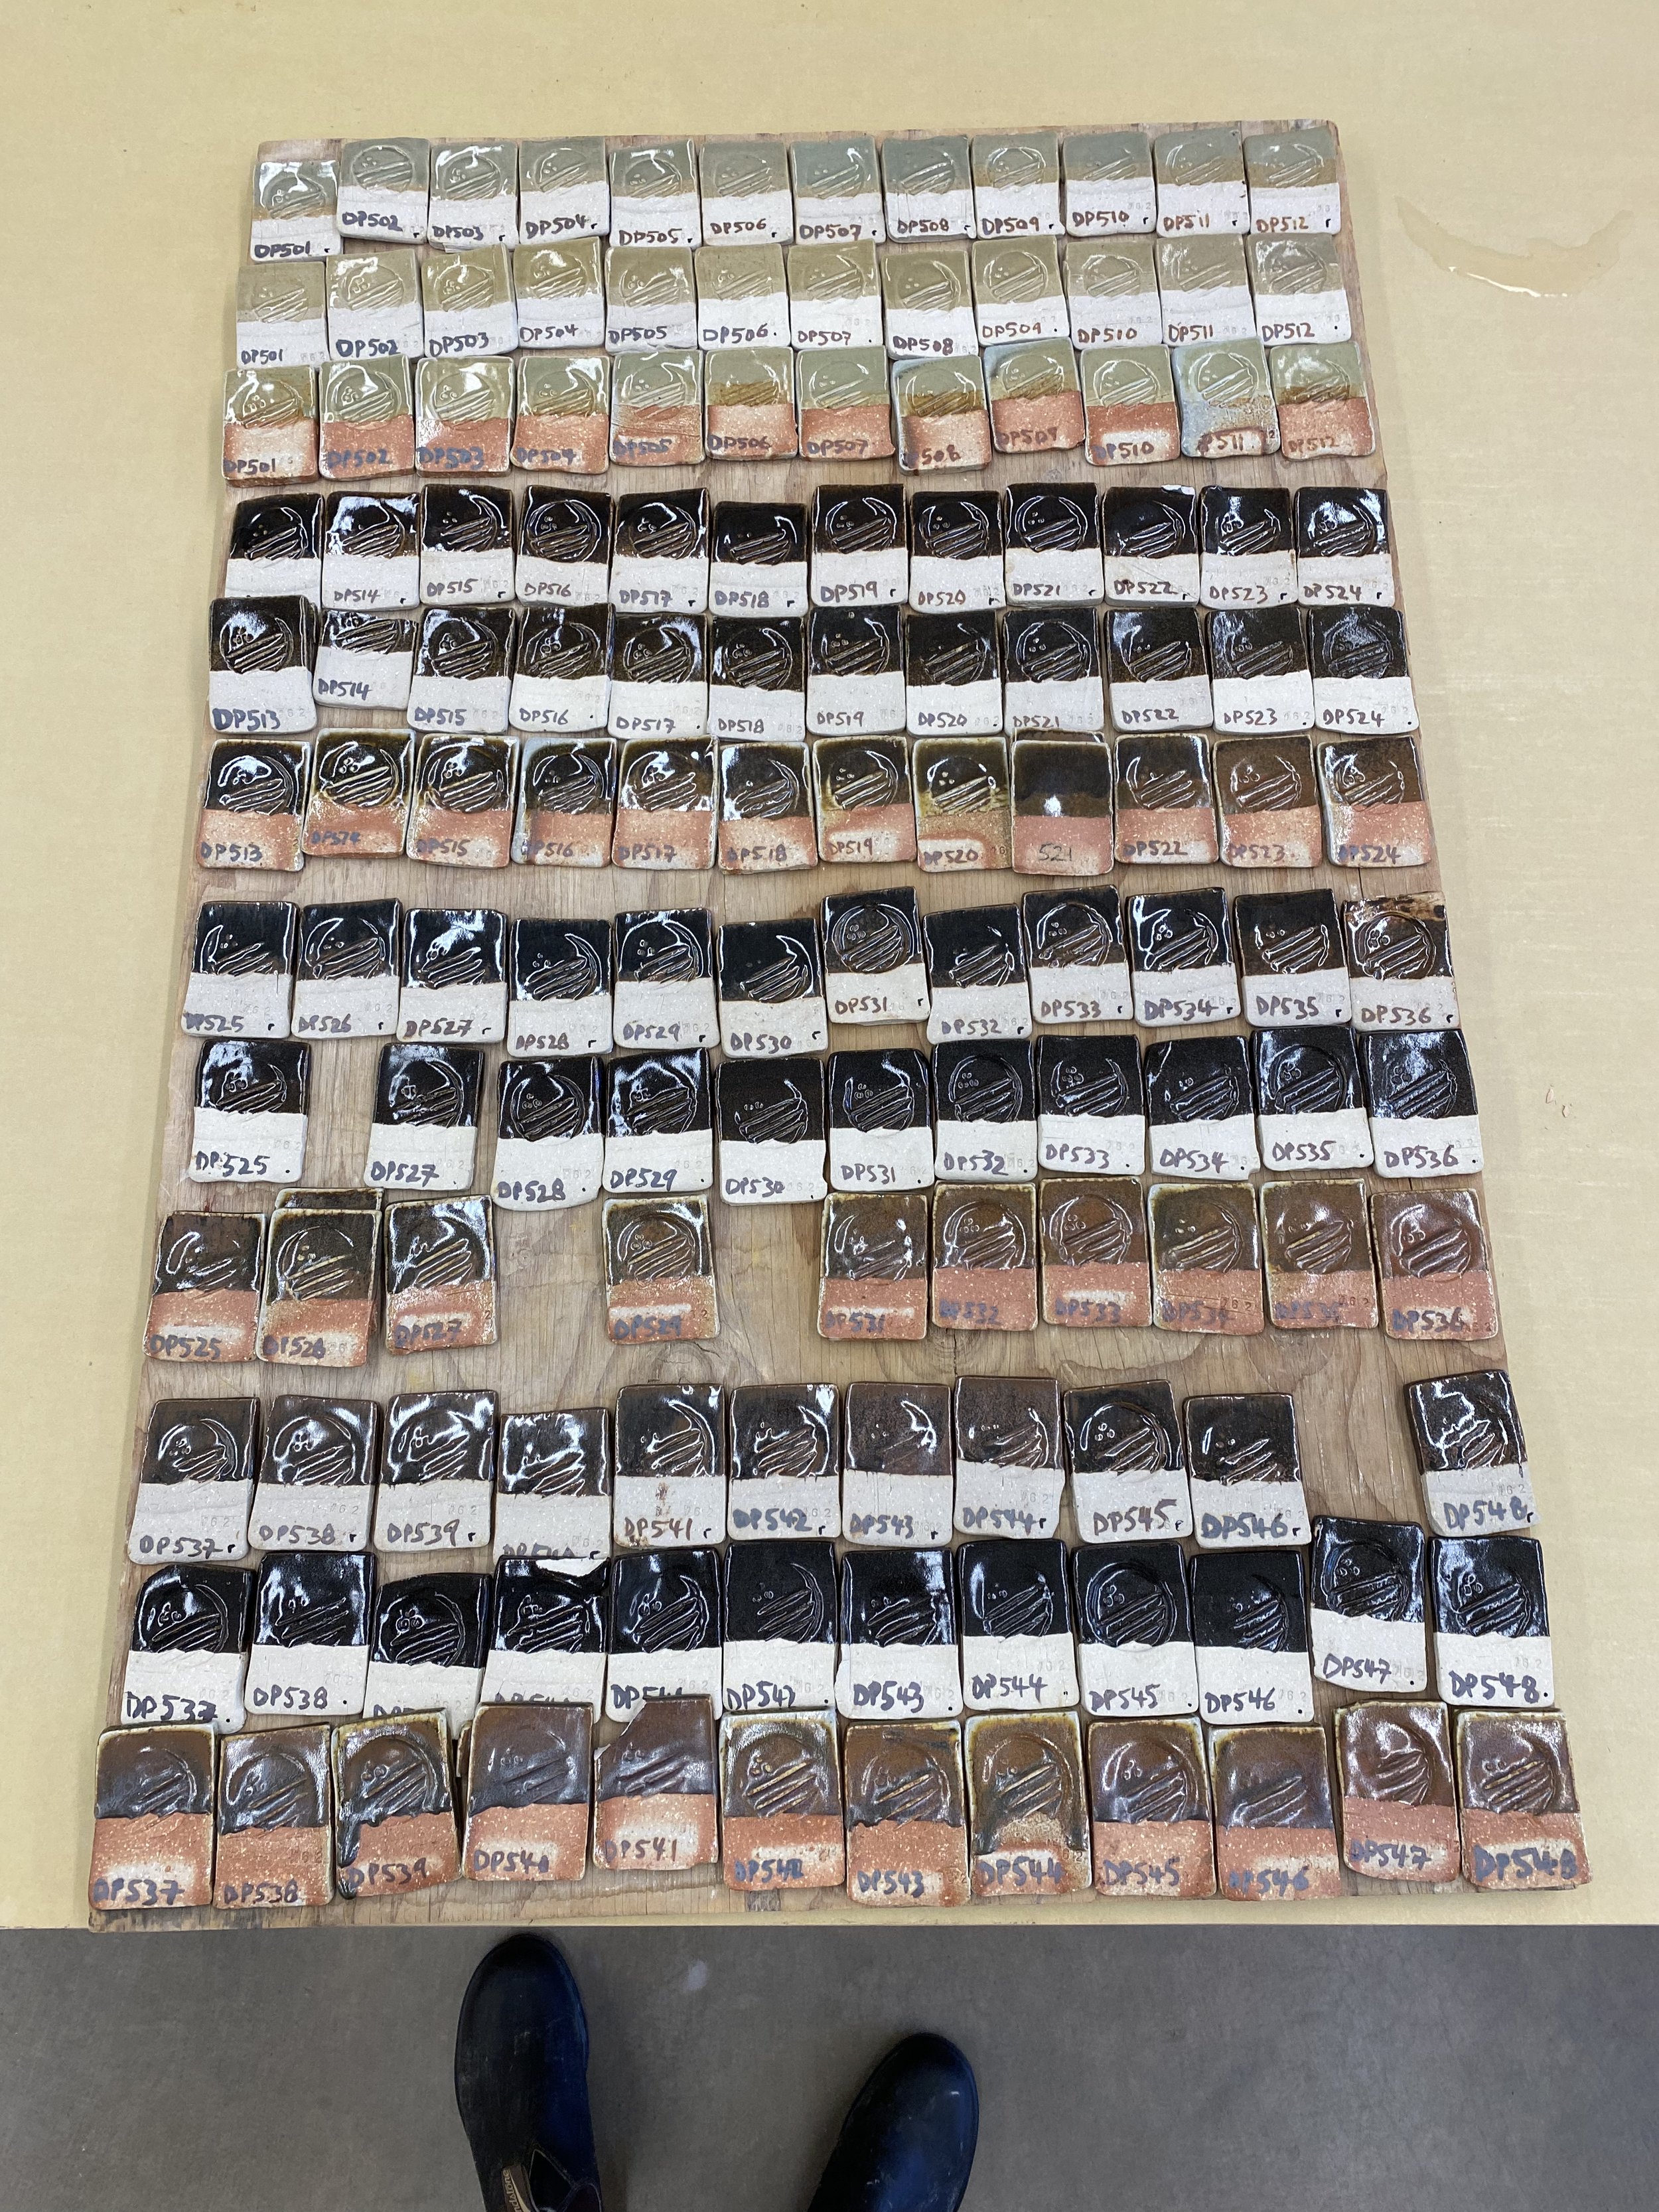
Next up I added bone ash to DP31 (the fluxier base granite glaze which has 80% granite, 10% lime and 10% minspar in it). DP501 has 1% bone ash in it, Dp502 has 2% and so on up to 10% at DP510. Then DP511 has 15% bone ash and DP512 has 20% added. Then the next set of three DP513-524 is the same base glaze but with 4% yellow iron oxide added. The next set DP525-536 is the same base glaze but with 7% yellow iron oxide added. The next set DP537-548 is the same base glaze but with 10% yellow iron oxide added.
The tests were all fired to cone 10. The top line of each of these tests is in reduction, the second set is gas oxidation and the final is gas soda.
Here are the tests individually so we can see them a little easier. This is the straight up bone ash additions (to DP31): 1,2,3,4,5,6,7,8,9,10,15,20%.
DP31 glaze with bone ash additions: 1,2,3,4,5,6,7,8,9,10,15,20%.
Generally the oxidation ones tend to be greener and the reduction ones bluer. The bone ash doesn’t have a huge impact until about 6% is added, then the glazes start to get a bit cloudier. This progresses all the way up to 20%. None are fully matte though. I was hoping for a greater impact from the bone ash frankly… aiming at a chun. More testing needed to get there!
In soda the glazes were greener and satiny: the bone ash did not have a huge impact.
Now here is the same tests with 4,7,10% yellow iron oxide added…
DP31 glaze with bone ash additions: 1,2,3,4,5,6,7,8,9,10,15,20%. Plus 4% iron oxide.
The addition of 4% iron led to a greenish black in oxidation and reduction… not particularly attractive when thin. In soda there was some potential in the 10-20% bone ash zone. Some nice reddish flecks happening there.
DP31 with bone ash additions: 1,2,3,4,5,6,7,8,9,10,15,20%. Plus 7% iron oxide.
The 6% addition of iron made the tests richer in oxidation and reduction. In reduction they were more interesting: got some red/brown flecks in the black. The flecks were there even from 1% bone ash upwards: not a big difference between them.
The soda tests were affected heavily. The tests got redder and increasingly interesting. 20% is pretty cool!
DP31 glaze with bone ash additions: 1,2,3,4,5,6,7,8,9,10,15,20%. Plus 10% iron oxide.
The 10% addition did’t change much in oxidation but reduction ones were quite interesting. John says these could do with more flux but could be nice. More running! I do like DP542-545 especially. Test more around this area.
In soda the glazes did start to run where hit heavily. Nice red flecks though! DP545-8 to be pursued for sure.
Okay, next set. In this one I am aiming at a yellow mate glaze.
In the first set (the top 3 rows) I added dolomite. DP549 has 2% dolomite added, DP550 has 4% DP551 has 6%, DP552 has 8%, DP553 has 10%, DP554 has 15%, DP555 has 20%, DP556 has 25%, DP557 has 30%, DP558 has 40%. In the second batch of tests here I added 1% yellow iron oxide. In the third batch I added 10% zircopax and then finally 6% titanium dioxide.
Here are the tests individually. First set with just the dolomite additions.
DP31 glaze with dolomite additions, from left to right: 2%, 4%, 6%, 8%, 10%, 15%, 20%, 25%, 30%, 40%.
Results from the test above: we can see that the reduction tests are bluer, the oxidation ones greener and the soda ones are a darker, more matte, green. In general with all of the tests as you add more dolomite they get lighter in color and a matter surface.
In the oxidation and reduction tests it takes 10/15% to matte out the glaze. In the soda they were all pretty matte, but certainly from 4% upwards. Progressively so! More flux necessary to balance this out. Although none of these were that exciting to me.
DP31 glaze with dolomite additions, from left to right: 2%, 4%, 6%, 8%, 10%, 15%, 20%, 25%, 30%, 40%. Plus 1% iron oxide!
Results from the test above: these were similar to the DP549-558 above, just a shade darker, and a bit fluxier. This is what I would expect from a 1% iron addition. DP562-4 were pretty nice in reduction I think: compare to my wood ash tests.
DP31 glaze with dolomite additions, from left to right: 2%, 4%, 6%, 8%, 10%, 15%, 20%, 25%, 30%, 40%. Plus 1% iron oxide AND 10% zircopax.
Results from the picture above: the gas and oxidation ones were fairly mankey (english for gross) as were most of the soda ones… until DP577-8. DP578 is full on yellow! This is very exciting. I need to do more testing around this as it is fairly drippy here but definitely close to a finished glaze I reckon. I wonder what it would look like with different levels of iron. Maybe some tin to brighten it. Perhaps some silica or clay to stop it melting too much.
Here’s that tile on its own…
Now I added 6% titanium dioxide to this whole set of tests.
DP31 glaze with dolomite additions, from left to right: 2%, 4%, 6%, 8%, 10%, 15%, 20%, 25%, 30%, 40%. Plus 1% iron oxide AND 10% zircopax AND 6% titanium dioxide.
Overall I’m not super into these. The titanium makes some crazy blue/purple hazy business happen. It also makes the glazes much more melty. The ones with 30/40% dolomite ran a whole lot in the soda. The yellow is still there but has a greener cast. The winner is still DP578 from this batch of tests I think.
Devil's Playground Granite Glaze Tests Round 2: Video
This is the second batch of tests I made with my Devil’s Playground granite. Based on my initial tests I wanted to take a step back and do a few basic grid tests to discover more about the composition of the granite. I do intend to do an analysis of the granite soon but wanted to see what I could learn using Ian Currie’s grid method first.
Ian Currie has a couple of excellent books which outline his method. Here’s his website if you fancy getting them. There are still copies to be had out there.
I explain the basics of the grid method in this video, as well as the results of my testing.
Watching the video is probably an easier way to see the results than reading my notes but I will outline them in my next blog post anyway. I will document the results with photos and discuss them further. And also explain my plan for the next set of tests!
EnVision: a Woodfire Invitational — WOODFIRE NC 2022
The COVID-19 pandemic caused WOODFIRE NC to be postponed twice. It was great to be able to actually get together and make it happen!
This blog documents the EnVision show that was set up at the conference. It had work from all of the presenters and artists invited to be part of WOODFIRE NC. It was fabulous being able to walk through the main hall and see these pieces throughout the conference. I have tried to document each piece and artist that were in the show but if I mislabelled any then please let me know!
For the first WOODFIRE NC conference back in 2017 I documented the show as well. You can check that out via the link below if you like:
But now it is 2022! Below are images of almost all of the pieces in the EnVision show. The images below are all cropped square but clicking on any one of them will enlarge them. Then you can flick through the un-cropped images at leisure!
There were some other pieces on display at the conference. This was Anne Partna’s Invisible kiln, full of her work and other local artists such as Hannah Cupp and Stillman Browning-Howe.
Some of the wild clays that Takuro Shibata uses in his Starworks clay blends…
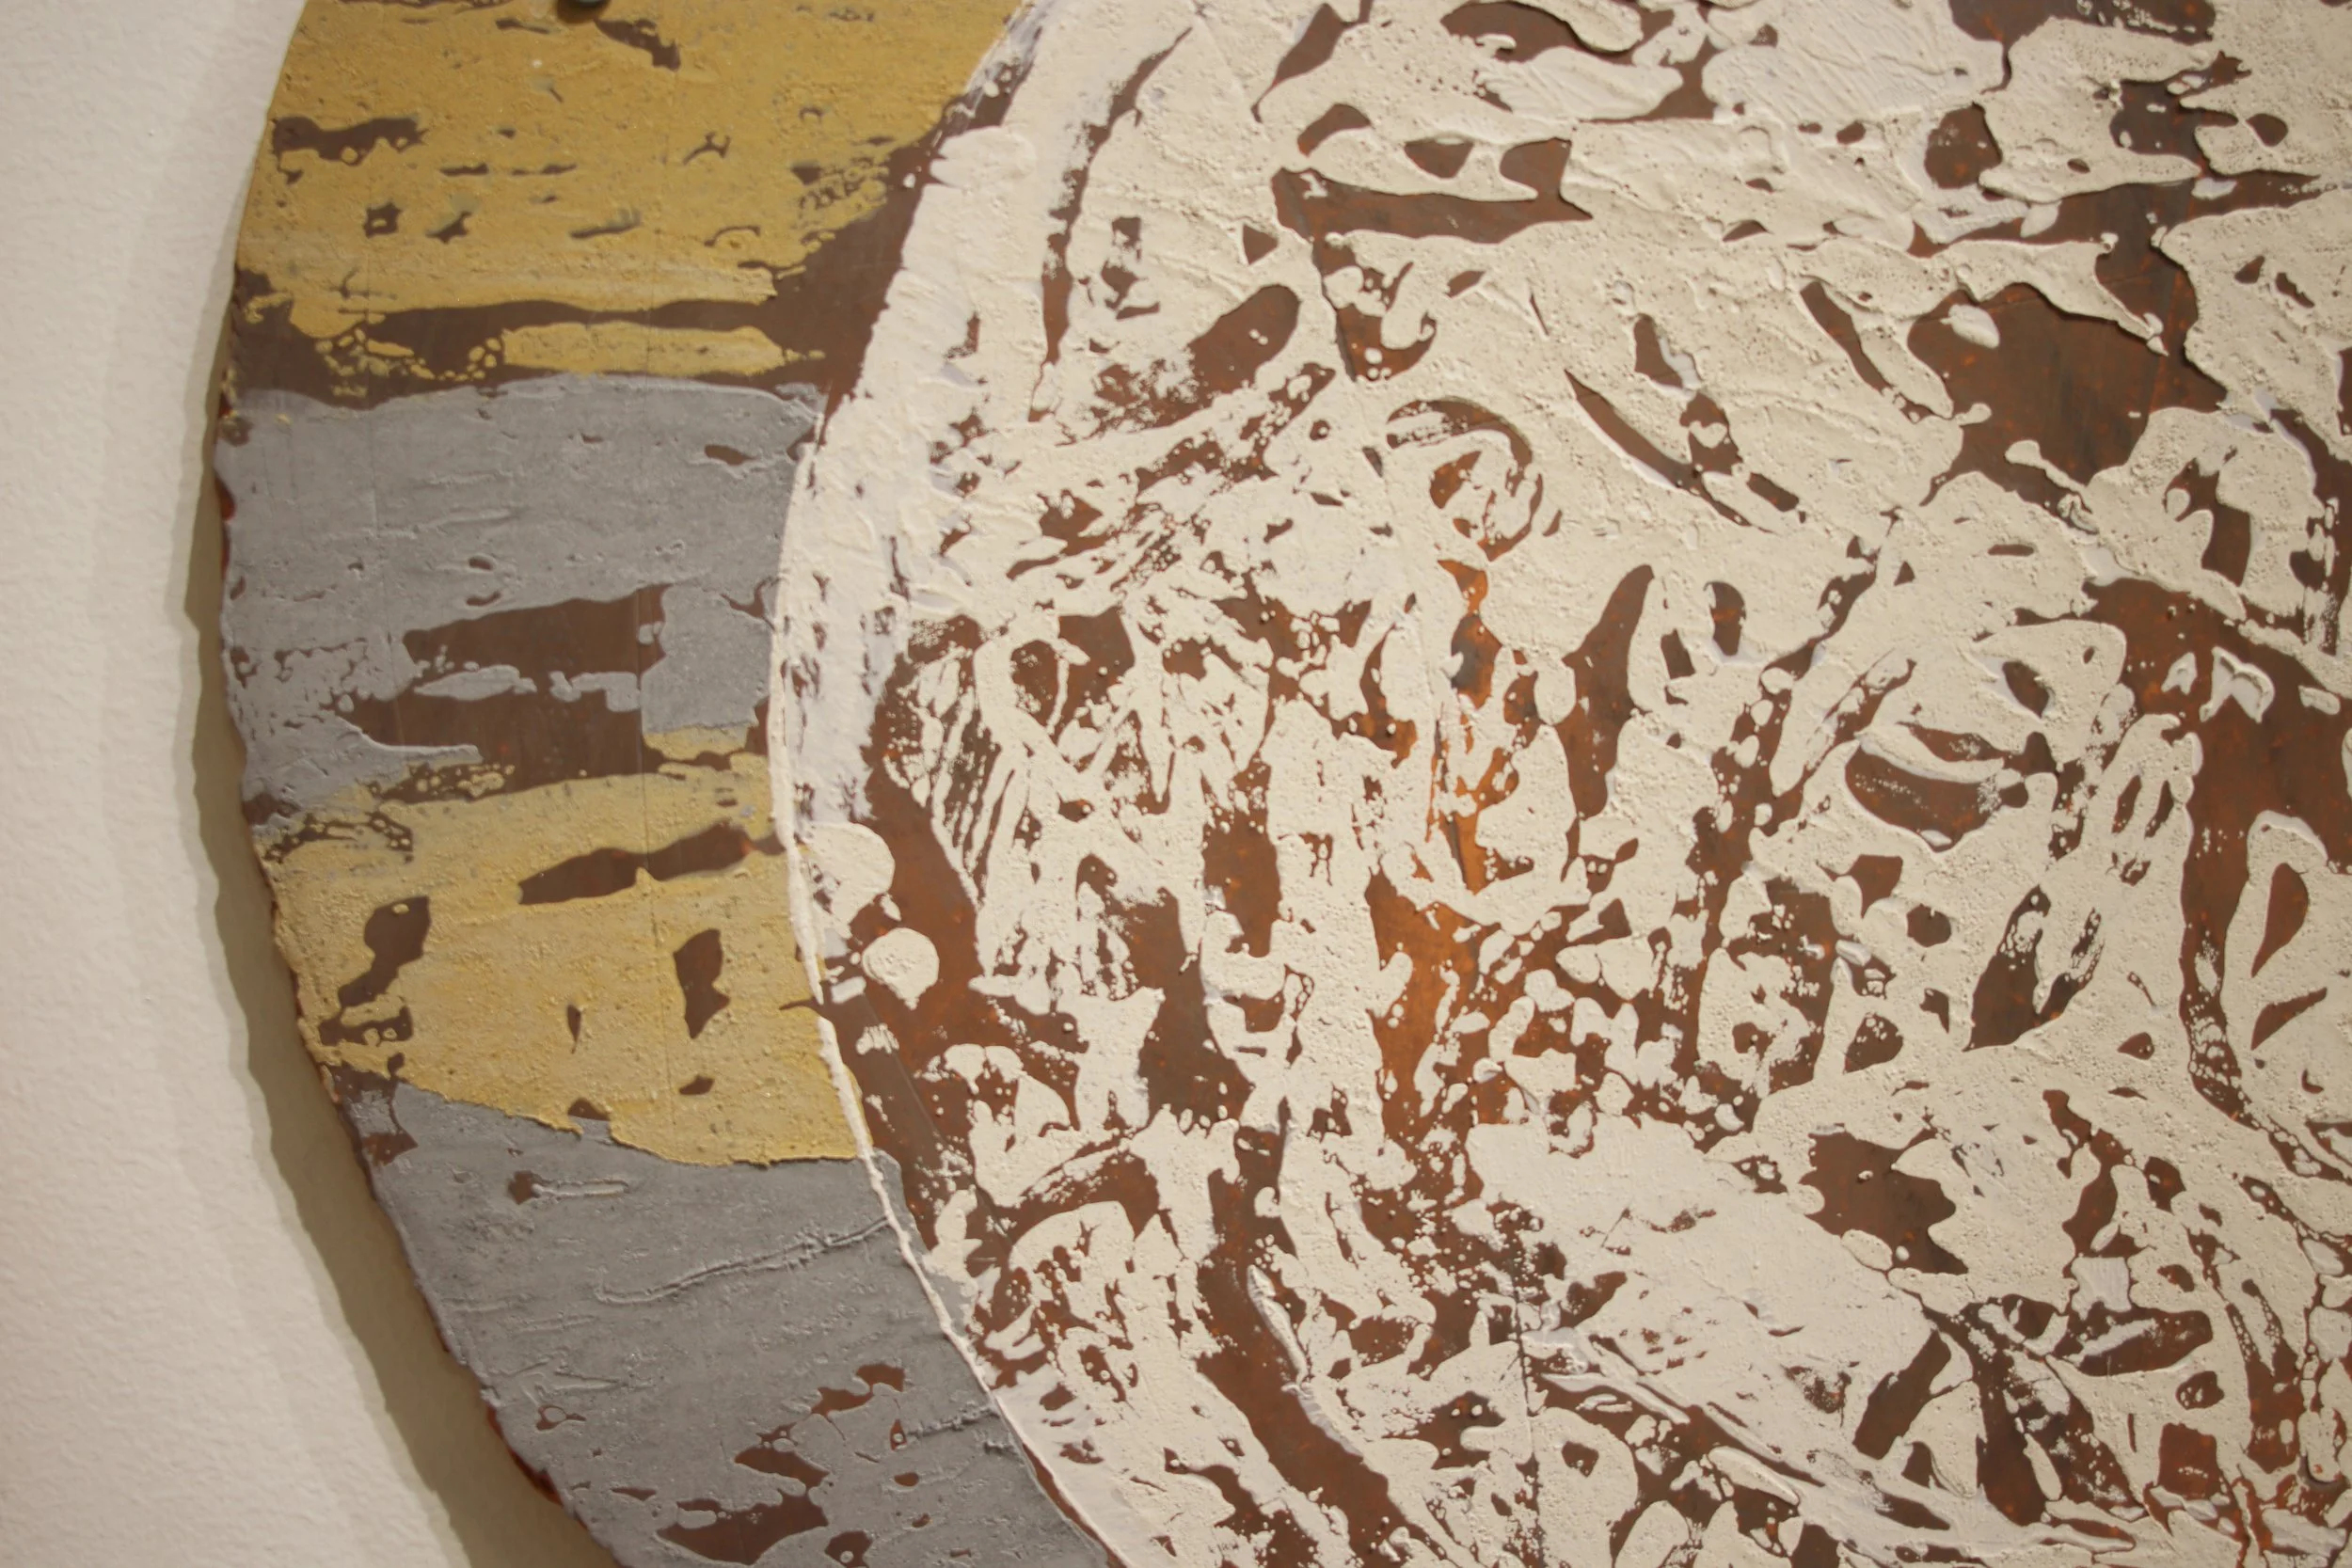
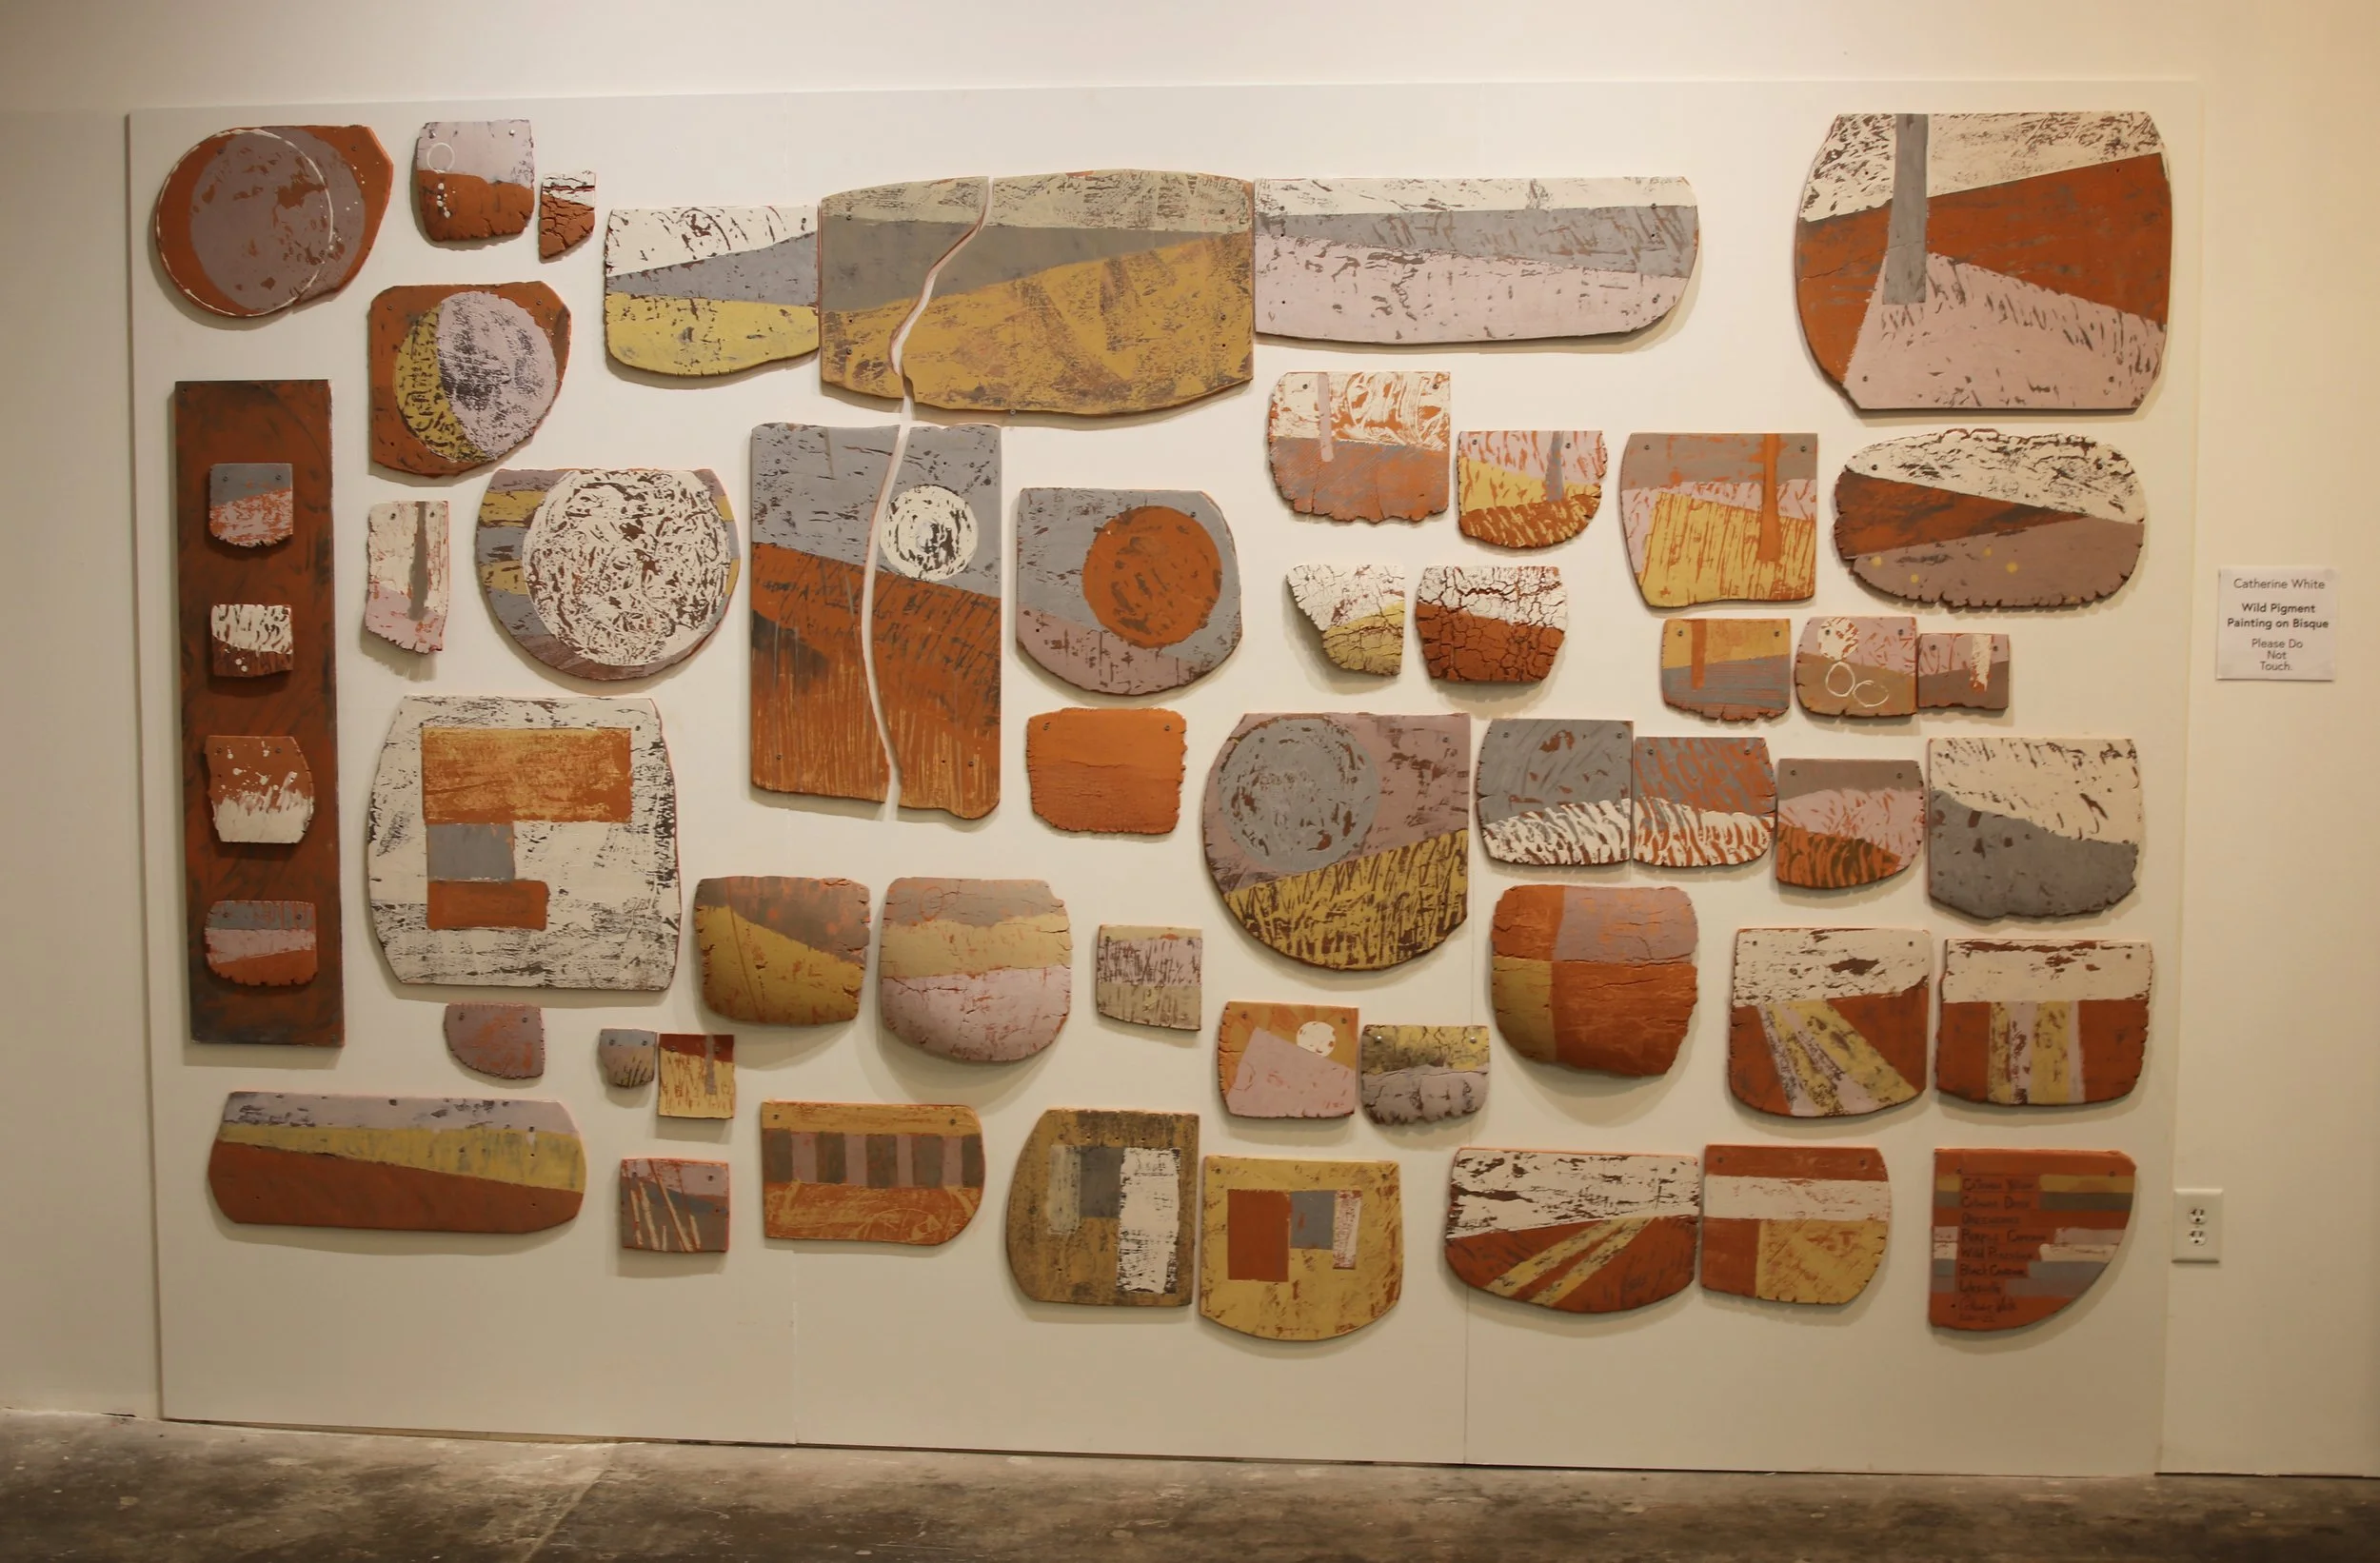
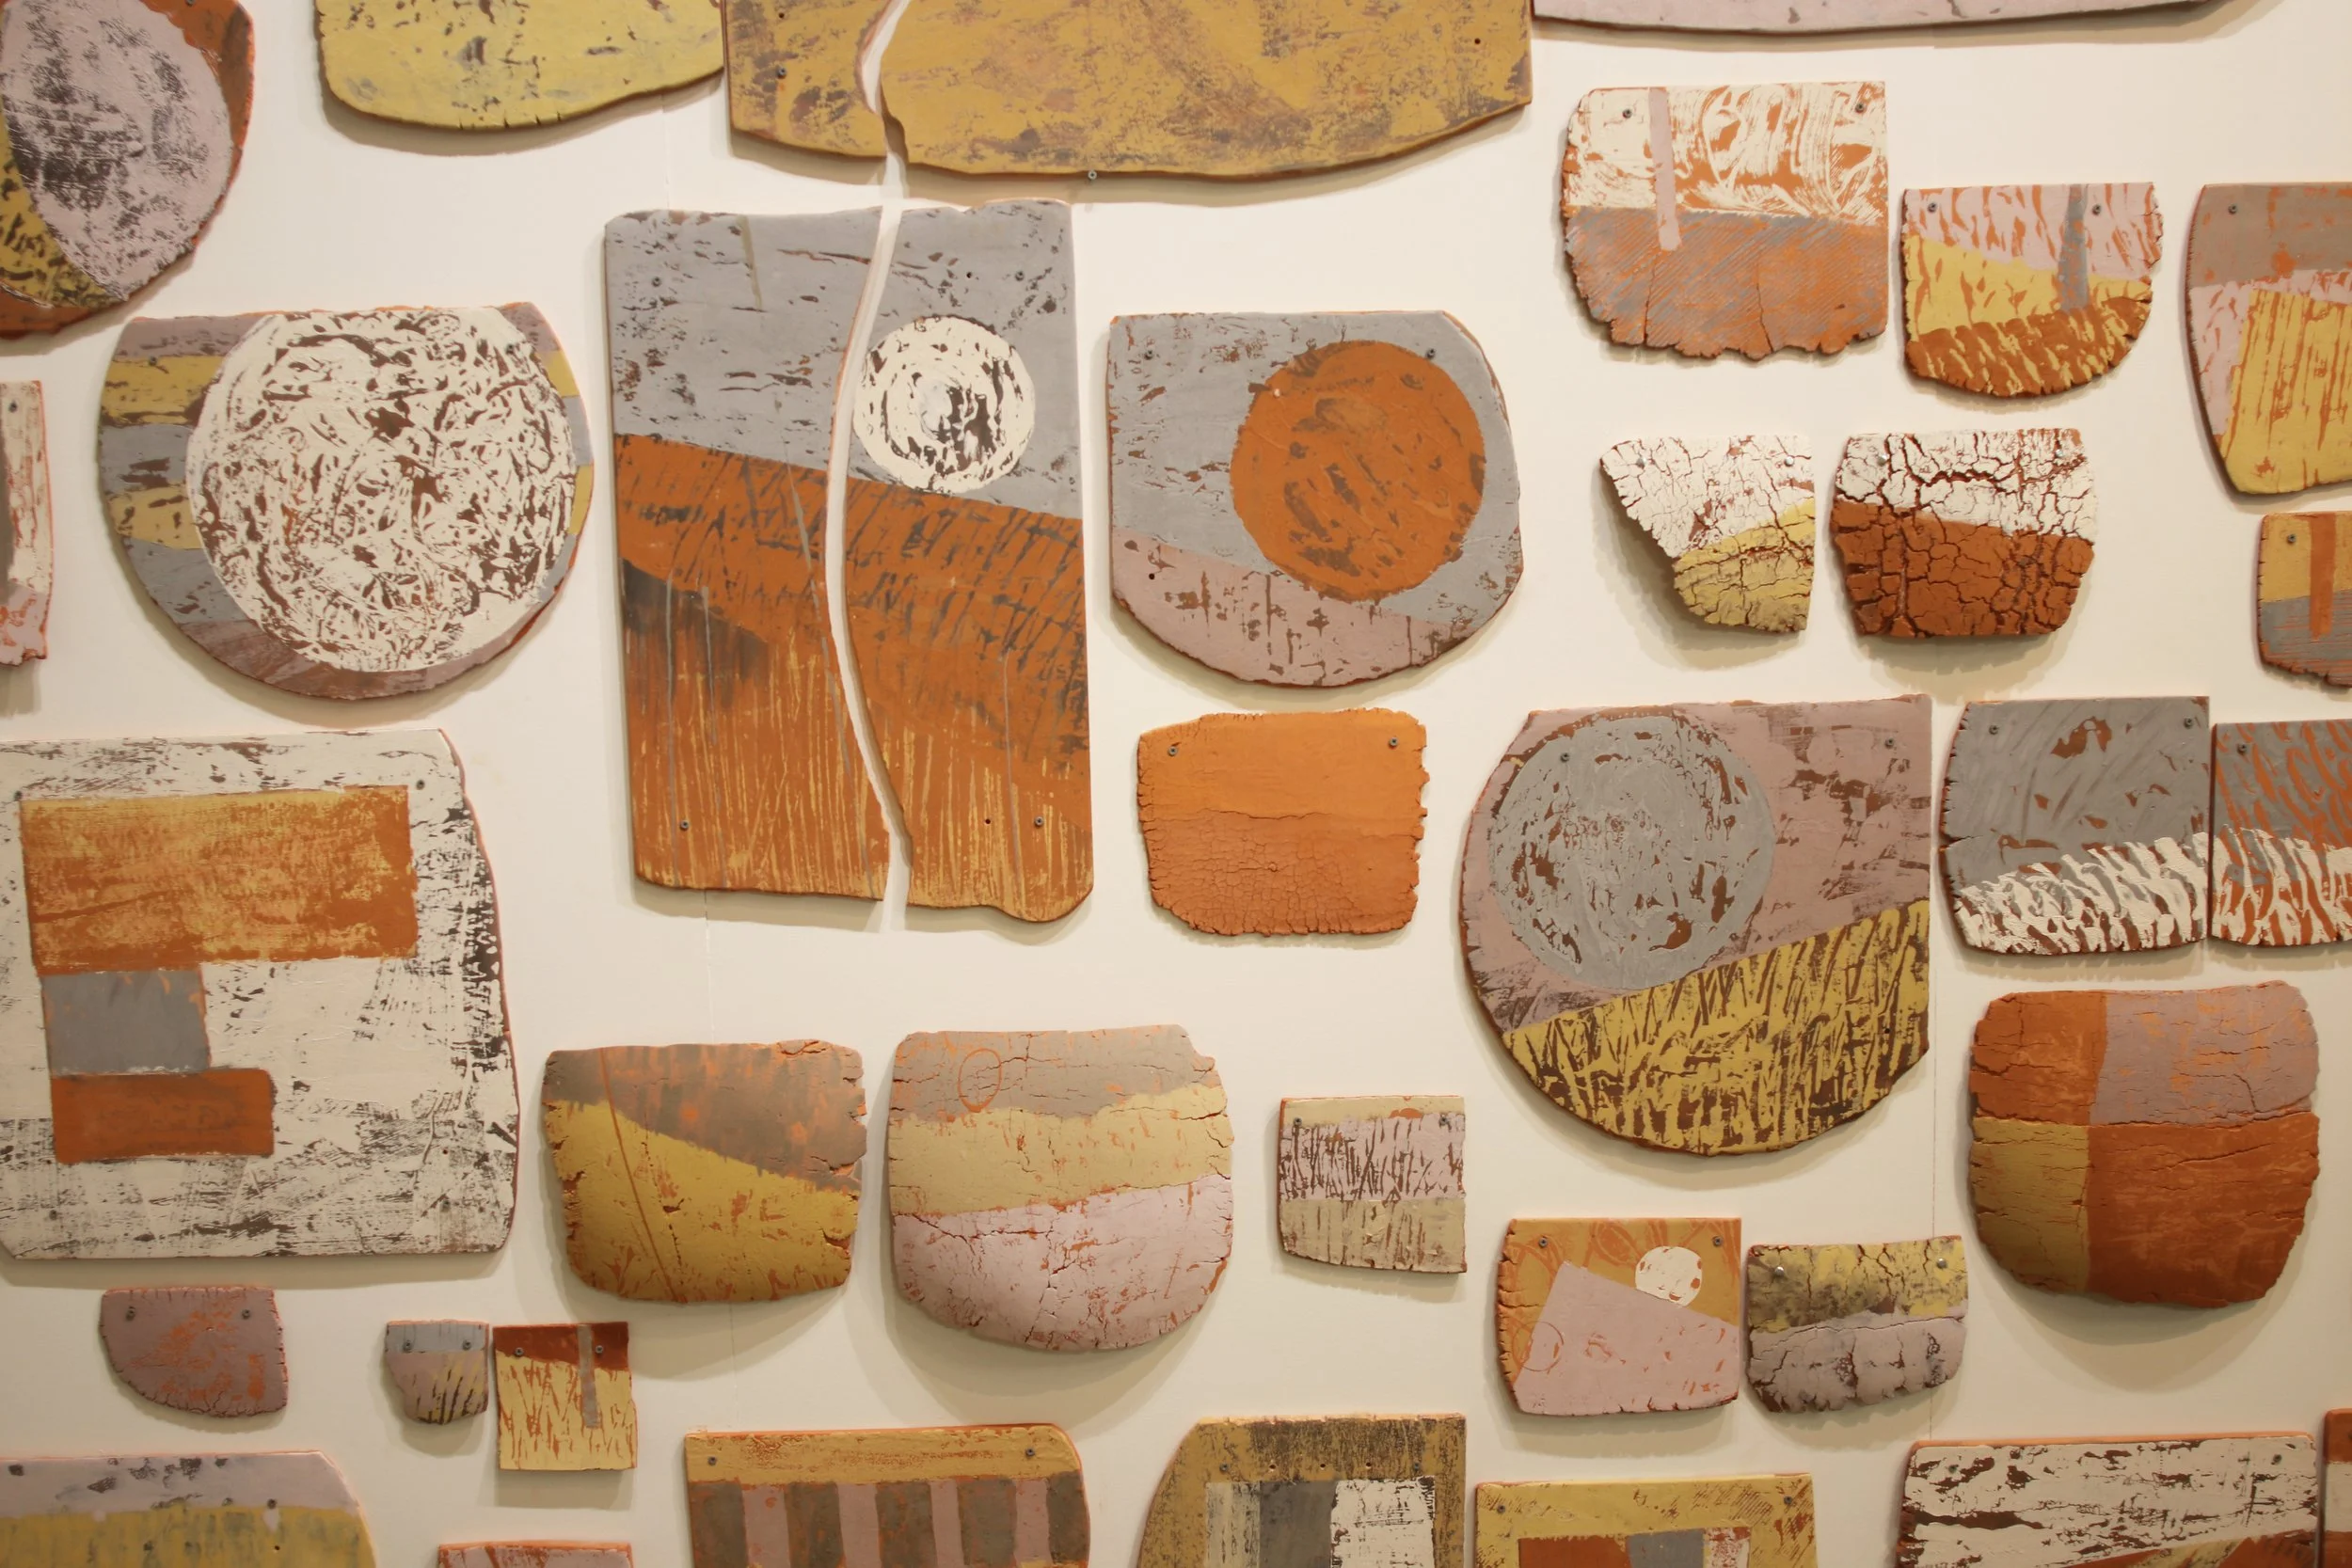
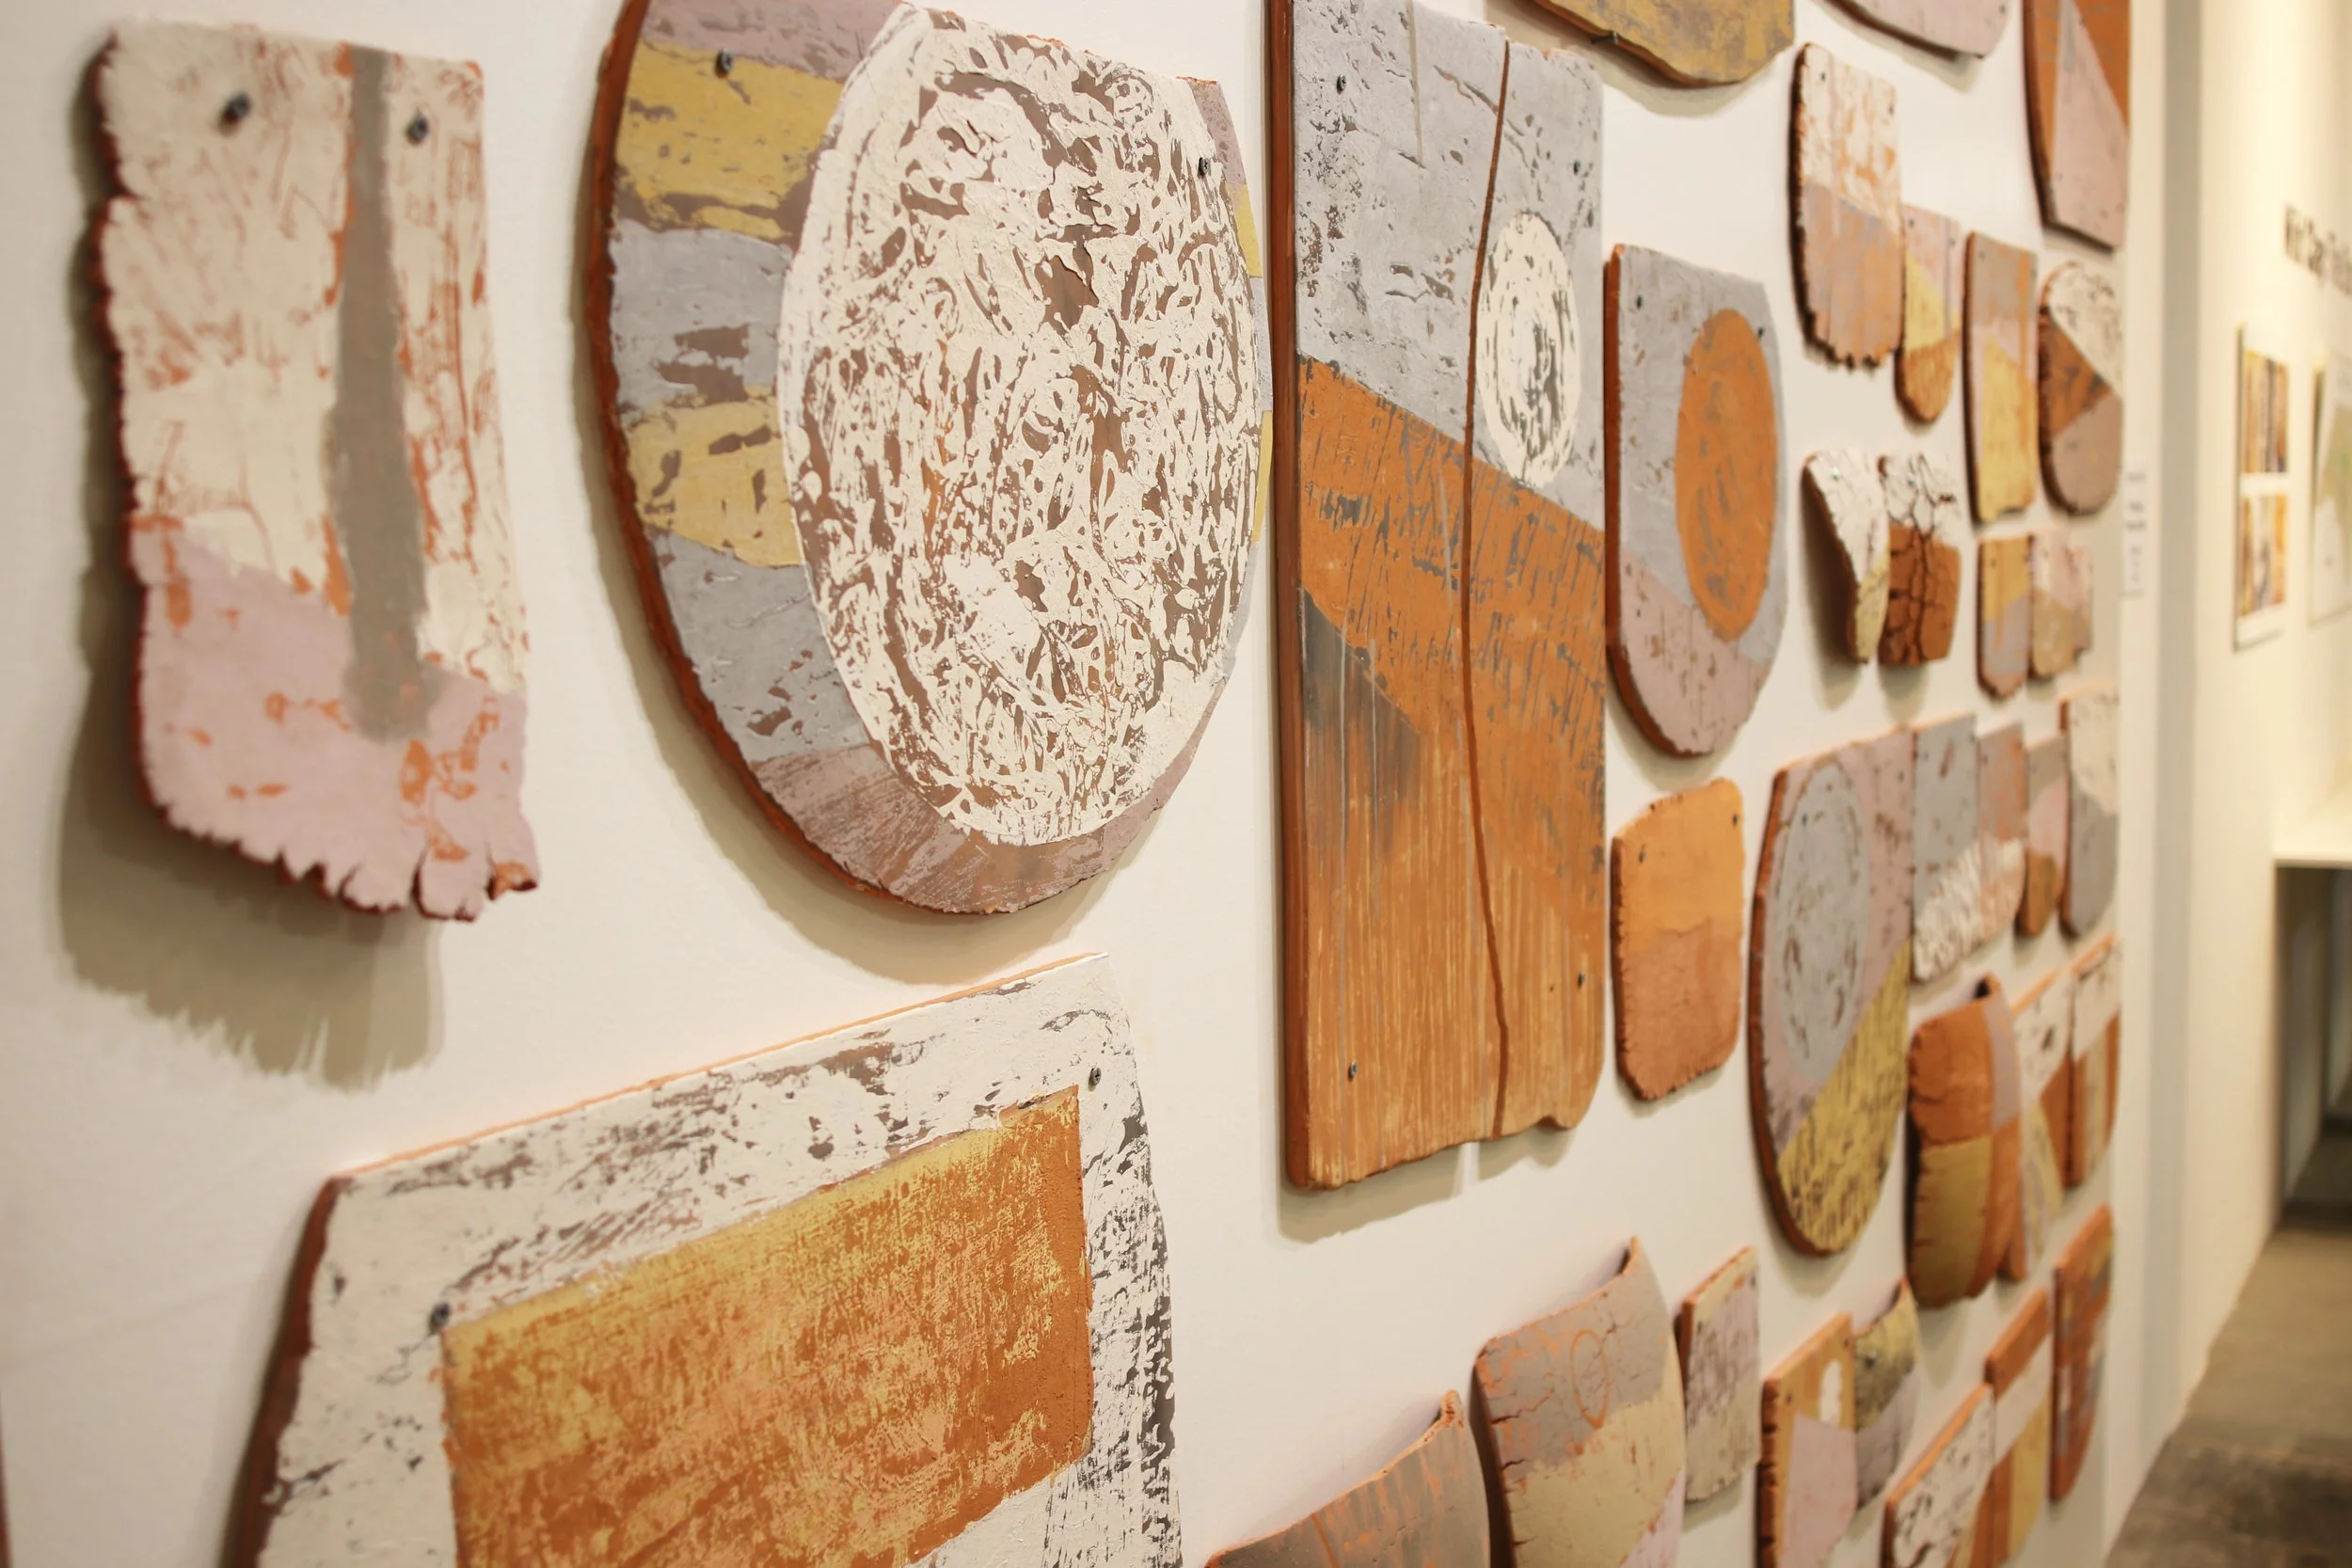
Catherine White’s clay paintings were particularly exciting to me. These were done with different colored unfired clays onto bisque tiles. Catherine calls them ‘Wild Pigment Paintings.’ I hope they stay on permanent display at Starworks.

Devil's Playground, Western Utah. The place!
Here is a little tour of where I am sourcing the granite to make granite glazes from. It is located in Western Utah. Very beautiful spot!
Here is a little video I took to get you situated…
And now some photographs of the place…
Wild glaze making: processing granite into fine granite powder for glazes.
I came to Utah State University to investigate turning rocks and minerals into glazes. Along the way I have also been experimenting with different materials in soda firing. The focus of my thesis show will be to investigate what I can do with one granite as a primary ingredient. I have collected a granite from Devil’s Playground in Western Utah and intend to make four or five distinct glazes from this material. I am setting the parameter for myself that these resulting glazes will contain at least 50% of this Devil’s Playground granite.
Why Devil’s Playground?
Well, a couple of reasons. The first being that the place is fabulous and made me want to keep returning to it. The second is that it makes an acceptable greyish green celadon all on its own with no additions at all. This means that it will provide a good base to experiment with.
Before we get to the processing, here are some pictures of me collecting some granite with my trusty companion Wellington out in Devil’s Playground…
When I was collecting the granite I tried to get pieces that were already not too large. Once I had the granite back in the studio the hard work began. I wish I had a hammer-mill but the one at USU is currently out of action. Thankfully I had the help of my friend Jack Orgill who is an undergraduate student at USU. He is a rock crushing machine! So we went for it by hand. Jack and I were both leaving town to go to the NW Woodfire Pottery Conference so time was of the essence. We only had a few days to get the granite crushed up, milled and set out to dry. It was a bit hectic but we managed it!
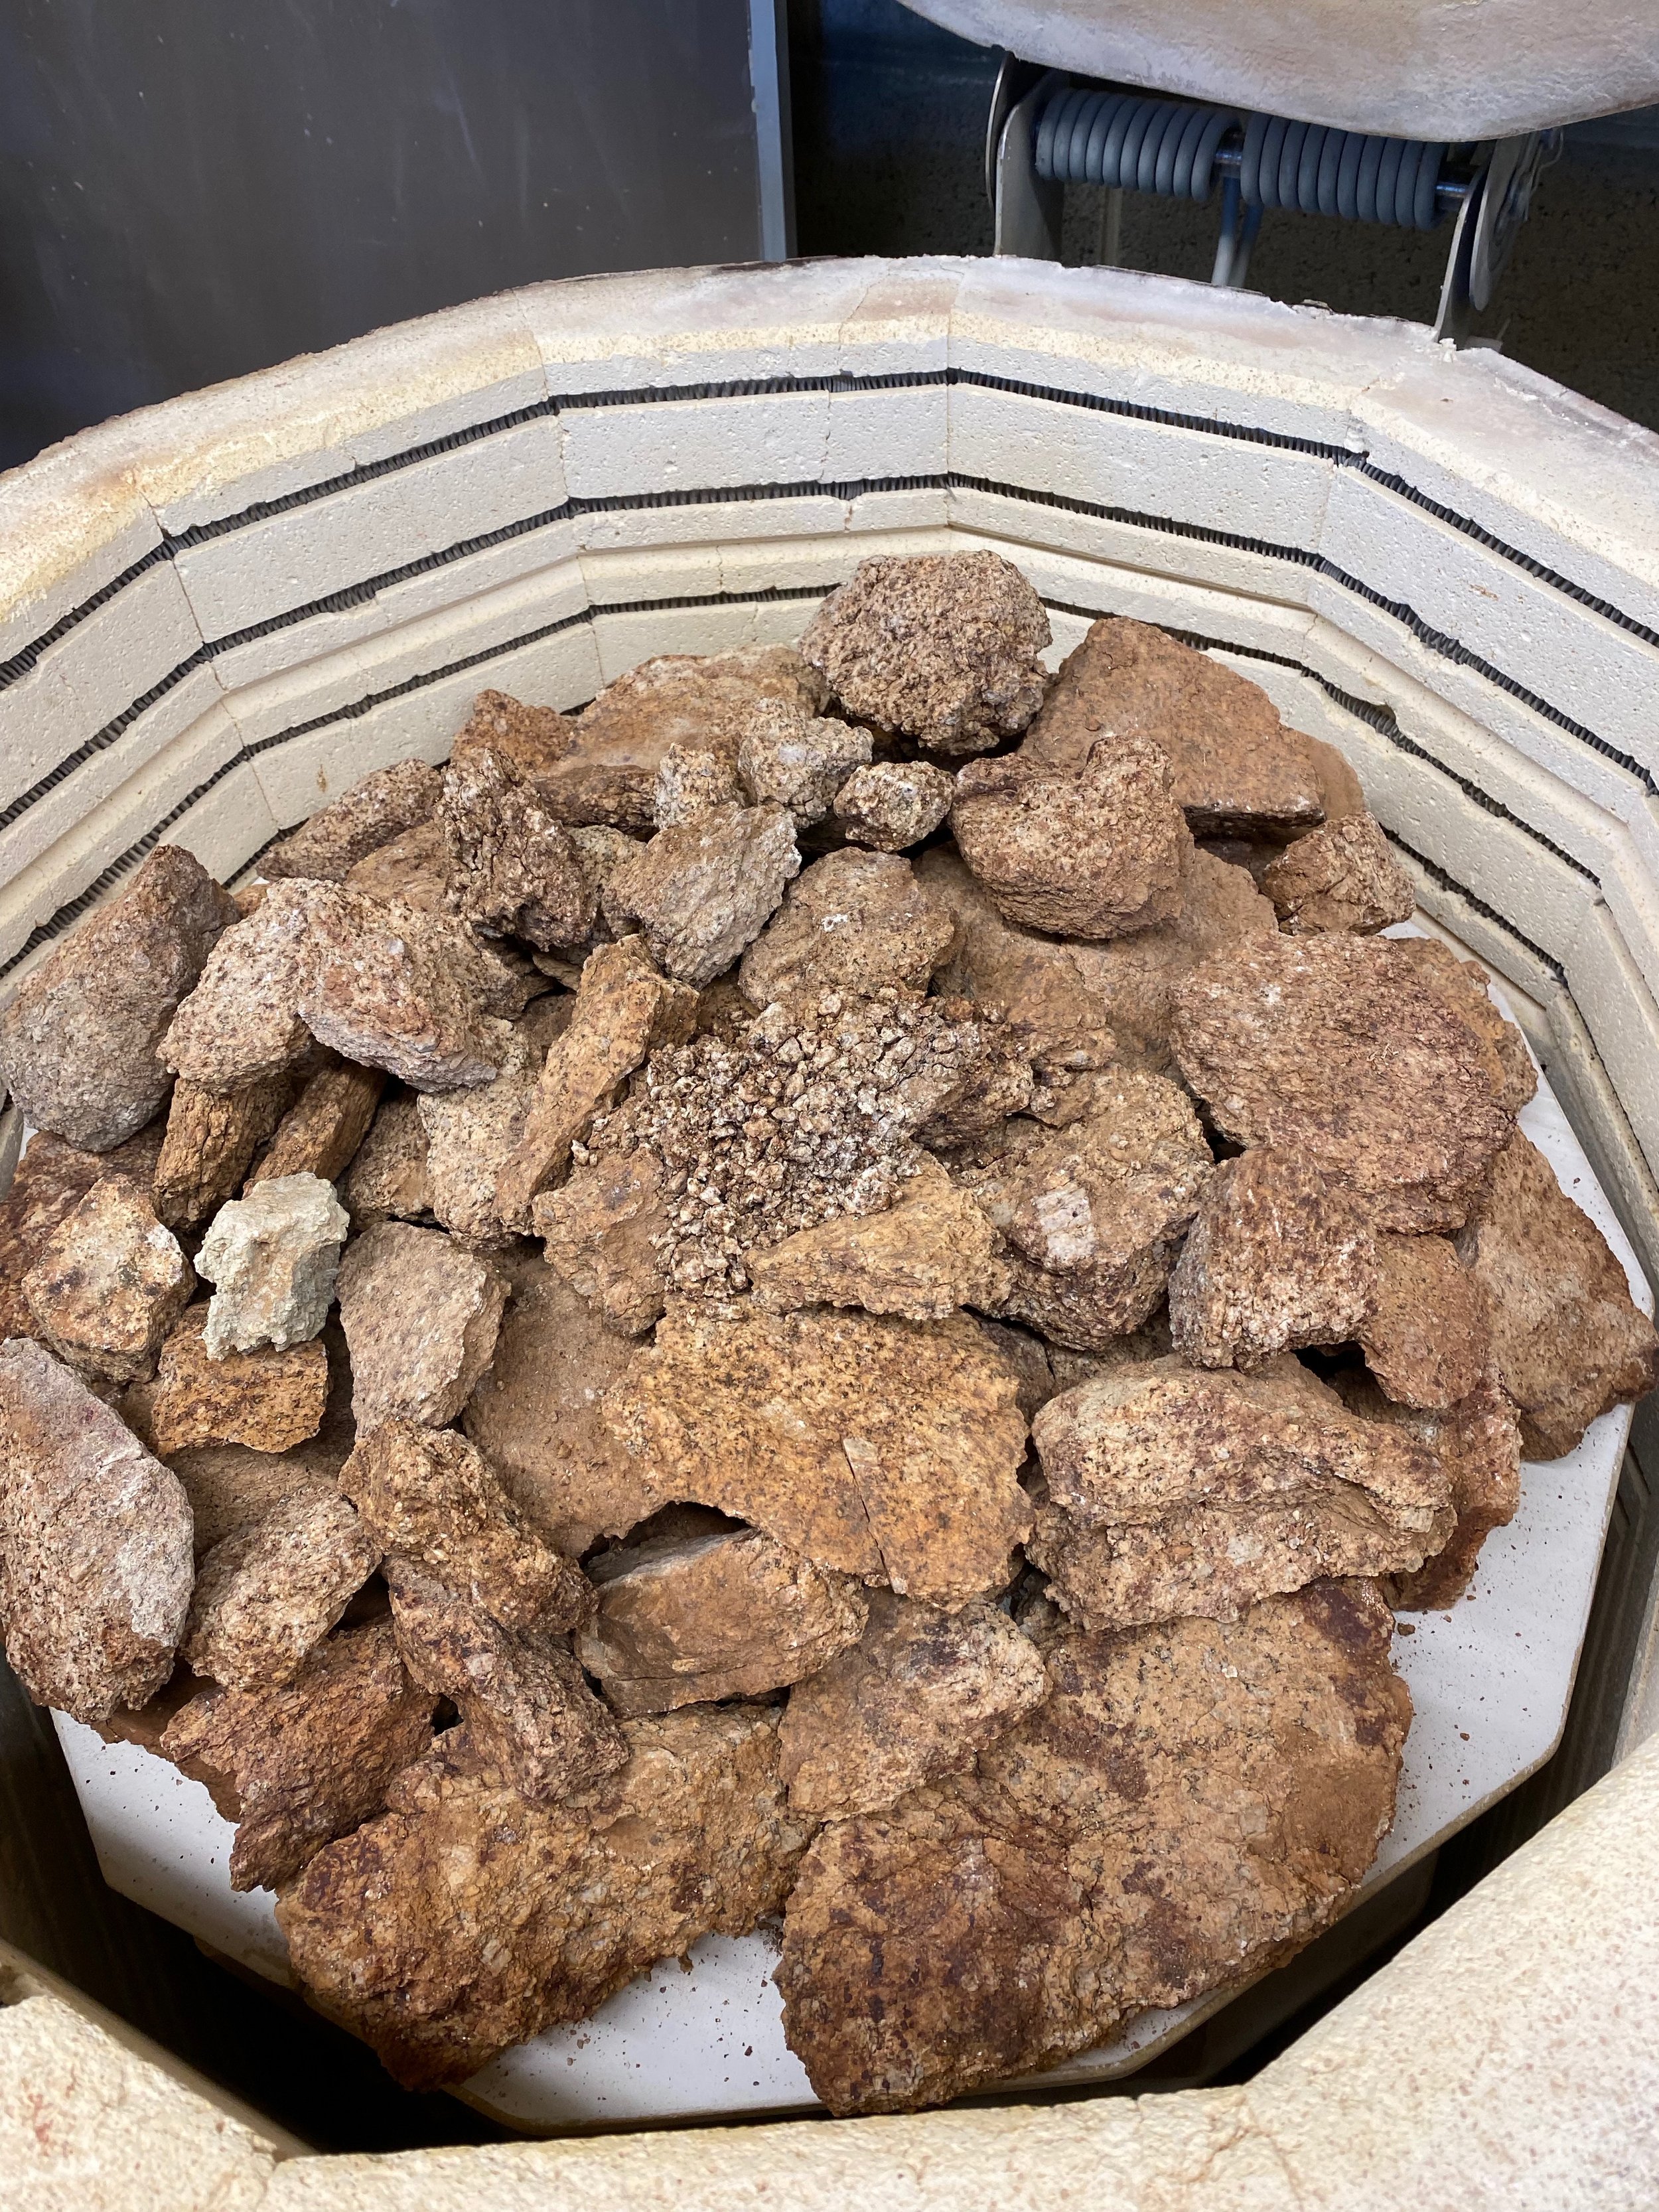
The first step was to calcine the granite. This makes the rock expand and contract and loosens the bonds between the minerals present in the granite. I loaded an electric kiln full with the rock and fired it slowly to 1400°F. When I say slowly here is the schedule: 50°F an hour ramp up to 180°F, held for 3 hours. 50°F ramp up to 480°F, hold for 3 hours, then 100°F an hour ramp up to 1400°F. No hold at the top. I did not experience any major blow ups. Some of the rocks did crumble and break apart but there was no high drama! You can see how the color changed: the redder rock on the right has been calcined.
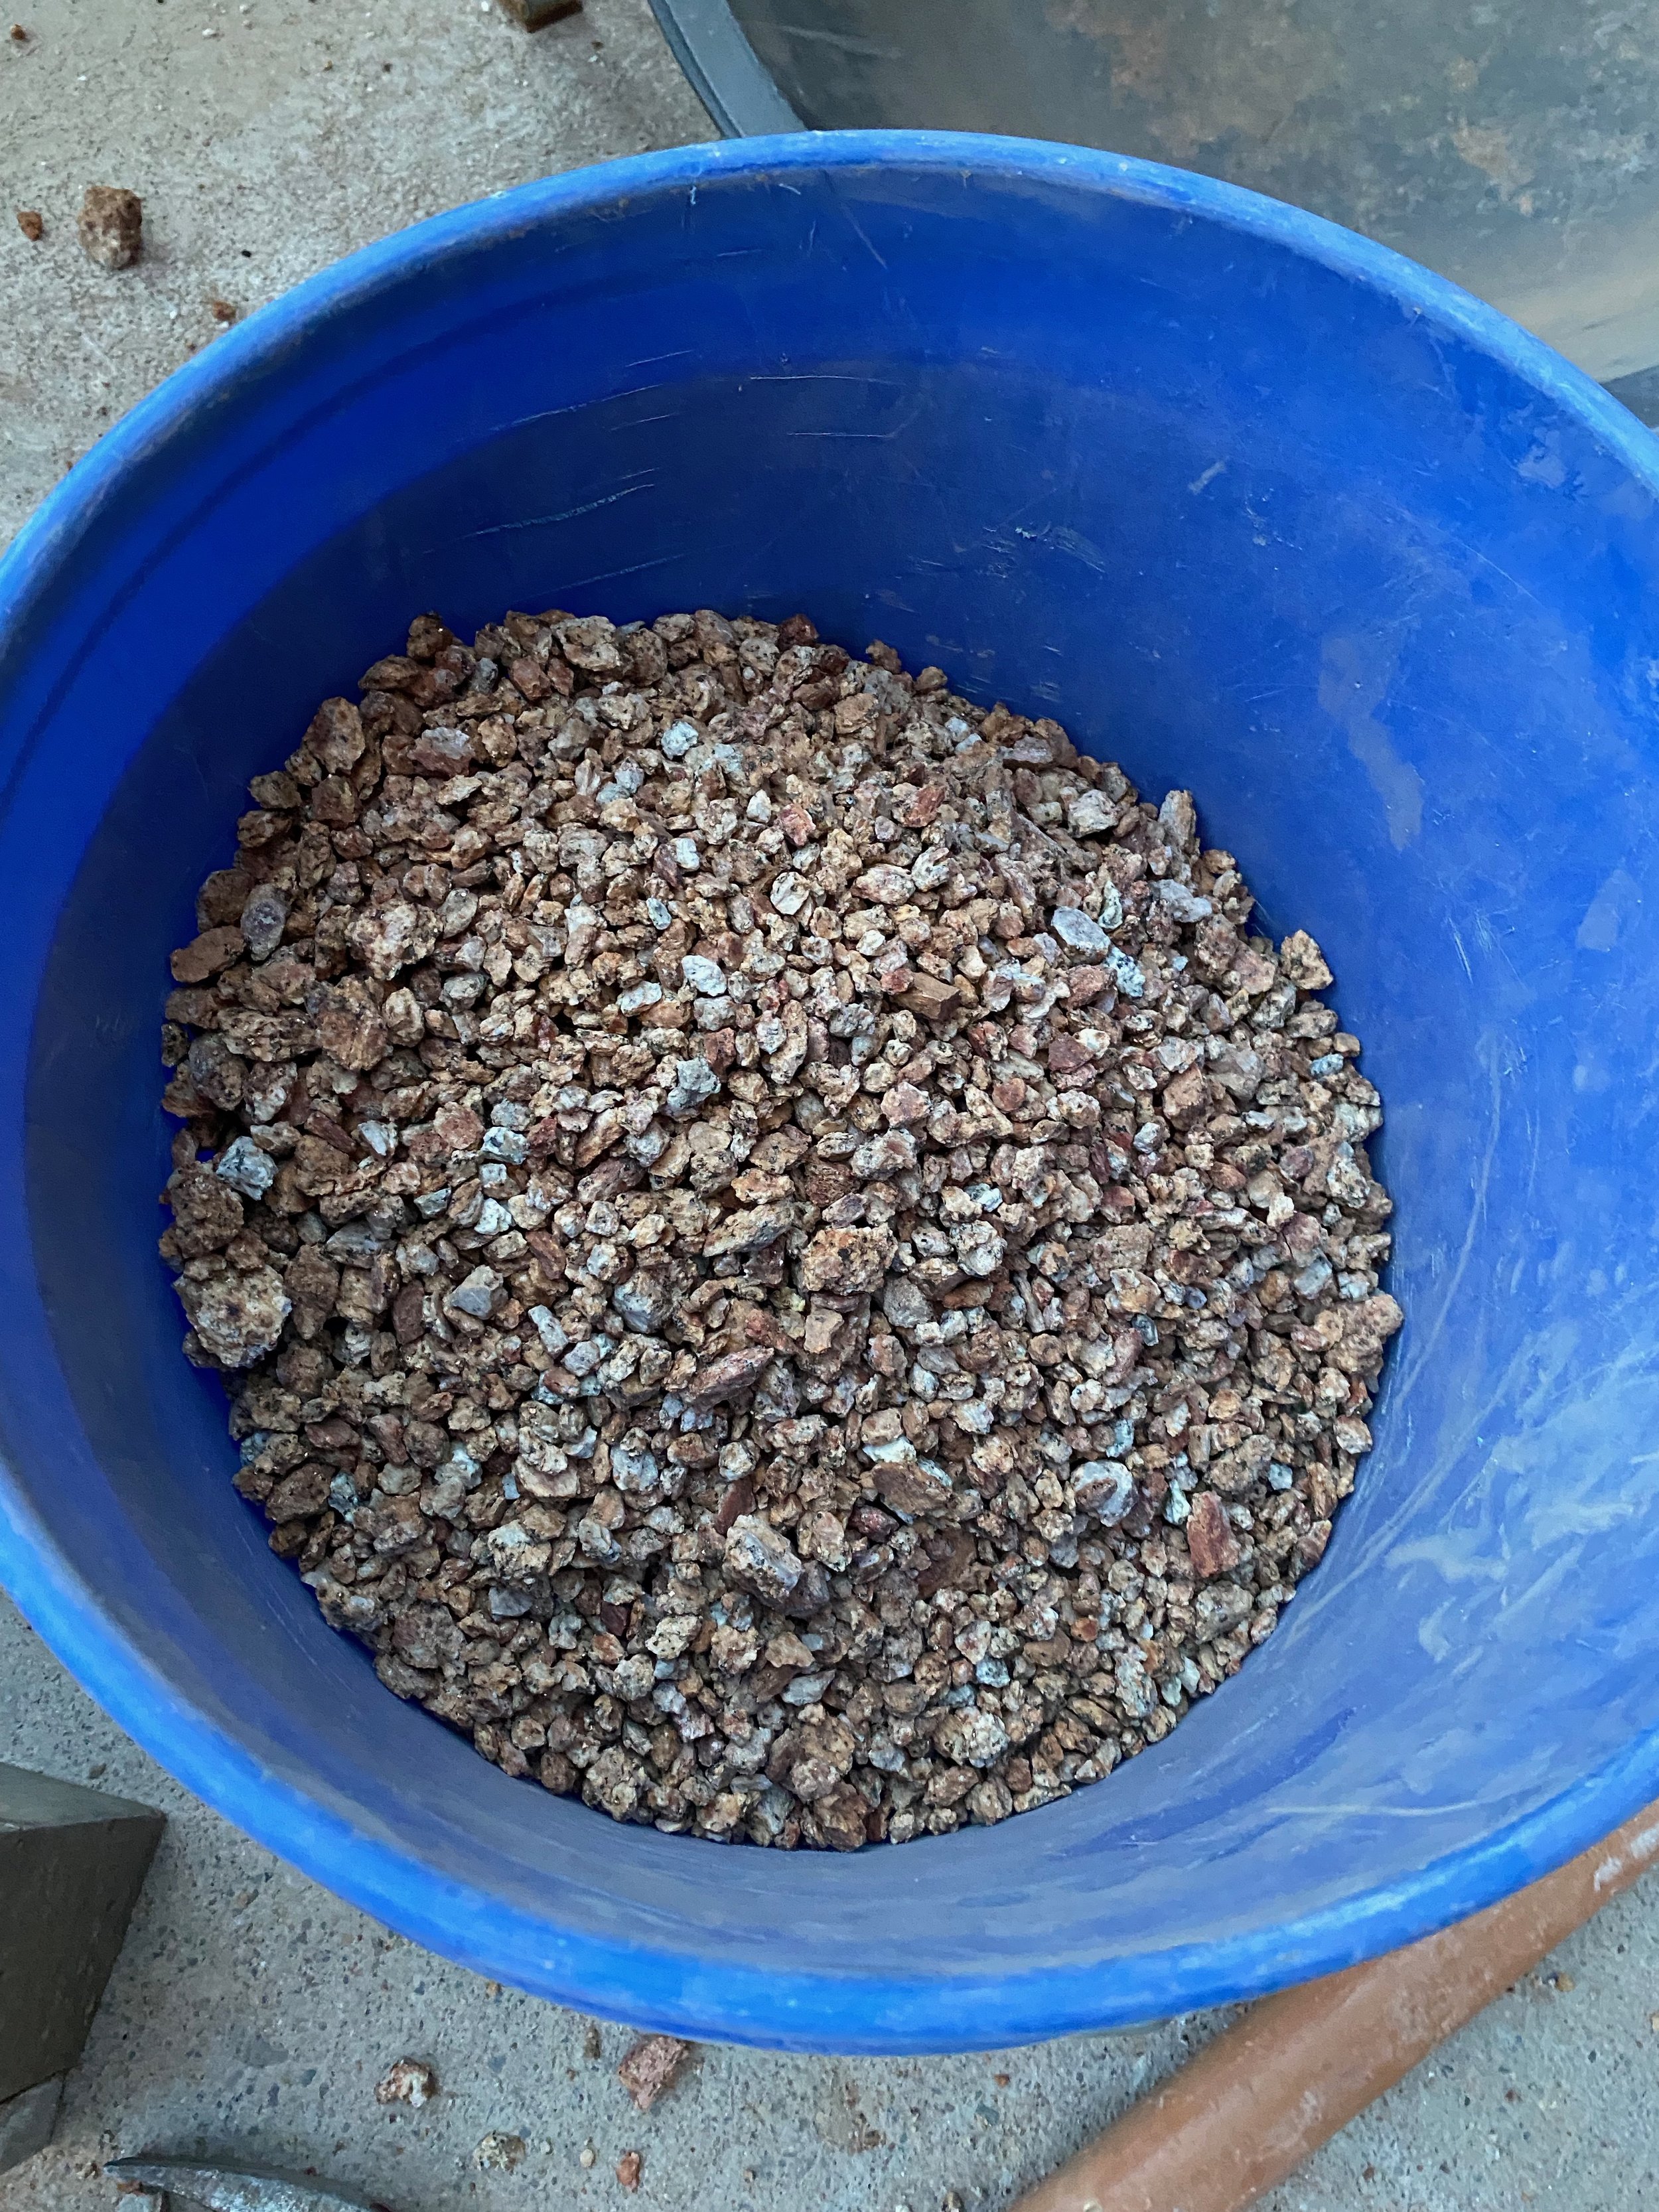
The calcined granite is much easier to break up. I know from trying both! Definitely much easier calcined. Here are some pictures of Jack going at the calcined granite with hammer and brick. He did an initial crush to break up the large chunks into smaller ones with a hammer and then took a brick to these smaller chunks to get them down to pea size. The brick worked well as it had a larger surface area. The calcined granite did not need heavily pummeling to get it to break up, just lots of small bashes. I have a sieve that lets through pea size pieces so we sieved the rock and re-crushed the ones that did not fit through. The yellow bucket at the end of this sequence shows the rock after the first crush and the smaller pea sized granite in the blue bucket.
After this step the small pea sized granite was small enough to go into the ball mill. We ground the granite overnight (10 hours or so) and then strained it, sieved it and cleaned out the ball mill thoroughly.
After sieving the granite through a 40 mesh screen we set the granite out to dry on home made racks, lined with sheets…
A few weeks later I came back and found beautiful dry granite dust waiting for me. Ready to turn into a multitude of glaze test!
Here is a video showing this whole process:
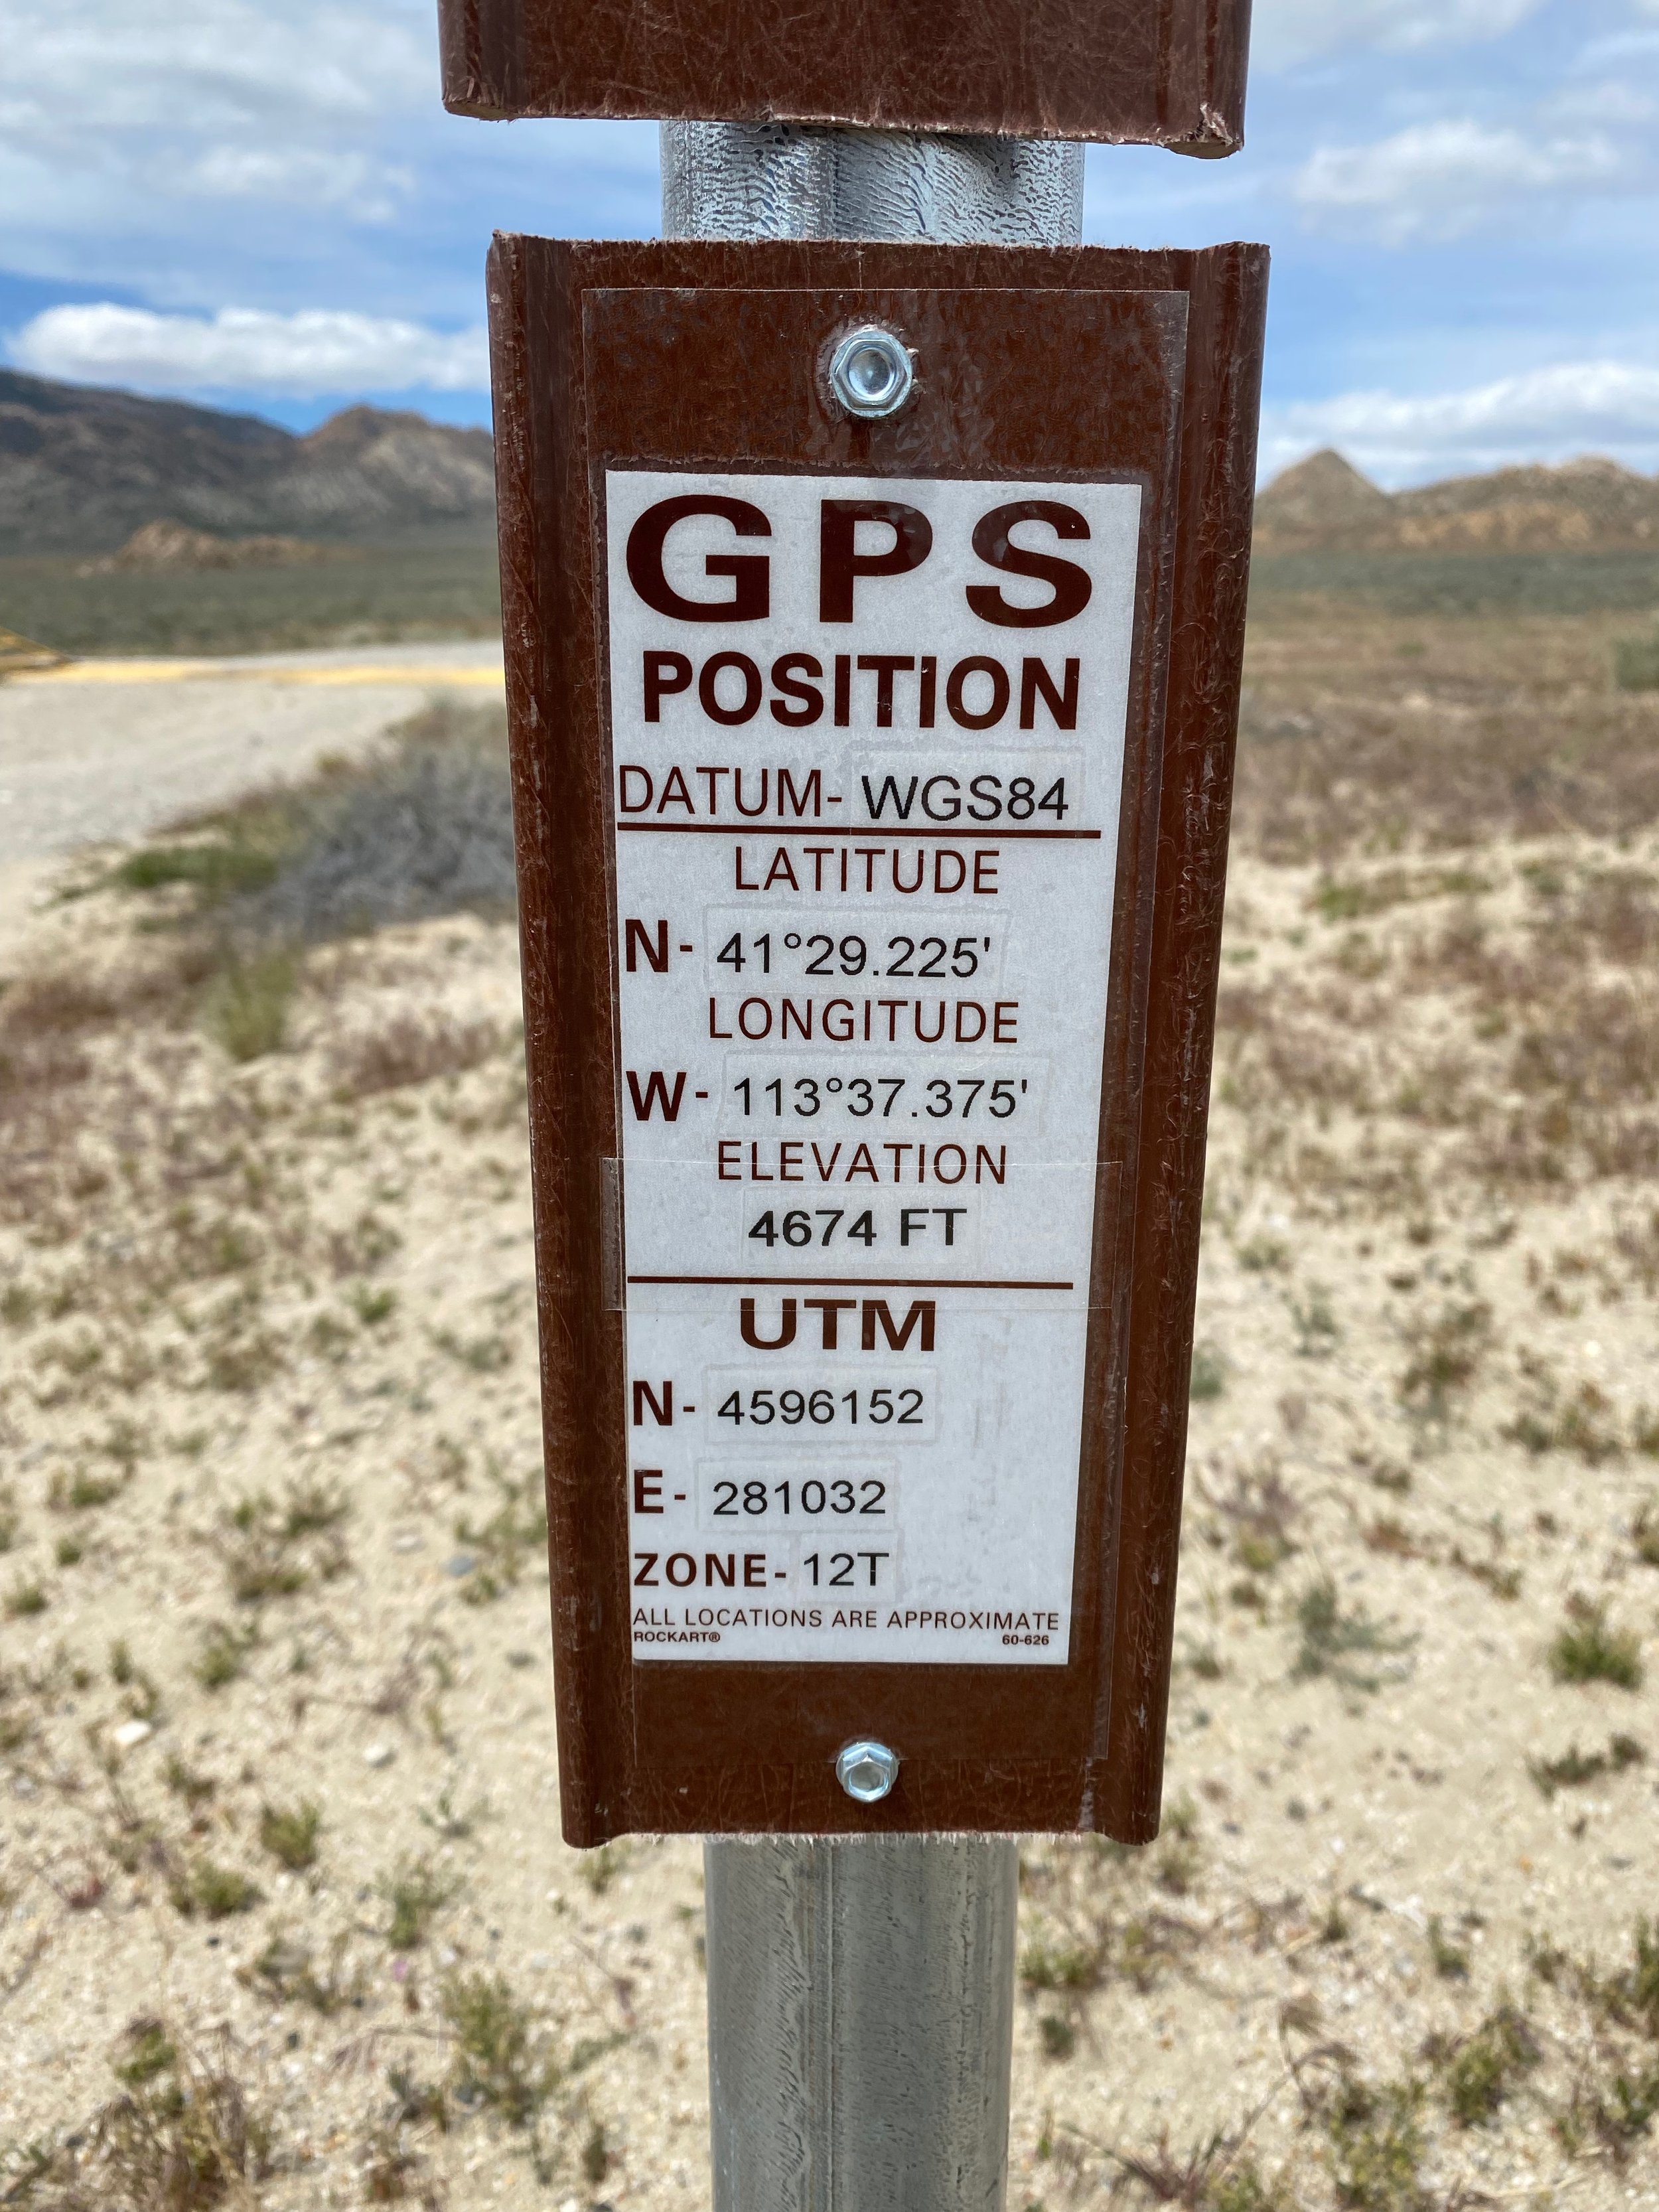
And finally, this is where Devil’s Playground is in case you want to visit…

