
Reliquary: Matt Sloan MFA Thesis Show at Utah State University (2021)
Today on the blog I have a lovely exhibition from Matt Sloan. I wrote this last year after Matt’s show but somehow forgot to post it! Now Matt has an online sale (here) so I thought it was a good time to put it out into the world. This was a fabulous exhibition so it was a treat to revisit it!
Matt was working at figuring out how to get gohonde spots on his pots for a while. Before John Britt’s PDF came out I might add! The gohonde spots I am referring to are the orange halos you see peppering his surfaces. They appear in random patterns, some having more and some less, depending on where they sat in the kiln. It’s a devilishly difficult surface to achieve. The clay has to be just right, as well as the slip, glaze and firing schedule. There are so many variables and the spots are fickle! Many a time I would come to the studio to see Matt depositing failed pots in the shard heap.
So, it’s really nice to see how Matt figured it out and to see so many winners in this exhibition. The surfaces are a real testament to Matt’s perseverance. The forms are various, but all speak to a specific purpose. These pots are destined to be used, mindfully designed to be used in the daily rituals of life. I have quite a few pots made by Matt and enjoy using them so much. They have a softness and generosity that I hope to imbue my own pots with. They are a pleasure to use. Some of my favorites in the kitchen and the hand.
Anyway, I’ll stop waffling. Here’s a couple pictures and then Matt’s own thoughts on the show.
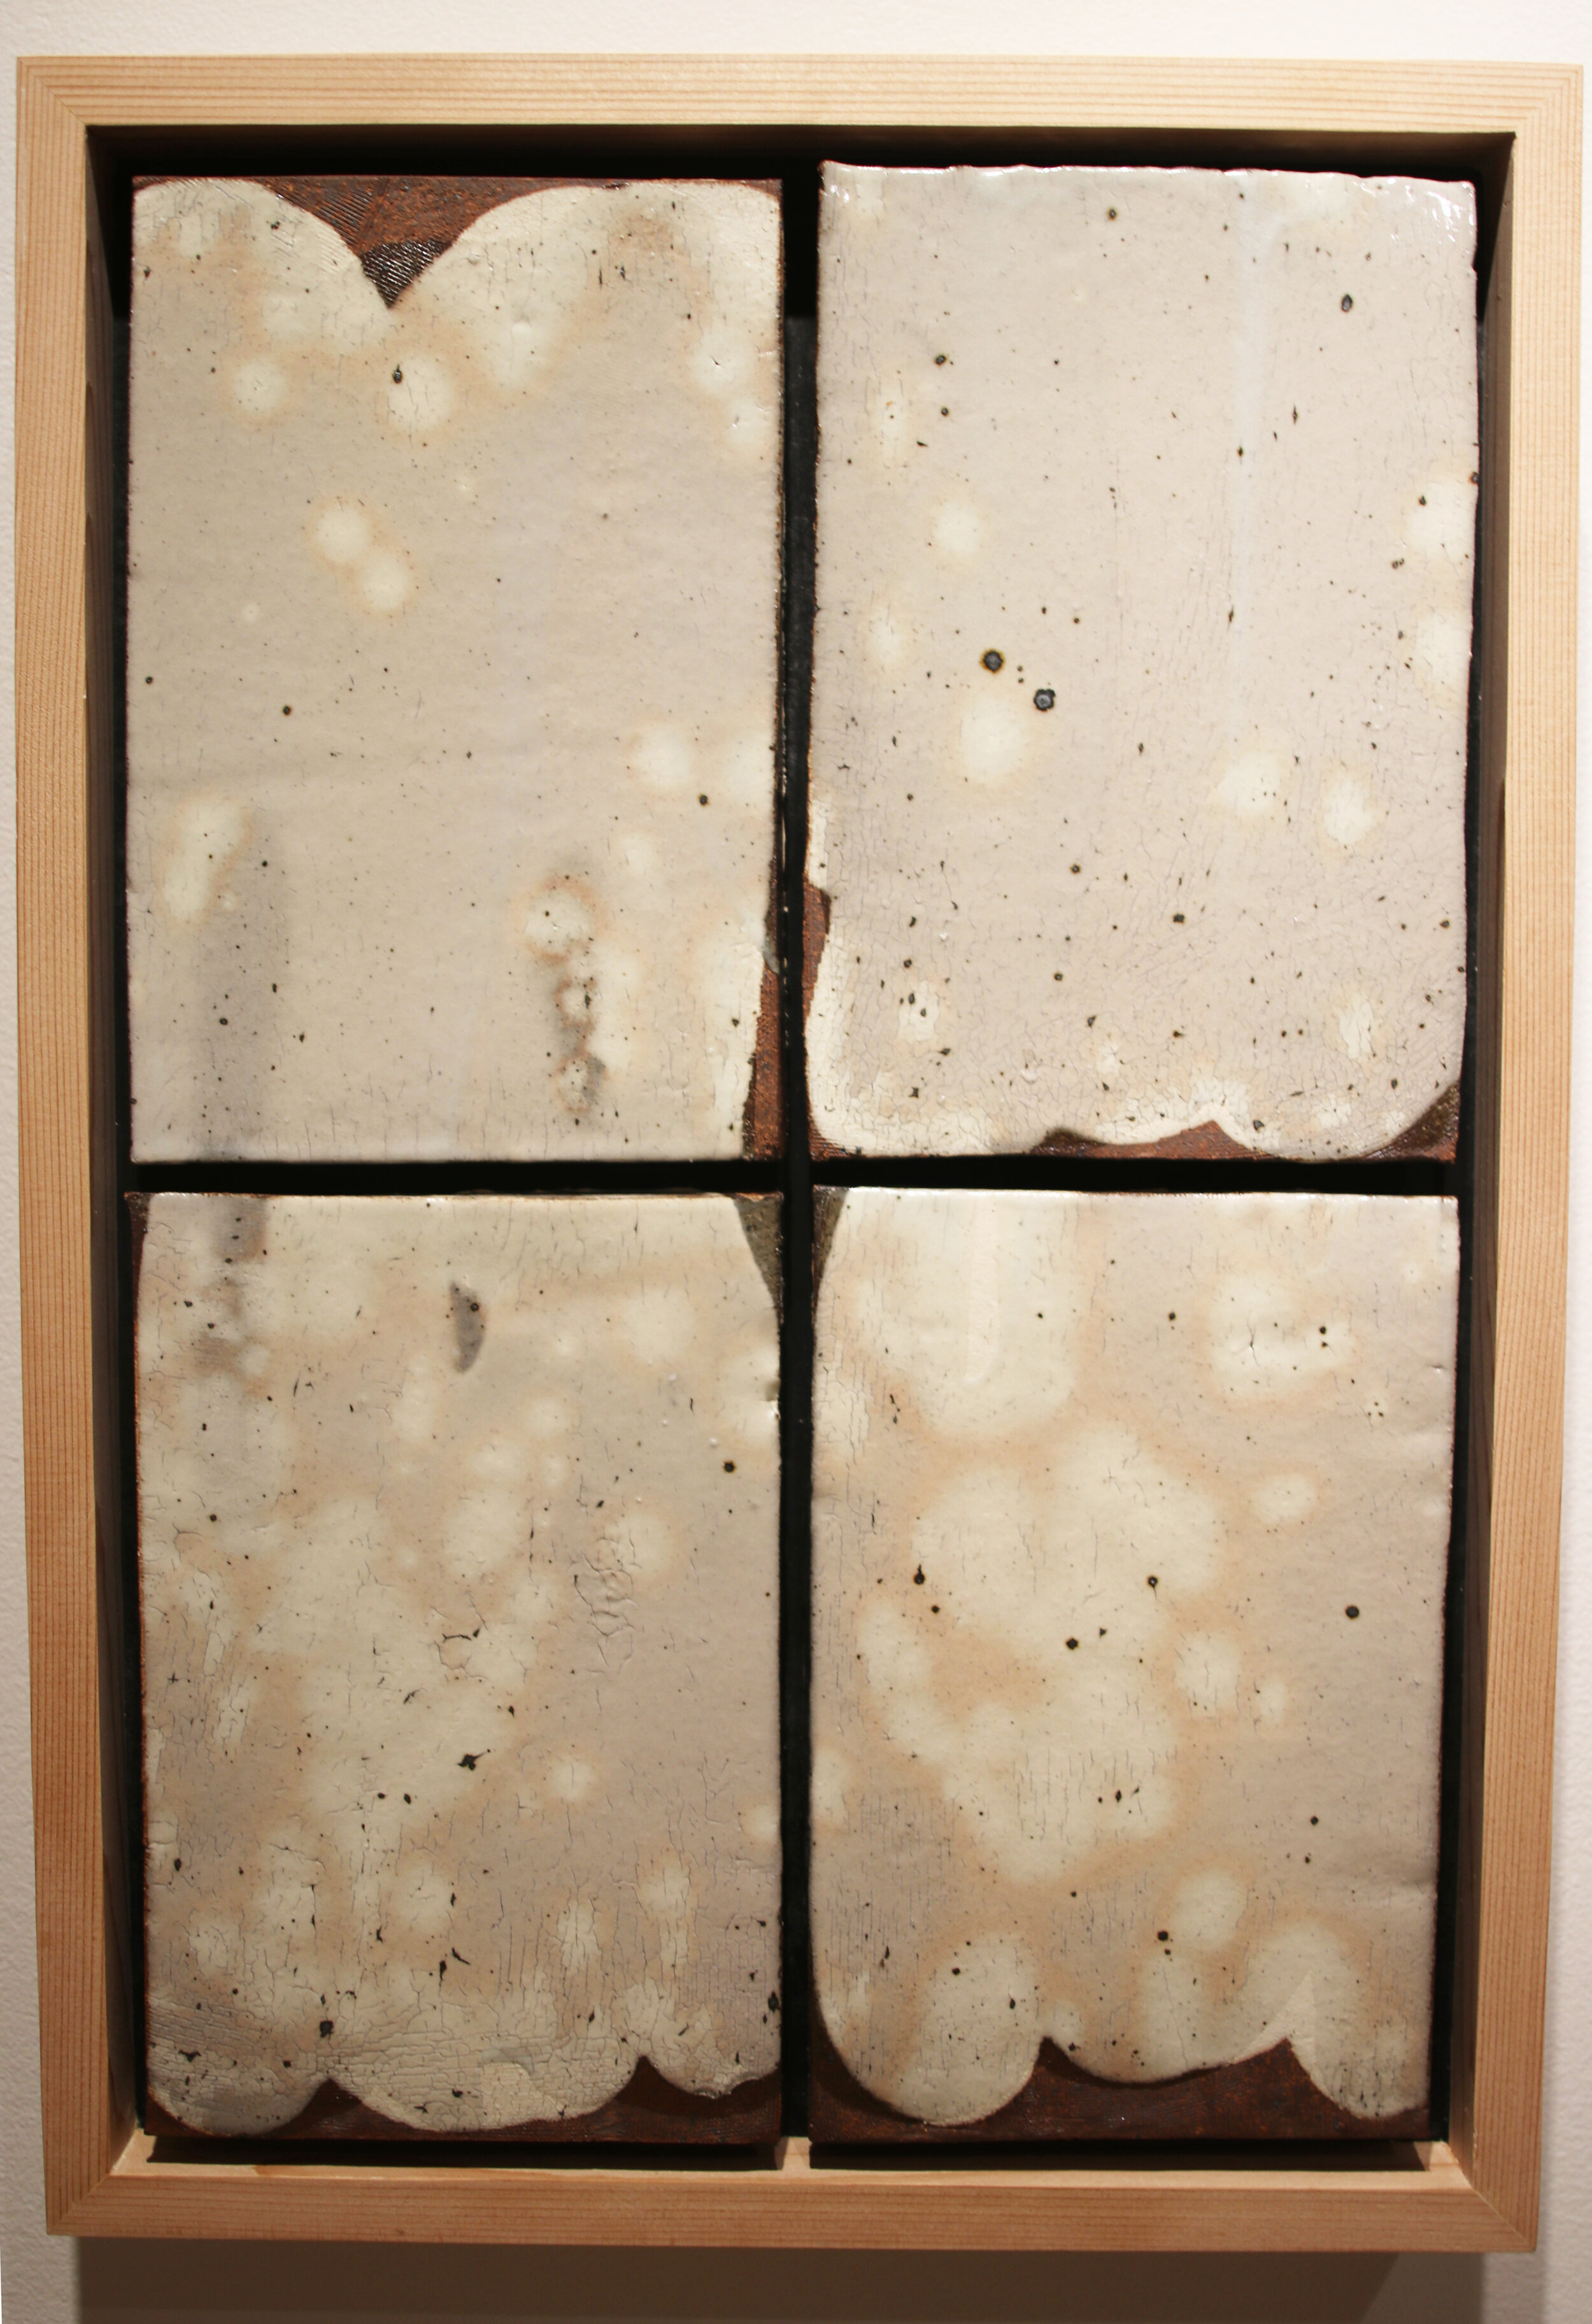


On to the pots! I’ve organised them by type. First up, I want to show these wall platters. This arrangement around the large vase set the tone for the whole exhibition, I think. They gave the space a somewhat religious feel. The way Matt lit them was reminiscent of a cathedral or church setting.


Now on to the bowls. Matt’s bowls are so nice. We have some at home and they’re a pleasure to use. Many of these got great firings too.


Here are some of Matt’s less functional pieces. They made me think of fancy architectural bird houses, but also you can see them as reliquaries or containers for relics.


Jar time…


Next up we have pouring vessels. Teapots, pitchers, bottles and cruets. These forms are close to my heart. I snagged one of the teapots (the first pictured one) and have been using it at home a lot.


Let’s end with some lovely vases, and a final plug for Matt’s website where you can shop for his work. Go check it out… https://sloanceramics.com/


Devil's Playground Granite Glaze Tests Round 4: Notes and Pictures
In this blog post I discuss the results from my fourth round of granite glaze tests. In the last post I showed the results of my yellow glaze research which were pretty promising.
Th eother main avenue of testing this round was in trying to hone in on my tenmoku glazes. This did not go exactly as I expected but I have a plan for how to move forward. I also ran a couple of extra material tests to see what would happen: adding tin oxide and salt to my granite. These results are at the end of the blog post.
First up though let’s look at the tenmoku tests. I chose to do two different base glaze recipes to see the difference between using wollastonite and lime as the main flux in these iron rich glazes. I made two different bases and then added 1-10% iron oxide to them. This was the first set of each and then I added 10% bone ash to the lime based tests, and zinc oxide to the wollastonite ones.
Lets look at the lime set first:


You can see that the base was too fluxy, even in just gas reduction. At 5% iron added the glaze started to run, and above 7% it definitely ran. In soda they were all on the move.
Here are a couple tiles from the first set using just lime as flux. The top two tiles here are just the base glaze, using lime as a flux. You can see that even with no iron added the glaze is pooling at the bottom of tile 1076. You can also see that it is badly crazed. In DP 1085 (which has 9% iron oxide added) the glaze ran a whole lot as iron is a flux too.


Now is DP 1085 plus 10% bone ash. In my previous tests bone ash added some jazz to the tenmoku glaze. It is kind of hard to see the effect here but there are some reddish flecks.


Here is what happened when I applied these glazes with the bone ash added to larger times that were fired flat (DP 1087-1097):


I think there is something interesting here: a kind of chun glaze happening. Especially at DP 1091 which has 4% RIO and 10% bone ash. I am a bit wary though. The vertical test tiles do not have as nice a surface. These larger tiles are fired flat, so do not show the drippiness. The chun like effect seems to be happening where the glaze is thick and settled (a factor that usually leads to glaze flowing too). I would like to pursue this though.
The tests in the soda all ran like crazy and I was not totally into any of the tones.
In general I need to stiffen the base glaze. I think a likely base would be 60% DP, 20% BASALT, 15% LIME, 5% EPK. This may not be stiff enough even so I plan to do some experiments up to 15% EPK added and lowering the lime to 10%. I want to add silica too.
Okay now let’s look at the other base glaze where I used wollastonite instead of lime. The base was 60% DP, 20% BASALT, 20% LIME. This was also too fluxy as you can see. i was kind of into the DP1099 in soda. None of the tenmokus really came out. I got better results from the lime set.
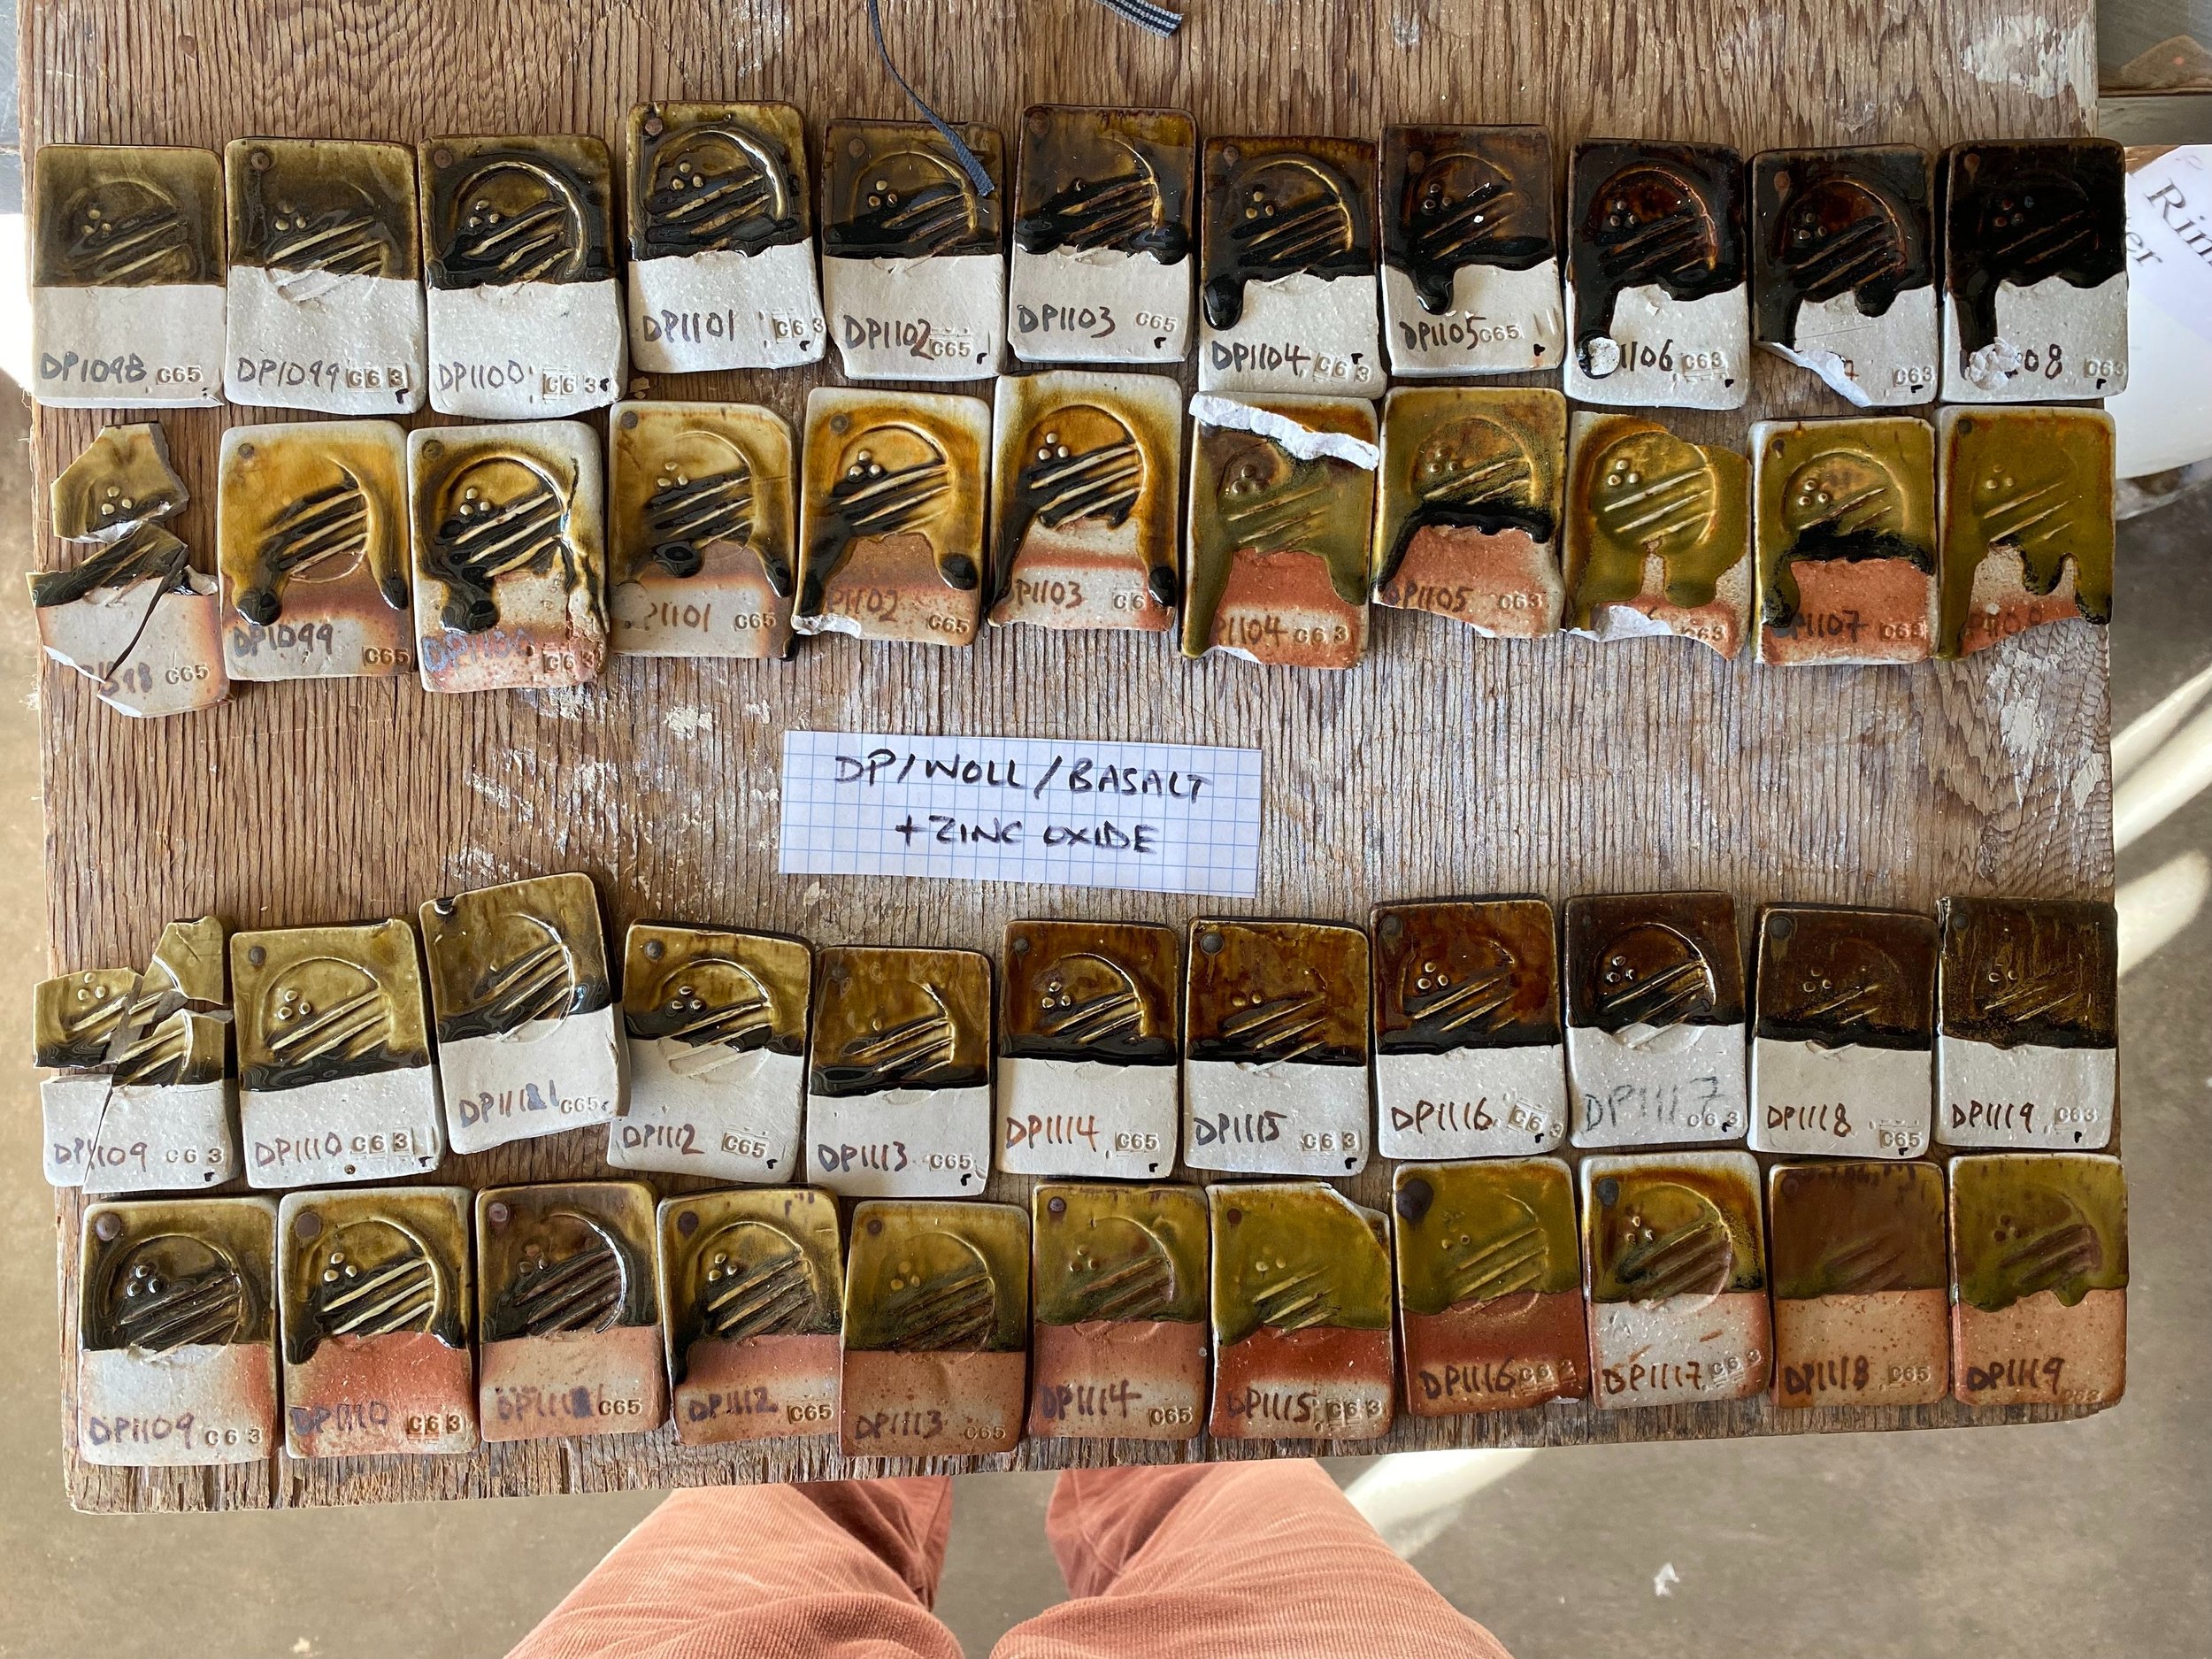

Adding zinc oxide stiffened the glazes considerably, which is a nice property. Some of my previous tests had more jazzy effects from the Zinc. I am curious why this didn’t happen here. At 20% I should have seen more jazz. I think maybe it had something to do with the iron not being well sieved in my previous test. I think maybe iron sprayed on would create seeds that zinc would get excited about.


I think it is worth showing the base tests side by side too. The top row clearly shows the difference of using lime compared to wollastonite. The lime seems to bleach the iron out less (although this is not the best test as I used 20% wollastonite compared to just 16% lime). In soda the wollastonite tended to make the glazes yellower.


Finally, here are a couple extra tests that I did not get round to before. Here is what happened when I added tin oxide to my Devil’s Playground granite.


These results were not particularly exciting. In general we can say that the tin acted as an opacifier. At higher levels it made the glazes kind of shino like. Could be more interesting when added to other glaze but nothing here to pursue really. Tin is also expensive so I was only really doing this out of curiosity, in case I found something spectacular.
Now here is a final experiment. I added salt to my granite. 5 up to 50%. Initially when opening the kiln to see these tests I was baffled. The glaze kind of migrated!


When I first saw these tests I said “well, I never need to do that again,” and “now I can tell people just to not put salt in their glaze, unless they want it to run away.” I thought that this had happened because salt vaporises at a low temperature. I assumed it was something to do with this. But Louis Katz, a Professor at A&M University in Corpus Christ, Texas messaged me to say:
“I think this is because the glaze coat did not dry. Salt slows it. The steam in the heating causes a weakness in the mechanical hold the glaze has on the bisque. Expect the clay body to bloat. The eutectic with salt (even its melting temp) is so low that it seals over the clay well before all the carbonates and sulfates in the clay have time to escape. I think that if you dried out the sample at 212 and then slowly raised it a few degrees over an hour you would get less or no crawling.”
This is intriguing! So not I am eating my words and will have to do another test. I will not run this whole test again but probably just do a few test tiles to test Louis’ theory.
Okay well, thats all for now. Until the next round!
Devil's Playground Granite Glaze Tests Round 4: The search for yellow continues!
In my last blog post I showed my tests in video form, with commentary. In this post I will lay out the tests in pictures and notes.
From the last round of testing I had a few leads that I wanted to follow and try and hone in on. The search for a nice yellow glaze continued, as well as testing different tenmoku base recipes. And then I did a couple ‘shot in the dark’ tests just to see what would happen: with salt and tin oxide additions to my granite.
First up, though, let’s look at the second round of the yellow glaze search.The first picture here shows the base glazes I guessed at. Last time the glazes ran a lot. I made the mistake of using 30% dolomite as well as other materials. I was pretty sure that this was the cause of the lower than ideal melting temperatures I was seeing. So in these tests I reduced the dolomite to 20-25% and played with adding 5-10% bone ash, 10-15% zircopax, 5-15% EPK (Edgar Plastic Kaolin) and silica 5-15%.


The tests out of the gas reduction kiln were variations on a kind of peppermint green glaze. The magic happens when this glaze is soda fired. It goes yellow! The results were interesting.
In general I learnt that when you add silica, the yellowness of the glaze dissipates. John Neely said this was because it was becoming more of a proper glaze, rather than a matte glaze, undersaturated in silica. The glazes with 25% dolomite were more fluxy in a kind of mottled way. I feel like 20% is about right. In terms of zircopax, the glazes with 15% seemed yellower than 10%. This glaze also seems to be able to handle anywhere from 5-15% EPK with little color change.
Overall the winner was DP977. This may be a slightly skewed test as the atmosphere of the kiln clearly plays a big role. Test tile DP977 looks particularly toasty (reduced) so maybe this made for a warmer yellow color. We shall see in the next round! I plan on mixing up a batch of this glaze and testing it out on some actual pots. This round of tests were made with a commercial dolomite. I have collected and ground down four different local dolomites so I will also test these out in the same formula as DP 977.
The glazes with 1% iron oxide added were slightly warmer but the iron did not mix full into the tests so look dotty. At 4% added the results were not very attractive. Some of the 7% iron added tests were promising though (such as DP1022).
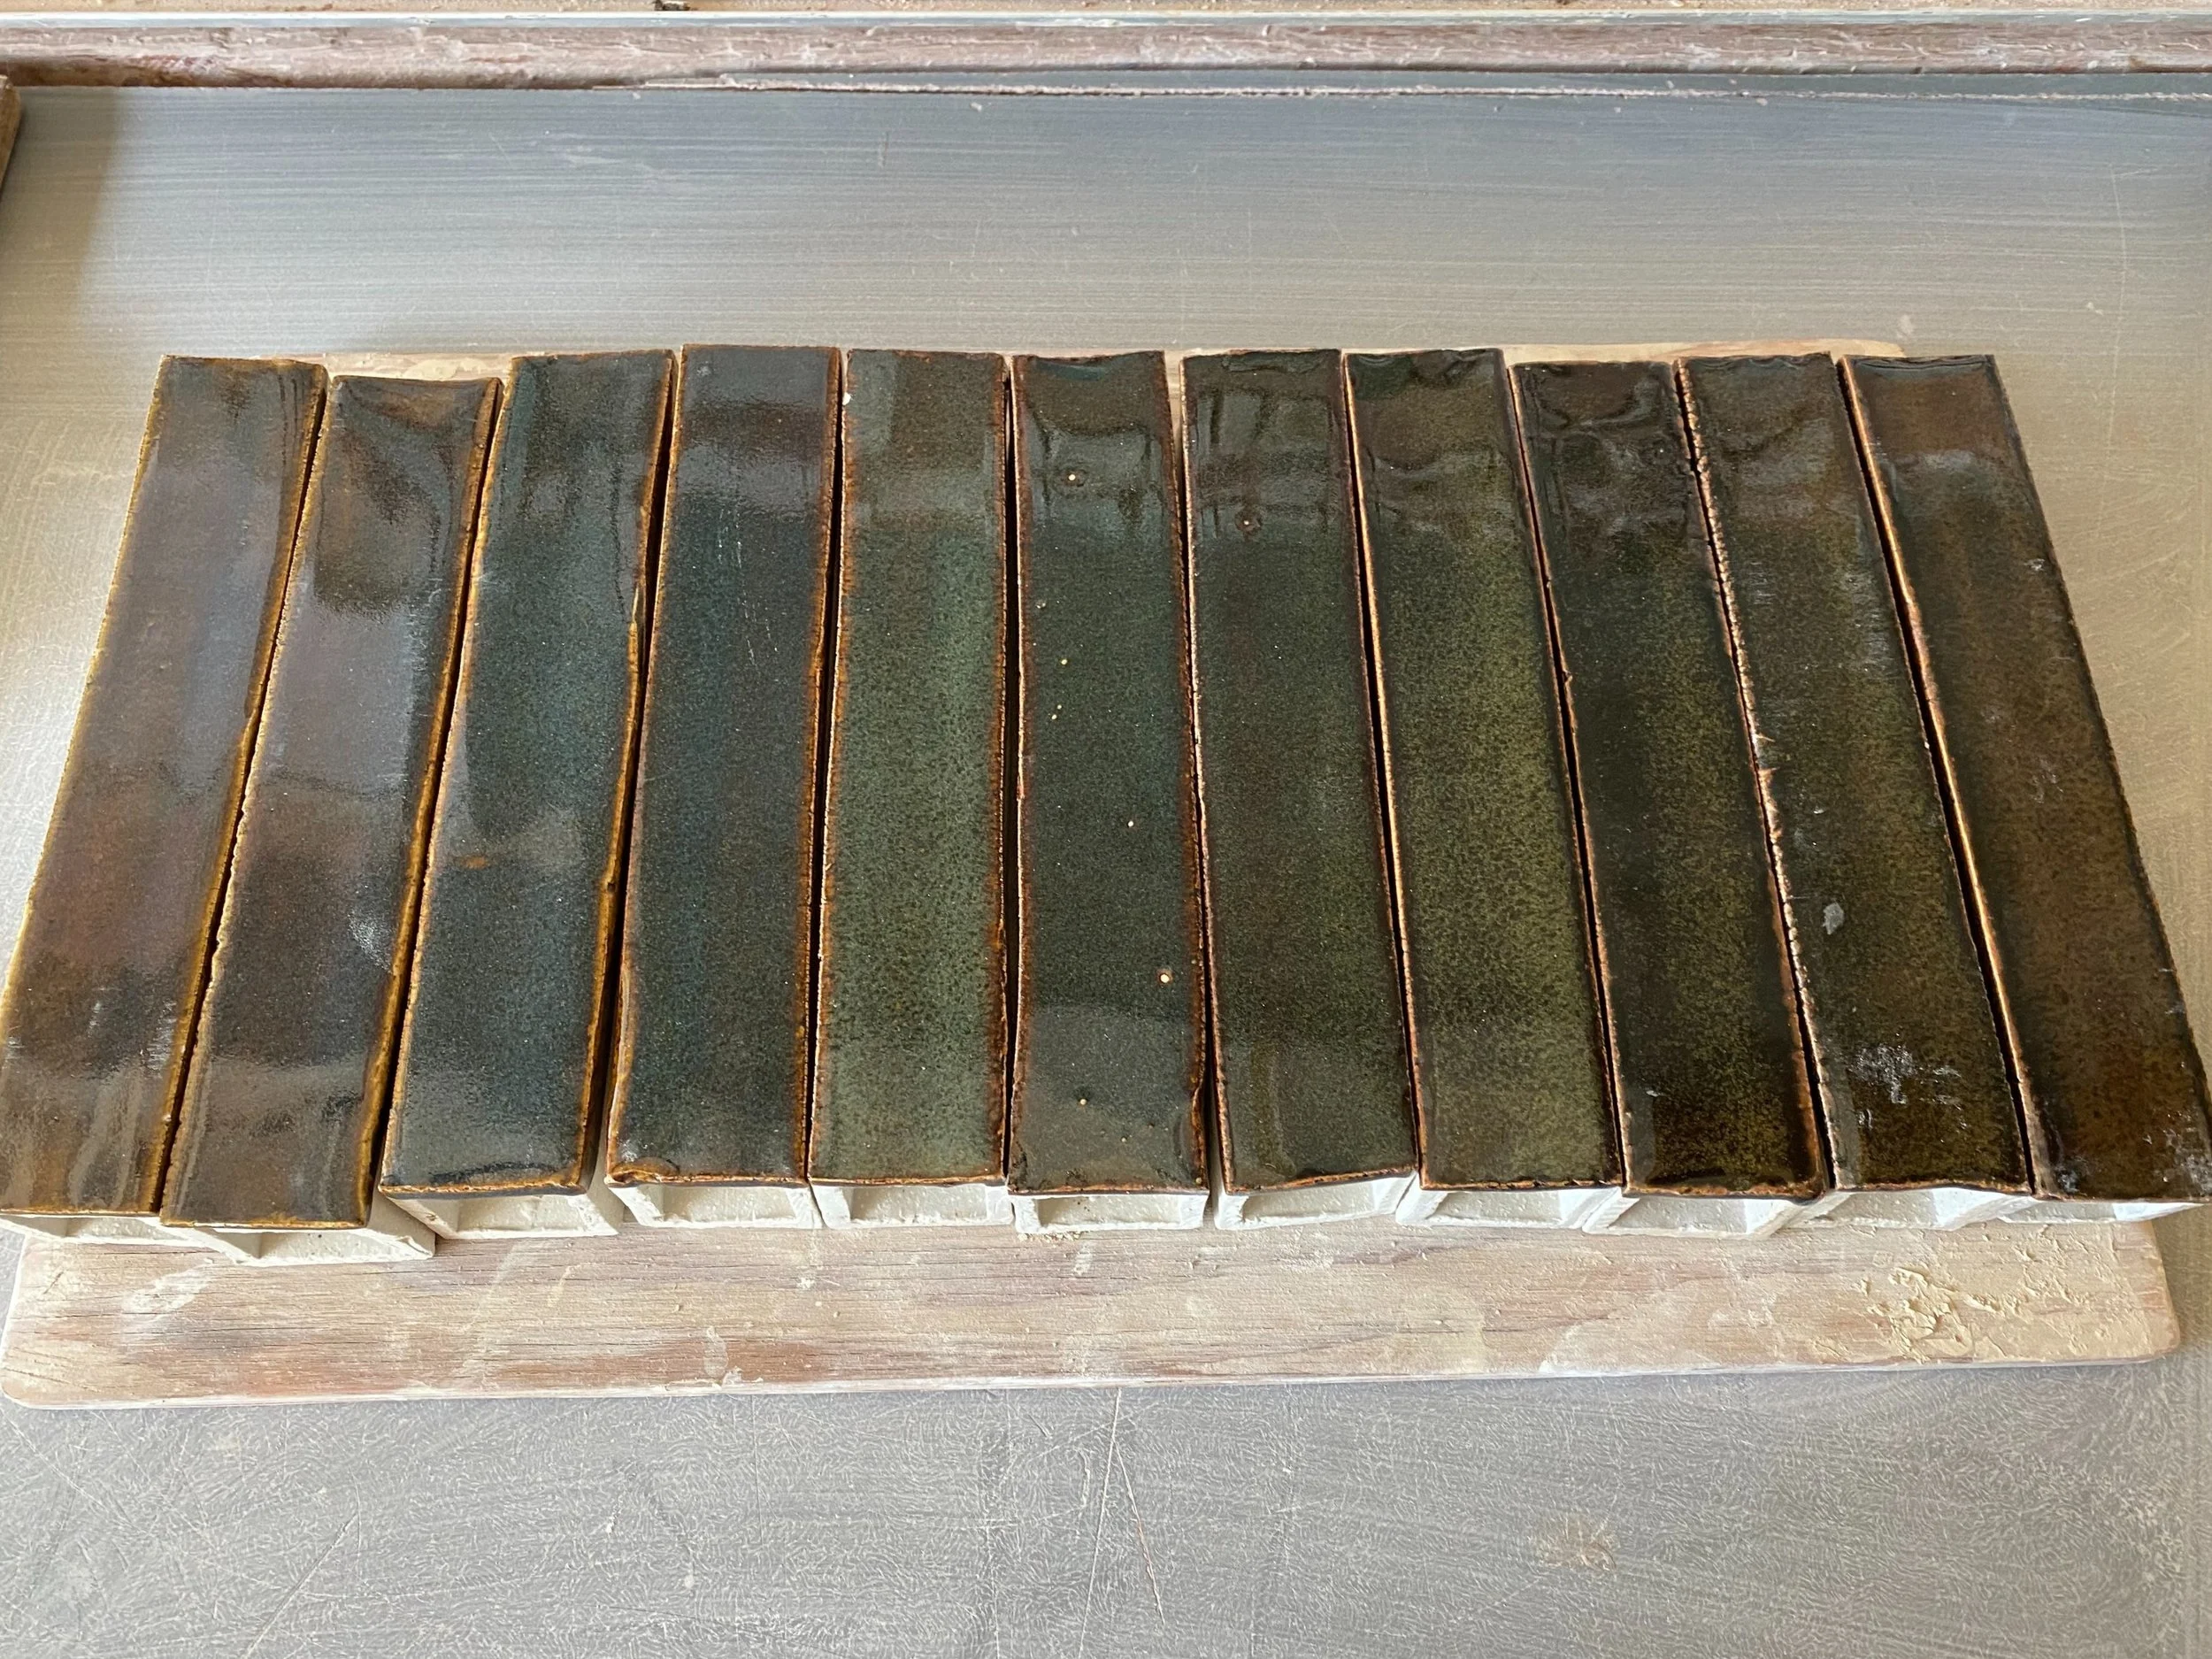
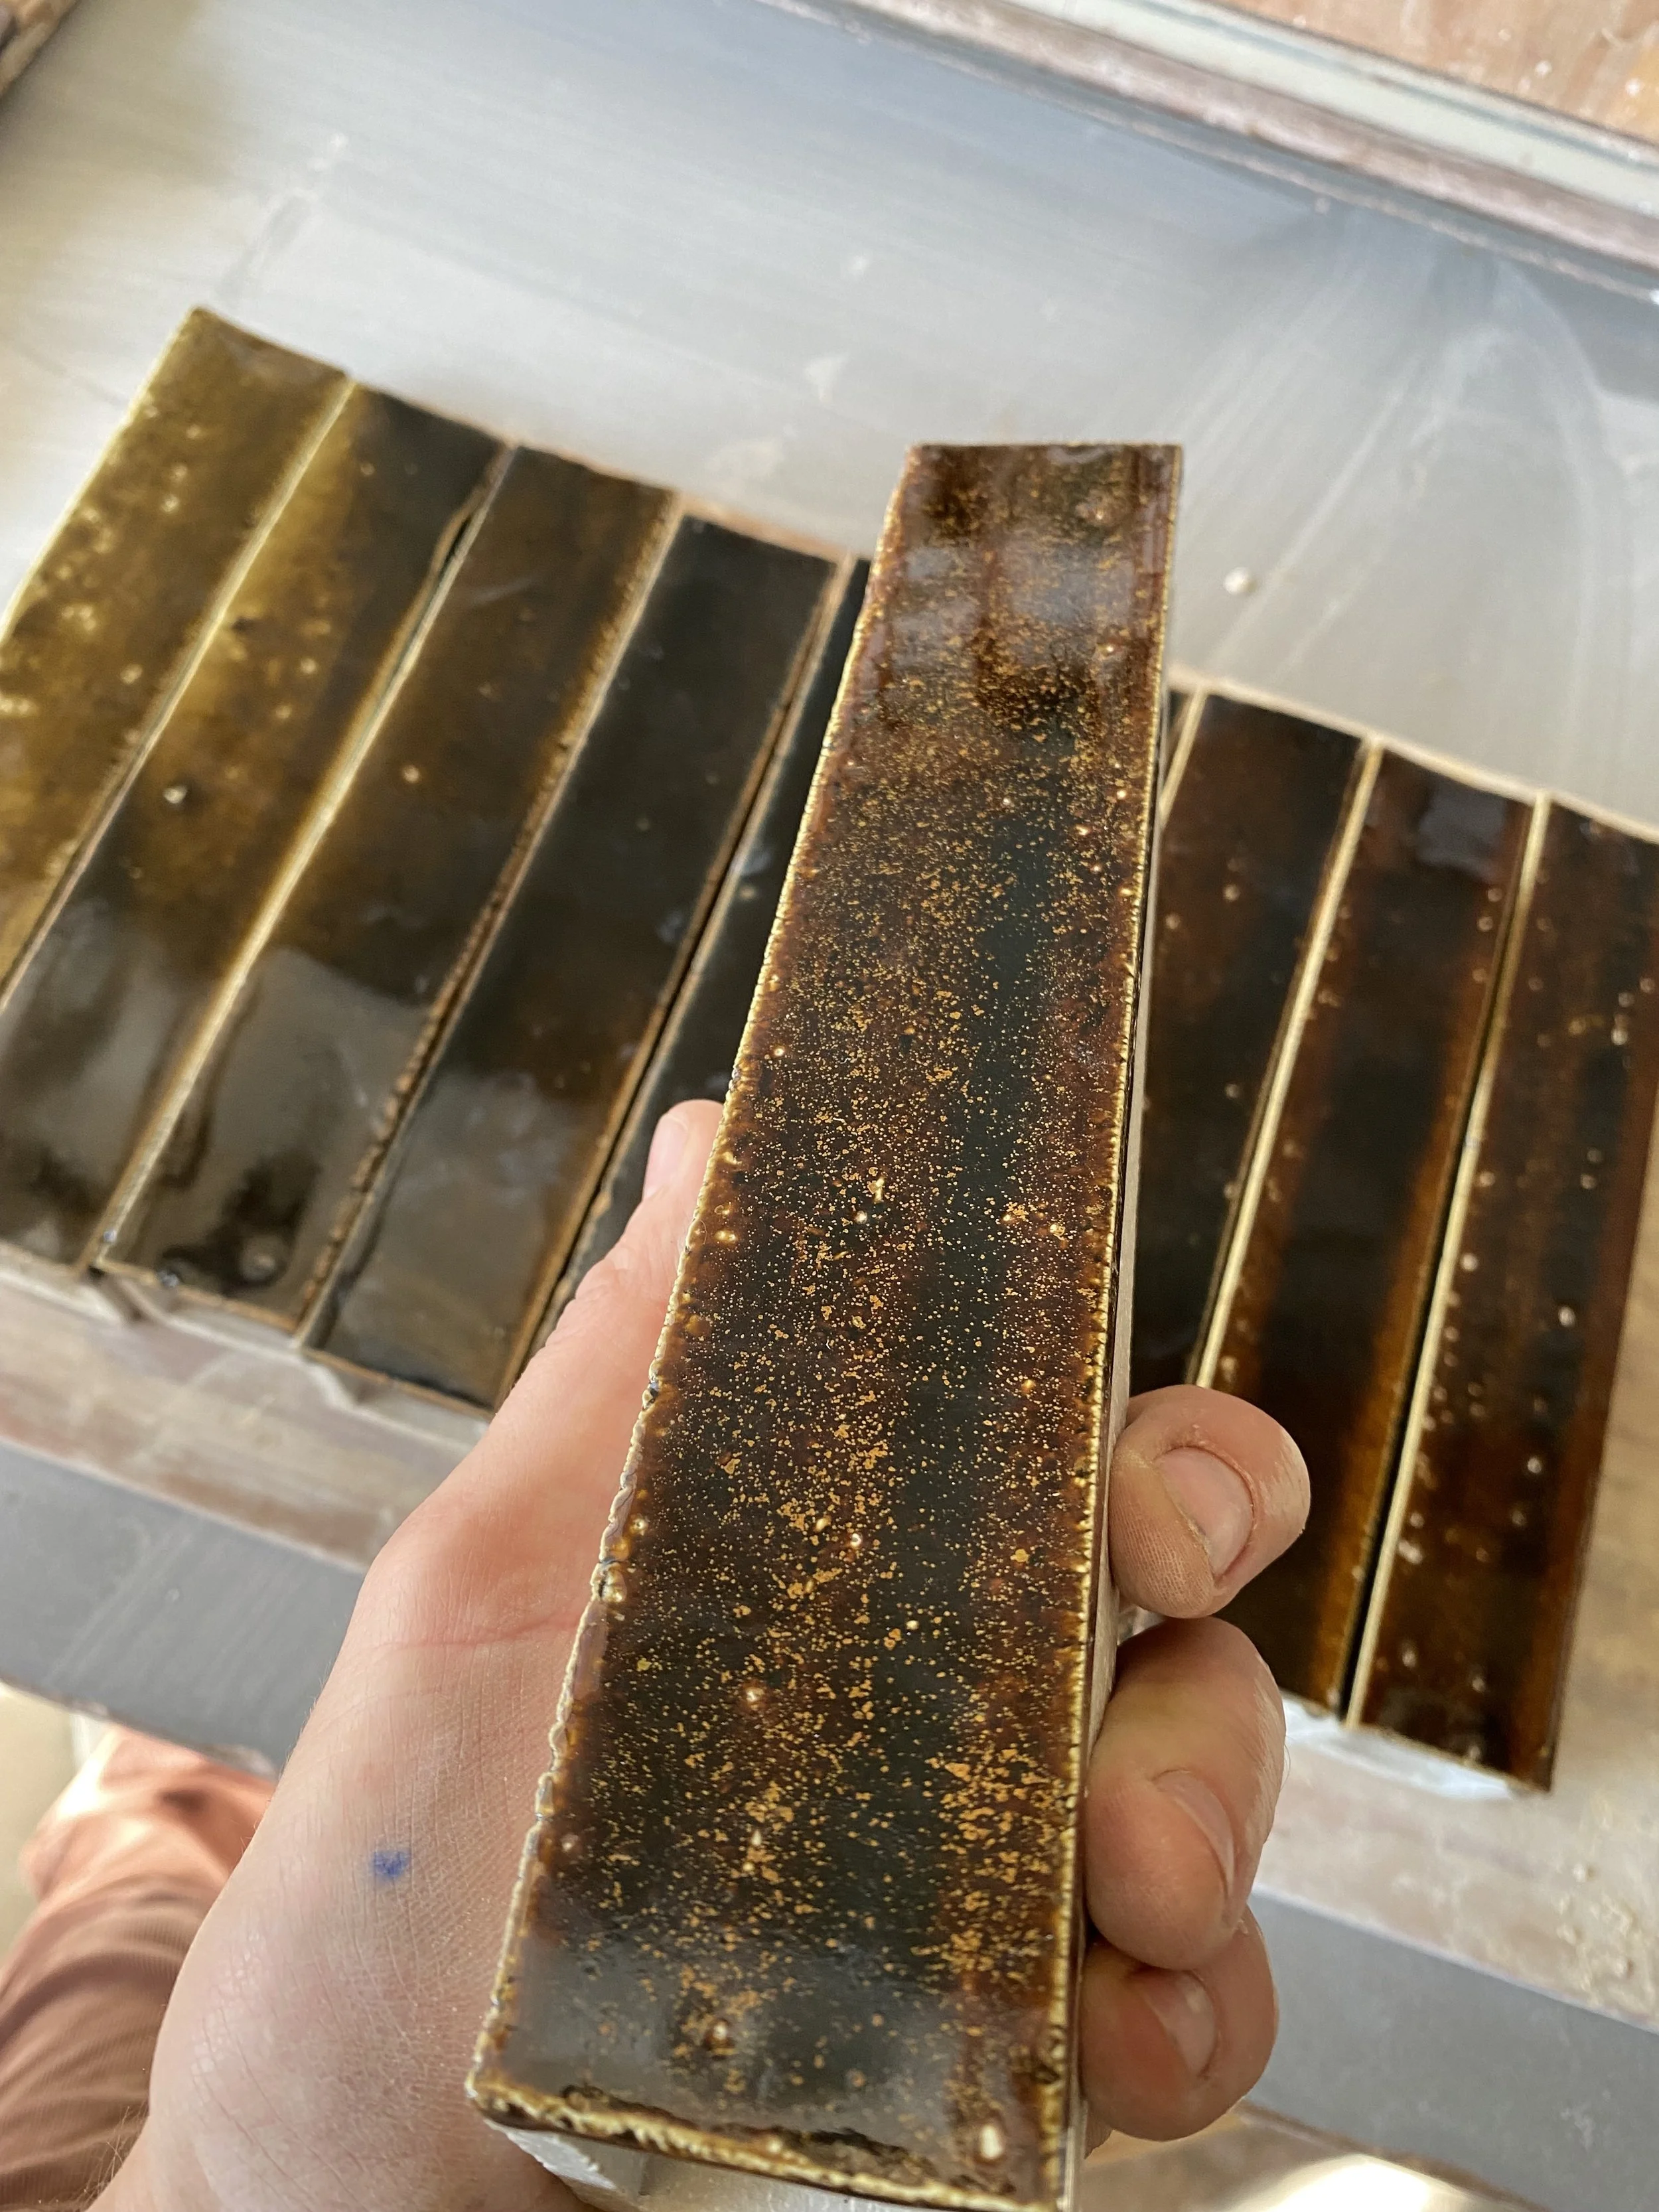
Here are those tests in bar form…


These tests were fired once in a gas kiln (all came out pretty bland)-I actually mistakenly put them in the gas kiln when they should have been soda fired. I think this may have skewed the results somewhat. The first three test tiles on the left were fired on the ledge by the door of the kiln so got blasted with soda. We can see from this that the soda affects the color significantly.
All of these got more soda than the small test tiles. It shows that a medium amount is necessary for the yellow color in these glazes. There were some interesting results here. DP983 is a nice warm yellow and DP988 is not bad either. This was very different from the small test tile results.
Ultimately I think quite a few of these would work as a yellow glaze. It is nice to know there is some wiggle room to adjust the glaze if need be.
In my next post I will show the results of my tenmoku attempts and the tin oxide and salt additions too.
Devil's Playground Granite Glaze Tests Round 4: Video
In this round of testing I had a few aims. Firstly I wanted to pursue the yellow glaze. In my last round of tests I got some promising color responses but I had way too much flux so the tests ran a lot. See my last blog post for details. In this set I got some pretty promising yellows!
I also wanted to hone in on a tenmoku glaze. I was interested to see whether or not there would be a difference in using lime or wollastonite as the main flux in these glazes. I used 20% wollastonite compared to 16% lime. I had thought that lime was a stronger flux because wollastonite has silica in it too, but it turned out that the wollastonite tests did run a little more. This is not a scientific result as there was 4% more wollastonite. The difference in flux did impact the look of the glazes fairly considerably.
I also decided to do a line blend of my DP granite with salt, and also tin oxide, just to see what would happen. The salt was a disaster and the tin was okay but nothing to write home about!
Here’s the video…
In my next blog post I will lay out these tests in more detail with pictures and notes.
Chasing the yellow glaze of my dreams!
I have long yearned after a buttery yellow glaze. I’ve had dreams about it. Have you seen John Reeve’s pots? His yellow pots? So nice. I’ve include on of his teapots below. Here is a short article about him if you are interested.
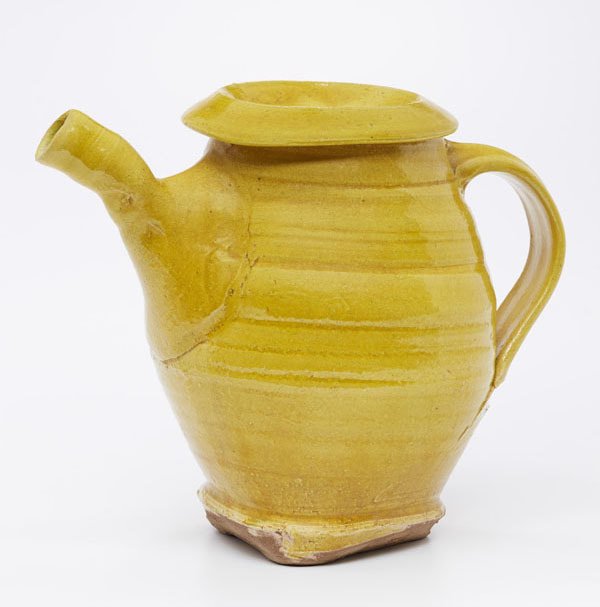
John Reeve teapot, c. 1983-1986, earthenware, Photo Peter Lee
John Reeve was making earthenware pots though, not stoneware, and I suspect he was using a lead glaze. It is pretty easy to get a beautiful yellow at the lower earthenware temperatures, especially using lead. Here are another couple of juicy examples:


I just love these pots and this color, but am using higher firing materials so that I can easily use rocks and minerals I find as glazes. So the search is o to try and get a yellow at these higher stoneware temperature, using local materials.
I’ve been testing all sorts of materials, trying to get at this. In my last round of granite glaze tests I followed up on some likely candidates. It did not go exactly to plan but I did get some promising results.
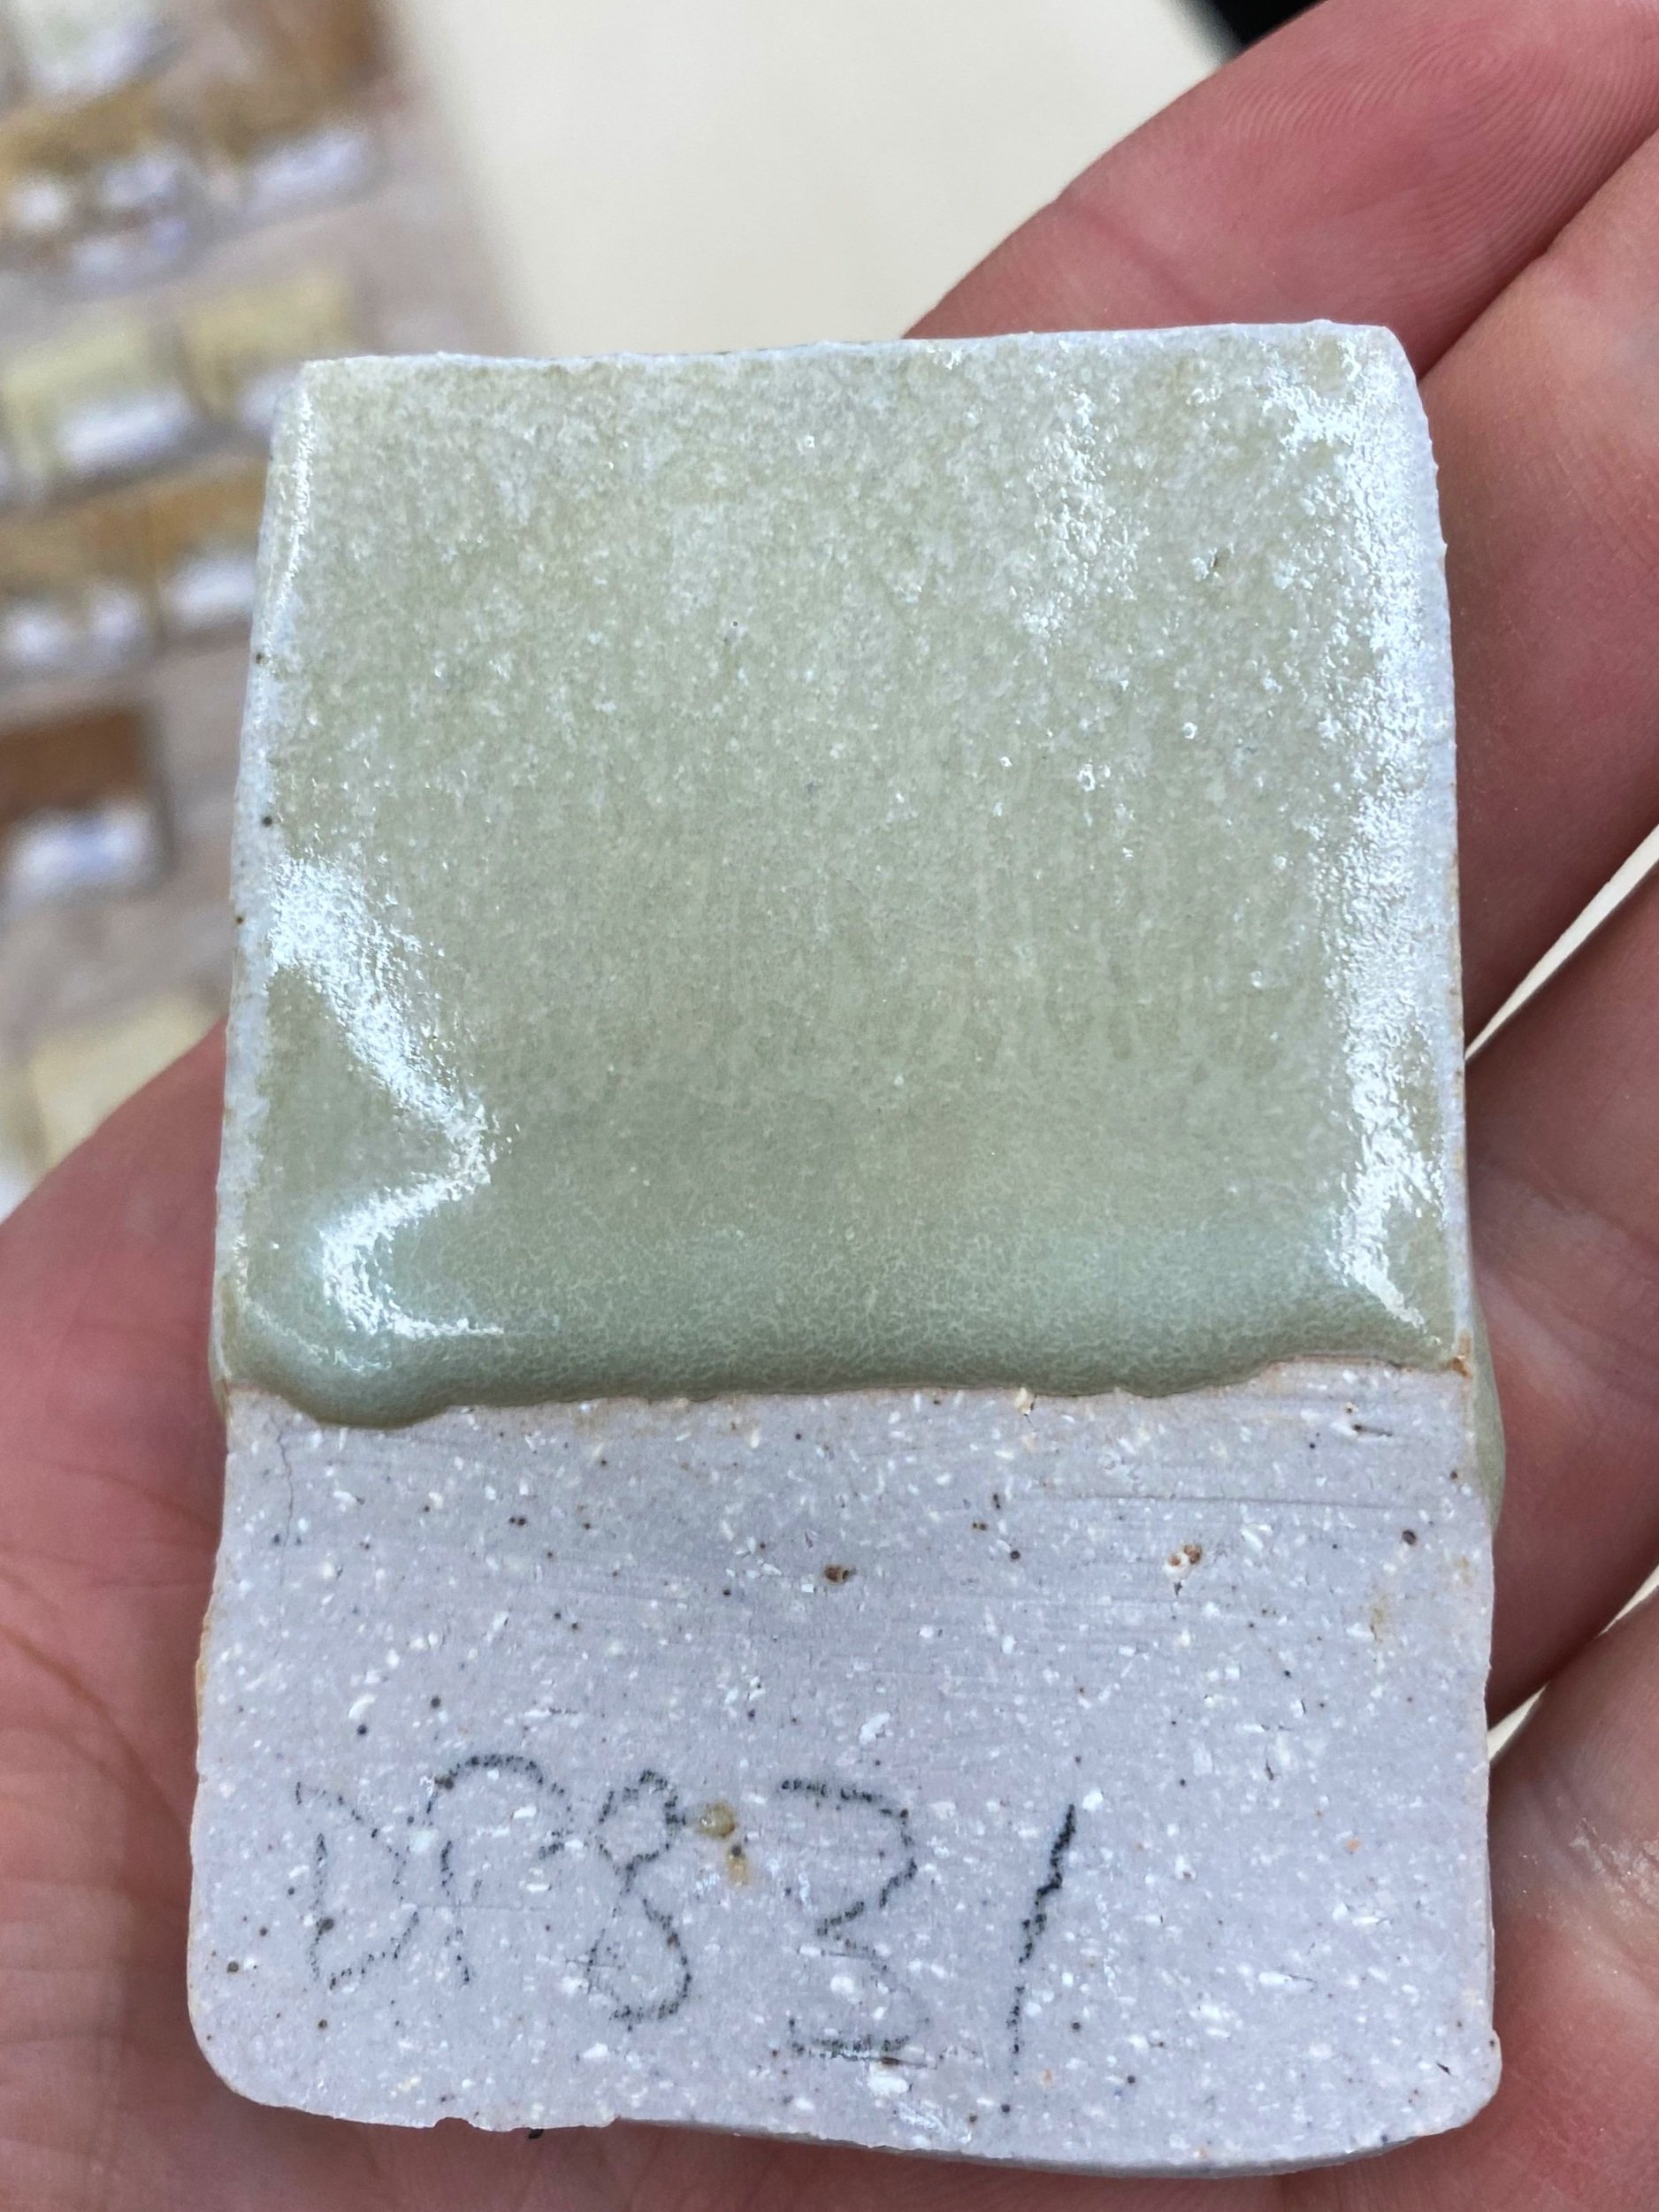
I guessed at a potential base glaze which I then altered three different ways: DP 783, DP 807, and DP 831. When deciding the base glaze I looked at previous tests and followed the ones that looked the most promising. I thought this was a reasonable base: DP (Devil’s Playground granite) 50%, 10% bone ash, and 30% dolomite. This base totals 90%, with 10% left for change.
In DP 783 I chose 10% EPK to add more alumina and silica to the base.
For DP 807 I chose 10% lime to add more flux to the base.
For DP 831 I chose to 10% zircopax to add a stiffener and opacifier to the base.
As you can see from the pictures below my base was too fluxy to begin with. Both DP 783 and DP 807 melted and dripped considerably more than I had hoped.


What this extra melt meant was that many of my test glazes dripped off their tiles and stuck them to the tile holders. I should have taken a picture of the carnage really. It was brutal. As you can see on the ones that survived many are broken because I had to snap them out of the tile holders. In many cases I could not decipher which test they were so I had to throw them away. I was not pleased. If I had only put in 20% dolomite rather than 30% in the base glaze then the results would have been much more useful and less drippy! Anyway, here are the ones I salvaged…

DP 783-854 granite/dolomite glaze tests
Initially when I unloaded the kiln I was tempted to throw the lot away but something told me to save what I could. I’m glad that sense prevailed because I was able to decipher and learn from the results.
First of all, the set where I added lime (DP 783-806) were the most drippy. This is to be expected as the lime is a strong flux. You can see in the tests the classic alkaline drip look to these tests. I am not super into that look.
The set where I added EPK (DP 807-830) did not drip quite as much as the lime laced ones but still ran a lot. There wasn’t enough EPK (only 10%) to make enough of a difference. The color response on these tiles wasn’t that exciting either.
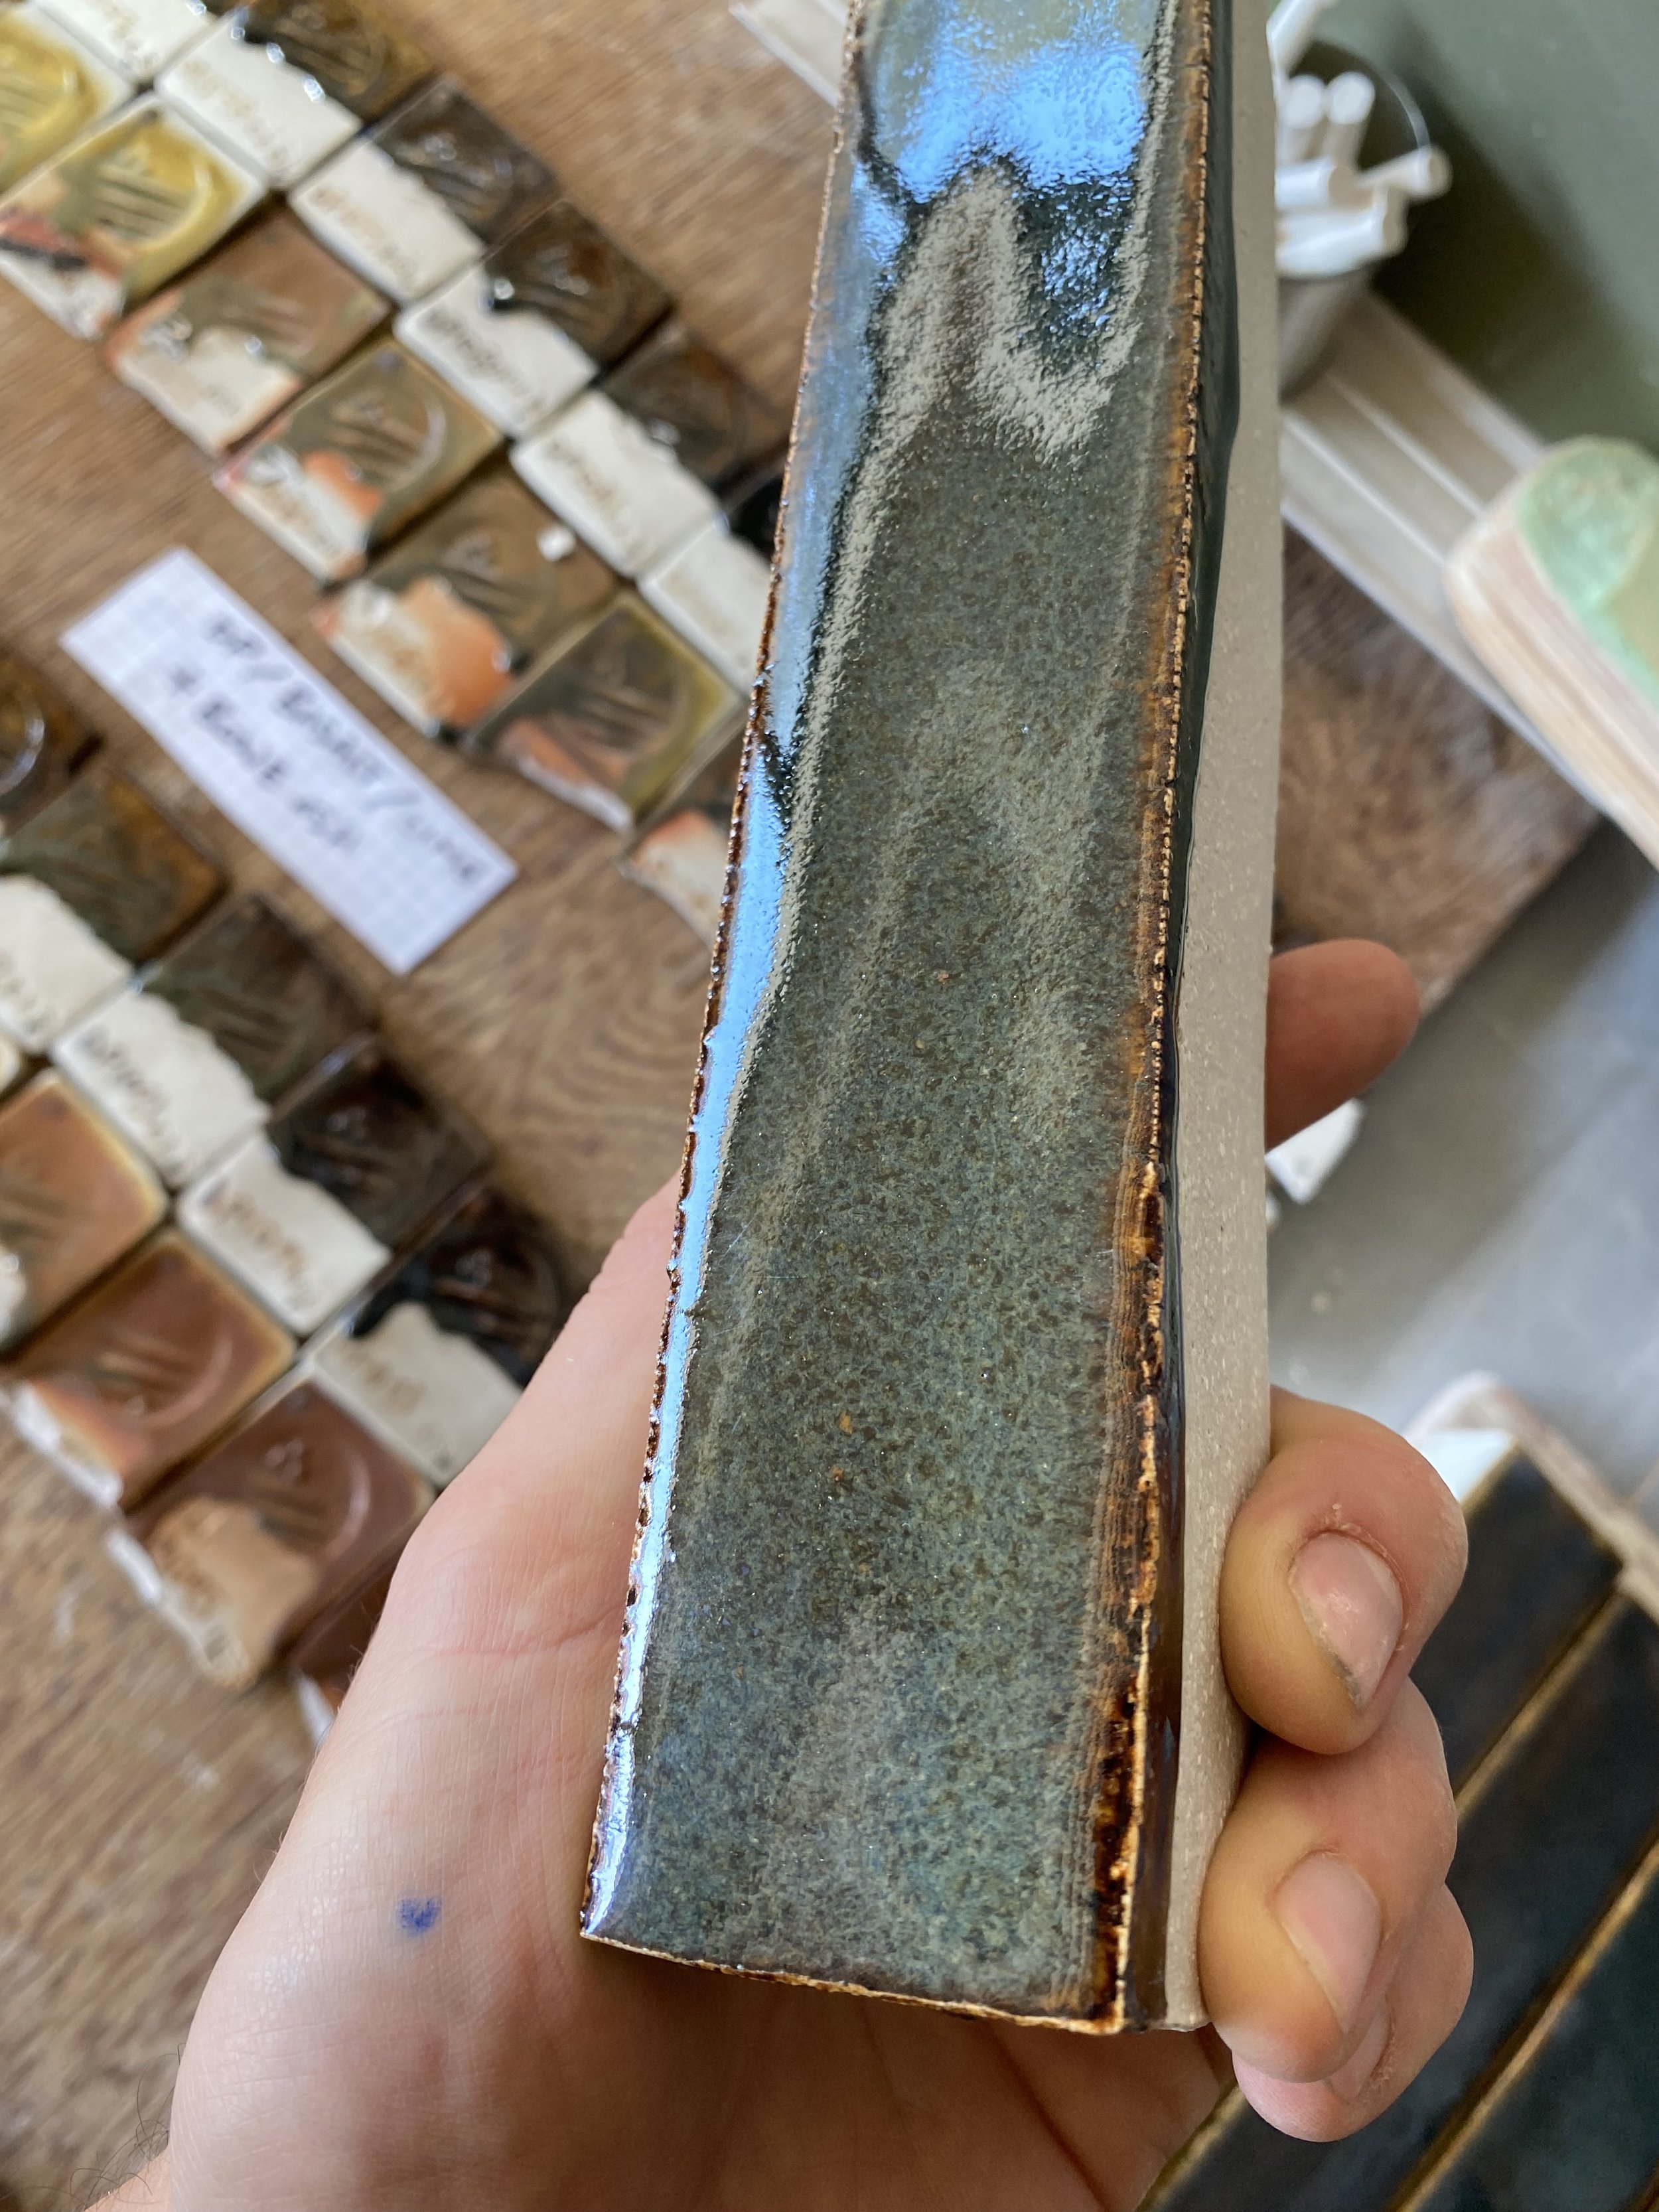
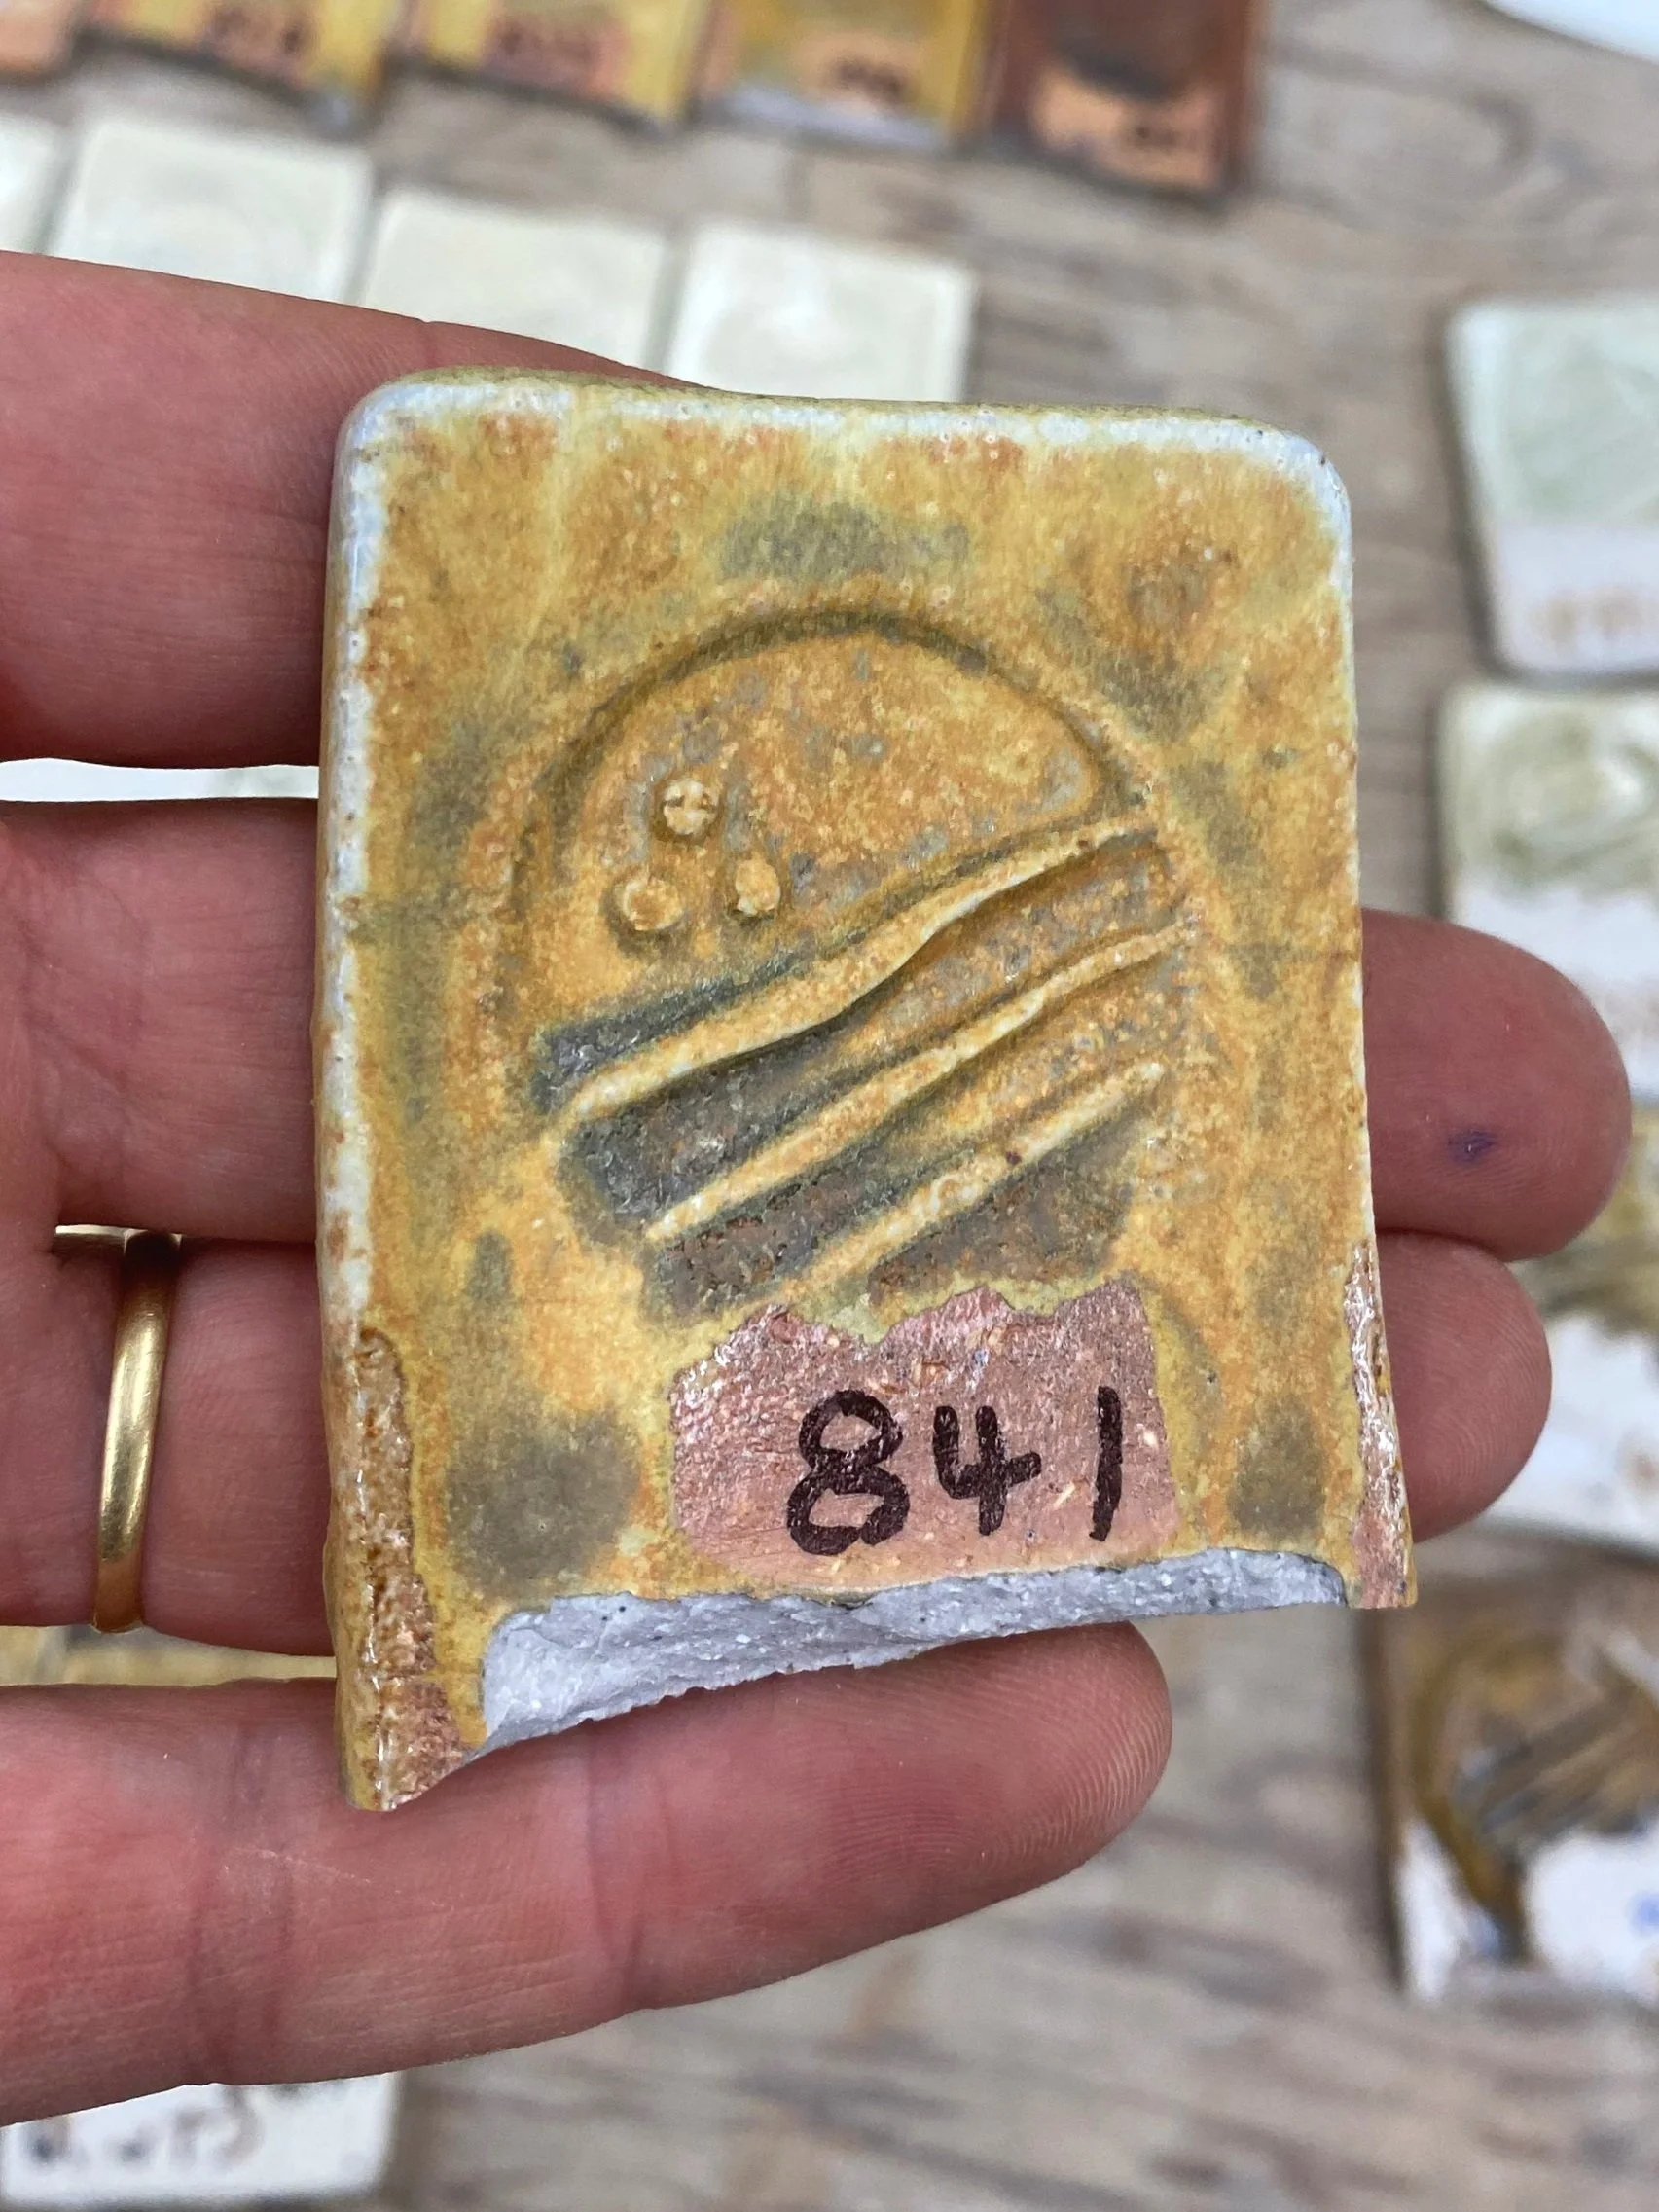
The zircopax set (DP 831-854) was where I got excited. Especially in soda. The test cup that is pictured first in this post is the same glaze formulation as the tests below. The cup and the bottom two tiles here were fired in the soda kiln. You can see how much of a difference in color response there is. From a pale greenish glaze in reduction we get to a yellow in soda.


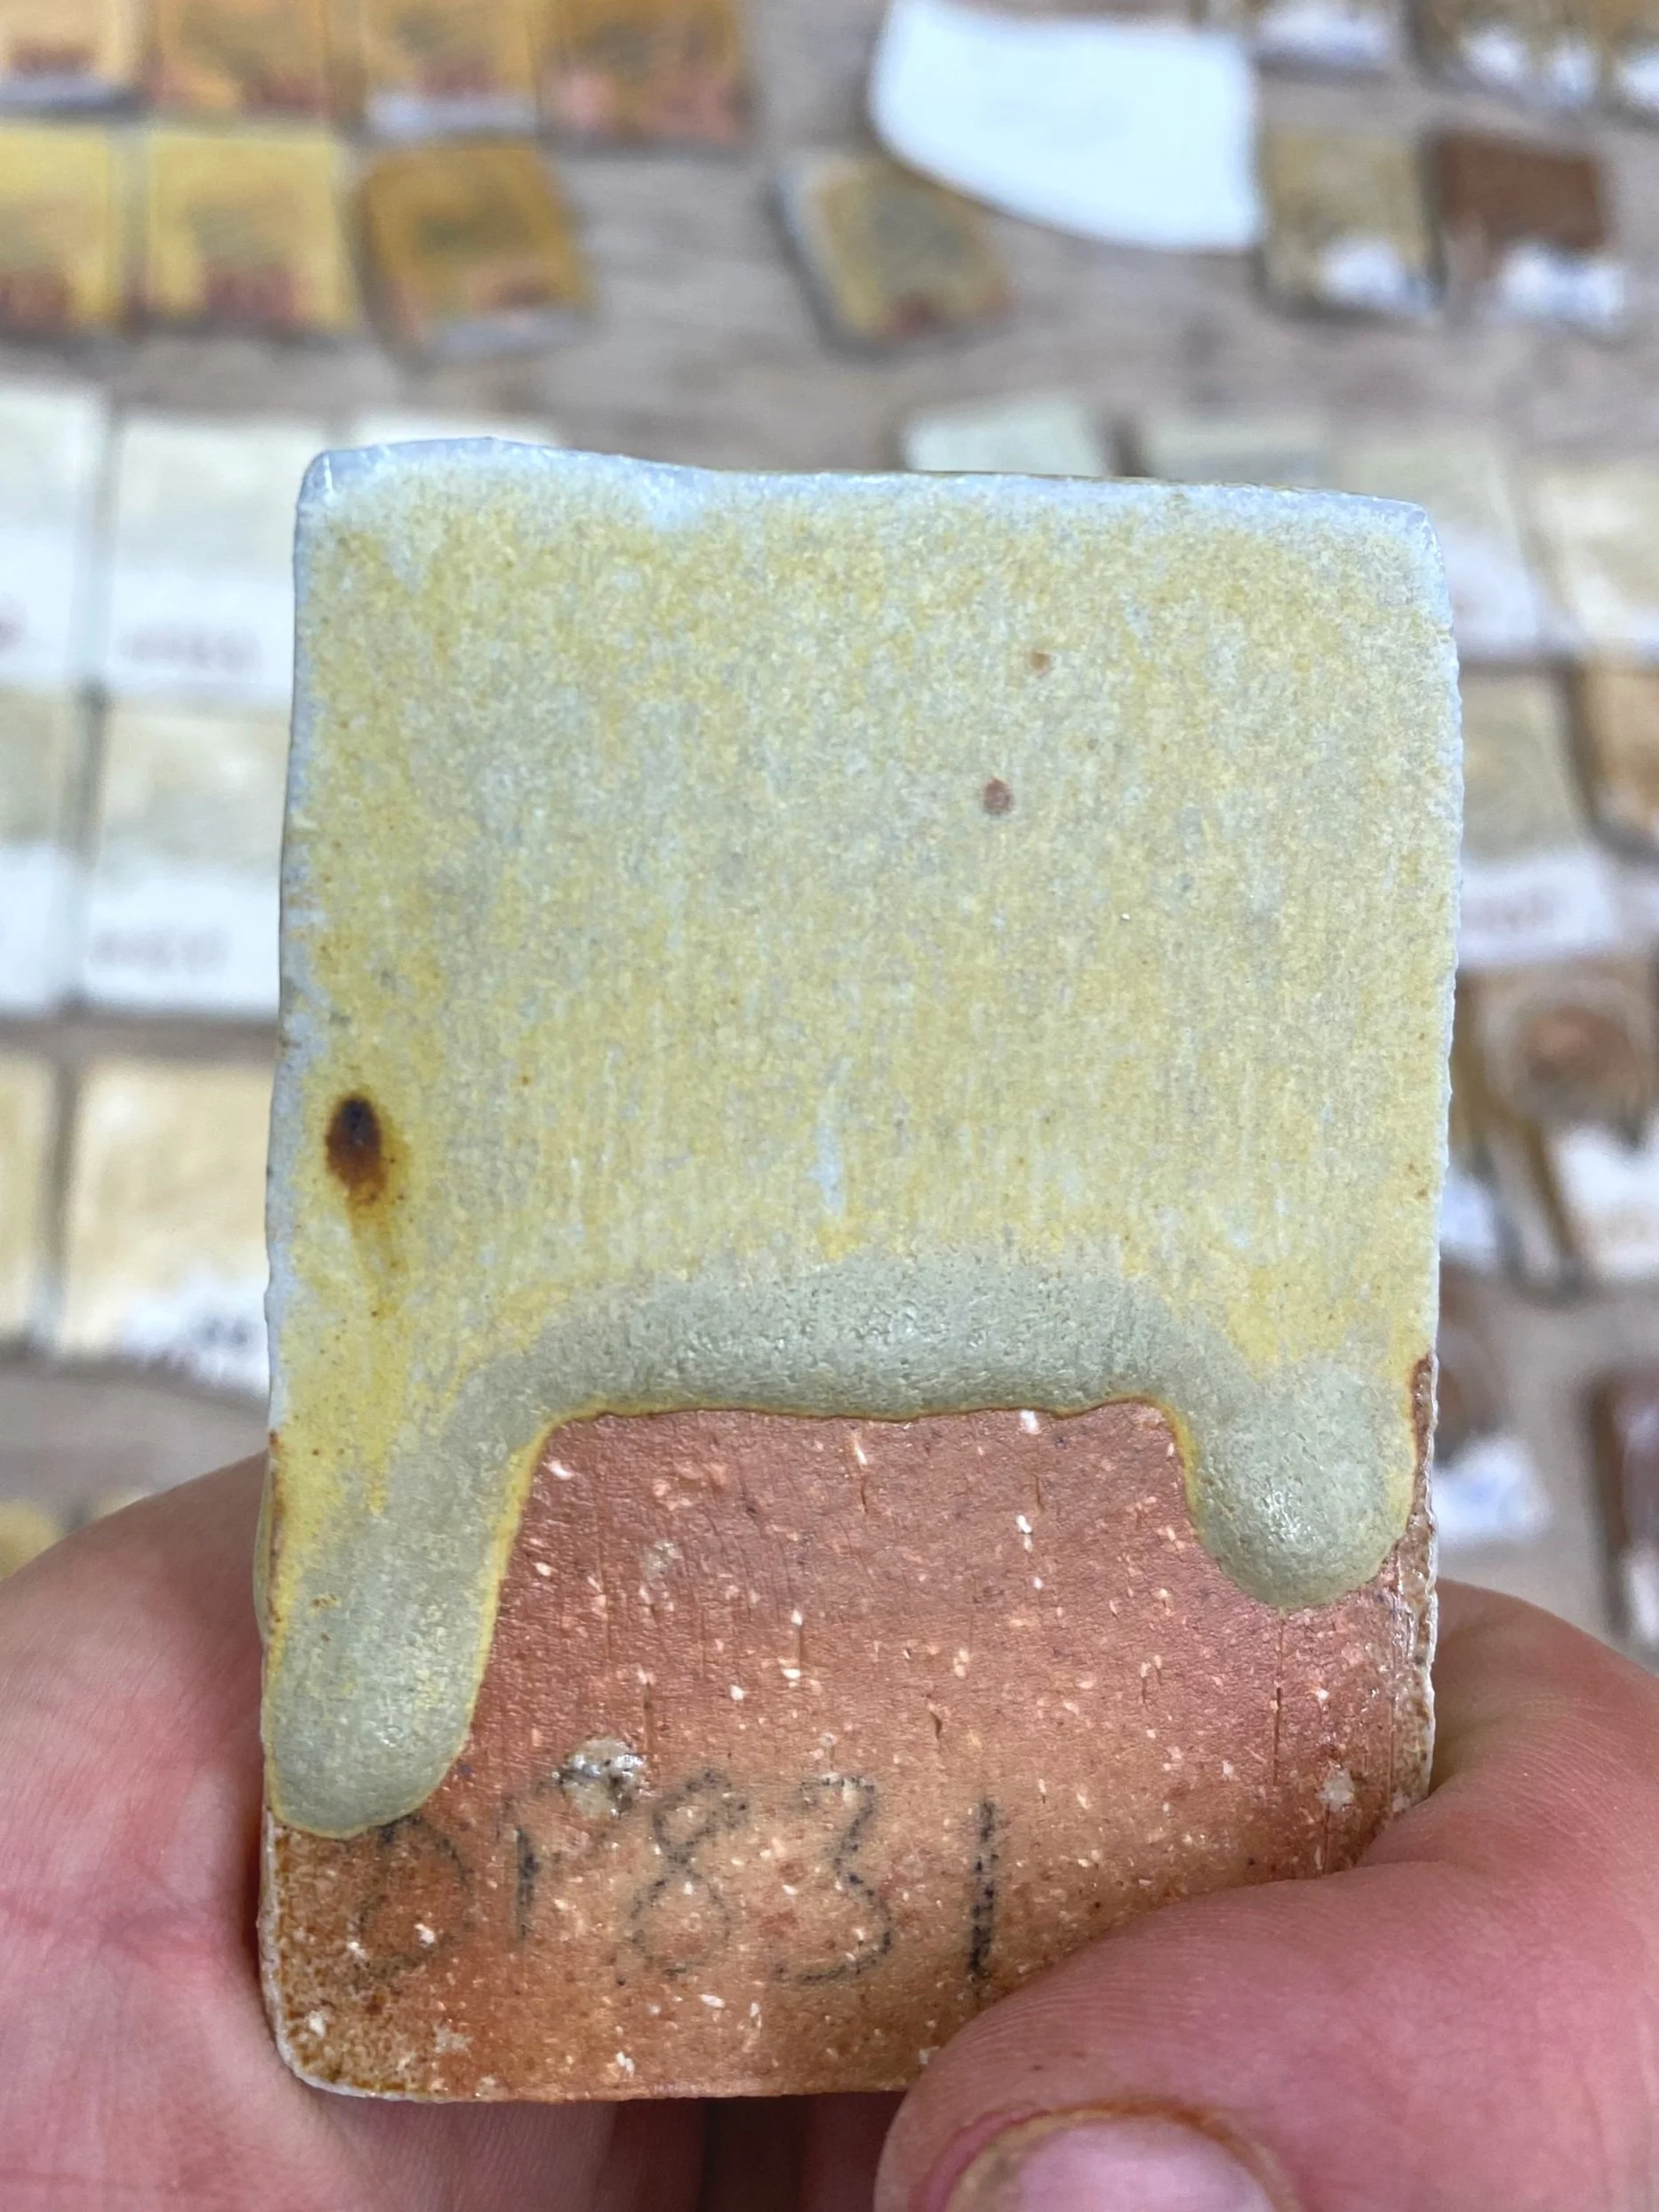
We can see that the soda affects the color significantly, but also makes the glaze more fluxed. It wants to melt too much. I will have to stiffen the glaze in my future tests.
There were some other interesting tones!
As much as I was excited about this yellow, I was perhaps more excited for some of the other yellows I managed to coax out of the tests.


Looking at this palette I am particularly drawn to DP 836 and 851. Below are some of these tests individually. The first couple actually have EPK in them rather than zircopax. This shows that the yellow influence may be helped by the zircopax but it is not the cause. I suspect the dolomite is the magic that causes the yellow.


I am thrilled with the colors of these tests, but obviously have some work to do to make them less drippy! I hope that when I stiffen them up the color response is the same. I am really excited to test further in this direction, and also use some of the dolomite I collected in Logan Canyon rather than bagged, processed dolomite.
I have 4 different types of dolomite from the canyon to try out and compare. We shall see if millions of years and slightly different composition makes a significant difference in the glazes.
Devil's Playground Granite Glaze Tests Round 3: Pictures and Notes
In my last post, I explained the basis for this third round of glaze tests with my granite collected at Devil’s Playground. I wanted to see what various different fluxes would do to it at cone 10.
In addition to the flux tests, I also did a follow-up test with some basalt I collected, and a second test of some yellow glazes I was aiming at. Because this blog post is likely to be rather long, I will do another one dealing with the yellow glaze research. Generally speaking, this is the flux addition round of tests.
If you have any questions about any of this research, please don’t hesitate to email me. I’d love to chat!
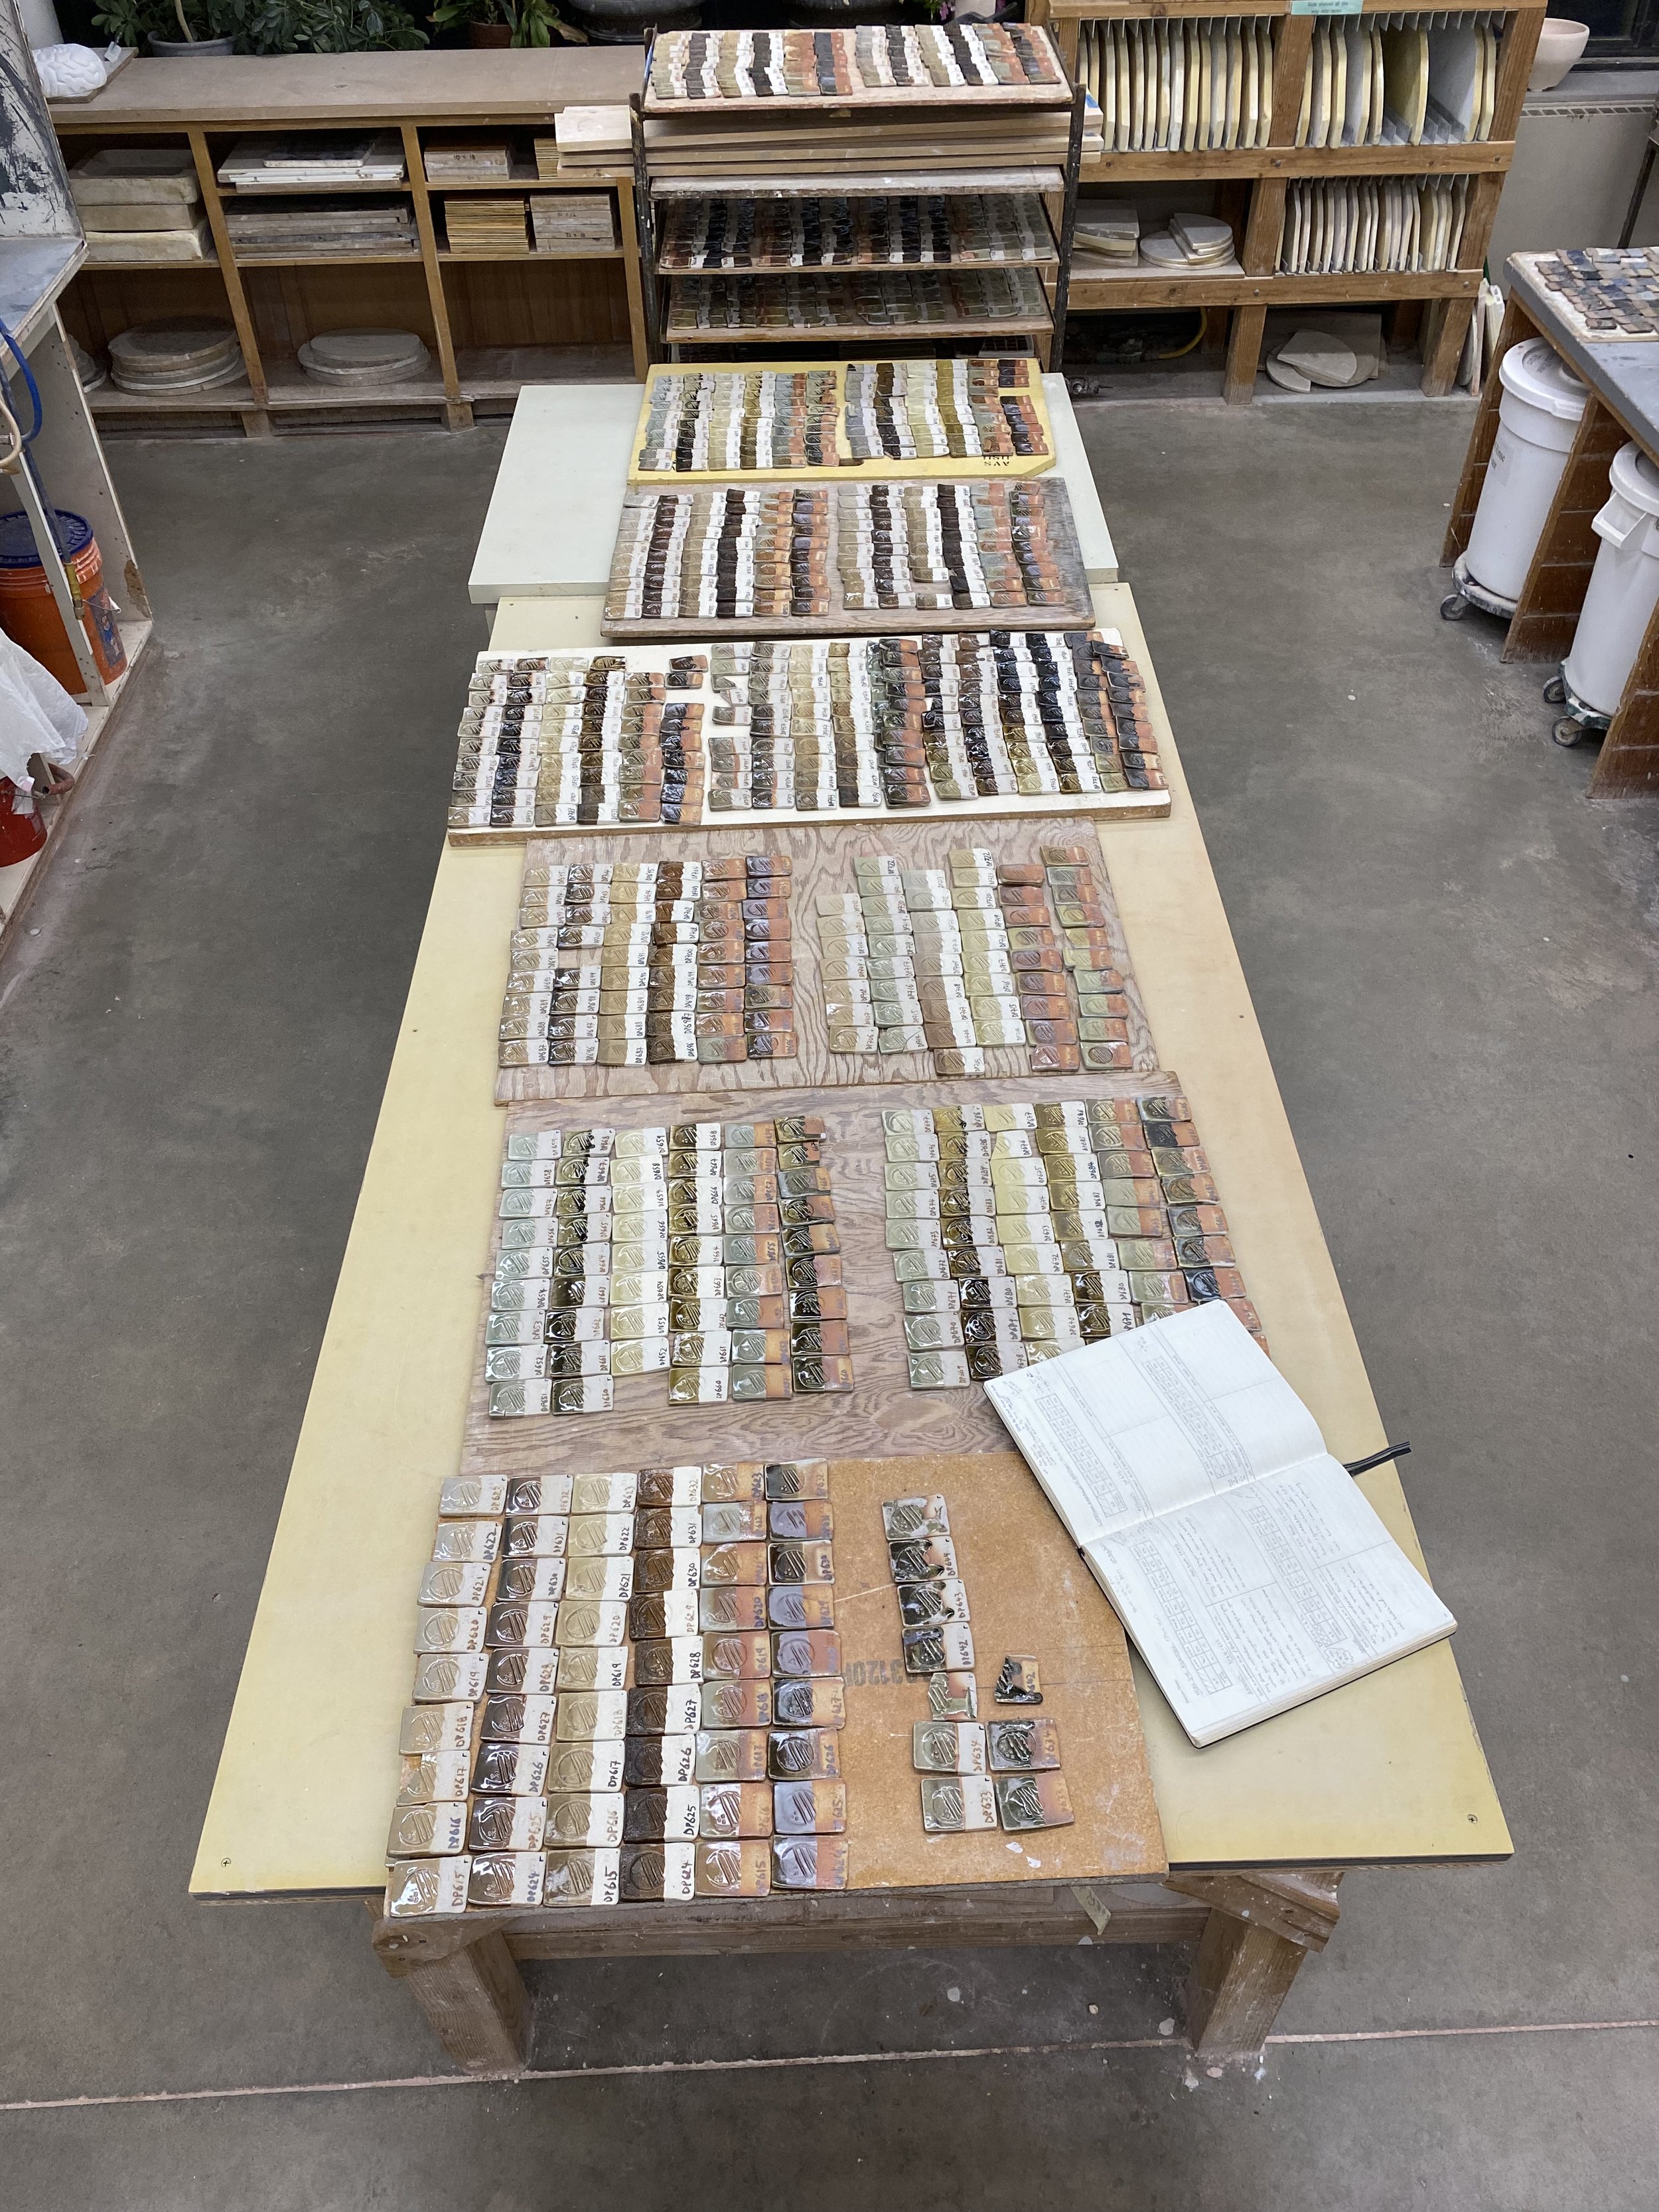
In each of the groupings here, I have displayed the cone 10 gas reduction tiles on the top row, then the oxidation ones below them and finally the soda ones. The reduction tests have a little r in the bottom right corner of them (written in sharpie), the oxidation ones have a dot and the soda ones are marked by the flashing on the clay (n sharpie required).
I analyse these results based on my own predilections and goals, but I am sure there are folks out there who might like some of the tests that I dismiss. I also can see coming back to these tests in the future and picking out some, (that I am currently dismissing) for further testing.
In this post, I will go through each set of tests and lay out the results. Each test was fired in three atmospheres: gas oxidation, gas reduction and gas soda, all to cone 10. Click on any of the images to enlarge them and flick through the pictures in each gallery.
Okay, first up I have my second attempt with a basalt addition to the granite. This basalt came from just outside Craters of the Moon park. The results from round 2 were not great: I got a lot of dull khaki colors, but I hoped that by adding extra flux to my granite and redoing the test, I would get more promising results. So I used a mix of 80% granite with 20% lime.

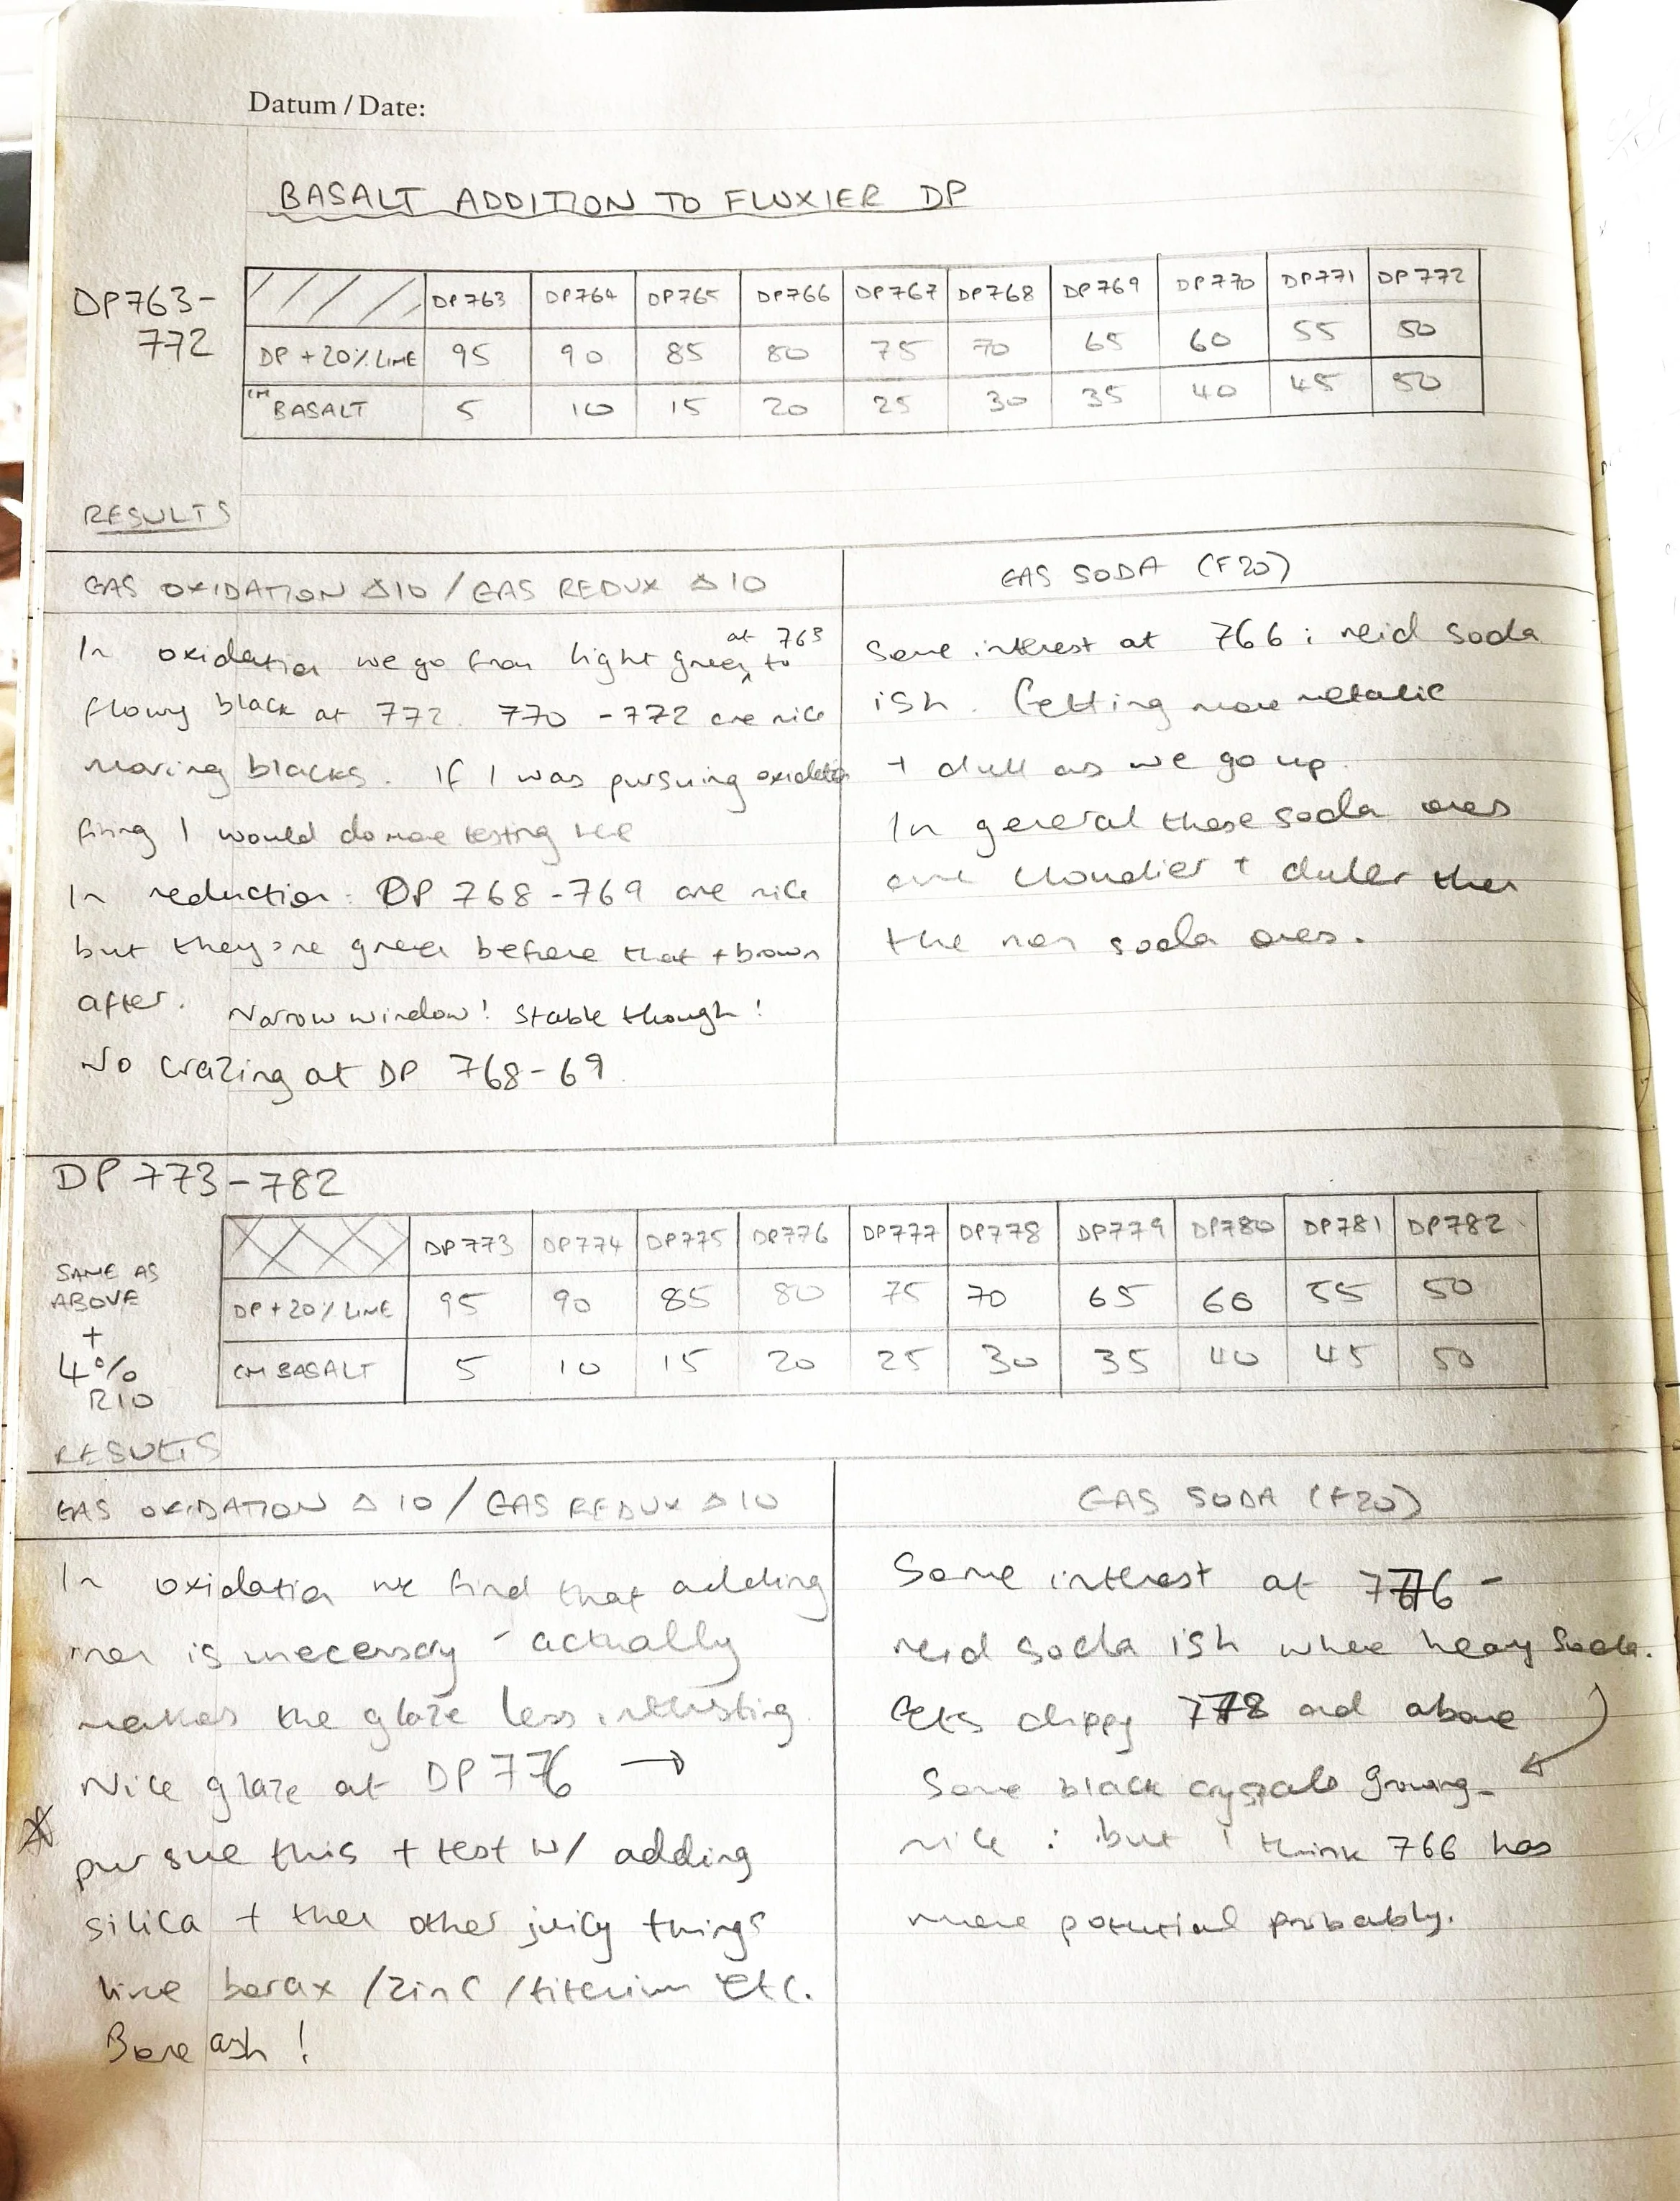


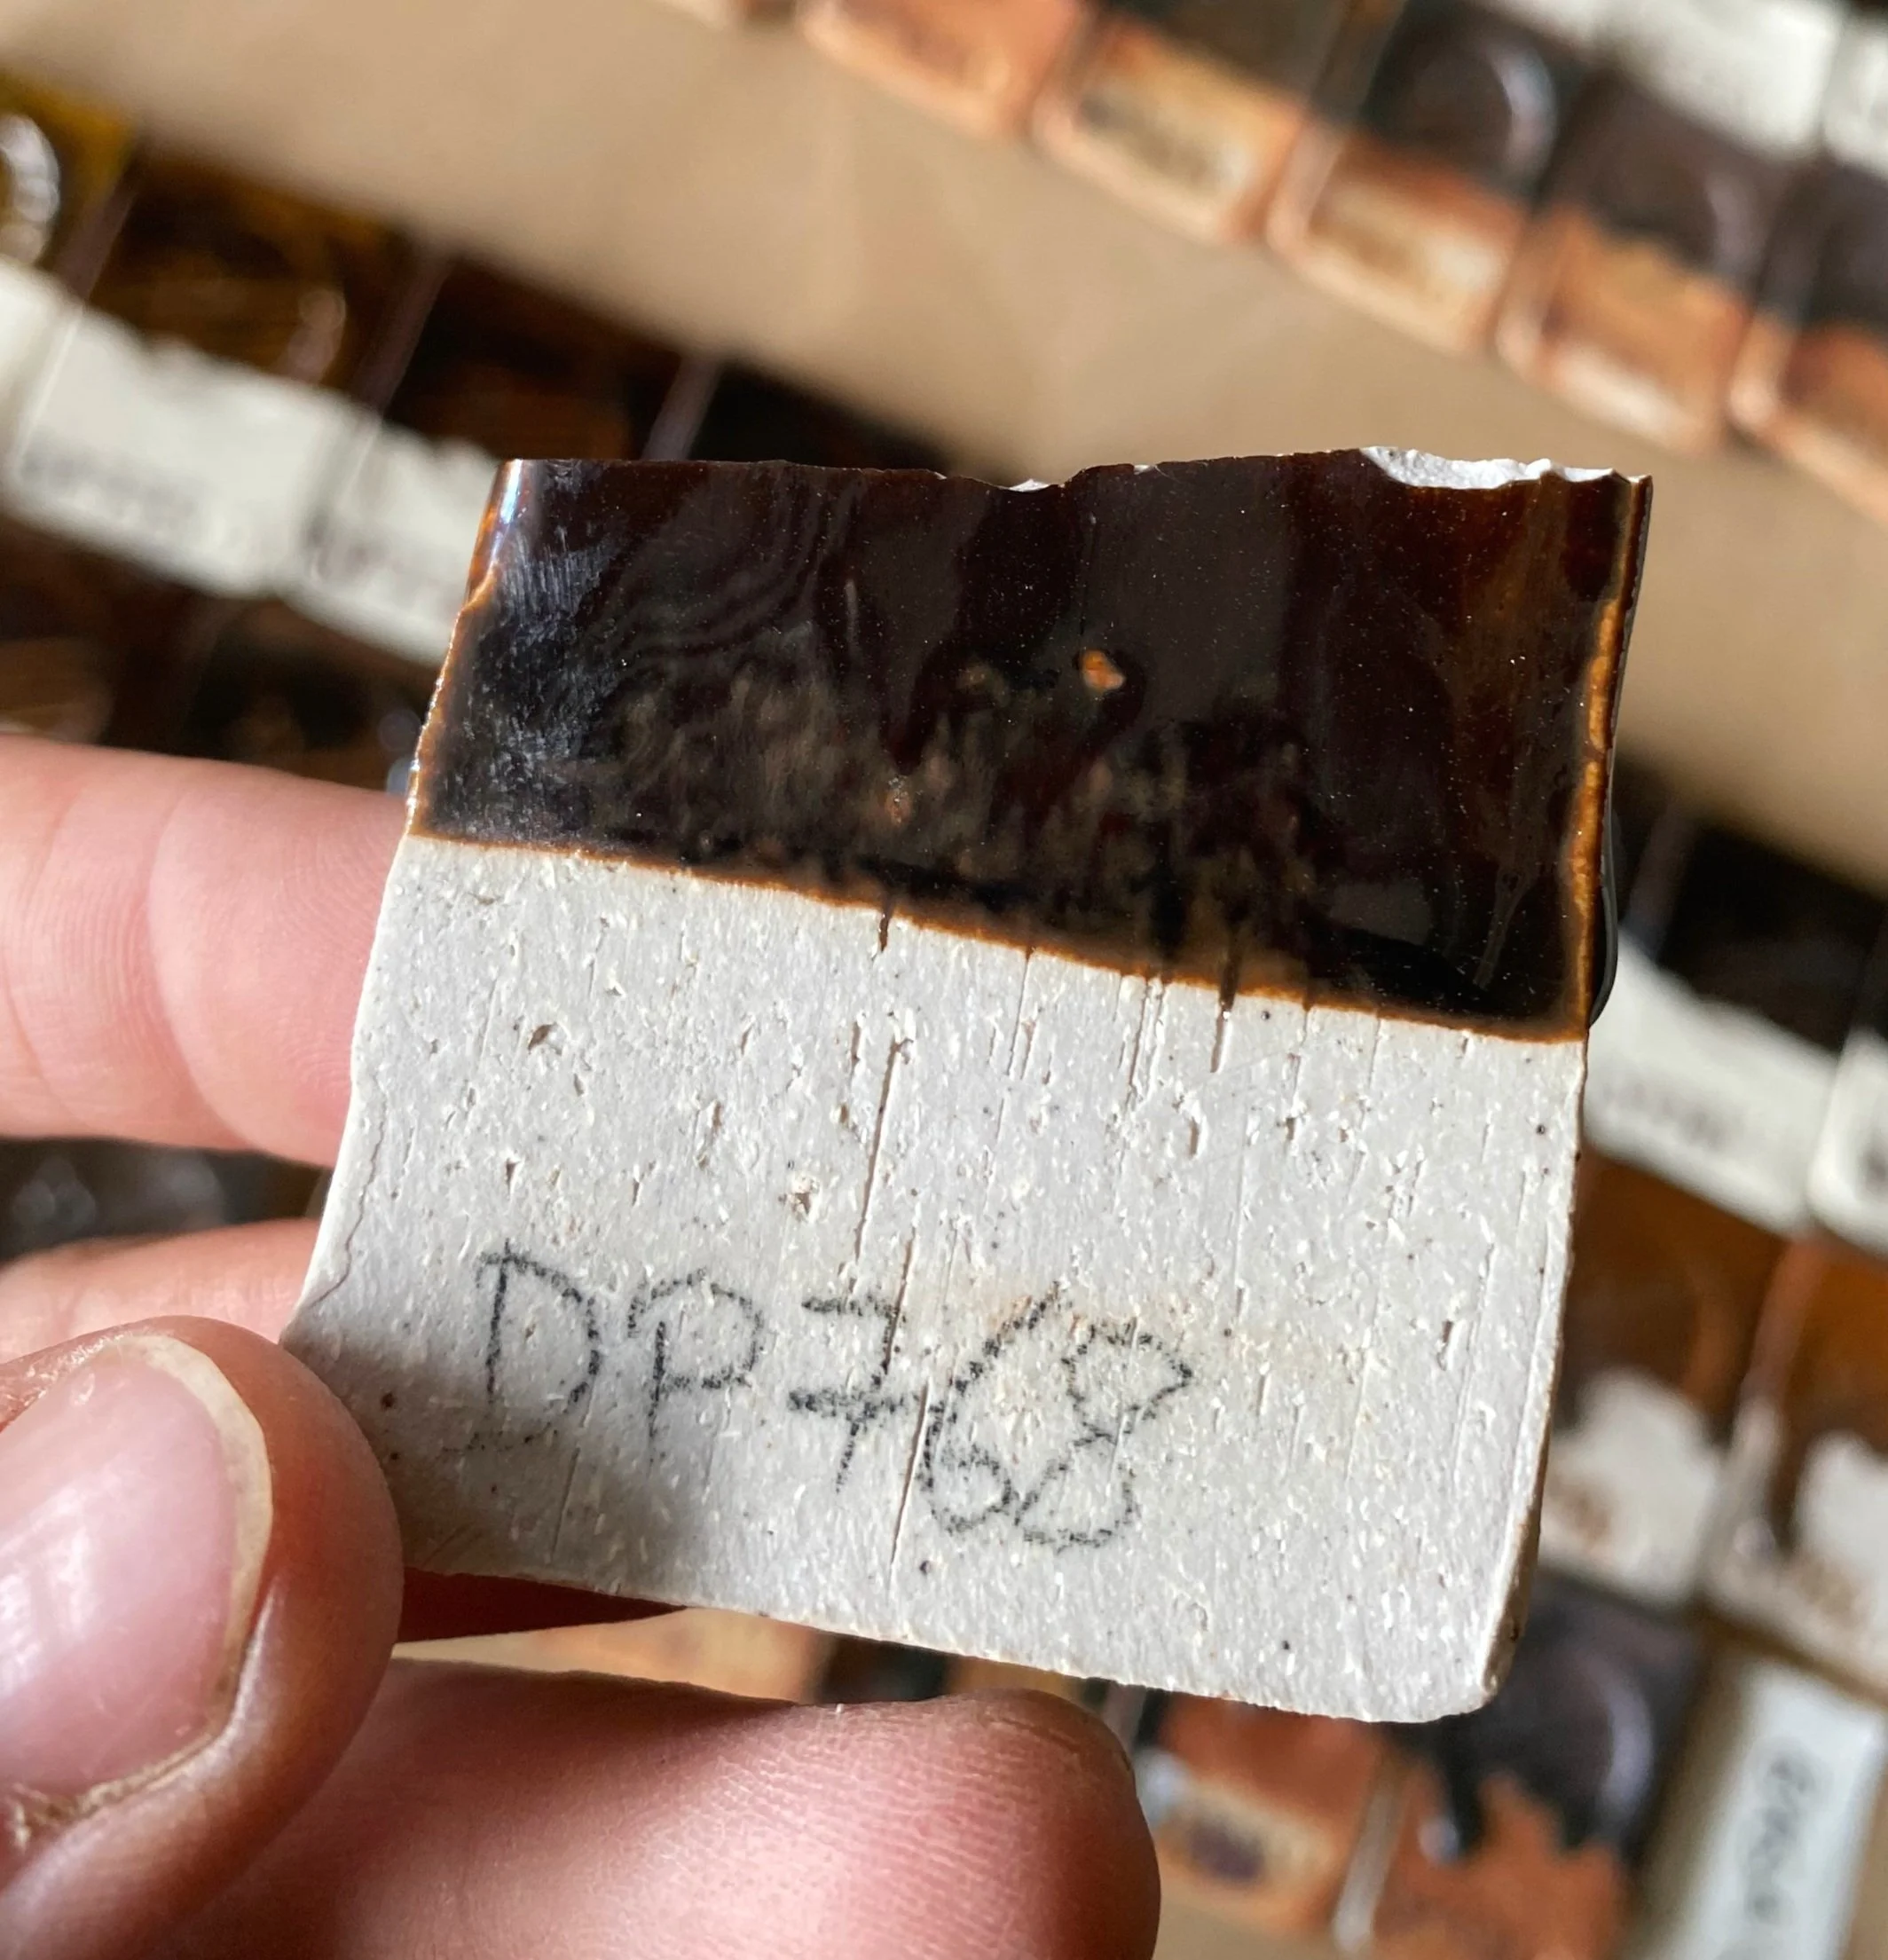


Definitely some promising results from this basalt addition test. I plan to try and make this a base for a tenmoku recipe. I think I favored DP776 in gas reduction. It had 20% basalt to 80% DP mix (80:20 DP:Lime) plus 4% iron oxide. The iron brought a richness without having to use a higher % of basalt. Basalt is quite tough to grind and I do not have an unlimited supply of it, so 20% is more convenient than 40%! Trying to be as practical as possible here. I definitely will follow up on this test and try to jazz it up with some other additions, too. I think it would respond well to iron decoration.
Next up, I have the wollastonite test (yes I spelt it wrong on the paper here; something about wollastonite makes me want to think of it as woolly)…


The wollastonite test represented a big win in these experiments. Wollastonite brings both silica and calcium to the table: its chemical formula is: CaSiO3. This mix made from brighter and bluer glazes than the lime (which we will see below). Out of all the fluxes, wollastonite was the cleanest and brightest. My flux of choice with this granite!
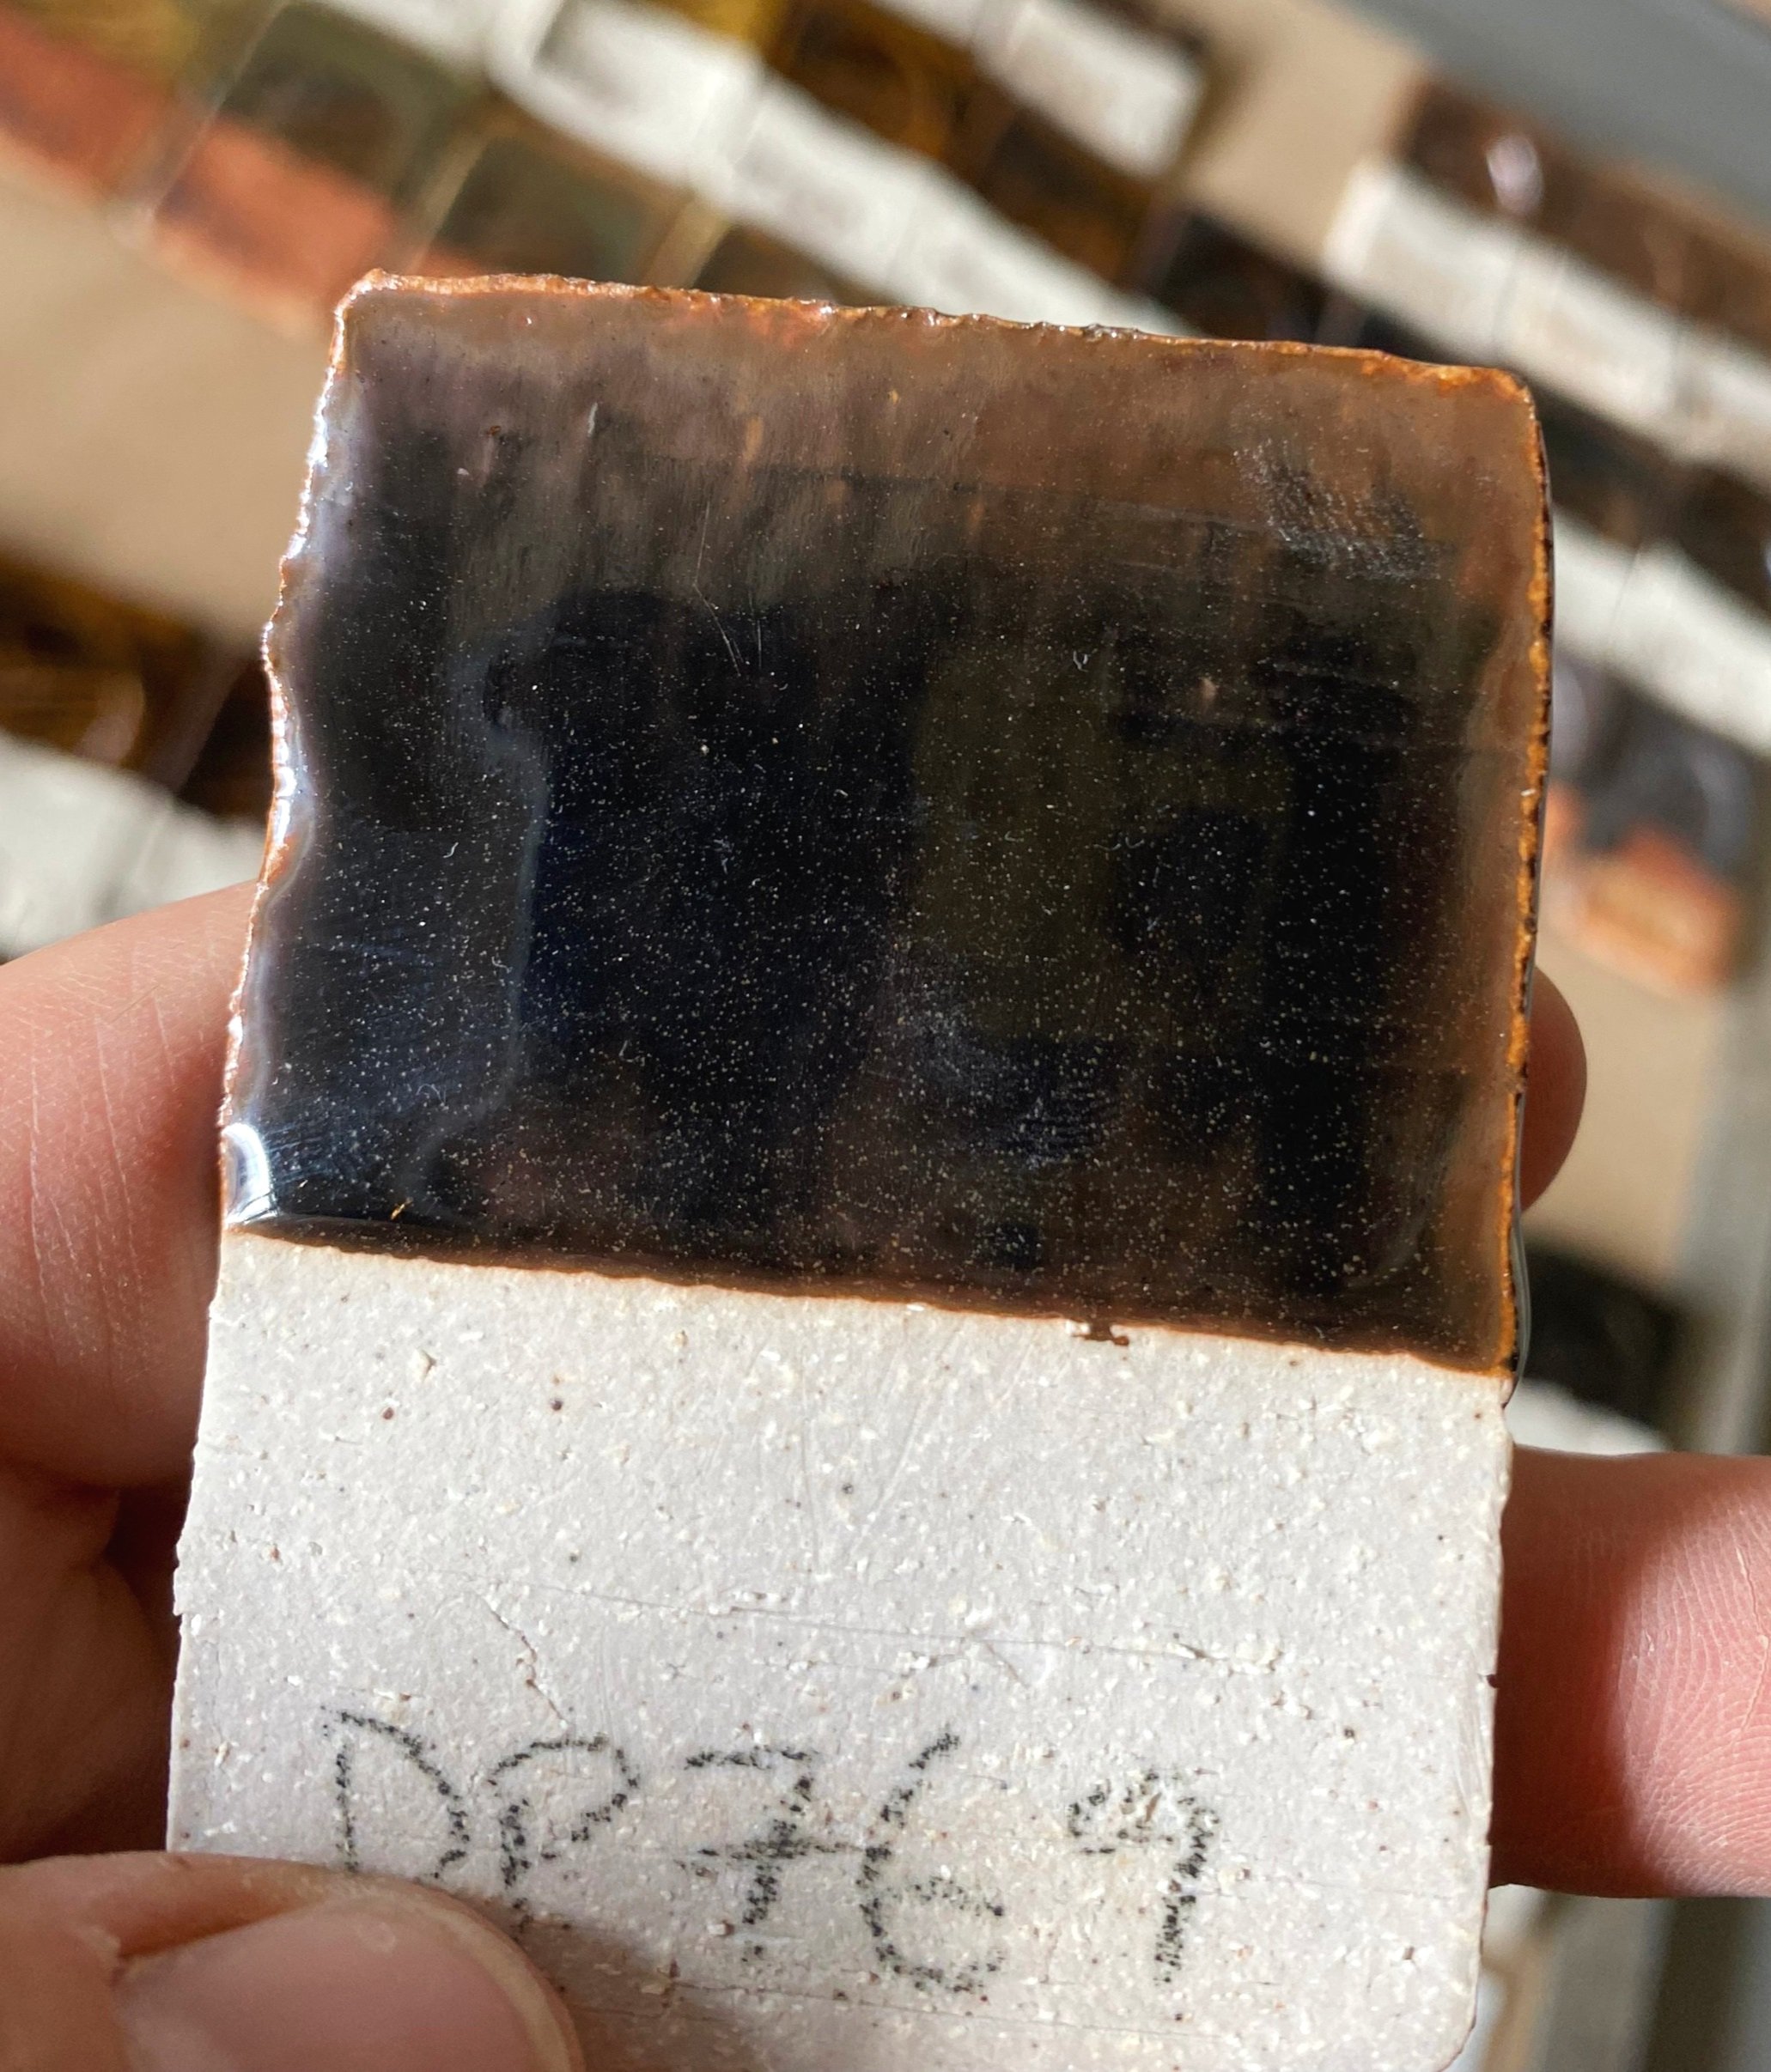
Next up we have the lime set…

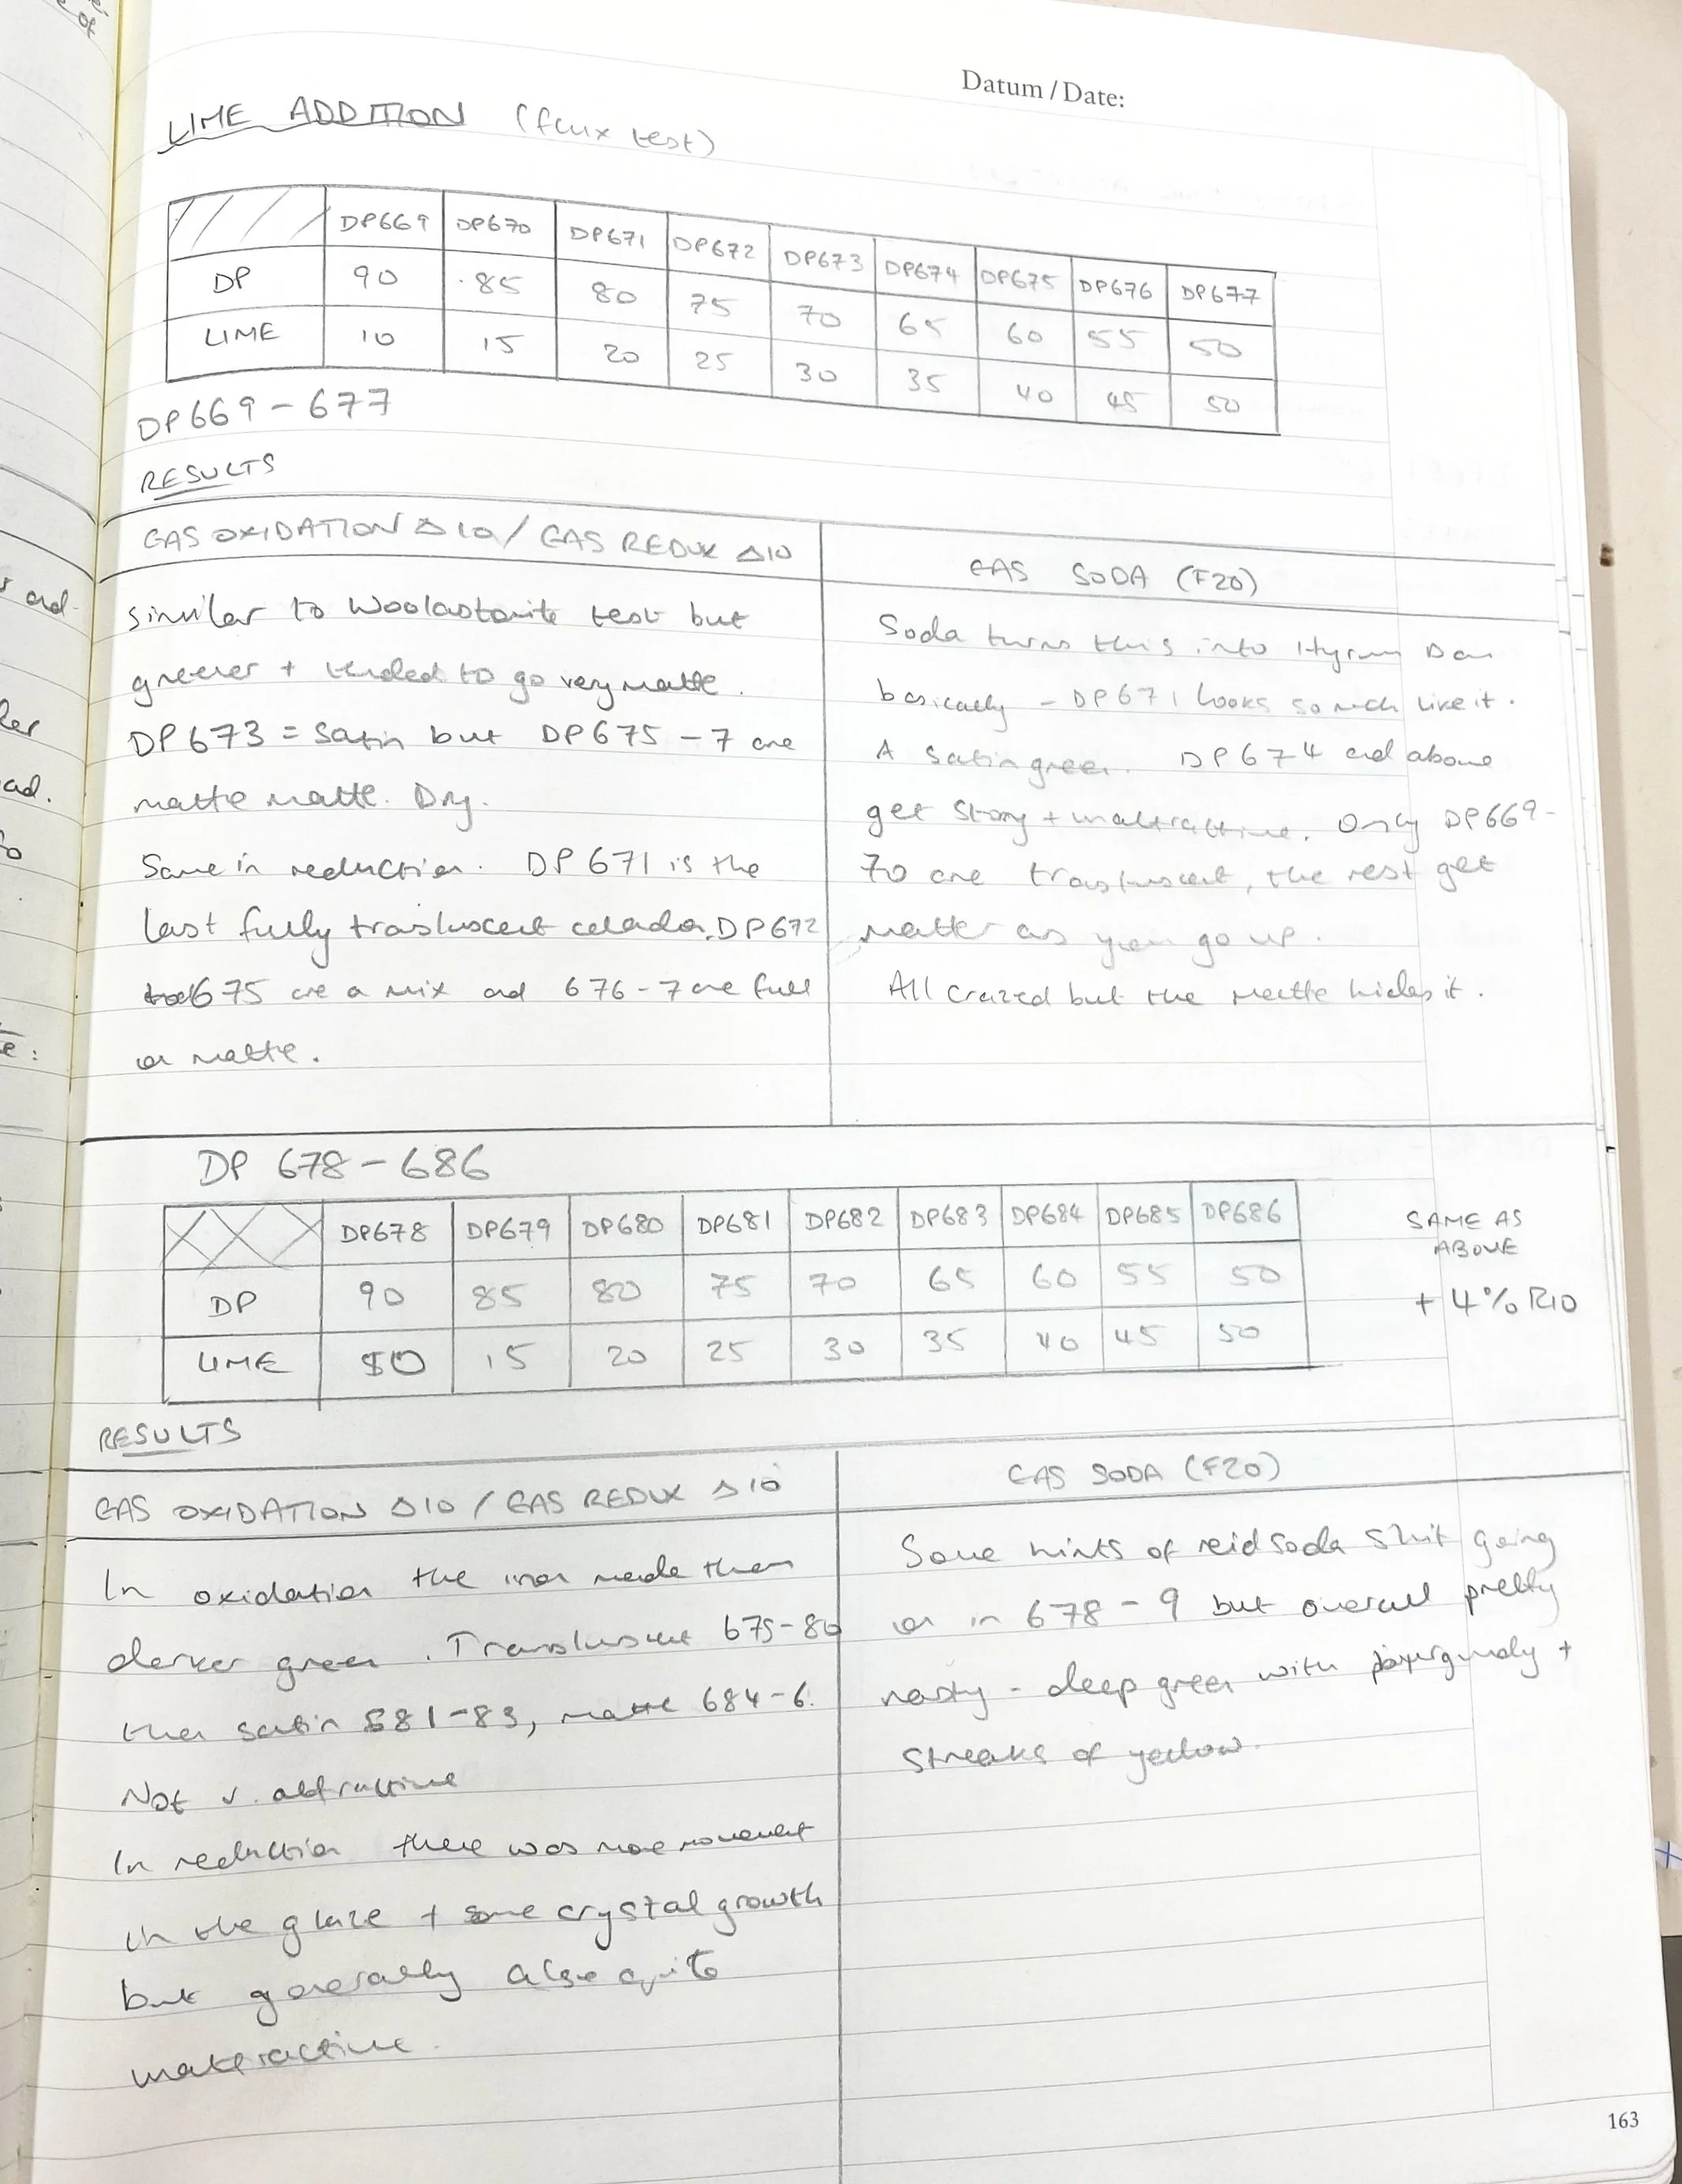


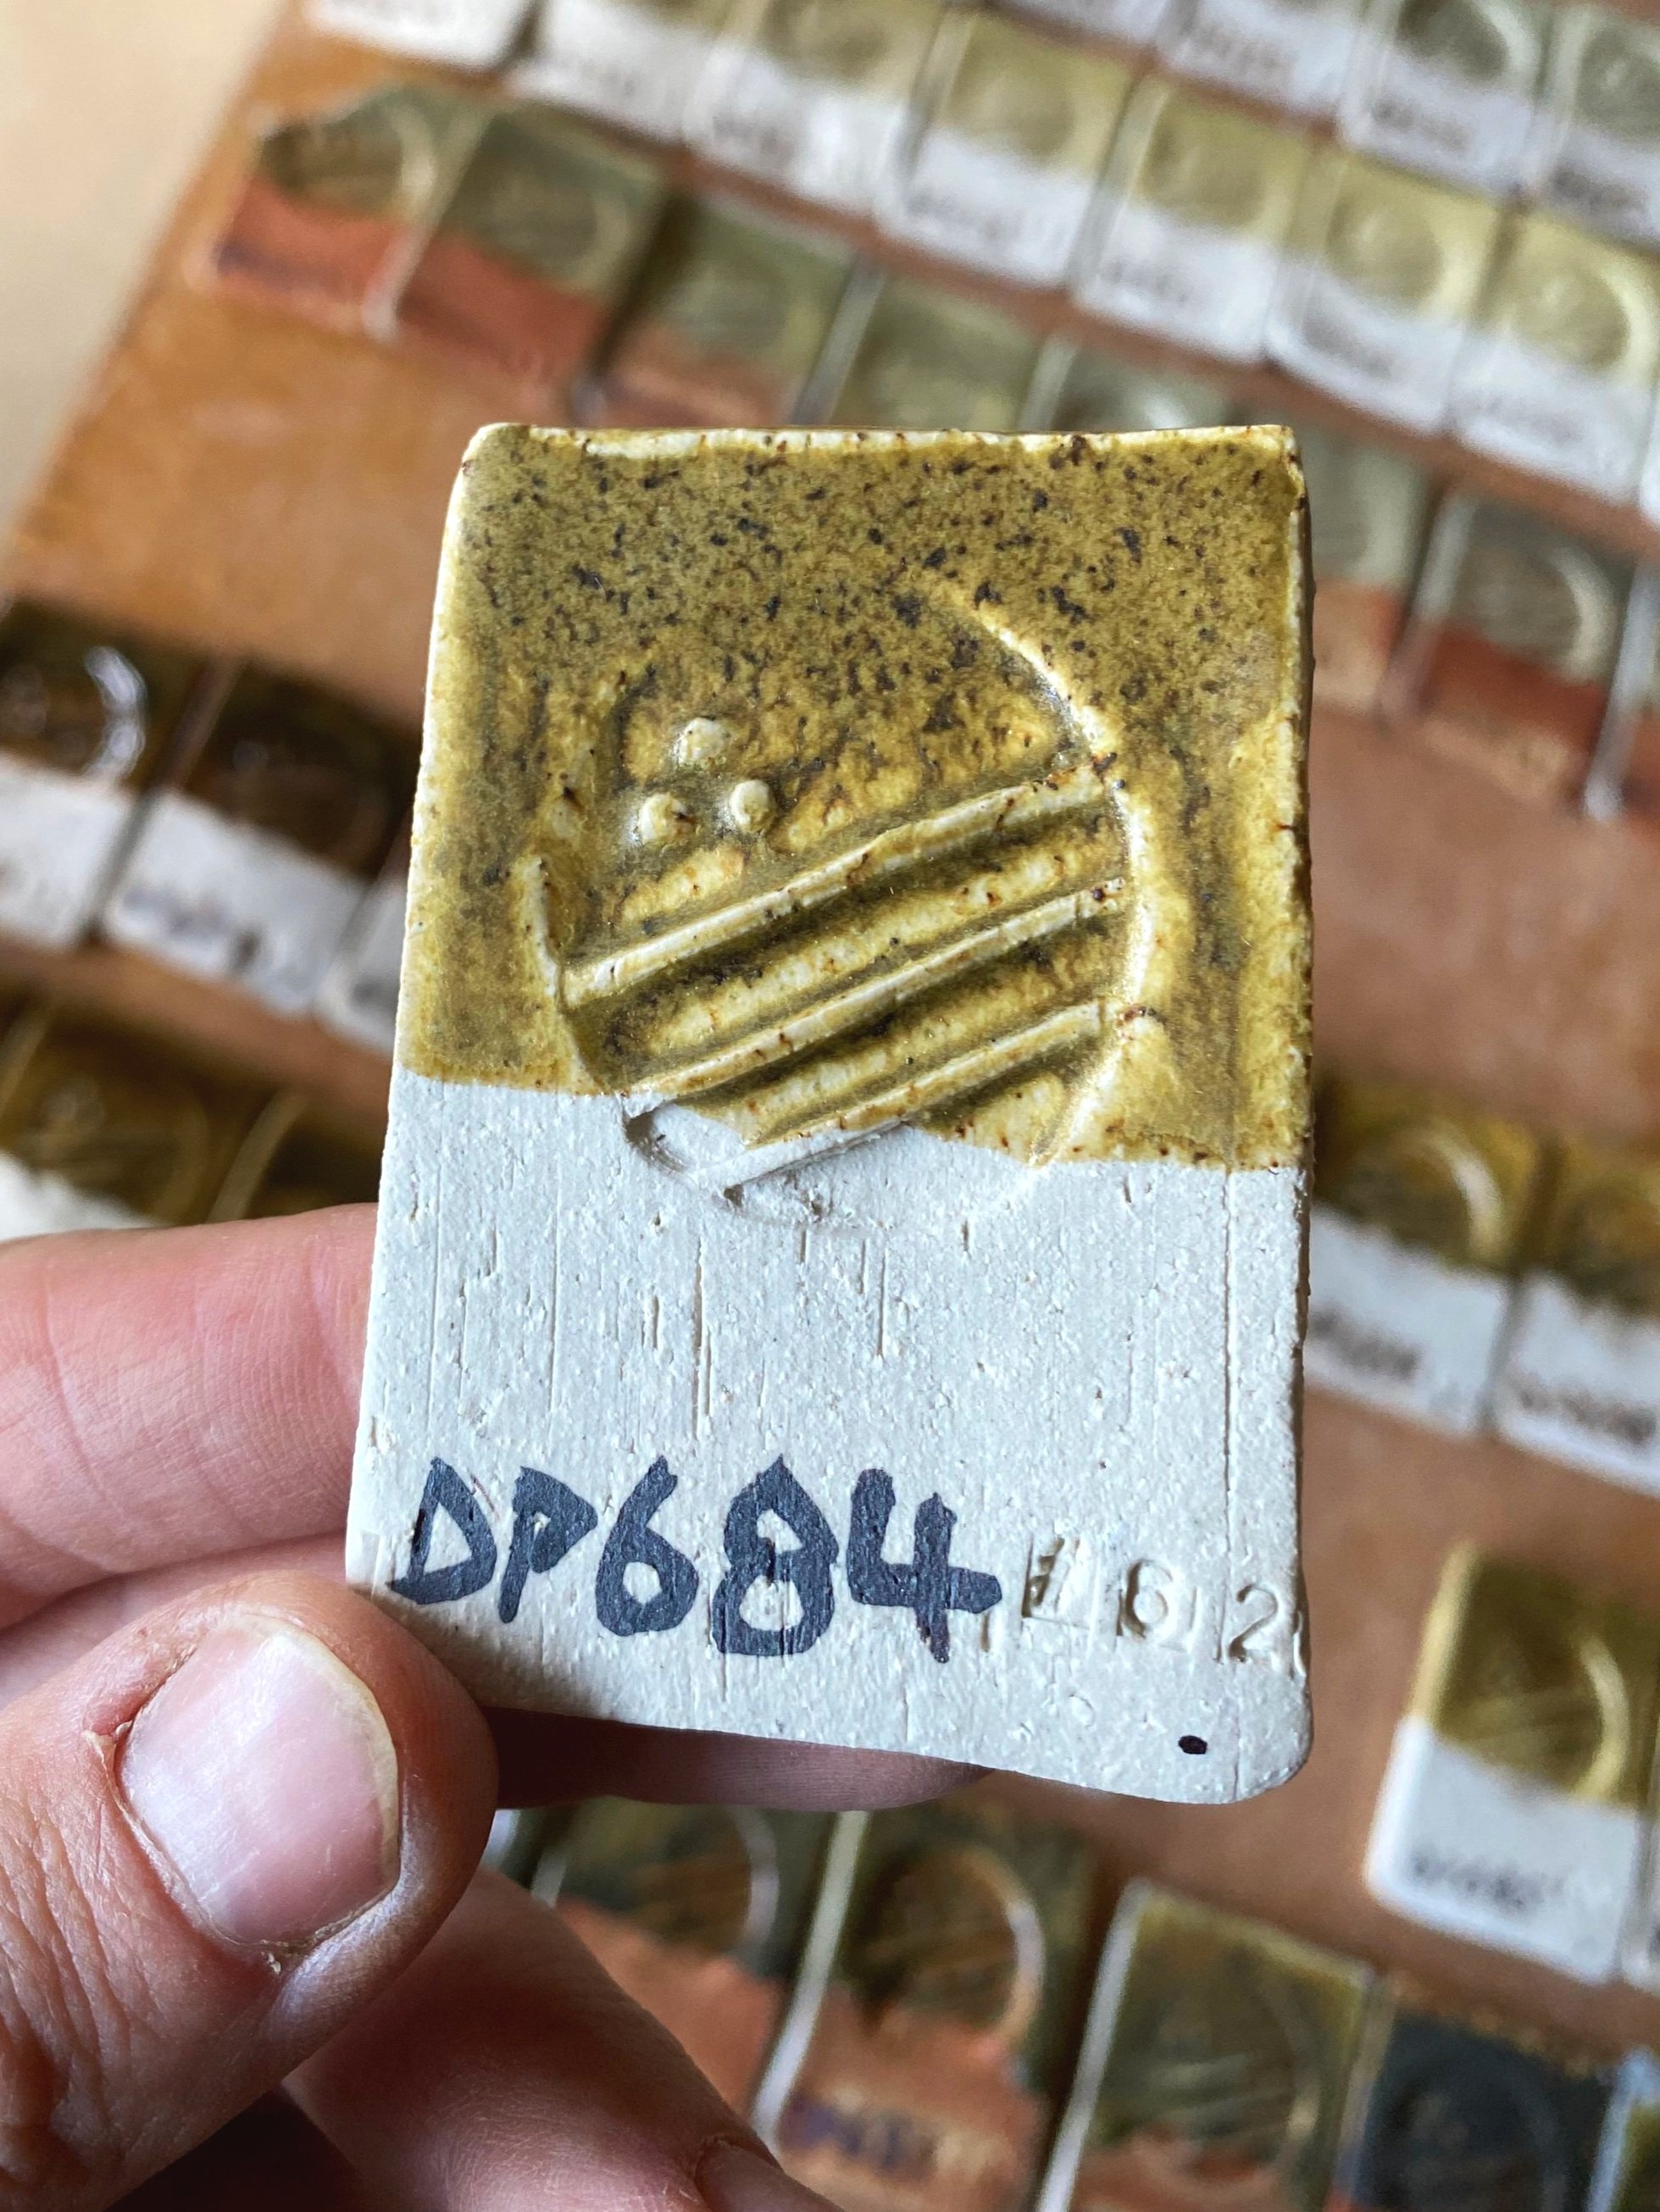
I have often used lime as a flux in the past. It supplies calcium, which is a strong flux. In general, it tends to make the glaze greener and also fairly quickly sends it matte. DP673 has a satin texture (at 30% lime) but above that we are in matte territory. The tests were remarkably stable, only threatening to drip in soda.
Next up we have spodumene (LiAl(SiO3)2) which provides lithium as a flux.


On the whole, I did not love any of the spodumene tests. They moved towards shino-like surfaces but none were that special.
Moving on to the grolleg additions. Grolleg is not a flux, although it does contain some flux. It is a blended clay from England that looks good in soda; nice flashing. I have made several successful porcelain bodies using 50% grolleg and various slips, too. In this test, I was hoping to find an attractive slip for soda firing with it. I doubted whether I would get anything interesting in gas reduction or oxidation without soda.


DP 705-13 were fairly drab but when I added 20% lime to them, the results were much nicer. I did not arrive at a tasty soda slip but I did get some intriguing results. DP714-8 were nice blue celadons. It shows how important the flux in the glaze is for color response! With clay, too, I am sure.
Moving on to adding borax to the granite…
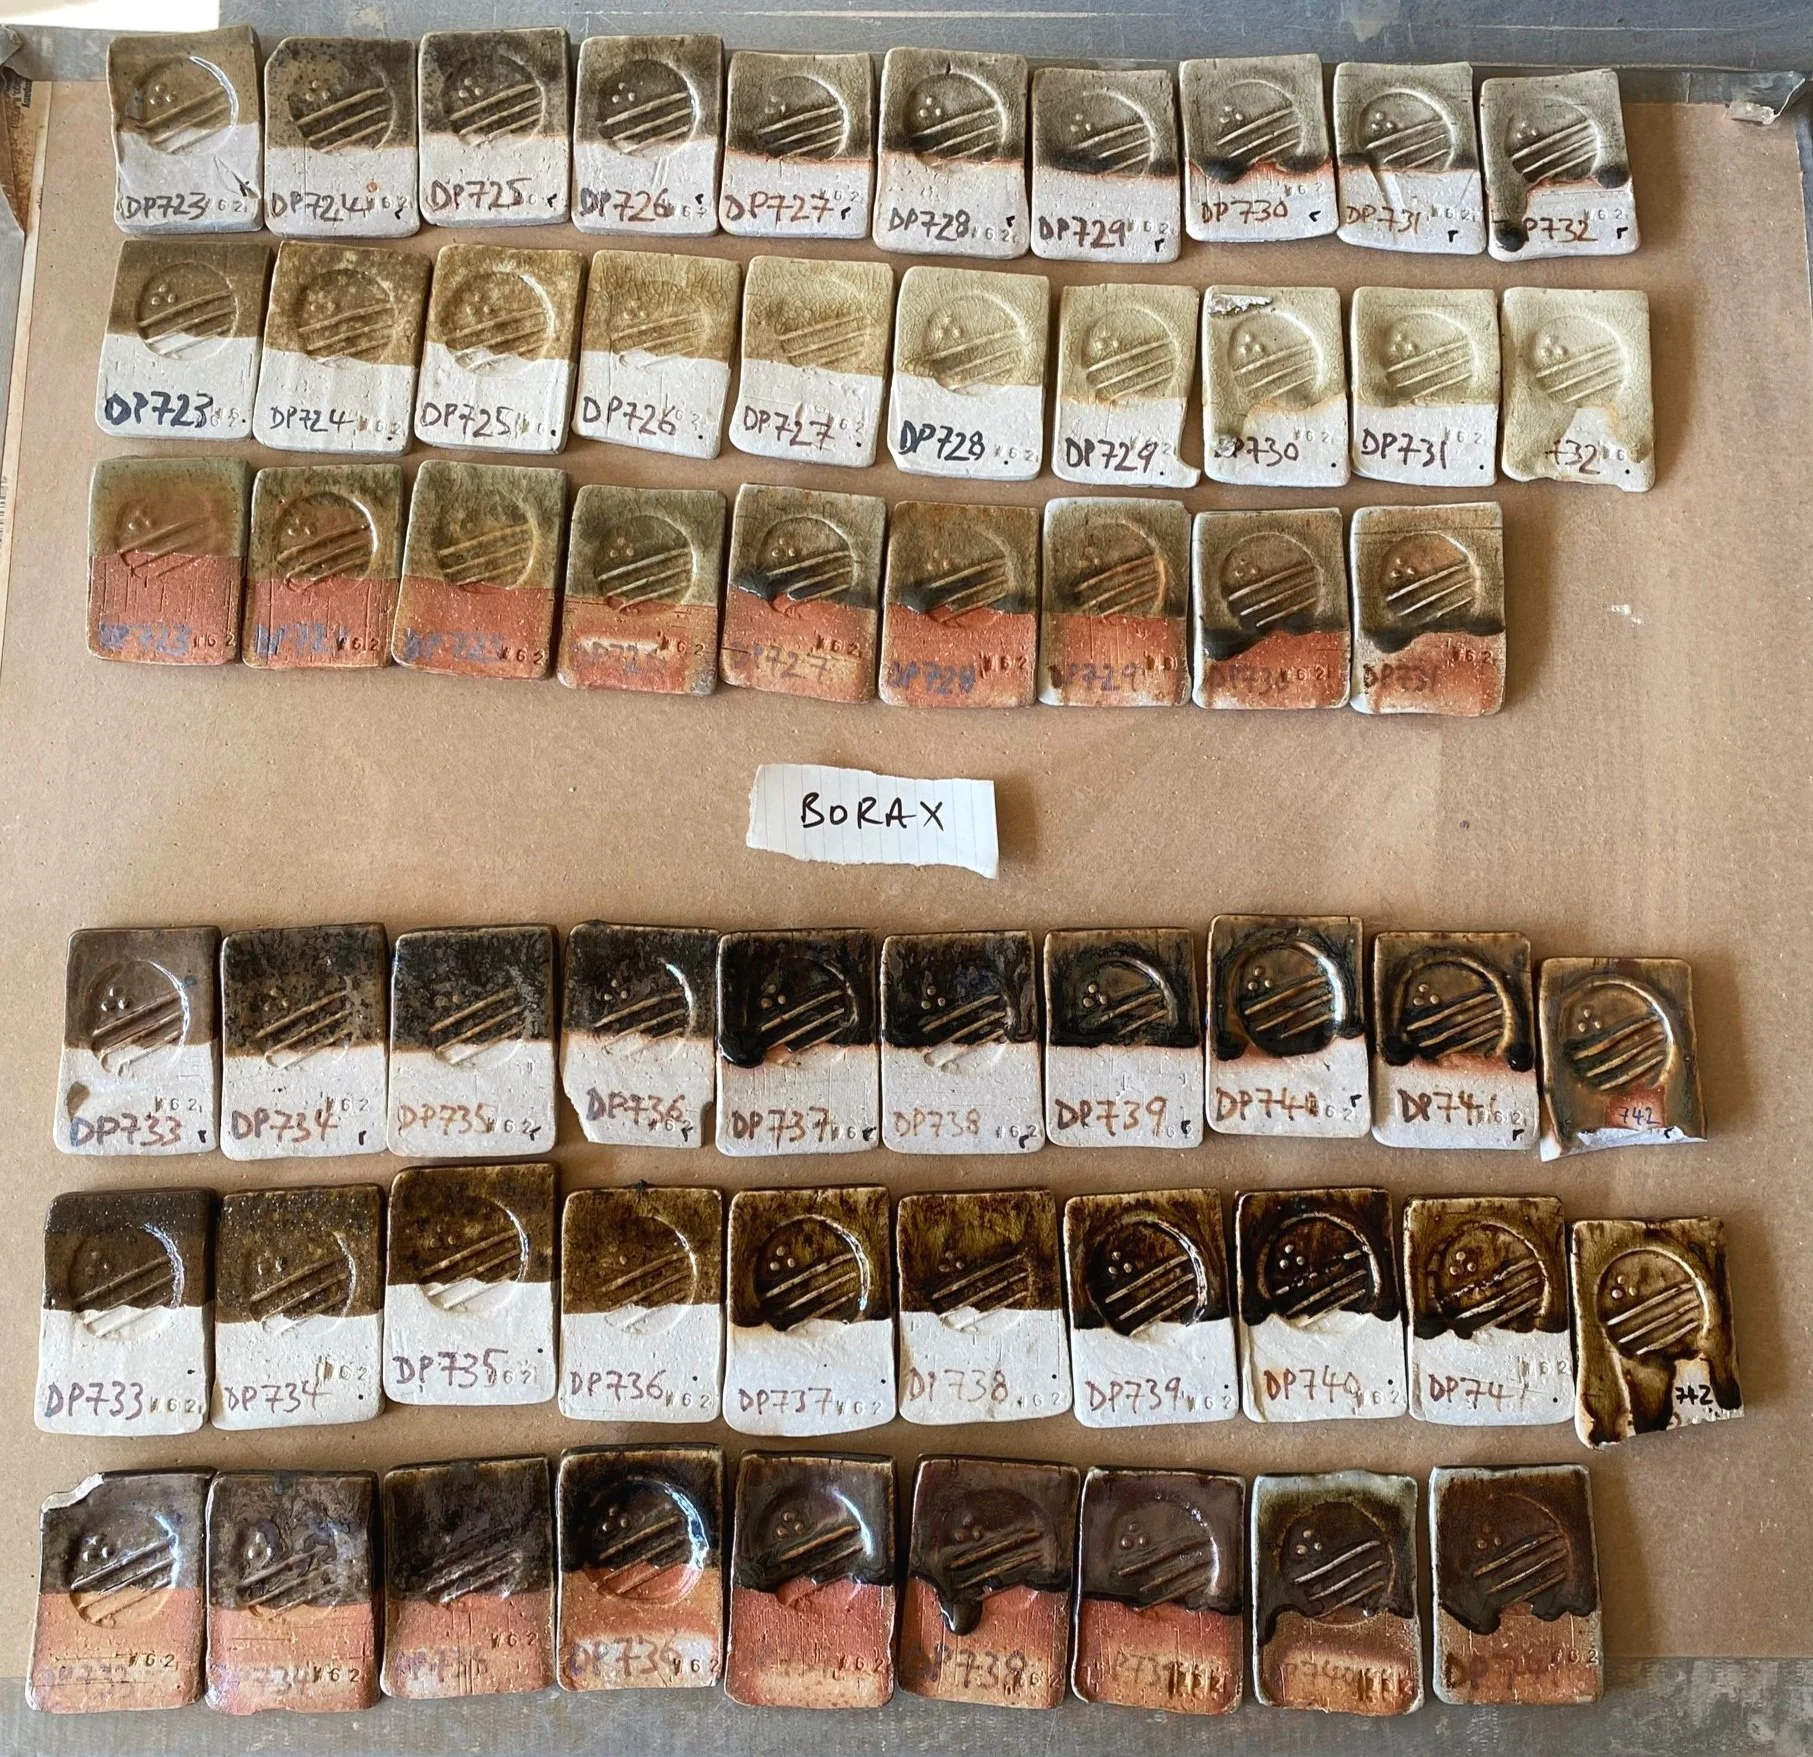


The borax did some really interesting things. Especially when I added 4% iron to the mix. In chatting to John Neely about these tests, he said boron (which borax is made up of) melts early on, so it creates some phase separation in the glaze. There were some oily surfaces which I quite liked, and I see a lot of potential here for further experimentation. Seems like as little as 10% makes things more interesting.
Next up: soda ash…


This was an interesting set of results. I got a fair bit of bubbling in oxidation (due mostly to a fast firing I think)… this happened to some of the sets of tests but not others. Anyway it was particularly potent with the soda ash tests. The tests that I found most promising were DP 747-52 in soda. They came out kind of splotchy, almost like ink in water. Quite an interesting effect. It makes me want to try adding soda ash to some other glaze formulations to see what happens.
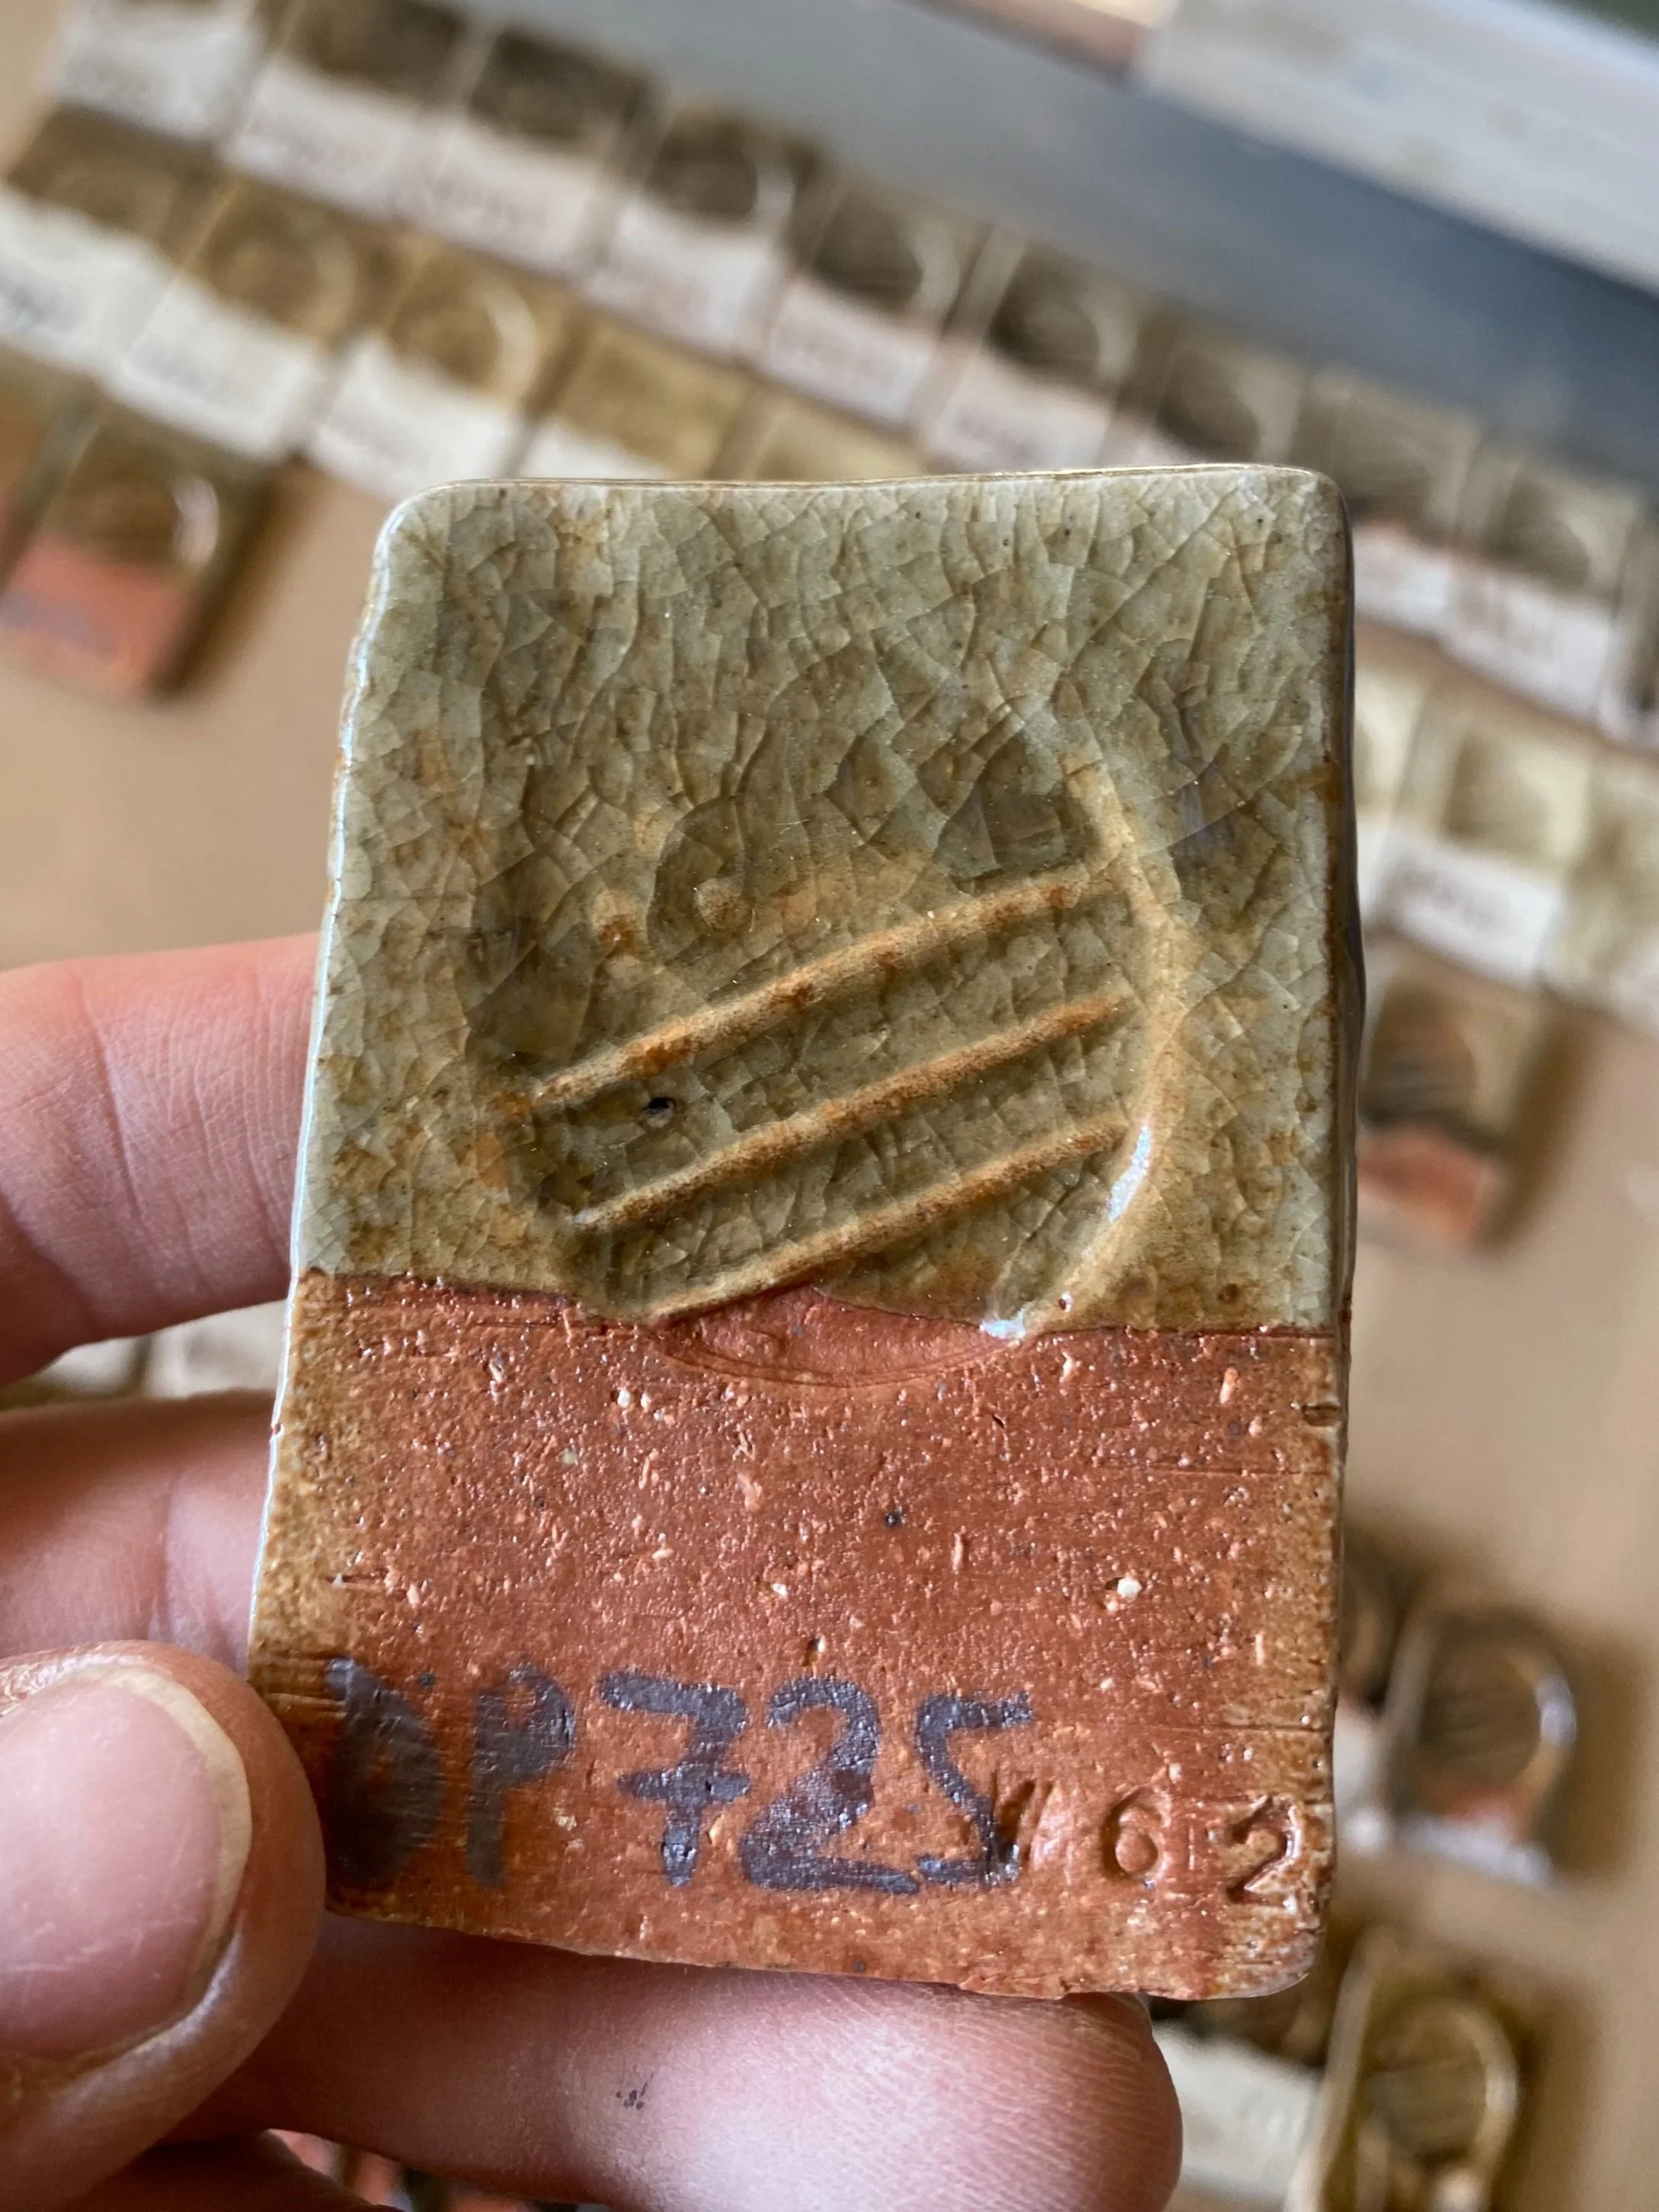
Now the minspar (a soda feldspar) addition…


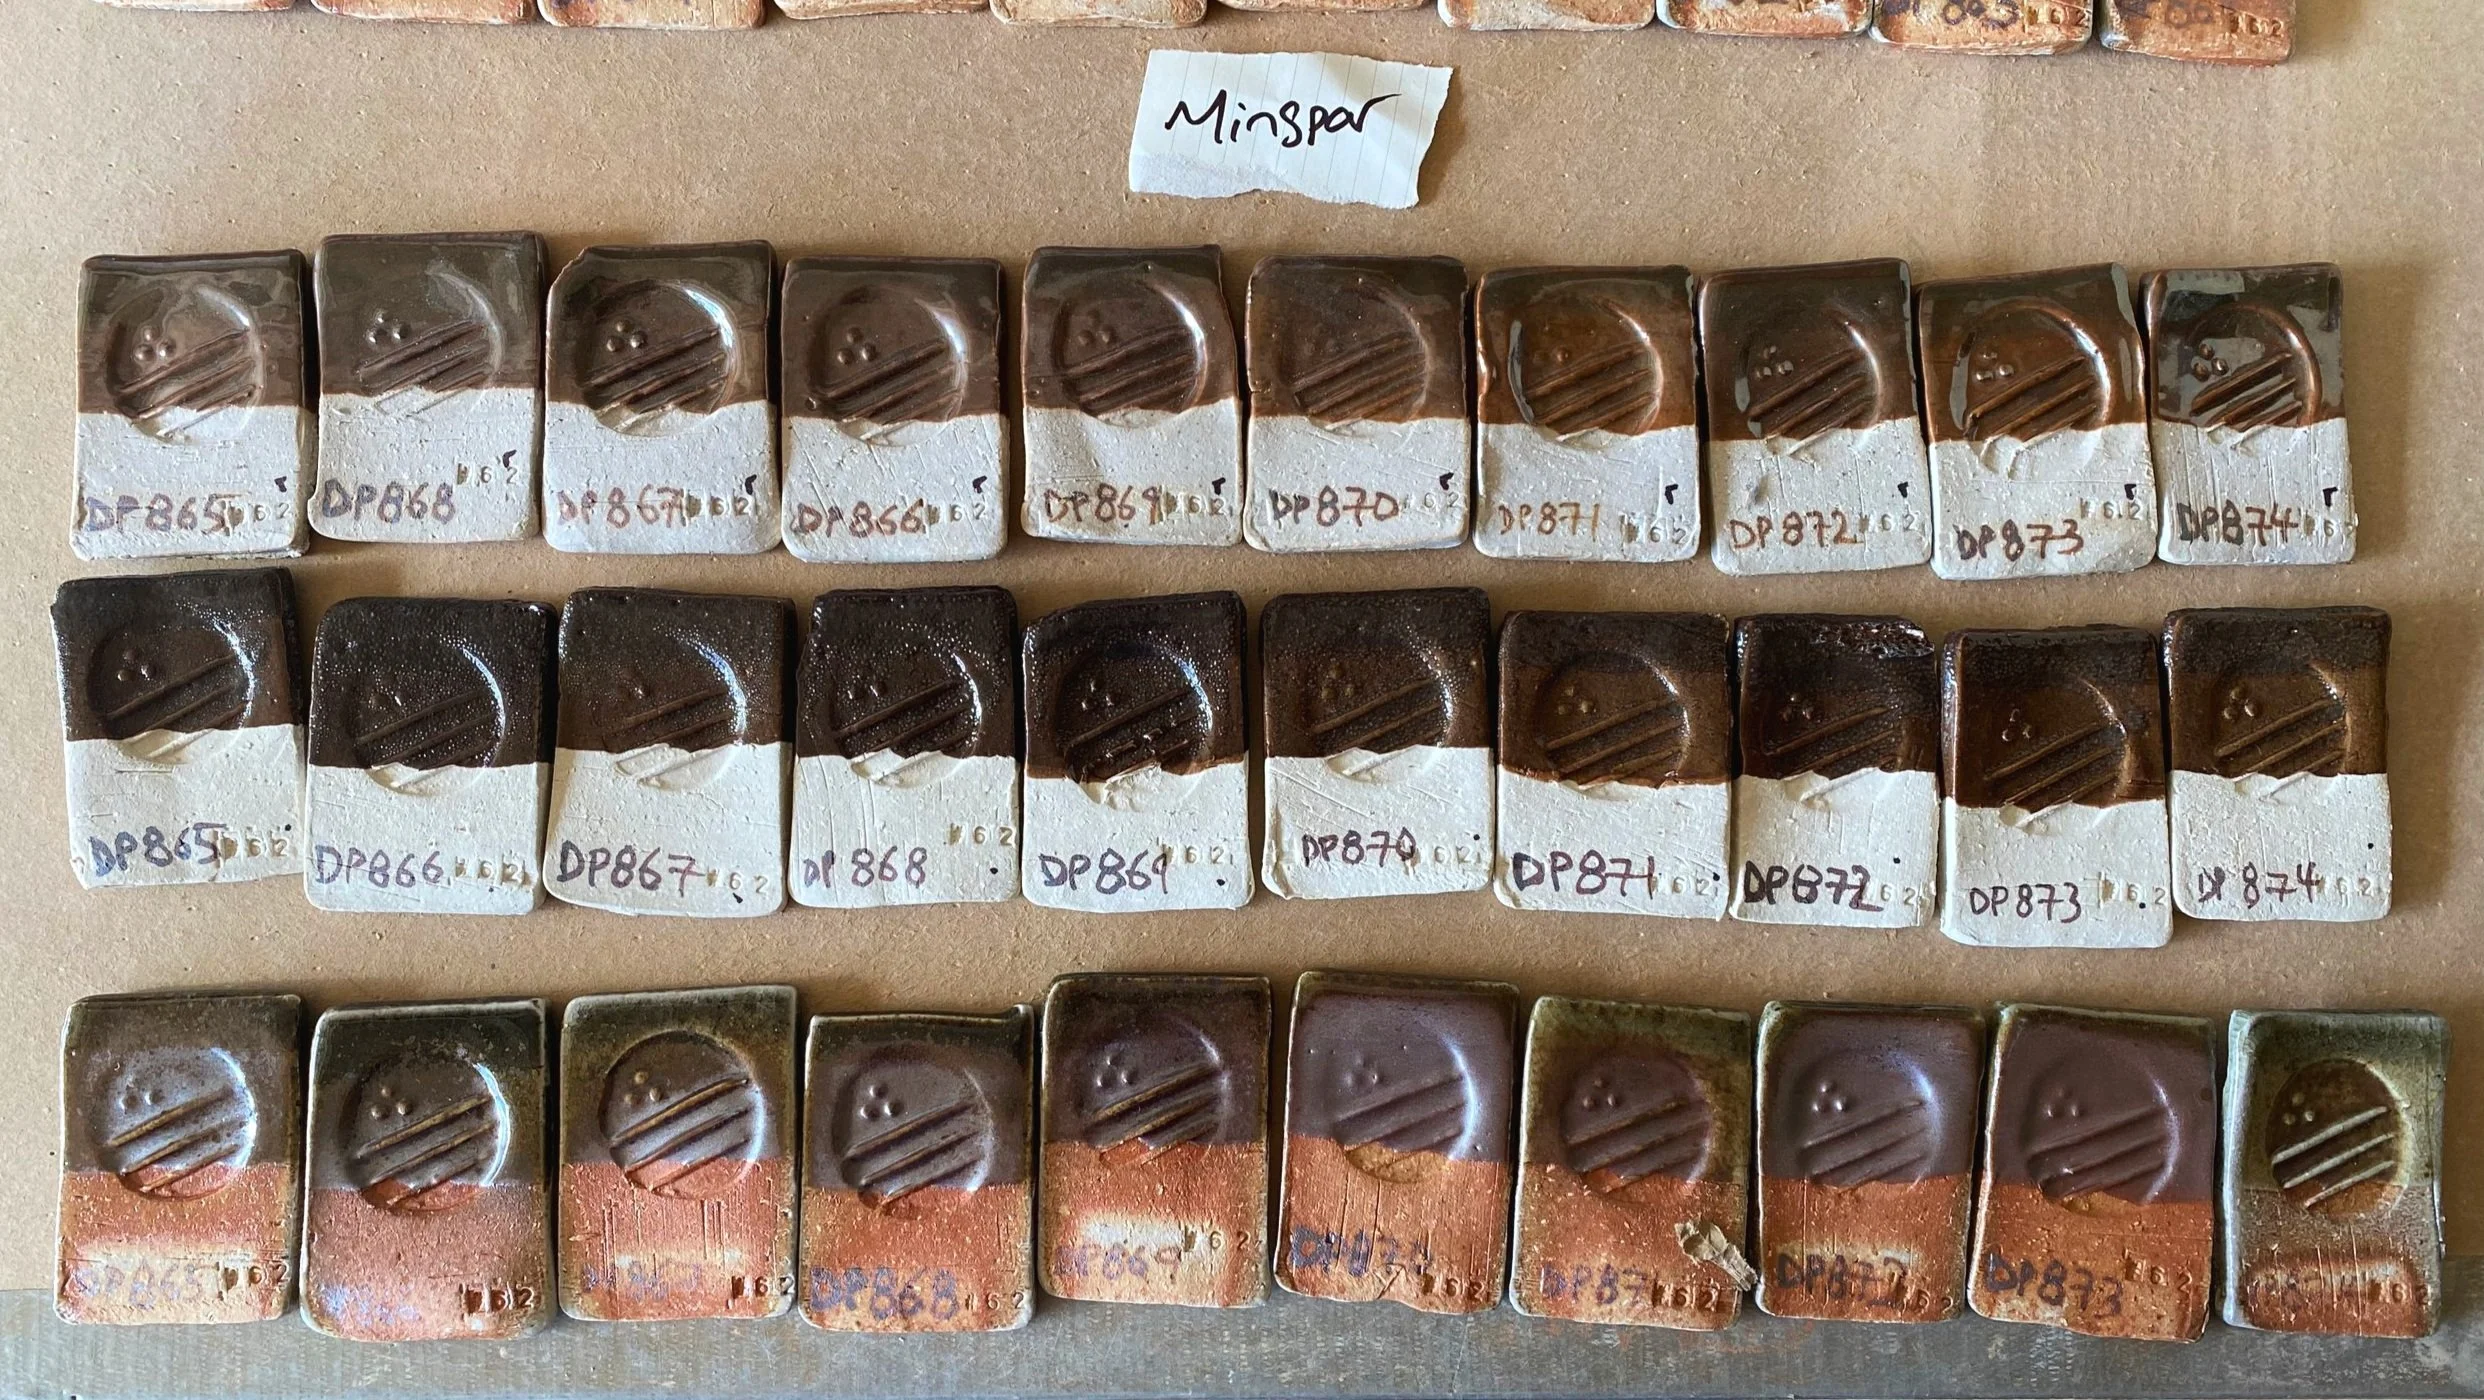


These results were similar to the spodumene tests. None too exciting. In soda they tended towards grey/brown and not very nice browns with extra iron added in.
Now the custer feldspar (a potash feldspar) addition…


These results were very similar to the minspar addition and spodumene too. Nothing to write home about!
Next up is strontium carbonate (SrCO3)…


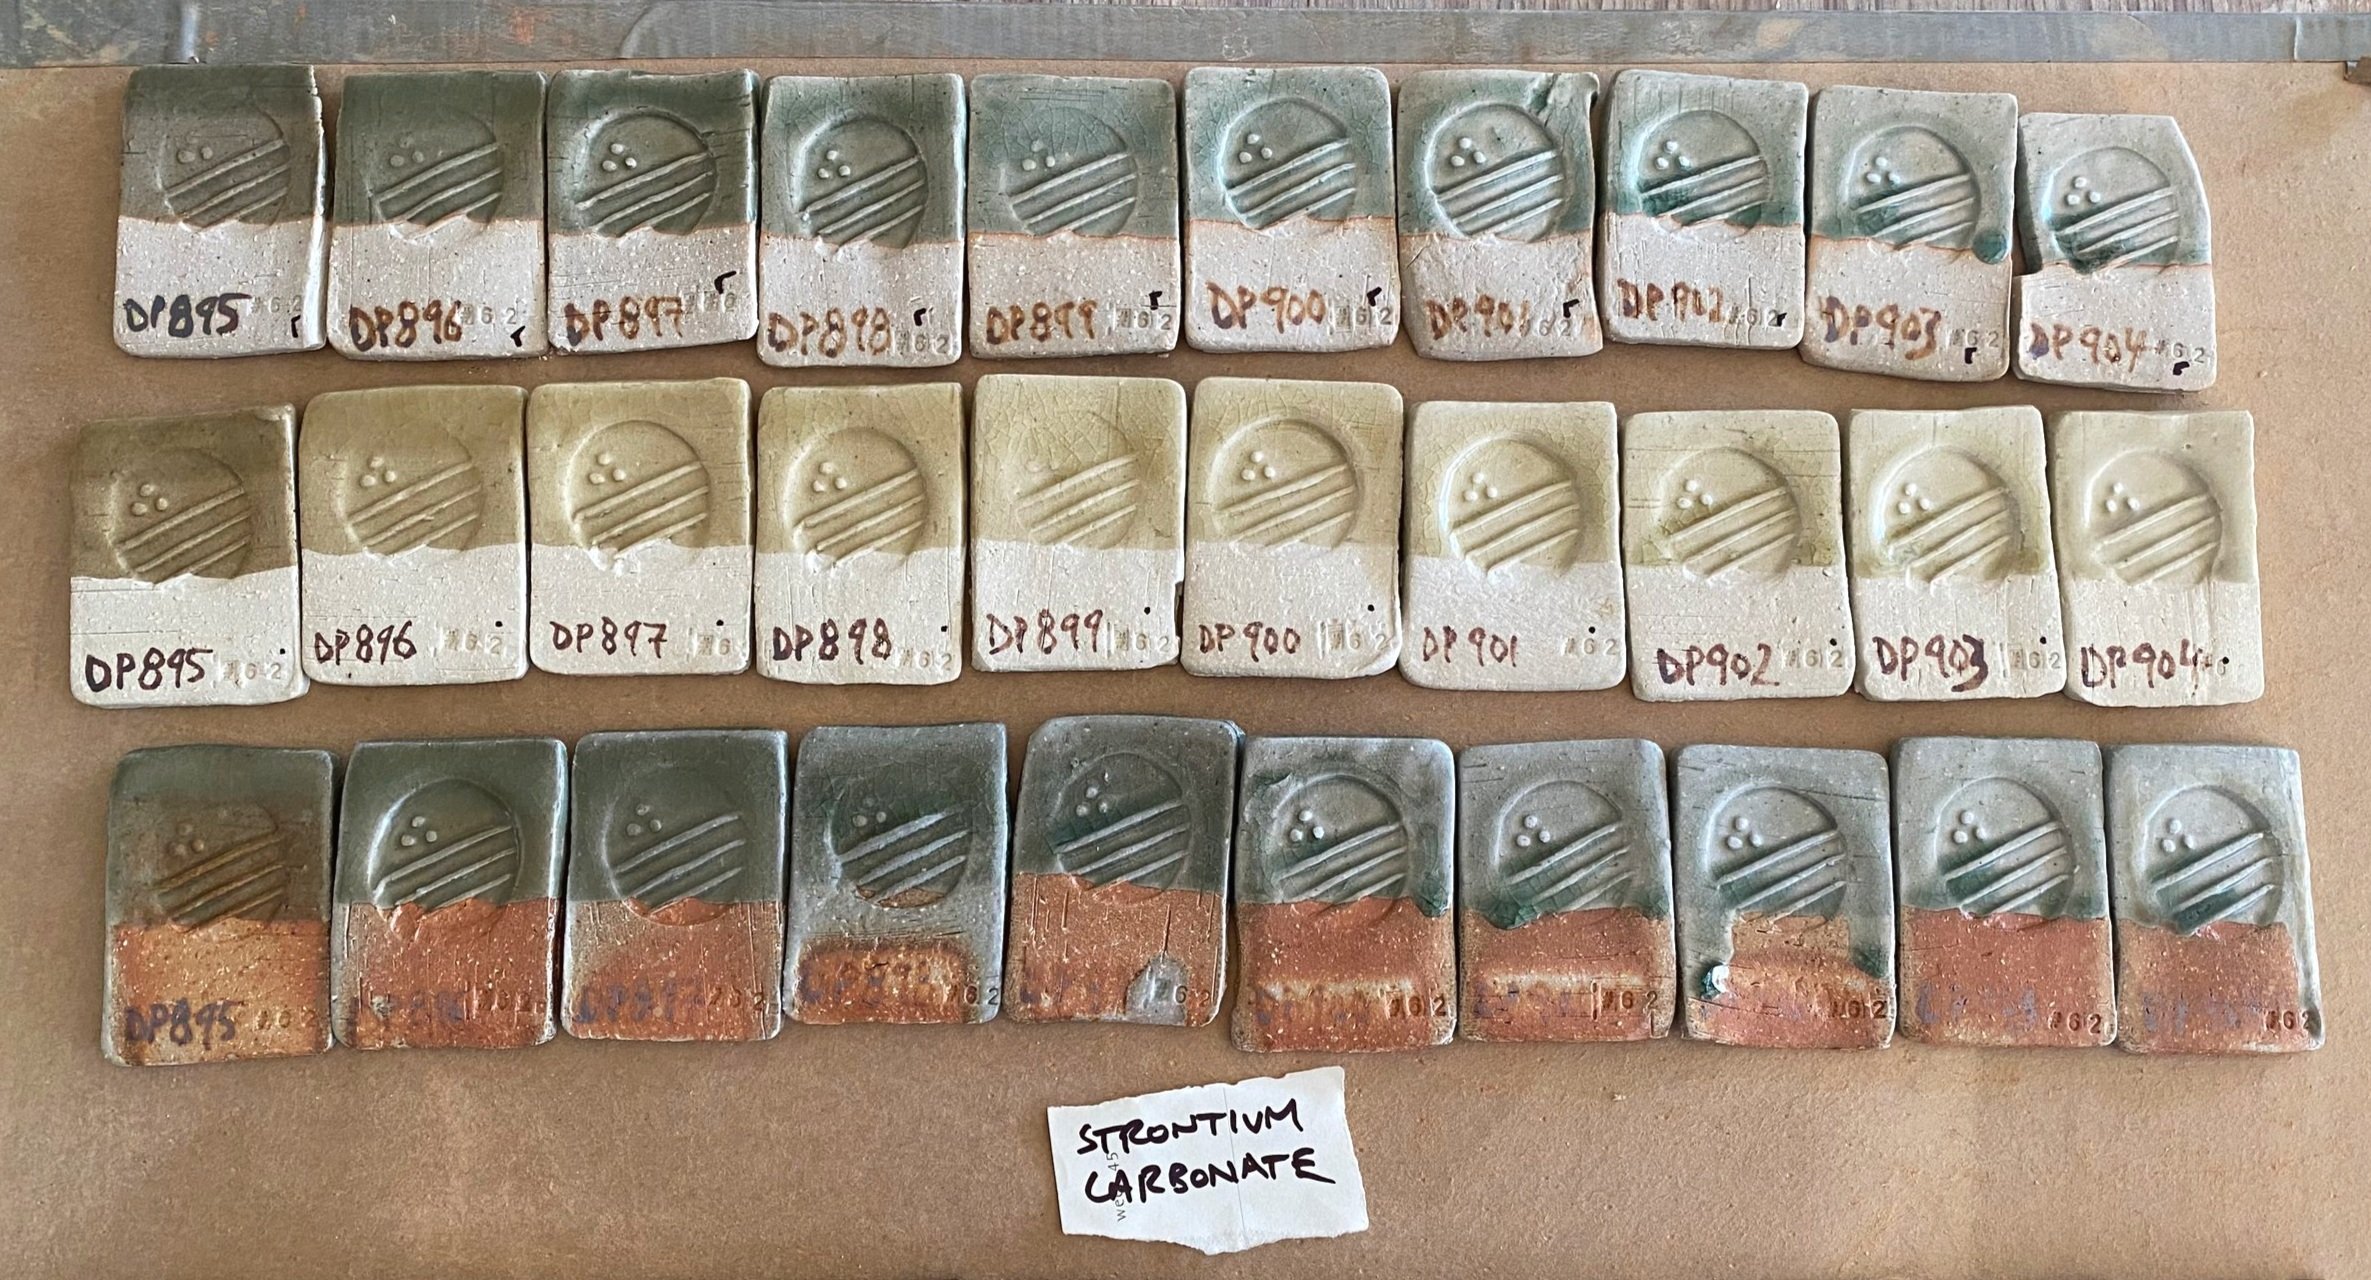


In reduction I got some pretty nice color out of the strontium carbonate addition. It was similar to the wollastonite, which I was wowed by, except a little darker. Started to get drippy with 45-50% added. DP 899-900 were nice.
Next up we have zinc oxide…


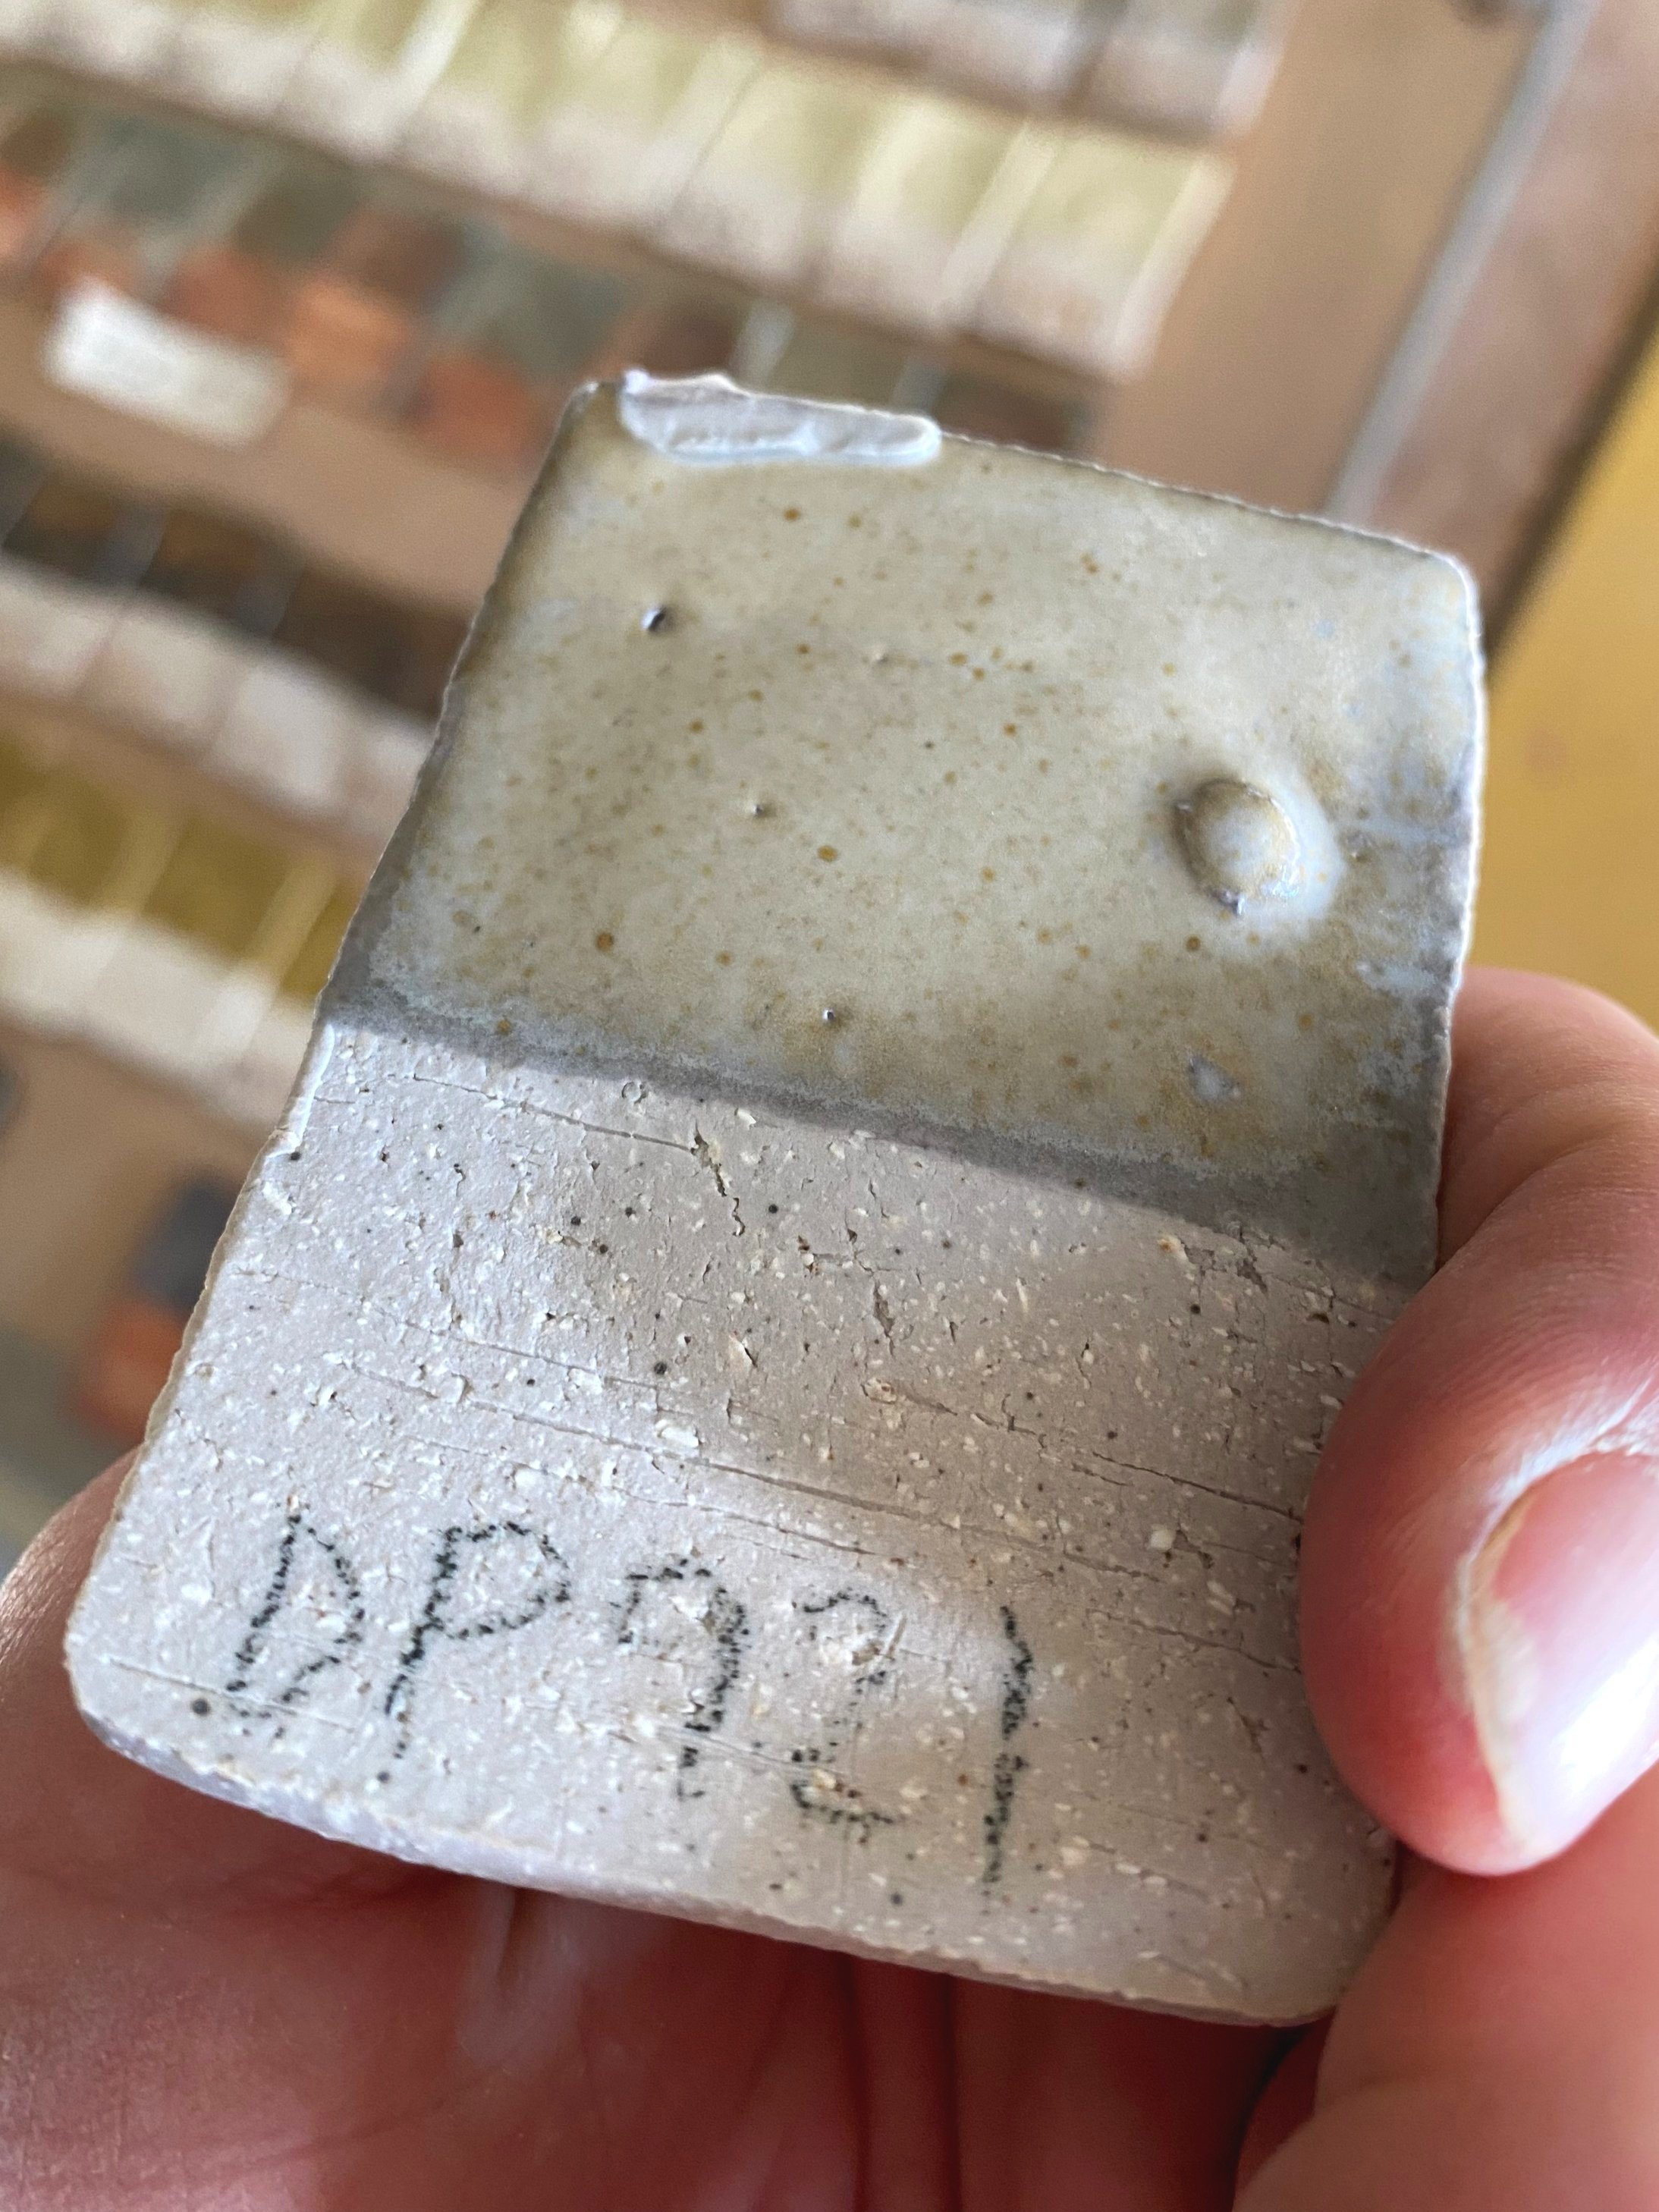


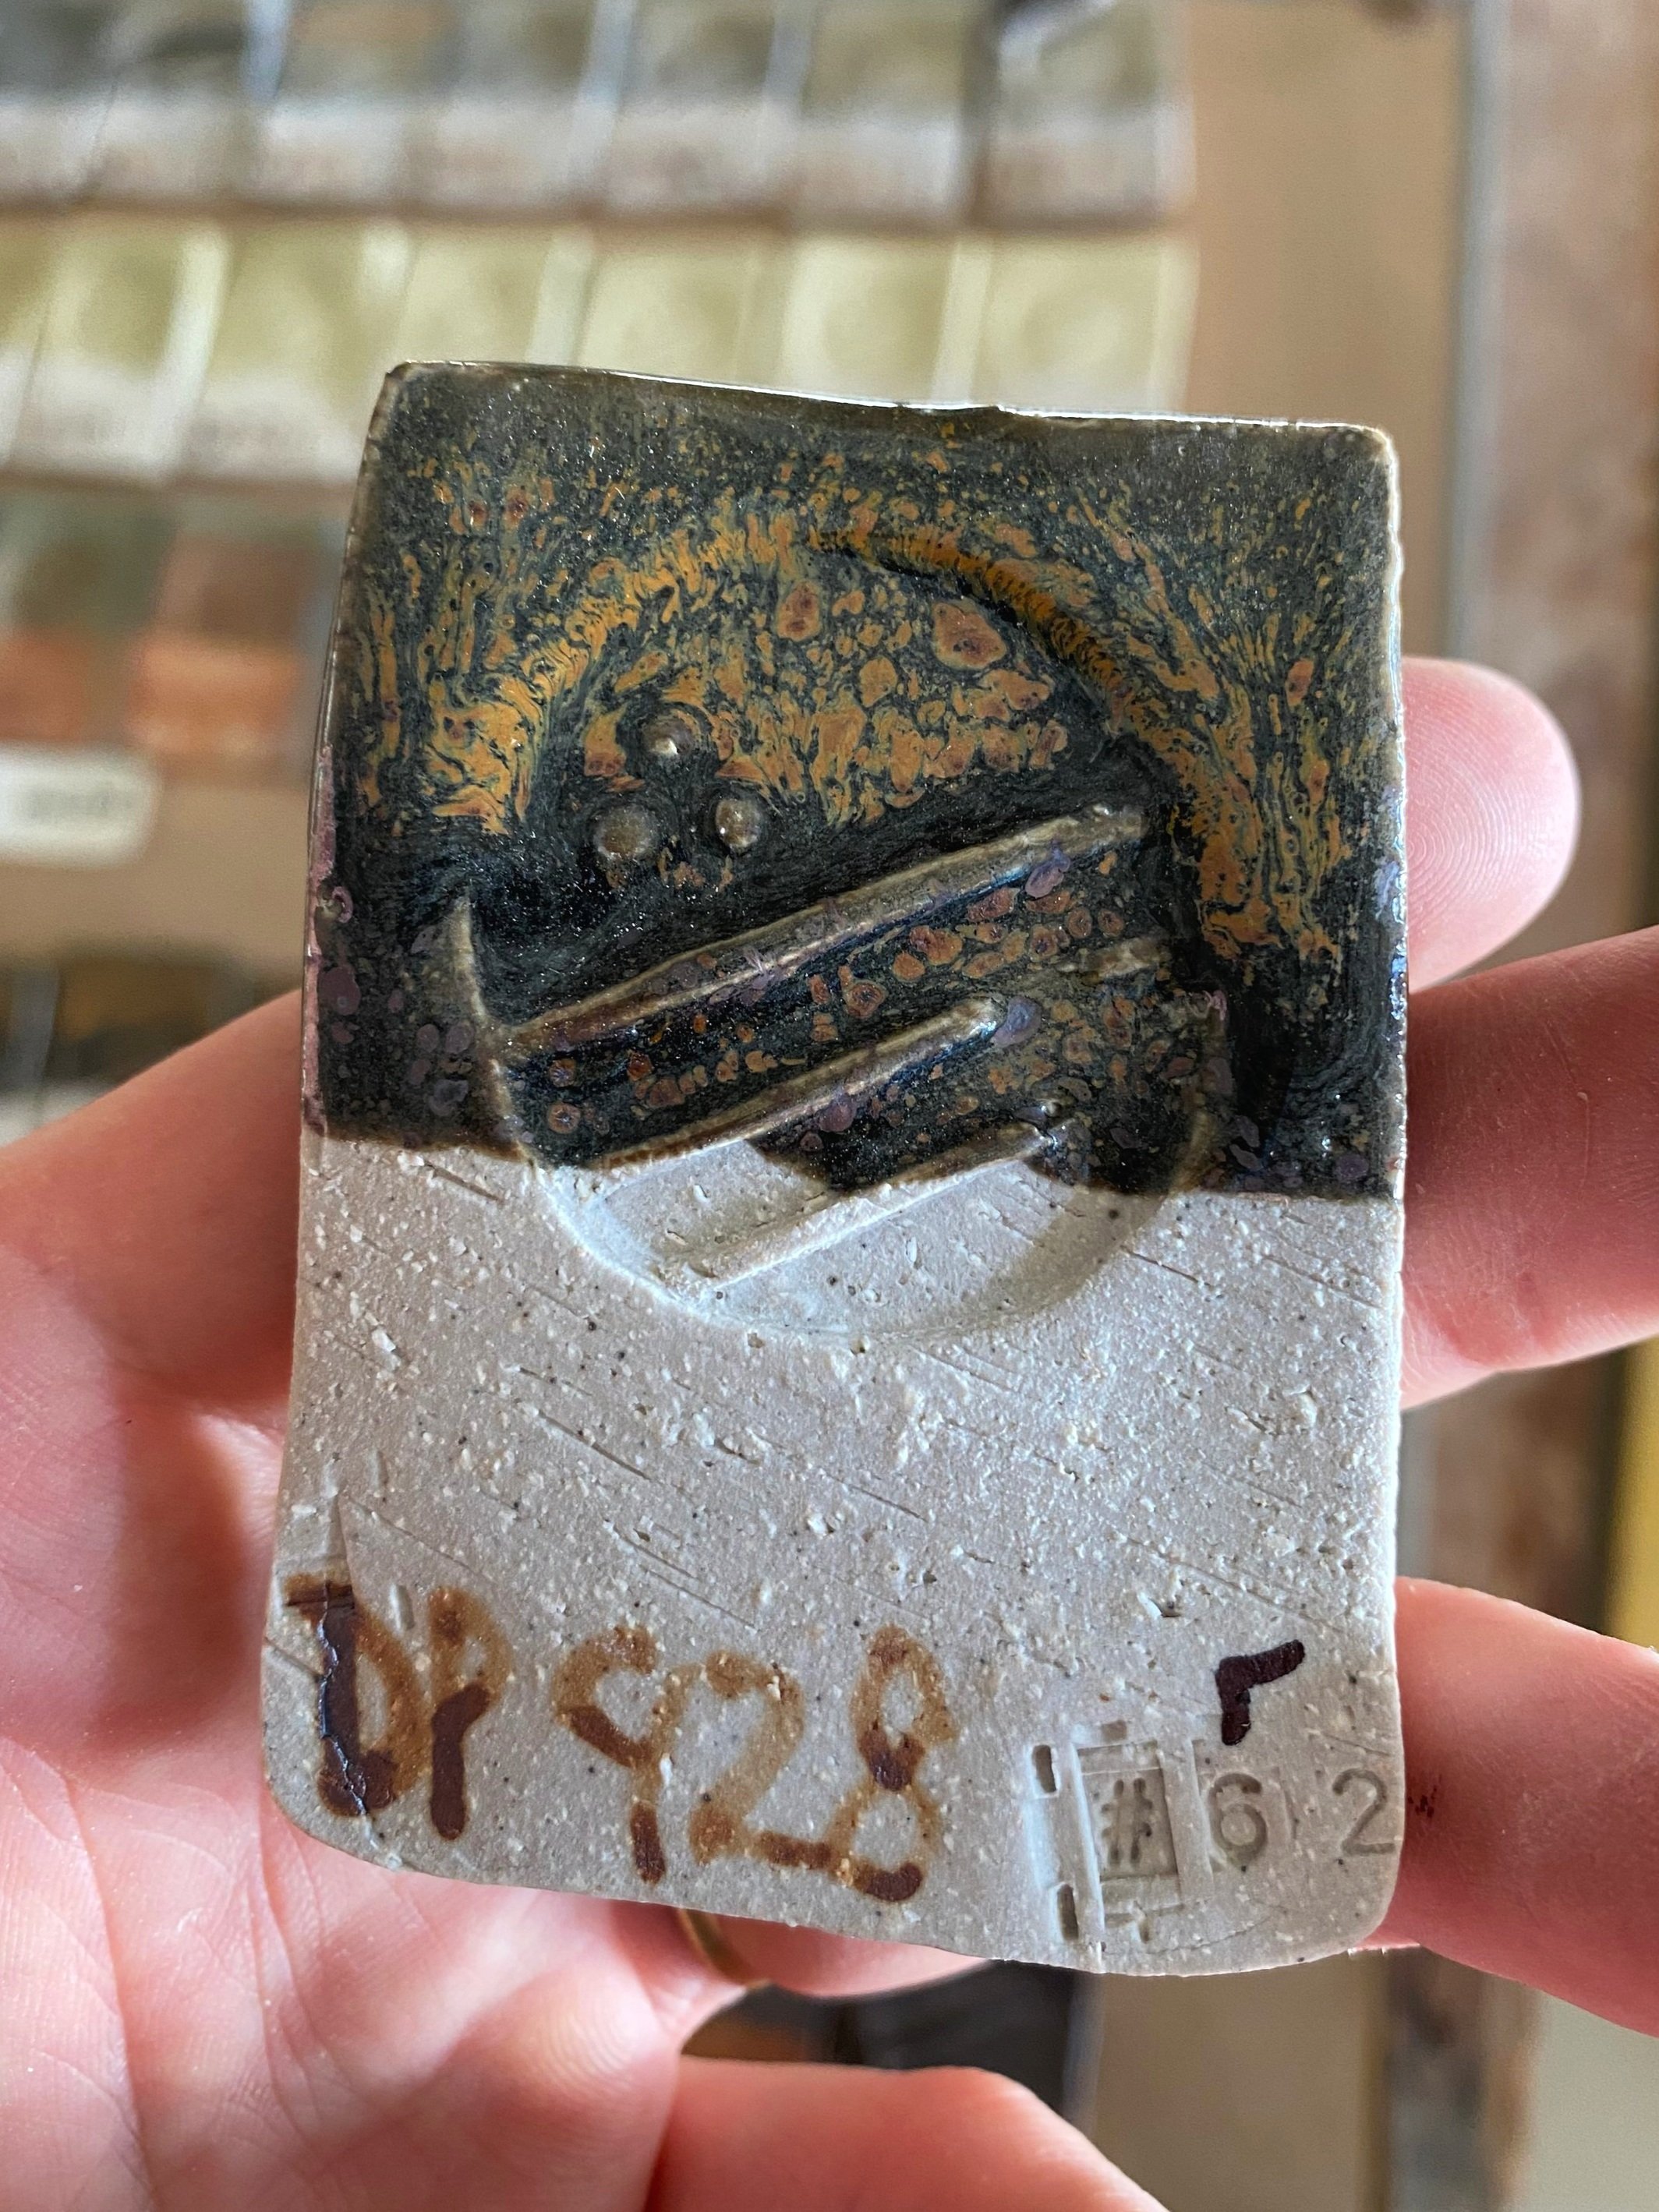


There were some pretty exciting results from this set. In reduction, that is. The action was all in reduction. Without iron added I got some interesting kind of goldish tones on mostly cream DP921-3. But when I added the 4% iron things got wild. All the way from 5% zinc oxide up to 50%, there were interesting flecks and colors happening. I will be experimenting more with this!
Next up is petalite (another lithium bearing material)…


The results here were very similar to spodumene, similar to minspar and custer feldspar as well. Nothing that interesting really.
Next up we have magnesium carbonate…


I was not expecting these results. Heavy crawling effects! I did not know when I ran the test that magnesium carbonate is often used to make glazes that crawl in a big way. This is not what I am going for right now, but could be interesting on a sculpture or something like that. One interesting thing to note is the difference between the oxidation and reduction firing.
You can see this in the tile DP 943 above. The reduction firing cycle is much longer than the oxidation cycle… this lead to a difference in the crawling effect. In the oxidation tile, it is more pronounced: the glaze cooled before it had a chance to melt over and heal. This healing started to happen on the reduction tile. We also see more of the crawling effect in the set without iron. The extra flux of the iron caused more melting in the glaze and less crawling.
Okay! Last one! End on a bang! Here we have the lithium carbonate addition…


I made full sets of these lithium carbonate tests but most of them physically broke. The glazes aggressively did not fit. Steer clear of lithium carbonate! John Neely told me that lithium carbonate has a very low thermal expansion; negative thermal expansion, even. So it just will not fit a normal clay body. Perhaps a flame-ware body might accommodate lithium carbonate.