
Sawing Wood
I awoke this morning to a bright crisp November day. I could
see the leaves sparkling yellow from the window above our sink, a tiny
squirrel munching bird seed underneath. My first thought was to get my
air rifle and attempt to dispatch it, but Lauren dissuaded me and we
watched it instead.
Mike Finch informed me a few days ago that as soon as we got a break in the rainy weather I would be out cutting wood for future firings. The local saw mill who supplies us with wood (mostly pine) is set to deliver soon, so a space needed clearing.
It was an excellent day to be working outside, even with such an antiquated circular saw. Until coming to Winchcombe I didn't even know you could attach a saw to a tractor.
Here is my day in pictures:


And here is a short video of the operation in motion.
And finally a picture of the Lauren the beautiful camera lady, who helped out filming and picture taking despite it being her half-birthday (!!!) and having the manuscript of her novel to edit.

Mike Finch informed me a few days ago that as soon as we got a break in the rainy weather I would be out cutting wood for future firings. The local saw mill who supplies us with wood (mostly pine) is set to deliver soon, so a space needed clearing.
It was an excellent day to be working outside, even with such an antiquated circular saw. Until coming to Winchcombe I didn't even know you could attach a saw to a tractor.
Here is my day in pictures:
 | |||||
| Essential tools: gloves, goggles, helmet with visor and ear protectors. |
 |
| Some of the wood to be cut up. |
 |
| Making a start in the morning sun. |
 |
| "Watch out for those fingers Hamish." |
 |
| For some of the thinner pieces it was easier to push them through from one side. |
 |
| Cutting up the off cuts for the workshop fire. |
 |
| Chucking the offcuts on the pile. Very satisfying. |
 |
| Me and my piles. |
 |
| Would it make Svend Bayer proud? Probably not, but a good stack nevertheless. |
 | ||
| Happy to still have all of my limbs and digits. |
And here is a short video of the operation in motion.
And finally a picture of the Lauren the beautiful camera lady, who helped out filming and picture taking despite it being her half-birthday (!!!) and having the manuscript of her novel to edit.
MIxing Clay
Gone are the days when the clay was dug on site at Winchcombe
Pottery. It was a lot of work to achieve a clay body which contained
lime so tended to blow out during firing. Today the clay is mixed on
site but comes in powdered form from Devon and Cornwall.
Mixing the clay is very much like making a cake batter. Indeed, the machine we use used to be a dough mixer in a bakery. I cannot divulge the exact recipe but can show the ingredients and process.
It starts with the iron oxide.
Whilst the mixer is off tip a few bags of clay in. Turn the mixer on. Add the sand.

After a couple of minutes dry mixing add the iron oxide and water. Add a little more water if necessary. Judging how much water is important as it directly impacts how soft or hard your clay is.
It is easier to mix the clay stiffer at this point and if you need to make it softer then add some recycled (sloppy) clay later, when you pug it. Using differing amounts of the stiff and sloppy clays you can get any consistency you need.
Once it has mixed for 10/15 minutes perhaps, it will
hopefully be almost all mixed in to the point where you can't see big
lumps of grey clay. Turn the machine off and start chucking it onto the
slate bed. You can see this in the picture below. There was no clay
there at the start of the day. I wish I had taken a picture then as now
you probably won't believe me. I did the clay mound on the right first.
It is made from recycled clay which Mike Finch uses to make plates
(after its pugged). The clay on the left is much stiffer, more useful
for cylinders.
Time for a beer.
Oh but here is a short video of the mixer:
I
do feel like this is a very boring video, and perhaps not worth the
effort of uploading it to youtube, but anyway, its done. Now the whole
world can see it in action!
Mixing the clay is very much like making a cake batter. Indeed, the machine we use used to be a dough mixer in a bakery. I cannot divulge the exact recipe but can show the ingredients and process.
It starts with the iron oxide.
 |
| Okay, you found the bag. |
 |
| Now weigh it out. |
 | ||||
| Mix it thoroughly. This lovely machine does this part for you whilst you get everything else together. |
 | |
| Separate scales for the sand. |
 |
| Many bags of clay. |
 |
| One bag of clay. |
Whilst the mixer is off tip a few bags of clay in. Turn the mixer on. Add the sand.
After a couple of minutes dry mixing add the iron oxide and water. Add a little more water if necessary. Judging how much water is important as it directly impacts how soft or hard your clay is.
It is easier to mix the clay stiffer at this point and if you need to make it softer then add some recycled (sloppy) clay later, when you pug it. Using differing amounts of the stiff and sloppy clays you can get any consistency you need.
 |
| A still of the mixer mid mix. |
 |
 |
| The end of the day. Clay piled up good and high. |
Time for a beer.
Oh but here is a short video of the mixer:
The bathroom of our dreams.
Whilst I was working in the pottery on Saturday Lauren decided to take my bathroom make-over to the next level. Here it is:
Tomorrow I shall post on the wonders of mixing clay.
 |
| Our new and very white shower. |
 |
| Just beautiful. |
Tomorrow I shall post on the wonders of mixing clay.
I thought now was a good time to do a few posts on some of my other duties at Winchcombe Pottery. It is not all producing four inch bowls (and now beakers). In fact, its mostly not.
Here is a list of the jobs that spring to mind: lighting the fire in the workshop, stocking the shop, serving customers in the shop (when they ring the bell), packing up orders, tidying, cleaning, moving and chopping wood, mixing clay, pugging clay, scraping off bats, packing and unpacking kilns, preparing the kiln shelves with alumina, sorting kiln furniture, mixing glazes, sieving glazes, glazing and fettling, grinding down pots, pressure hosing down the floor, strimming undergrowth, removing tree limbs. Oh and helping set up Ray Finch's old room as a teaching space.
It would take me a long time to document all of that and there is probably no need. Not sure anyone wants to see me pressure hosing a floor. But I'll do a few anyway.
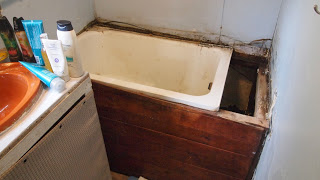
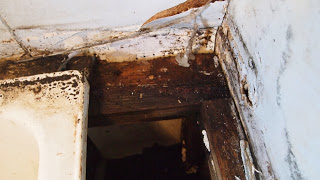
But before that, some bathroom pictures! The wooden sills around our shower/bath thing weren't sealed, so water was leaking down and through the wall into the bedroom. Bad news. So I removed the wood. Here is what I found.
A mushroom I found hiding under the rotting wood.
Further horror.
As you can see, bathroom maintenance is also part of living at the pottery.
It still smells of weird rubbery plastic in there. I just need to varnish or paint the back piece and it will be complete. I don't think its bad for my first forray into the world of luxury bathrooms.
Here is a list of the jobs that spring to mind: lighting the fire in the workshop, stocking the shop, serving customers in the shop (when they ring the bell), packing up orders, tidying, cleaning, moving and chopping wood, mixing clay, pugging clay, scraping off bats, packing and unpacking kilns, preparing the kiln shelves with alumina, sorting kiln furniture, mixing glazes, sieving glazes, glazing and fettling, grinding down pots, pressure hosing down the floor, strimming undergrowth, removing tree limbs. Oh and helping set up Ray Finch's old room as a teaching space.
It would take me a long time to document all of that and there is probably no need. Not sure anyone wants to see me pressure hosing a floor. But I'll do a few anyway.
But before that, some bathroom pictures! The wooden sills around our shower/bath thing weren't sealed, so water was leaking down and through the wall into the bedroom. Bad news. So I removed the wood. Here is what I found.
 |
| I really didn't want to look too closely in that hole. Lots of spiders webs. |
 |
| Lovely. |
A mushroom I found hiding under the rotting wood.
 |
| I don't think its edible. |
 |
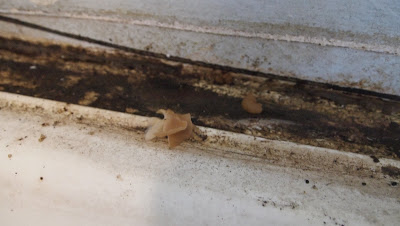
| A slug who also thought its home was the bathroom. Its not even native. |
As you can see, bathroom maintenance is also part of living at the pottery.
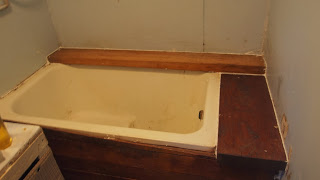 |
| Here is the freshly sealed effort. |
My heart is still beating quite fast. I just got out of the shower and stepped on a bee. I didn't know bees were still about-its November! Thankfully for me I must have stepped on his head and not his tail. I came out unscathed, he is writhing on the rug. I should probably dispatch him.
Okay, that's done, slippers on.
I forgot to put up some pics of the four inch bowls toasted little bottoms. Here they are, with a couple of right way up close ups too.
 |
| You can really see where the flame from the wood has hit the pots |
 |
 |
| I like how the iron in the slip bleeds rusty brown. |
 |
| One final blue slipped bowl. |
Four Inch Bowls, Step 8. Finishing touches.
Right. The kiln is cool enough to crack open. Do it. The four inch bowls are nearly finished!
They may well be stuck together, especially if you have stacked them up. A good way to prevent this is alumina in between each foot, but the bowls rim to rim often stick anyway.
If you have not cleaned the rims off well enough and a blob of glaze is attaching the two pots you may be in trouble. Soaking in hot water can aid them releasing.
Once this is done, you may find some sharp bit on the rims or bits of flakey kiln shelf stuck to the bases. This can be remedied with a carborundum stone.
You rub the stone along the rough or sharp area and it wears it down like sand papering wood. This can take anywhere from a few seconds to a few minutes, depending on the blemishes.
Right then. Here we are. Finally. Below are some of my finished four inch bowls.


Excessive number of pictures but I feel like its been a long road getting to these finished bowls.
You will be pleased to know that I have now actually left four inch bowls and moved on to making beakers. I have only made 30/40 so far. They are a whole different kettle of fish.
They may well be stuck together, especially if you have stacked them up. A good way to prevent this is alumina in between each foot, but the bowls rim to rim often stick anyway.
 |
| A stack of stuck bowls. |
 |
| This is the device for separating your bowls. It is essentially a stick. |
 |
| To get them apart you just hit them with your stick. |
 |
| Usually you only need to hit them gently though. |
If you have not cleaned the rims off well enough and a blob of glaze is attaching the two pots you may be in trouble. Soaking in hot water can aid them releasing.
Once this is done, you may find some sharp bit on the rims or bits of flakey kiln shelf stuck to the bases. This can be remedied with a carborundum stone.
 |
| A fresh carborundum stone |
 |
| The stones after some use. |
You rub the stone along the rough or sharp area and it wears it down like sand papering wood. This can take anywhere from a few seconds to a few minutes, depending on the blemishes.
Right then. Here we are. Finally. Below are some of my finished four inch bowls.
 |
| Blue slipped with a matt white (more like shiny white) glaze over the top. |
 |
| These ones were slipped with an iron slip, combed and then covered with a celadon glaze. |
Excessive number of pictures but I feel like its been a long road getting to these finished bowls.
You will be pleased to know that I have now actually left four inch bowls and moved on to making beakers. I have only made 30/40 so far. They are a whole different kettle of fish.