

Pots and Skeletons in the Actun Tunichil Muknal (ATM) Cave, Belize.
A visit into the deep, dark ATM Cave in Western Belize near San Ignacio. All about our adventure seeing the archeological artefacts, skeletons, pottery and incredible stalactites and stalagmites of the cave.

Lauren and I recently went to Belize for two weeks. I was surprised by the wild mix of cultures there—I encourage you to read about the country's history here. Belize today has Creole, Maya, Garifuna, and Mestizo cultures; there are also Mennonites who are of German descent. Every bus we went on blared out a mixture of reggae and calypso music. The staple food is rice and beans with Jamaican style jerk chicken (we ate this a lot). Queen Elizabeth II is still the symbolic head of state, and sits on the currency, but Belize became an independent nation in 1981. The people we met seemed grateful for Britain's continued involvement, especially in fending off the Guatemalan government's threats (it has been trying to claim Belize since its independence).

Photo credit: https://letsgetdealstoday.com/actun-tunichil-muknal-cave-a-journey-into-an-ancient-mayan-underworld/
On May 12 (Lauren's 29th birthday, no less) we decided to go underground, into the depths of the Actun Tunichil Muknal (ATM) Cave in Western Belize, near San Ignacio. Actun Tunichil Muknal translates as "Cave of the Stone Sepulcher." If you are thinking about Indiana Jones already, then just wait. The ATM is an hour's drive from San Ignacio, or 45 minutes from a fabulous hostel we stayed at called Lower Dover (hands down the best place we stayed and tastiest meals we had on our trip). You pass through a small village called "Tea Kettle" on the way, which made me inordinately happy. Once you park up, it's about an hour trek through the jungle, including two rivers which you have to swim across. This means that you can only access the cave certain times of the year. We saw several snake tracks crisscrossing the trail en route, as well as a massive tarantula in a tree hollow.

Photo credit: http://discovermagazine.com
Once we reached the cave mouth, there was a last opportunity to pee and soak up a little Vitamin D before plunging into the turquoise waters. Once inside the initial opening, you are mostly wading though knee to chest-deep water all the way through the cave (thankfully the water wasn't too cold). I found all of these pictures on the internet by the way, as we weren't allowed cameras in the cave. For good reason, I might add—in 2012 an ancient skull was broken by a tourist dropping his camera on it.
Photo credit: https://www.cahalpech.com/blog/5-weird-facts-about-actun-tunichil-muknal-cave/

Photo credit: http://www.vengavalevamos.com/atm-cave-belize-maya-mysteries/
The cave was rediscovered in 1989, and opened to the public in 1998, although archeological research continued until 2003. Our guide told us that for the Mayan people, caves were seen as a liminal space between life and death, an underworld. You can believe it when you see the gigantic stalactites hanging from the ceilings, bigger than most church organs. We know now how these were formed—through the slow process of calcium carbonate eroding from limestone above and dripping down into the cave below. But to people hundreds of years ago, these structures must have seemed supernatural.

Photo credit: http://resort-blog.grandcaribebelize.com/wp-content/uploads/ATM-Caves-3.jpg

Photo credit: http://discovermagazine.com/2014/dec/15-cave-of-the-crystal-maiden
At a certain point, after swimming, scrambling, and squeezing your way deep in the cave, (over 3km) you get to a large boulder and steep ledge (pictured on the right). Our guide helped us climb over it, into the entrance to the inner cavern, where the majority of the archeological finds have been made.
We were instructed to leave our shoes behind, before entering a vast chamber. The room felt like a great hall, or a cathedral, and led into several other large chambers. As we walked through, our guide pointed out the multitude of human bones scattered around.
The cathedral is pictured below. You can see how the water has flown through the chamber, forming the undulating pattern on the floor. We were told to walk on the ridges as these are harder deposits of calcium carbonate, and the troughs between them are where many artefacts have been found.

Photo credit:http://discovermagazine.com/2014/dec/15-cave-of-the-crystal-maiden

Photo credit: https://www.cahalpech.com

Photo credit: https://barefootservicesbelize.com/atm-cave-in-belize/
We know that human sacrifices were performed in the cave. Fourteen complete skeletons have been found to date; seven adults and seven children, and many more partial remains. Most were killed with blunt blows to the head. It is believed that these were ritualistic killings performed in an attempt to please the gods during a particularly brutal drought. Geologists have found that there was a 60-year period preceding 811AD during which almost no rain fell in the region. It's estimated that Belize had a population of about two million people prior to that time; now, it has fewer than 400,000. The landscape was likely much more deforested than it is today, and geologists surmise this may have had an impact on the sudden lack of rainfall. A more detailed discussion of this history can be found here.
Whilst other factors such as disease could have been involved, the severe drought was likely the main cause of the collapse of the Mayan civilisation. Imagine entering the cave during that time to find water still percolating through the ceiling and dripping all around. You can see why they equated the cave with a life-giving force.
One particularly gruesome skeleton is the "crystal maiden"; she was an 18-year-old whose heart was removed (or at least that's what it seems like as two of her vertebrates are broken apart). Over time, she has become covered in beautiful, fine sparkling calcium carbonate deposits. This photo doesn't do it justice. I couldn't help but think of Indiana Jones in there—it was surreal, and there are few barriers between you as a tourist and these crystalline bones.

Photo credit: www.jmbelizetravel.com

Photo credit: tripadvisor
Whilst these skeletons are hard to accurately date, we do have other human evidence left behind. Pots! Of course! Only a fool goes wading into the depths of the earth without a picnic. I had heard before we went that there were pots down in the cave, and that was a main reason for going, but I was not prepared for the amount of pots or the scale of them. There were shards of pots all over the main hall, I'm not exaggerating. Archeologists have found and cataloged over 14,000 artefacts down there. They have been dated to between AD250-909, mostly in the latter end of that age range. This supports the hypothesis of links between the drought and ritual use of the cave as the Mayan civilisation was collapsing.
Mostly the pots were in clusters, around the sooty remnants of fire pits and fireplaces in the large chambers. It almost seemed like campsites left by unruly teenagers, empty beer bottles strewn around for someone else to clear up.

Photo credit: http://www.duplooys.com/caves/

Photo credit: https://internationalliving.com/stalactites-and-skeletons-in-belizes-mayan-underworld/
I was fascinated by the pots, not least because of the size of some of them, and how thin the wall thickness of many of them were. They are really nicely made—wood fired, earthenware pots. Archeologists have tested them and found residues of food on the insides.
Having barely scraped my way into the cave, I can't imagine how they got these pots full of corn or rice or other supplies into the cave in one piece.

Photo credit: www.jmbelizetravel.com/actun-tunichil-muknal.html

Quite a few of the pots were complete and in very good condition. We saw them placed all around the chamber, often underneath stalactites, presumably to collect water. We tried some of this water at one spot (upon our guides suggestion) and found it quite delicious—filtered through the earth and limestone.

Photo credit: www.dontforgettomove.com/exploring-atm-caves-in-belize/
Many of the pots appear to have been intentionally broken and are marked with "kill holes," suggesting that they were used in sacrificial rituals, too. Here is an article about kill holes—basically they are pots with intentionally pierced holes in them, though we're not entirely sure why. It would seem silly to me to carefully juggle pots and a lit torch into the depths of the cave, only to smash them, but hey, I'm a potter and not a shaman.
I couldn't believe we were allowed to be so close to the artefacts. Unscrupulous individuals could easily take pieces of pots out without anyone noticing. Our guide told us of one person he took in who came out rattling, pockets filled with shards. They need a better protection policy.
Look at the beautiful surface and rim on this pot:

Photo credit-Kate Brunton: http://yourshot.nationalgeographic.com/photos/2338436/

Photo credit: www.islandexpeditions.com/belize-vacations-blog/5-highlights-ultimate-adventure-trip-belize
Most of the pots were large, round storage and cooking vessels but there were a few other shapes around, too, such as these bowls:

Photo credit: www.cahalpech.com

Photo credit: https://eternalarrival.com/travel-blog/north-america/belize/atm-cave-actun-tunichil-muknal/
Possibly the most curious pot in the cave is this one (to the right and below). This monkey decoration has only been found on four pots, located at various sites across Central America.
I was not able to find much information about these monkey vessels—if anyone knows, let me know!

Well, that's all for now. We got out of the cave alive, dried off, and had a delicious lunch of rice, beans, salad, and plantains. Hope you can sleep tonight!
Interview with Takuro Shibata at the 'Wild Clay' show, StarWORKS N.C.
Interview with Takuro Shibata all about wild North Carolina clays, how he got StarWORKS clay started and some specifics of how to formulate your own clay body and deal with defects in it.
A few weeks ago I went back to StarWORKS and re-visited the Wild Clay Show, which is on display there. The show opened at the International Wood Fire Conference (WOODFIRE NC), which I covered in depth in my last blog post. It was nice to take a closer look without so many people about, and I was lucky enough to be able to interview Takuro Shibata about the show. Takuro set up and runs STARworks clay business whilst also managing to make lovely pots at their place (Studio Touya) with his wife Hitomi.
In the interview I also asked Takuro some specifics of making a successful clay body, his interest in wild clay, and how the StarWORKS clay factory got started, amongst other things. First, I've put up some pictures of the show and then below laid out a transcription of our interview. I think this is one of those rare situations where the words are actually more interesting than the pictures.
Oh and also, if you are a potter and haven't tried any of STARworks clay then you should give it a go, its beautiful stuff!


I meet Takuro at the Wild Clay exhibit after two very engaging artist talks by Tony Clennell and Dan Finnegan. 'Wild Clay' is in a large industrial-scale room with the previous year's FIREfest sculptures along one wall and an imposing installation by Daniel Johnston on the other side. There are people next door noisily grinding and polishing glass. The crunchy screeching sound bounces off the tall ceiling and reverberates around us. I ignore it and dive in...
HAMISH: So how did the 'Wild Clay' show come together?
TAKURO: It was a group effort between Steve Blankenbeker of Taylor Clay Products, Josh Copus, Michelle Flowers, Michael Hunt, Fred Johnston, Hitomi Shibata, Takuro Shibata, David Stuempfle and Erin Young, as well as many others who helped out along the way. Dave Stuempfle came up with the idea originally and then worked with us all to put it together. It was fun. We had a smaller version at the Pottery Centre and then expanded it for WOODFIRE N.C. We could do more I think. Josh worked really hard on these pieces (he points to the 'Clay Landscapes').
H: Seeing this show and your talk on wild clay got me really excited about digging my own materials.
T: Yes, that would be fun. I hope more people get interested in wild clays and local materials. It depends where you are as to what you can find. Out in Utah, there are many different minerals which are good for using in glazes, and then in some areas you can find earthenware clays. Around here we don't find much earthenware clay, but there is much good clay for stoneware potters. We might be able to find earthenware clays because there has been a tradition of this pottery in North Carolina, but we haven't found it yet.
H: How did you get started? How much clay did you make the first year?
We came here in 2005 and no, nothing, no clay making. We had to find the sources first. And see what we could do. Many people helped us get going, including Mark Hewitt and Steve Blankenbaker. To begin with, we talked to Highwater and distributed their clays, because we had space and many people use that clay. We set up some equipment. Maybe in 2009, we started actually making our own clay bodies. I thought initially that we could sell a body based on Mitchfield, but not many people liked it. You need to make clay that is ready to make pots. Our first clay was 100% Cameron, just to test the equipment. We had a lot of set up and testing. Local clays are so different too from commercial clays. People were nervous at first. Some didn't even want to touch it!
H: It seems like Steve Blankenbaker has been very helpful in finding clays...
T: Yes. Steve is the clay man. He really knows which clay might be good for potters to use. When he goes out with his team to collect clay he gets the very best parts and separates them out for us. He gives us the best of the best.
H: Coming from Shigaraki, famous for its coarse clay, did you want to try to find a similar clay body?
T: Oh, no, not at all. I don't look for Shigaraki clay here. Everywhere you go you can find clays unique to that area. I wanted to try in North Carolina. I was kind of hoping we would find something. In Massachusetts, we couldn't find any local clay to touch, but in Virginia we found some. Then when we came to Seagrove and found some local potters processing their own clays; this was so exciting for us. Why are people not interested in local clay? That was my question in the beginning.
H: What does a commercial clay manufacturing process look like? How does it differ from what you do here?
T: Most companies buy processed commercial powdered clay and dump them into a big mixer, adding water and there, that is the clay. The materials are already fine. It is much quicker and less work for the clay company, because half of the process has already been done by the mine. It is much more convenient. But you don't have too many choices, because big mines are limited. If you go to Massachusetts or Florida, or another part of the states, most people are using the same sources of clay. Probably their recipes differ a little bit -- you might have a little bit more red art or gold art or om4, for example. There isn't much regional uniqueness in commercial clays from the south to the east coast to the west coast. The clay of North Carolina is different than the clay in other parts. Some of the clays we have here are basically self glazing though, like the Mitchfield. It has so much silica in it. The Cameron has lots of silica too. Generally it seems like the local North Carolina clays have higher silica than most ball clays or commercial clays. It is fun to use the local clay. It gives a distinct character to the pottery.
H: I totally agree. Also, if you dig your own clay, it's free.
T: And it is more unique!
H: Yeah, I mean, to know this was from my back garden or a stream down the hill -- I think that is so much better than buying commercial clays made with powders from mines all over the world. Maybe I am just romantic.
T: No, I think it would be fun if more people used more local clays and local materials.
H: And that's how it was in the old days wasn't it?
T: Yes, exactly. Pottery villages pop up where there is an abundance of local materials fit for making pottery. In Japan, all the pottery villages were built on clay. They found good clay and started making pottery. Clay comes first. Then they tried to fire the clay and figured out the best way to use that clay. In Shigaraki for example, they need to fire hot to get the flashing and ash to melt, but in Bizen they cannot fire that hot. They have to fire slower and to lower temperatures to make beautiful functional pots. That is fun! They are aware of there own uniqueness.
H: It is a kind of language...
T: Yes; they have an entirely different way of firing and different styles of kilns, all because of the clay. But here, you go into a ceramic supply shop and say, "I have to get a cone 10 clay..." (laughter). No, the clay you dig from the ground might need to be right fired a little bit lower or a little higher. You can try different glazes on it. For me it is very interesting to figure out how to best use the materials that we have around here. I think those regional differences help artists, too.
H: I think a lot of people are becoming more and more interested in using local materials in all walks of life. But it seems like your clay business is going really well. Are you providing clay to an ever-growing list of potters?
T: Yes it is going well, but it is also a big responsibility, supplying these potters. I get worried when I see potters firing their big kilns on Facebook. It is so scary to me. It used to be that the clay maker did not see all these kilns being opened. But now, you really see. It's a lot of responsibility, but we are trying our best. And the clay is changing, as it's natural. It's always challenging.
H: How close to full capacity do you think you are?
T: It depends on equipment and how many people we have working. Eventually we will be at capacity, unless we get more equipment. But we want to keep the quality good, too, so if we got too big, that's more difficult to manage, too. If we can keep the business healthy, providing clay to local artists, then, that might be a good thing -- not necessarily having too many people working.
H: But you haven't turned anyone down yet?
T: No. Not yet. We are trying to make more. Yes. We will see. We can increase a bit more.
H: So I recently mixed my own first batch of clay with Stillman (my fellow apprentice at Mark Hewitt's Pottery) and learnt a lot in the process. To begin with, it was not very plastic, but as it aged it grew more workable...
T: All of your clay particles need to get really wet. The best way is to mix it from dry into a slip. Then dry it out again. But it still takes time for the water to fully penetrate into the clay particles.
H: Do you think pugging adds plasticity, kind of like how kneading bread adds gluten to the dough?
T: No, but using a de-airing pugmill and letting the clay sit in a vacuum does help. If you take dry clay and add it to water and then try to throw with it straight away, then it will not be plastic -- there is still so much air in the clay. When you let it sit, it completely changes. The pug mill saves your wrists and also time.
H: We threw some of the wild clays you use on their own and the differences were staggering -- the Catawba was super plastic and threw like a dream, whereas the Mitchfiled was terrible -- full of rocks and would just rip apart on the wheel...
T: [Laughing] Yes, well, you should try a 50/50 mix of the Mitchfield and Okeewemee. They are both very difficult to work with individually, but when mixed together, you can make anything you like. You can throw cups really thin. You can easily throw things too thin because it throws so well.
H: Really? That is so weird to me. It reminds me of "eutectics" in chemistry (where you add two materials together and the resulting melting point is wildly different from either of them individually)...
T: It has a lot to do with the size of the clay particles. You would think a 50/50 blend of Catawba and Okeewemee would be a good blend, because Catawba by itself is so plastic, but you would be surprised. It is awful clay.
H: So you recommend 50/50 mixes of different clays as a good starting point for making a clay body?
T: Definitely, 50/50 tells you a lot. It tells you which clays would be a good combination because some are really bad. I try to find out the good combinations and then I use that as a base. If I still need to have a little bit more color, I might add some Okeewemee. Or sometimes we need more silica for the firing, so we'll throw in some more Mitchfield clay. Most of these clays are very high-temperature, so you can add feldspar to lower the firing temperature. The mesh of the feldspar also makes a difference. 200 mesh can help. This makes clay sometimes easier to work with if it's cracking. Cameron by itself can crack in the firing. But first you need to know each individual clay character, then which combinations work. Like mixing the Mitchfield and Okeewemee; you may find it's fantastic. Wow, you would not have expected that!
H: We sieved our first batch of clay pretty coarsely, trying to keep a lot of the natural rocks in the clay. I found it much more abrasive than the clay I'm used to -- it made throwing a batch of cereal bowls almost painful. But I like the look of the trimmed feet a lot...
T: When I was learning in Shigaraki, the clay was very coarse. When one of my teachers would make flower vases, he would wear a glove. I thought this was kind of interesting, because it must be hard to feel the clay as he was throwing. He knew how to throw already and he didn't want to scratch his hand too much. If you can make good pots with a glove, it's fine! The glove could be one tool, if you want coarse rocks to show up in your pots.
H: How do you deal with defects such as bloating in clay bodies?
T: It's all a balance. Some clay shrinks more, so you are more likely to get cracks. This is why our sculpture clay has less clay in it and more pre-fired elements; so it shrinks less. If the body has a good balance of particle sizes then even if it shrinks a lot it will be less prone to cracking. Also, with non-plastic clays, water will migrate through the body much faster -- one drop of water on a block of really unplastic clay will cause it to totally fall apart. This is really important when you are using slips or raw glazes. Plastic materials stop water migrating through the clay. An extremely fine clay like bentonite will stop the migration of water almost entirely.
H: When you first got going, did you only have a few clays to play with?
T: Yes, when we started we only had Cameron and Okeewemee. That was it. If you have just these two, you can't do much, which is why in the beginning we had to add some Foundry Hill Cream or other powdered clays to make it work. Which was okay. I mean, it wasn't using 100% local clay, but if you have to use some commercial clay, that's okay. Our goal is to make 100% North Carolina clay bodies. 100% is more unique, but sometimes, with sculpture clay, the purpose is different. It should be sturdy and not get too many cracks. That's more important. We should use grog instead of rock, for instance, because grog is already fired. The rocks in the clay will expand and contract more. Grog is more stable. Silica rocks can cause problems, but for making pots, that could make them more interesting in terms of texture and character.
H: Alright, well, that was fabulous Takuro, thank you so much for talking with me.
T: Thank you.
WOODFIRE, NC. International Wood-Firing Conference 2017, at STARworks and the Pottery Centre in Seagrove, North Carolina.


Mark Hewitt Pottery. Firing 98 and Kiln Opening. December 2017.

Here are a few snaps from the firing...


Now on to some flatware...


On to the planters...


To end here is a great moment I captured of a customer photographing his pots in front of the compost heap.


Becoming a Beekeeper: My first year keeping bees in North Carolina.
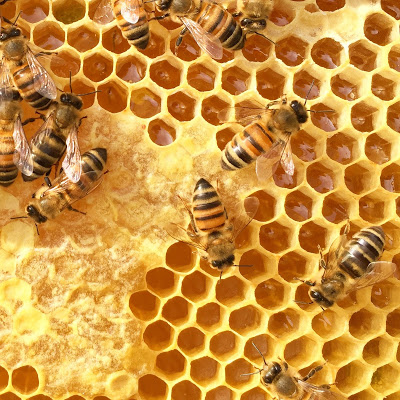 |
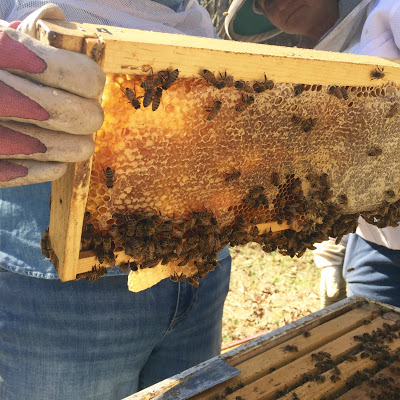
| Honey and bees! |
Local beekeepers told me to take "Bee School," a bi-annual class run nearby in Pittsboro, before getting my own hives. I was absolutely going to take this advice, but an opportunity presented itself in the fall when a chap in the association wanted to get rid of his hives. He had started them the previous spring and they were doing well, but his niece and nephew had been stung a few times. So I took the opportunity and got them.
I'll describe my first year beekeeping by the season, as it is a highly seasonal pursuit.
AUTUMN
I got the hives on September 11th 2016. They had been started off from packages in the spring of 2016. They had grown up to fill out two deep boxes and one medium each.
My master/mentor Mark and his wife Carol kindly let me put the hives on their property, down in in the apple orchard behind the pottery. I weed-whacked around the area and put down a tarp to help prevent weeds taking over and set up breeze blocks on flat spots for the hives. I wanted to expand the apiary to four hives, so I leveled and set up those spots in advance. It's nice having the hives at work as I can go and check on them at lunchtime.
A couple of friends who are beekeepers helped me move them and advised me on preparing for overwintering. In our area, it's common to have to feed the bees diluted honey water or sugar water in Autumn to make sure they have the food stores to get through winter. I didn't have to feed them much, though, as they had decent enough stores already. Moving them wasn't too bad--we did it at night, with a wire mesh stapled to the front entrance of the hives to stop any bees escaping. We tied a ratchet strap tightly around each and used a hive lifter (which clamps under the handles) to get them onto the bed of the pick up truck. The journey was only about five miles, but I was still worried all the way there!
 |
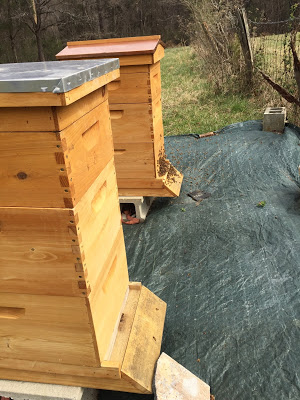
The hives in their new spot.
|
We arrived safely and placed them down carefully, leaving the hive closed for a couple of days. Once opened up, the bees reoriented themselves by flying in circles around the hive. It was pretty cool to see, but I made sure to give them some space and not disturb them for a couple of weeks, just observing from a distance.
I named the hive on the left Rosemary and the one on the right Thyme. Bees actually hate thyme oil so this was a poor choice in retrospect. I din not know this at the time. Rosemary has always been a step ahead of Thyme.
 |
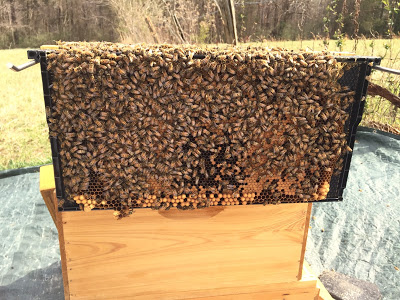
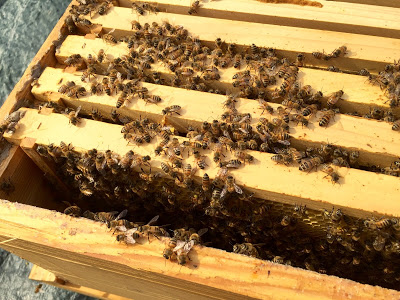
| Rosemary, in the back of the photo, building up like crazy--lots of foraging and new bees, whereas Thyme in the front is not doing so well. |
My first major mistake was being convinced that Rosemary did not have a Queen. I could not see any sign if her, nor eggs or larvae. So I found another Queen and introduced her to the hive. I introduced her slowly as you are supposed to... putting her in a cage watched inside the hive for 3 days. When 3 days were up I let her out, only to see her balled up by workers. They stung her till she was no more. It was a sad moment. The workers are very sensitive to a new Queen with different pheromones, and will only accept her if they really are Queenless. The Queen slows down laying at the end of Autumn and stops altogether in winter so this is what must have occurred: I didn't see any fresh eggs because she wasn't laying.
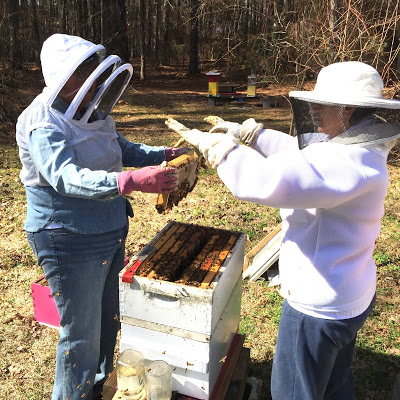 |
| Experienced beekeeper Lori Hawkins on the right describing how to pick up a frame properly. |
In early October 2016, we had a scare from Hurricane Matthew, so I prepared the hives as shown below. Thankfully the main part of the storm missed us, and the hives were fine.
 |
| Hurricane prep. |
Once the weather got cold, I pretty much left the hives alone. You don't want to open them up and let warmth out during the winter. On the occasional warm day, I had a peek in to see how the stores were holding up. It was a pretty mild winter by all accounts, apart from a couple of brutal weeks, and they came through fine, with no additional feeding. Come January/February, I gave them a little pollen and sugar to get them excited for spring.
 |
| Me and some of my ladies. |
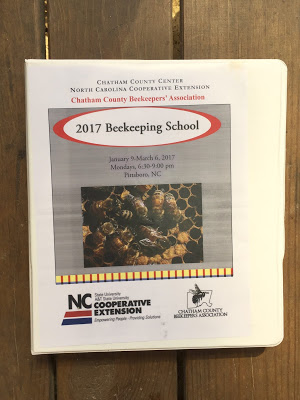 |
| Bee School secrets inside. |
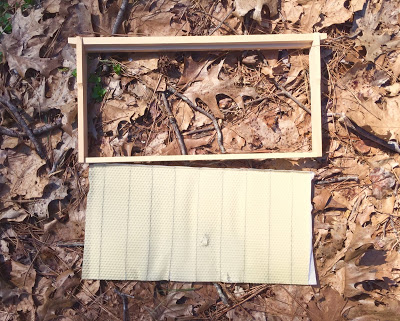 |
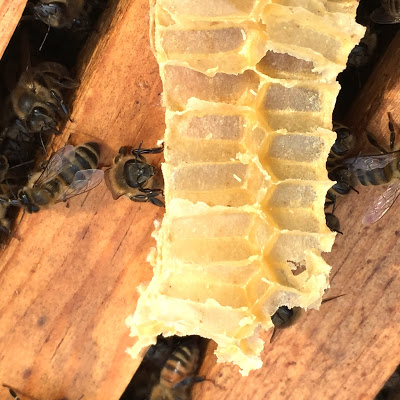
| This is an empty frame, waiting for the wax foundation to be inserted into it. This thin layer helps get the bees started building comb. They will do it on their own but it helps speed things up. |
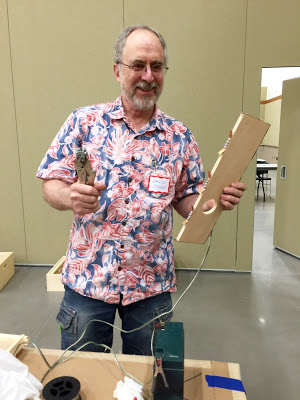 |
| This is David Jones, demonstrating his homemade device for embedding the wax foundation onto the wire supports by sending a quick blast of electricity through them which melts the wax just enough. |
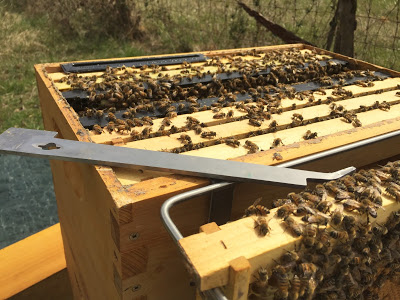 |
| My hive tool resting on the box. The scraping side is helpful to remove sticky propolis, which the bees use to glue the hive together. The hooked side helps lift frames out of the box. |
SPRING
Once the weather warmed up some (Febuary/March), the bees started going out and foraging again, and the Queens started laying eggs again.
 |
| You can see some tiny tiny freshly laid eggs in this picture--they look kind of like rice. Unfortunately the Queen laid them in between the boxes in "burr comb" which broke as I opened the hive up. |
 |
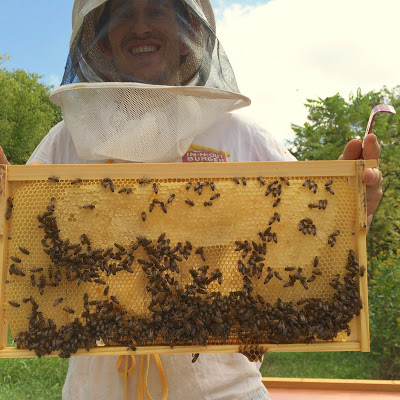
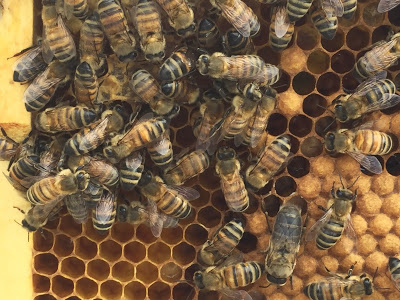
| I was very happy to find this frame-all of the filled in cells are "capped brood" which means baby bees waiting to hatch. They cap the cells 8 days after the Queen lays them and the workers emerge 13 days later. |
 |
| You can see drone brood on the bottom of this frame: the cells are slightly larger. Drones are the male bees whose only contribution to the hive is munching on food and then going off flying to try to find a Queen to mate with. |
 |
| Spot the DRONE. There is only one here. |
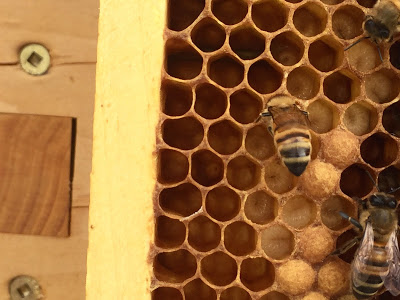
I was slow on the uptake and totally missed the signs (Queen cells) and a cramped hive. So in early Spring I had two hives with zero Queens. Bad news. But I did have four Queen cells in one hive, and five in the other. These are larger cells which the workers feed extra Royal Jelly (bee superfood) and then the egg develops into a Queen. If you have more than one emerge at the same time, they will fight to the death! If one emerges before the others then she will go and sting all the other Queen cells before they can. There can only be one Queen in any house!
 |
| You can see worker larvae developing in these cells. The bee with its head in there is a nurse bee feeding the young larvae. |
With the help of Gerald Wert--an experienced local beekeeper--we split these two hives into five, each with one or two Queen cells. I would have never taken such a dramatic course of action, but now see it was the right course of action. I only wanted four hives, but Gerald advised to make more just in case. The hope was that each of them would make a new Queen, but sadly two of them didn't take. This is not uncommon. So I combined two of the hives (one Queenless with one Queen right) and managed to procure a VSH Queen (see below) from a local supplier to put into one of them. So at the end of spring, I had four laying Queens in four hives. They were weak but Spring is the time of year when there is plenty of forage out there for the bees.
Marjoram and Basil had joined the apiary!
SUMMER
Early summer is typically when beekeepers extract honey in my area. I was all excited and ready to try in June, managed to borrow a centrifugal extractor, and had all my equipment set and ready. Unfortunately, upon full inspection it was clear that the hives didn't have enough stores for extraction. I was not hoping to take much, the hives being young and all, but it was still a tad disappointing. I could have taken a few frames from Rosemary, who was the heaviest by far, but the Queen had been up in the honey supers, laying eggs on the back of frames of honey... this meant that if I extracted that honey then those babies would be lost. I wasn't about to do that! There was literally only one viable frame, which I took and scraped out. It was enough to fill one small glass jar. It tastes good though: we've been enjoying it for breakfast (sparingly) on sourdough toast.
 |
| A frame from one of Lori's hives: it is full of capped honey and ready for extraction! |
I did a "sugar shake" to see how many varroa mites were in each hive. Varroa mites are the worst pest affecting bees worldwide (except possibly humans). They only made their way to North Carolina in 1990 but have been wreaking havoc since. Last year, 40% of all bee hives were lost in our state, and this is at least in part due to varroa mites. They spread viruses and diseases and can weaken the colony significantly.
 |
| One frame removed. |
There are guidelines for how many mites is acceptable in a hive, laid out by the state inspectors and general literature. Nine mites per 300 bees is the maximum that is acceptable. Rosemary came in at three, Thyme at 18, Basil at 10, and Marjoram at zero. There are two main ways of dealing with the mites: treating the hive, as you would if you got head lice--with a chemical that kills them--or re-queening the hive. I decided to use Api-Guard, which is a product, somewhat ironically, made from thyme. It is a soft-chemical, but a chemical nonetheless, and I felt bad about inflicting it on the bees. It is not easy trying to kill a small bug on a larger bug. Next time I think I will try re-queening with VSH Queens... these are Queens who have been bred to be "hygienic:" their offspring tend to clean themselves super well, and dump the varroa mites off them.
The treatment worked well enough--I had a significant drop in varroa mites in those hives, and the Queens got back to laying again.
AUTUMN 2017
It was just about a year ago that I got Rosemary and Thyme. I have made many mistakes not to be repeated, and am currently just giving the hives a little sugar water to make sure they have enough food to get through the winter!
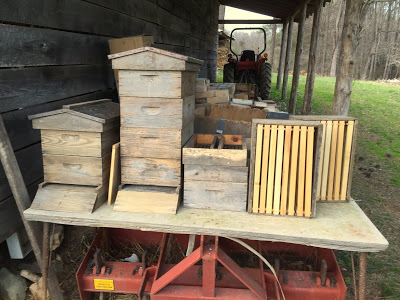 |
| Some extra equipment I managed to get at a good price through the CCBA, ready for next year. |
FURTHER MISTAKES:
It took me awhile to get over the sense of fear when pulling apart the home of 30,000 bees (I haven't counted, but that's a conservative estimate). To begin with, I got stung quite a bit: partly this was because I was clumsy... dropping a whole frame of bees usually means you are going to get stung! Also, going down to the apiary without a lit smoker is silly--even if you try not to use it, its nice to have if the bees get riled at all. It blocks their pheromones and tends to make them more docile.
Going barefoot is a bad idea when inspecting, and shorts can also be problematic. Trousers with elastic bands around your ankles are really nice so the bees don't crawl up your legs. I don't practice this, but can see how it would be nice! A veil is essential when you are starting out--the bees tend to fly at your face and eyes when defending the hive. Having not tied my veil up properly and been stung on the eyebrow once, I know the value of the veil. Gloves tend to hinder me more than help, though.
One time I got stung quite a few times in one place on the thigh (wearing shorts), and came out in hives all over my body. Had to nip down to emergency care for a shot of steroids in the buttocks. Apparently this can happen if you get stung right in a vein. I have only had this reaction once. Fingers crossed it doesn't happen again. I now have an EPI pen in my beekeeping stuff too.

OTHER BASIC INFO:
Life cycle of the honey bee:
Type
|
Egg
|
Larva
|
Cell capped
|
Pupa
|
Average Developmental Period
|
Start of Fertility
| ||||||||
Queen
|
3 days
|
5 1/2 days
|
7 1/2 days
|
8 days
|
16 days
|
Approx. 23 days
| ||||||||
Worker
|
3 days
|
6 days
|
9 days
|
12 days
|
21 days (Range: 18-22days)
|
N/A
| ||||||||
Drone
|
3 days
|
6 1/2 days
|
10 days
|
14 1/2 days
|
24 days
|
Approx. 38 days
|
Worker bee service:
1-2 days: Cleaning cells and warming the brood nest, eat pollen and beg for nectar by older bees passing by.
3-5 days: Some of earlier tasks plus feeding older larvae with honey and pollen.
5-8 days: Nurse bees-hypoparyngeal gland is well developed so they can produce royal jelly to feed young larvae and Queen bee.
8-12 days: Take/process incoming food; ripen honey/store pollen.
12-16 days: Wax glands well developed; produces wax and constructs comb, ripens honey.
17-21 days: Guards hive entrance and ventilates hive, orientation flights.
22 days +: Forage for nectar, pollen, propolis and water.
Helpful Resources:
The CCBA (Chatham County Bee Association) has been amazing; I would have struggled much more had it not been for them. Each meeting has a different speaker come and present on a specific topic such as "using honey as medicine" or "tackling varroa mites." Whilst some of this goes over my head, I always learn things.Wherever you are, join the club--beekeepers who will more than likely want to help you with your bees.
In North Carolina, we have an amazing resource at our disposal--the state-supported (and funded) Apiary Services Program. NC is divided into six zones, each with its own inspector. You can call them out to check on your bees. Ours is Don Hopkins: he is extremely knowledgeable, and taught the bee school section on diseases, pests, and pest management.
There are a lot of books on beekeeping out there, but these are a few I have enjoyed and found useful:
First Lessons in Beekeeping by Keith S. Delaplane
Beekeeping for Dummies by Howland Blackiston
The Beekeeping Bible by Richard A. Jones and Sharon Sweeney-Lynch
I recently took a test to be basic "Certified" beekeeper but it goes up to Journeyman, Master and Master Craftsman. Heres the site: www.ncbeekeepers.org/master-beekeeper-program
Some beauty to end on:
 |
| Here's a picture of some native bees on a cacti flower, atop a cliff, on the island of St John in the Virgin Islands last Spring. |
Summer Kiln Opening, Firing 97, Mark Hewitt Pottery.


Now some apprentice pots...


